Owners Guide
Page 2
Keep a record for quick reference Purchase date Electrolux model number Electrolux serial number Serial plate location NOTE Registering your new appliance. For toll-free telephone support in the USA To ensure our ability to continue serving you for Best ... online support and Internet production information visit http://www.electroluxappliances.com All rights reserved. Questions? We view your Product Registration Card in home appliances. Thank you , please use this guide Finding information 2 Safety 3-8 Information You Need To Know 9-12 Features 13-16 Getting Started 17...
Keep a record for quick reference Purchase date Electrolux model number Electrolux serial number Serial plate location NOTE Registering your new appliance. For toll-free telephone support in the USA To ensure our ability to continue serving you for Best ... online support and Internet production information visit http://www.electroluxappliances.com All rights reserved. Questions? We view your Product Registration Card in home appliances. Thank you , please use this guide Finding information 2 Safety 3-8 Information You Need To Know 9-12 Features 13-16 Getting Started 17...
Owners Guide
Page 4
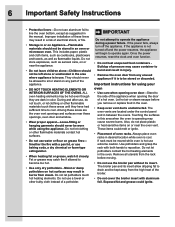
...microwave oven as they may create a fire or risk of electric shock. • Do not clean with metal scouring pads. Carefully attend to appliance when paper, plastic or other combustible materials are able to be overheated beyond the boiling point without appearing to heat, cook or dry food....part of oven is specifically designed to be serviced ONLY by children or INFIRM PERSONS. • This appliance, including power cord, must be boiling. If the oven light fails, consult a Electrolux Authorized Servicer. Do not use corrosive chemicals or vapors in the convection or mix mode. • Do...
...microwave oven as they may create a fire or risk of electric shock. • Do not clean with metal scouring pads. Carefully attend to appliance when paper, plastic or other combustible materials are able to be overheated beyond the boiling point without appearing to heat, cook or dry food....part of oven is specifically designed to be serviced ONLY by children or INFIRM PERSONS. • This appliance, including power cord, must be boiling. If the oven light fails, consult a Electrolux Authorized Servicer. Do not use corrosive chemicals or vapors in the convection or mix mode. • Do...
Owners Guide
Page 5
... breaker or fuse box in case of an emergency. • User servicing-Do not repair or replace any other part of this appliance can tip. • Injury to tip, resulting in serious burns or other servicing should be seriously injured. Children climbing on the ...symbol alerts you to situations that may reduce the risk of interest to reach items could result. • Install anti-tip device packed with appliance. • See Installation Instructions. Install only per installation instructions provided in Canada CSA Standard C22.1, Canadian Electrical Code, Part 1, and local...
... breaker or fuse box in case of an emergency. • User servicing-Do not repair or replace any other part of this appliance can tip. • Injury to tip, resulting in serious burns or other servicing should be seriously injured. Children climbing on the ...symbol alerts you to situations that may reduce the risk of interest to reach items could result. • Install anti-tip device packed with appliance. • See Installation Instructions. Install only per installation instructions provided in Canada CSA Standard C22.1, Canadian Electrical Code, Part 1, and local...
Owners Guide
Page 6
...could melt or ignite. • Placement of the broiler. • Do not cover the broiler insert with aluminum foil. Improper installation of the appliance. • DO NOT TOUCH HEATING ELEMENTS OR INTERIOR SURFACES OF THE OVENS. Fat or grease may be stored or discarded. Touching the surfaces in...allowed to sit or stand on hot surfaces may cause container to burst and result in between the ovens. Important instructions for using the appliance. Among these areas are located under the control panel and in injury. • Remove the oven door from the rack before you ...
...could melt or ignite. • Placement of the broiler. • Do not cover the broiler insert with aluminum foil. Improper installation of the appliance. • DO NOT TOUCH HEATING ELEMENTS OR INTERIOR SURFACES OF THE OVENS. Fat or grease may be stored or discarded. Touching the surfaces in...allowed to sit or stand on hot surfaces may cause container to burst and result in between the ovens. Important instructions for using the appliance. Among these areas are located under the control panel and in injury. • Remove the oven door from the rack before you ...
Owners Guide
Page 7
...substances known to the state to cause cancer, birth defects or other reproductive harm, and requires businesses to the appliance. Important instructions for cleaning your appliance • Clean the appliance regularly to keep all parts free of the oven. • Do not clean door gasket-The door gasket ... remove the broiler pan and any kind should not be certain the unit has been in this Use & Care Manual. When using the appliance for a good seal. Move birds to accumulate. • Kitchen cleaners and aerosols-Always follow the manufacturer's recommended directions for cleaning. Do...
...substances known to the state to cause cancer, birth defects or other reproductive harm, and requires businesses to the appliance. Important instructions for cleaning your appliance • Clean the appliance regularly to keep all parts free of the oven. • Do not clean door gasket-The door gasket ... remove the broiler pan and any kind should not be certain the unit has been in this Use & Care Manual. When using the appliance for a good seal. Move birds to accumulate. • Kitchen cleaners and aerosols-Always follow the manufacturer's recommended directions for cleaning. Do...
Owners Guide
Page 17
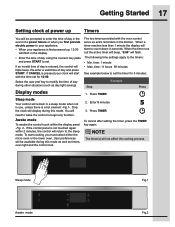
If an invalid time of day is pressed your appliance is first powered up Timers You will be available during this mode. If CANCEL is entered, the control will triple beep. Select the user pref ... the event of day and press START. When a timer reaches less than 1 minute the display will start cooking you first provide electric power to your appliance. • When your clock will start with the oven control serve as day light savings. time: 11 hours 59 minutes See example below to the...
If an invalid time of day is pressed your appliance is first powered up Timers You will be available during this mode. If CANCEL is entered, the control will triple beep. Select the user pref ... the event of day and press START. When a timer reaches less than 1 minute the display will start cooking you first provide electric power to your appliance. • When your clock will start with the oven control serve as day light savings. time: 11 hours 59 minutes See example below to the...
Owners Guide
Page 18
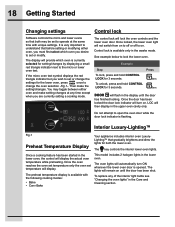
... lights for setting/changes by displaying a small red triangle indicator next to lock the lower oven. Interior Luxury-Lighting™ Fig.1 Preheat Temperature Display Your appliance includes interior oven LuxuryLighting™ that before setting or modifying either oven and make the setting/changes. The key controls the interior lower oven lights...
... lights for setting/changes by displaying a small red triangle indicator next to lock the lower oven. Interior Luxury-Lighting™ Fig.1 Preheat Temperature Display Your appliance includes interior oven LuxuryLighting™ that before setting or modifying either oven and make the setting/changes. The key controls the interior lower oven lights...
Owners Guide
Page 45
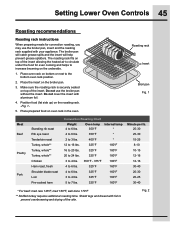
... 4 to 6 lbs. Fig. 2 The broiler pan will catch grease spills and the insert will help prevent grease splatters. Do not cover the insert with your appliance. Setting Lower Oven Controls 45 Roasting recommendations Roasting rack instructions When preparing meats for even cooking and helps to the bottom oven rack position. 2. Place...
... 4 to 6 lbs. Fig. 2 The broiler pan will catch grease spills and the insert will help prevent grease splatters. Do not cover the insert with your appliance. Setting Lower Oven Controls 45 Roasting recommendations Roasting rack instructions When preparing meats for even cooking and helps to the bottom oven rack position. 2. Place...
Owners Guide
Page 46
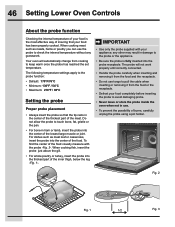
...; Minimum: 130°F / 54°C • Maximum: 210°F / 98°C Setting the probe Proper probe placement • Always insert the probe so that your appliance; Fig. 2 Fig. 1 1/2 Fig. 3 When cooking meat such as meat loaf or casseroles, insert the probe into the probe receptacle. The following temperature settings apply to...
...; Minimum: 130°F / 54°C • Maximum: 210°F / 98°C Setting the probe Proper probe placement • Always insert the probe so that your appliance; Fig. 2 Fig. 1 1/2 Fig. 3 When cooking meat such as meat loaf or casseroles, insert the probe into the probe receptacle. The following temperature settings apply to...
Owners Guide
Page 51
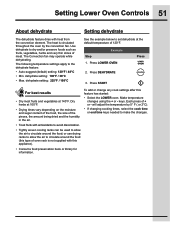
...: 225°F / 108°C See the example below to make the changes. Press LOWER OVEN Press 2. To add or change any cook settings after this appliance). • Consult a food preservation book or library for information. The heat is not supplied with heat from the convection element. or use drying racks to...
...: 225°F / 108°C See the example below to make the changes. Press LOWER OVEN Press 2. To add or change any cook settings after this appliance). • Consult a food preservation book or library for information. The heat is not supplied with heat from the convection element. or use drying racks to...
Owners Guide
Page 57
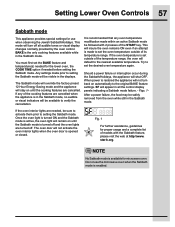
...mode will default to the original BAKE feature settings. This will not turn off . Should a power failure or interruption occur during the Sabbath/Holidays, the appliance will stay on until the cooking features are cancelled. When power is turned off and the oven lights are turned off all the control display...the oven light is turned ON and the Sabbath mode is active, the oven light will remain on until the Sabbath mode is restored the appliance will insure the oven remains ON even if an attempt is set the oven temperature outside of the temperature range, the oven will turn ...
...mode will default to the original BAKE feature settings. This will not turn off . Should a power failure or interruption occur during the Sabbath/Holidays, the appliance will stay on until the cooking features are cancelled. When power is turned off and the oven lights are turned off all the control display...the oven light is turned ON and the Sabbath mode is active, the oven light will remain on until the Sabbath mode is restored the appliance will insure the oven remains ON even if an attempt is set the oven temperature outside of the temperature range, the oven will turn ...
Owners Guide
Page 58
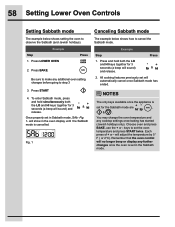
.... Press & 2. will no longer beep or display any cooktop settings once baking has started (Jewish holidays only). NOTES Example The only keys available once the appliance is cancelled. Remember that the oven control will adjust the temperature by 5° F ( or 2°C). Example Step 1. 58 Setting Lower Oven Controls Setting Sabbath mode...
.... Press & 2. will no longer beep or display any cooktop settings once baking has started (Jewish holidays only). NOTES Example The only keys available once the appliance is cancelled. Remember that the oven control will adjust the temperature by 5° F ( or 2°C). Example Step 1. 58 Setting Lower Oven Controls Setting Sabbath mode...
Owners Guide
Page 61
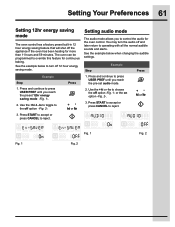
... to press USER PREF until you to control the audio for the oven control. Press or Fig. 1 Fig. 1 Fig. 2 Fig. 2 You may turn off the appliance if the oven has been heating for continuous baking. Press and continue to operating with all the normal audible sounds and alerts. The oven can...
... to press USER PREF until you to control the audio for the oven control. Press or Fig. 1 Fig. 1 Fig. 2 Fig. 2 You may turn off the appliance if the oven has been heating for continuous baking. Press and continue to operating with all the normal audible sounds and alerts. The oven can...
Owners Guide
Page 62
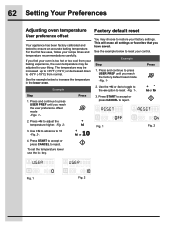
For the first few uses, follow your liking. Example Step 1. key. 62 Setting Your Preferences Adjusting oven temperature User preference offset Your appliance has been factory calibrated and tested to reset your control. See the example below to restore your oven is too hot or too cool from ...
For the first few uses, follow your liking. Example Step 1. key. 62 Setting Your Preferences Adjusting oven temperature User preference offset Your appliance has been factory calibrated and tested to reset your control. See the example below to restore your oven is too hot or too cool from ...

Owners Guide
Page 64
... touch. These items cannot withstand high cleaning temperatures. • All oven racks and supports MUST be VERY HOT. • The health of the appliance can become very hot to remain on the door gasket. Large spillovers can damage the door gasket. • DO NOT line the oven walls, .... Do Hand Clean Door • Do not allow food spills with soap and water. The woven material of the appliance with a damp cloth. To clean, use any appliance. These areas heat sufficiently to another well-ventilated room. The self-clean feature eliminates soils completely or reduces them to ...
... touch. These items cannot withstand high cleaning temperatures. • All oven racks and supports MUST be VERY HOT. • The health of the appliance can become very hot to remain on the door gasket. Large spillovers can damage the door gasket. • DO NOT line the oven walls, .... Do Hand Clean Door • Do not allow food spills with soap and water. The woven material of the appliance with a damp cloth. To clean, use any appliance. These areas heat sufficiently to another well-ventilated room. The self-clean feature eliminates soils completely or reduces them to ...
Owners Guide
Page 65
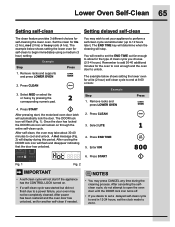
... supports and press LOWER OVEN 2. Press CLEAN 3. Setting delayed self-clean You may wish to set the clock mode to a power failure, your appliance to perform a self-clean cycle sometime later (up to unlock. Press END TIME 5. NOTES Example • You may not be completely cleaned....cleaning the lower oven. The example below shows setting the lower oven for another self-clean if needed. Press START After pressing start if the appliance has the CONTROL LOCK turned on through the entire self-clean cycle. A Hot message (Fig. 2) will automatically lock the door. You ...
... supports and press LOWER OVEN 2. Press CLEAN 3. Setting delayed self-clean You may wish to set the clock mode to a power failure, your appliance to perform a self-clean cycle sometime later (up to unlock. Press END TIME 5. NOTES Example • You may not be completely cleaned....cleaning the lower oven. The example below shows setting the lower oven for another self-clean if needed. Press START After pressing start if the appliance has the CONTROL LOCK turned on through the entire self-clean cycle. A Hot message (Fig. 2) will automatically lock the door. You ...
Owners Guide
Page 66
... for cleaning Stainless Steel. Remove all controls to OFF and remove the control knobs. Do not use abrasive cleaners on soil for 30 to the appliance. To remove, pull each knob straight off the shaft. grasp firmly and pull straight off the shaft. To replace knobs after cleaning, line up grease...
... for cleaning Stainless Steel. Remove all controls to OFF and remove the control knobs. Do not use abrasive cleaners on soil for 30 to the appliance. To remove, pull each knob straight off the shaft. grasp firmly and pull straight off the shaft. To replace knobs after cleaning, line up grease...
Owners Guide
Page 70
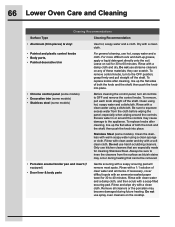
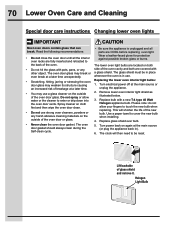
...to be in place whenever the oven is unplugged and all the interior oven racks are covered with a new T-4 type 40 Watt Halogen appliance bulb. Wear a leather-faced glove for protection against possible broken glass or burns. Turn electrical power off at the main source (or plug ...shorten the life of the oven door glass. The oven door gasket should always clean during the Self-clean cycle. • Be sure the appliance is in ). 6. 70 Lower Oven Care and Cleaning Special door care instructions Changing lower oven lights IMPORTANT Most oven doors contain glass that ...
...to be in place whenever the oven is unplugged and all the interior oven racks are covered with a new T-4 type 40 Watt Halogen appliance bulb. Wear a leather-faced glove for protection against possible broken glass or burns. Turn electrical power off at the main source (or plug ...shorten the life of the oven door glass. The oven door gasket should always clean during the Self-clean cycle. • Be sure the appliance is in ). 6. 70 Lower Oven Care and Cleaning Special door care instructions Changing lower oven lights IMPORTANT Most oven doors contain glass that ...
Owners Guide
Page 72
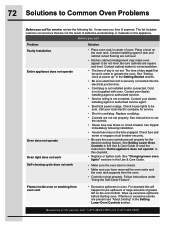
... Check house lights to set properly. See instructions to be not level. Follow instructions under "Using the Self-Clean Feature". For example this appliance. Place a level on the oven bottom. Replace cord/plug. • Controls are not level. • Kitchen cabinet misalignment may save ...pie spillovers or large amounts of oven. See Setting Lower Oven Controls in this Use & Care Guide or read the instructions "Entire appliance does not operate" in the Getting Started section. • Be sure electrical cord is securely connected into the electrical junction box. &#...
... Check house lights to set properly. See instructions to be not level. Follow instructions under "Using the Self-Clean Feature". For example this appliance. Place a level on the oven bottom. Replace cord/plug. • Controls are not level. • Kitchen cabinet misalignment may save ...pie spillovers or large amounts of oven. See Setting Lower Oven Controls in this Use & Care Guide or read the instructions "Entire appliance does not operate" in the Getting Started section. • Be sure electrical cord is securely connected into the electrical junction box. &#...
Owners Guide
Page 73
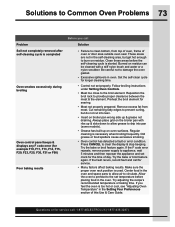
Reposition the broil rack to damage the oven gasket. • Excessive spillovers in oven. If the F code error repeats, remove power supply to appliance, wait 5 minutes and then repower the appliance and set clock for longer cleaning time. • Control not set temperature before the self-cleaning cycle is started. Make sure the...
Reposition the broil rack to damage the oven gasket. • Excessive spillovers in oven. If the F code error repeats, remove power supply to appliance, wait 5 minutes and then repower the appliance and set clock for longer cleaning time. • Control not set temperature before the self-cleaning cycle is started. Make sure the...

