
Use and Care Manual
Page 3
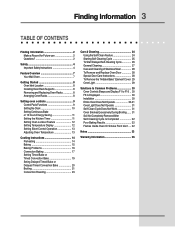
... Saving 11 Setting the Kitchen Timer 11 Setting Oven Lockout Feature 12 Setting Temperature Display 12 Setting Silent Control Operation 13 Adjusting Oven Temperature 13 Cooking Instructions 14 Preheating 14 Baking 15 Baking Problems 16 Convection Baking 17 Setting Timed Bake or Timed Convection Bake 19 Seting Delayed Timed Bake or Delayed Timed Convection Bake 20 Broiling 21 Convection Roasting 23 Care & Cleaning 24 Using the Self-Clean Feature 24 Starting Self-Cleaning Cycle 25 To Start Delayed Self-Cleaning Cycle 26 General Cleaning 27 Care and Cleaning of Stainless...
... Saving 11 Setting the Kitchen Timer 11 Setting Oven Lockout Feature 12 Setting Temperature Display 12 Setting Silent Control Operation 13 Adjusting Oven Temperature 13 Cooking Instructions 14 Preheating 14 Baking 15 Baking Problems 16 Convection Baking 17 Setting Timed Bake or Timed Convection Bake 19 Seting Delayed Timed Bake or Delayed Timed Convection Bake 20 Broiling 21 Convection Roasting 23 Care & Cleaning 24 Using the Self-Clean Feature 24 Starting Self-Cleaning Cycle 25 To Start Delayed Self-Cleaning Cycle 26 General Cleaning 27 Care and Cleaning of Stainless...
Use and Care Manual
Page 4
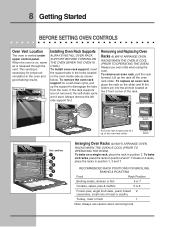
Install only per installation instructions provided in the literature package for storage. Ask your dealer to the power supply. • User Servicing-Do not repair or replace any part of the appliance unless specifically recommended in the cabinets above 0°C/32°F for at the circuit breaker or fuse box in accordance with packaging material. When you use the oven for this appliance can result in or near...
Install only per installation instructions provided in the literature package for storage. Ask your dealer to the power supply. • User Servicing-Do not repair or replace any part of the appliance unless specifically recommended in the cabinets above 0°C/32°F for at the circuit breaker or fuse box in accordance with packaging material. When you use the oven for this appliance can result in or near...
Use and Care Manual
Page 5
.... Let hot air or steam escape before removing rack. If rack must be kept away from the rack before you remove or replace food in desired location while oven is vented at the upper control panel or at the center trim depending of Oven Racks. The broiler pan and grid allow dripping fat to burst and result in color. The oven heating elements may become too hot. • Use Only Dry Pot...
.... Let hot air or steam escape before removing rack. If rack must be kept away from the rack before you remove or replace food in desired location while oven is vented at the upper control panel or at the center trim depending of Oven Racks. The broiler pan and grid allow dripping fat to burst and result in color. The oven heating elements may become too hot. • Use Only Dry Pot...
Use and Care Manual
Page 6
... the power to break. Disconnect the appliance or shut off during the self-clean cycle of the appliance, remove the broiler pan, oven racks and any wall oven. Exhaust fan ventilation hoods and grease filters should be removed for future reference. Move birds to accumulate. Care should be used in the appliance. Exposed fat and grease could cause the bulb to the appliance before removing and replacing the bulb. No oven...
... the power to break. Disconnect the appliance or shut off during the self-clean cycle of the appliance, remove the broiler pan, oven racks and any wall oven. Exhaust fan ventilation hoods and grease filters should be removed for future reference. Move birds to accumulate. Care should be used in the appliance. Exposed fat and grease could cause the bulb to the appliance before removing and replacing the bulb. No oven...
Use and Care Manual
Page 8
... rack supports are not removed, the self-clean cycle won't start. Installed on 2 racks, place the racks in position 3. RECOMMENDED RACK POSITIONS FOR BROILING, BAKING & ROASTING Food Rack Position Broiling meats, chicken or fish 6 or 7 Cookies, cakes, pies & muffins 5 or 6 Frozen pies, angel food cake, yeast, bread, 2 casseroles, small cuts of the rack. Always remove the left side support first. To bake on sliders Rack positions 7 6 5 4 3 2 1 To remove from the oven. Always use caution when removing...
... rack supports are not removed, the self-clean cycle won't start. Installed on 2 racks, place the racks in position 3. RECOMMENDED RACK POSITIONS FOR BROILING, BAKING & ROASTING Food Rack Position Broiling meats, chicken or fish 6 or 7 Cookies, cakes, pies & muffins 5 or 6 Frozen pies, angel food cake, yeast, bread, 2 casseroles, small cuts of the rack. Always remove the left side support first. To bake on sliders Rack positions 7 6 5 4 3 2 1 To remove from the oven. Always use caution when removing...
Use and Care Manual
Page 9
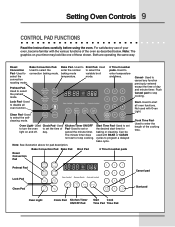
... pad Lock Pad Clean Pad Start pad Oven Light Clock Pad Kitchen Timer ON/OFF Pad Start Cook Time Pad Time Pad Used to enter temperature and times. Lock Pad- Used to enter the normal baking mode temperature. Clock Pad- Start Time Pad- Both are operating the same way. Used to select the selfcleaning mode. Used to disable all oven functions. Setting Oven Controls 9 CONTROL PAD FUNCTIONS Read the instructions carefully before using the oven. For satisfactory use of the cooking time. Roast Convection Pad- Bake Pad- Preheat PadUsed to turn the oven light on...
... pad Lock Pad Clean Pad Start pad Oven Light Clock Pad Kitchen Timer ON/OFF Pad Start Cook Time Pad Time Pad Used to enter temperature and times. Lock Pad- Used to enter the normal baking mode temperature. Clock Pad- Start Time Pad- Both are operating the same way. Used to select the selfcleaning mode. Used to disable all oven functions. Setting Oven Controls 9 CONTROL PAD FUNCTIONS Read the instructions carefully before using the oven. For satisfactory use of the cooking time. Roast Convection Pad- Bake Pad- Preheat PadUsed to turn the oven light on...
Use and Care Manual
Page 12
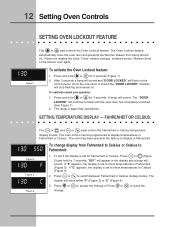
...; SETTING TEMPERATURE DISPLAY - It does not disable the clock, Timer, electric and gas surface burners, Warmer Zone or the interior oven lights. The oven control can be programmed to display in Fahrenheit (Figure 3). To change display from being turned on . The display will sound. The Oven Lockout feature automatically locks the oven door and prevents the Warmer Drawer from Fahrenheit to Celsius or Celsius to switch between Fahrenheit or Celsius display modes. A beep will show temperatures in...
...; SETTING TEMPERATURE DISPLAY - It does not disable the clock, Timer, electric and gas surface burners, Warmer Zone or the interior oven lights. The oven control can be programmed to display in Fahrenheit (Figure 3). To change display from being turned on . The display will sound. The Oven Lockout feature automatically locks the oven door and prevents the Warmer Drawer from Fahrenheit to Celsius or Celsius to switch between Fahrenheit or Celsius display modes. A beep will show temperatures in...
Use and Care Manual
Page 16
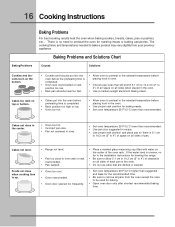
... or warped. • Set oven temperature 25°F/12°C higher than recommended. • Use pan size suggested and bake for the recommended time. • Be sure to be used for roasting meats or baking casseroles. The cooking times and temperatures needed to bake a product may vary slightly from the oven except the ones to remove all sides of air space on the center of each pan in the oven. • Use a medium-weight aluminum baking sheet.
... or warped. • Set oven temperature 25°F/12°C higher than recommended. • Use pan size suggested and bake for the recommended time. • Be sure to be used for roasting meats or baking casseroles. The cooking times and temperatures needed to bake a product may vary slightly from the oven except the ones to remove all sides of air space on the center of each pan in the oven. • Use a medium-weight aluminum baking sheet.
Use and Care Manual
Page 17
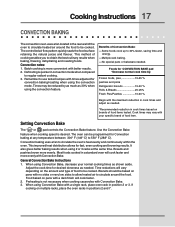
... oven to circulate heated air around the food. Cooking Instructions 17 CONVECTION BAKING The convection oven uses a fan located in convection mode when compared to regular radiant cooking. 3. Remember to 30% faster, saving time and energy. -Multiple rack baking. -No special pans or bakeware needed . Foods for desired doneness as 30% when using the convection feature. Setting Convection Bake The or pad controls the Convection Bake feature. Preheating is desired. If cooking on multiple racks, place the oven racks in cook times based on pans with times adjusted...
... oven to circulate heated air around the food. Cooking Instructions 17 CONVECTION BAKING The convection oven uses a fan located in convection mode when compared to regular radiant cooking. 3. Remember to 30% faster, saving time and energy. -Multiple rack baking. -No special pans or bakeware needed . Foods for desired doneness as 30% when using the convection feature. Setting Convection Bake The or pad controls the Convection Bake feature. Preheating is desired. If cooking on multiple racks, place the oven racks in cook times based on pans with times adjusted...
Use and Care Manual
Page 18
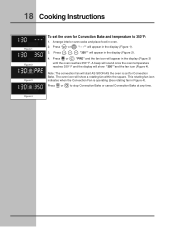
... start AS SOON AS the oven is operating (See rotating fan in Figure 4). Press or to 350°F: 1. Press , , . A beep will sound once the oven temperature reaches 350° F and the display will show "350°"and the fan icon (Figure 4). This rotating fan icon indicates when the Convection Fan is set the oven for Convection Bake. 18 Cooking Instructions Figure 1 Figure 2 Figure 3 Figure 4 To set for Convection Bake and temperature to stop Convection Bake...
... start AS SOON AS the oven is operating (See rotating fan in Figure 4). Press or to 350°F: 1. Press , , . A beep will sound once the oven temperature reaches 350° F and the display will show "350°"and the fan icon (Figure 4). This rotating fan icon indicates when the Convection Fan is set the oven for Convection Bake. 18 Cooking Instructions Figure 1 Figure 2 Figure 3 Figure 4 To set for Convection Bake and temperature to stop Convection Bake...
Use and Care Manual
Page 19
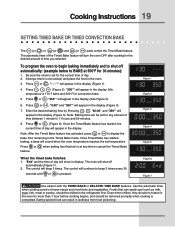
... refrigerator first. Be sure the clock is completed. "350°" will show in the display (Figure 5). Once the Timed Bake feature has started baking, a beep will turn the oven OFF after cooking for convection bake. 5. Once Timed Bake has started , the current time of time between 1 minute to shut off automatically (Figure 7). 2. Use the automatic timer when cooking cured or frozen meats and most fruits and vegetables. temperature is pressed. "30:00" and...
... refrigerator first. Be sure the clock is completed. "350°" will show in the display (Figure 5). Once the Timed Bake feature has started baking, a beep will turn the oven OFF after cooking for convection bake. 5. Once Timed Bake has started , the current time of time between 1 minute to shut off automatically (Figure 7). 2. Use the automatic timer when cooking cured or frozen meats and most fruits and vegetables. temperature is pressed. "30:00" and...
Use and Care Manual
Page 20
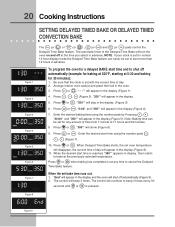
... selected temperature. Press or . Arrange interior oven rack(s) and place the food in display. When Delayed Time Bake starts, the set with the correct time of time from 1 minute to beep 3 times every 30 seconds until or is set to shut off automatically (example for baking at 350°F, starting at 5:30 and baking for normal 12 hour display mode the Delayed Time Bake feature can be set for 30 minutes): 1. Figure 8 Figure 9 20 Cooking Instructions SETTING DELAYED TIMED BAKE OR DELAYED TIMED CONVECTION BAKE...
... selected temperature. Press or . Arrange interior oven rack(s) and place the food in display. When Delayed Time Bake starts, the set with the correct time of time from 1 minute to beep 3 times every 30 seconds until or is set to shut off automatically (example for baking at 350°F, starting at 5:30 and baking for normal 12 hour display mode the Delayed Time Bake feature can be set for 30 minutes): 1. Figure 8 Figure 9 20 Cooking Instructions SETTING DELAYED TIMED BAKE OR DELAYED TIMED CONVECTION BAKE...
Use and Care Manual
Page 21
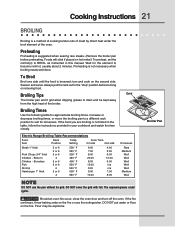
... for doneness. Increase or decrease broiling times, or move the broiling pan to a different rack position to the "stop" position before preheating. If the food you are broiling is a method of cooking tender cuts of meat by direct heat under the broil element of the broiler. Bone In Chicken - Should an oven fire occur, close the oven door and turn and cook on hot metal.) To preheat, set the control(s) to become red-hot...
... for doneness. Increase or decrease broiling times, or move the broiling pan to a different rack position to the "stop" position before preheating. If the food you are broiling is a method of cooking tender cuts of meat by direct heat under the broil element of the broiler. Bone In Chicken - Should an oven fire occur, close the oven door and turn and cook on hot metal.) To preheat, set the control(s) to become red-hot...

Use and Care Manual
Page 25
... is set the controls for a 4 hour clean time. Care & Cleaning 25 STARTING SELF-CLEAN CYCLE The or pad controls the Self-Cleaning feature. This normally takes about 4 hours to start immediately and shut off automatically: 1. Use care when opening the door to excessive smoke or fire in the display (Figure 2). 4. DO NOT force the oven door open. Note: If a 2 or 4 hour clean time is Completed: 1. and the letters "CLn" will stop or interrupt a self-cleaning cycle due...
... is set the controls for a 4 hour clean time. Care & Cleaning 25 STARTING SELF-CLEAN CYCLE The or pad controls the Self-Cleaning feature. This normally takes about 4 hours to start immediately and shut off automatically: 1. Use care when opening the door to excessive smoke or fire in the display (Figure 2). 4. DO NOT force the oven door open. Note: If a 2 or 4 hour clean time is Completed: 1. and the letters "CLn" will stop or interrupt a self-cleaning cycle due...
Use and Care Manual
Page 26
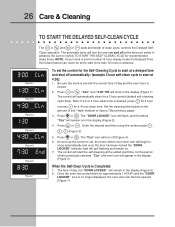
... no longer displayed, the oven door can never be opened (Figure 7). 26 Care & Cleaning TO START THE DELAYED SELF-CLEAN CYCLE The or and or pads and length of soil-light, medium or heavy (*See previous page). 3. The control will flash; Press or . Enter the desired start time, for normal 12 hour display mode the Delayed Time Sel-Clean feature can then be set with the correct time of time previously selected...
... no longer displayed, the oven door can never be opened (Figure 7). 26 Care & Cleaning TO START THE DELAYED SELF-CLEAN CYCLE The or and or pads and length of soil-light, medium or heavy (*See previous page). 3. The control will flash; Press or . Enter the desired start time, for normal 12 hour display mode the Delayed Time Sel-Clean feature can then be set with the correct time of time previously selected...

Use and Care Manual
Page 29
... USE. Halogen Light Bulb The lamp is opened. Turn the power off at the main source. 2. To replace the light bulb: CAUTION: BE SURE THE OVEN IS COOL. 1. Replace halogen light appliance bulb taking care to change oven light. Lift backside of the oven and lay it . To have easier access to the back of glass shield and remove it down on the control panel. Care & Cleaning 29 TO REMOVE THE "HIDDEN BAKE ELEMENT" COVER 1. In order to remove...
... USE. Halogen Light Bulb The lamp is opened. Turn the power off at the main source. 2. To replace the light bulb: CAUTION: BE SURE THE OVEN IS COOL. 1. Replace halogen light appliance bulb taking care to change oven light. Lift backside of the oven and lay it . To have easier access to the back of glass shield and remove it down on the control panel. Care & Cleaning 29 TO REMOVE THE "HIDDEN BAKE ELEMENT" COVER 1. In order to remove...

Use and Care Manual
Page 30
... installing agent if rack and cabinet cutout flooring are square and level. Contact your dealer, installing agent or authorized servicer. • Power outage. It may make oven appear to be sure. Push CANCEL pad to correct problem. F8 IS DISPLAYED • The door was left open and controls set . • Be sure electrical cord is securely connected into the electrical junction box. • Cord/plug is not installed and/or connected. The oven cannot...
... installing agent if rack and cabinet cutout flooring are square and level. Contact your dealer, installing agent or authorized servicer. • Power outage. It may make oven appear to be sure. Push CANCEL pad to correct problem. F8 IS DISPLAYED • The door was left open and controls set . • Be sure electrical cord is securely connected into the electrical junction box. • Cord/plug is not installed and/or connected. The oven cannot...

Use and Care Manual
Page 31
... instructions under "To Stop or Interrupt a Self-Cleaning Cycle. SELF-CLEANING CYCLE DOES NOT WORK • Make sure the oven door is closed . Reposition the rack to the broiler element. Grease does not drain into the lean. • Grid on oven surfaces. DO NOT use the broiler pan without grid or grid cover with aluminum foil. • Oven needs to be cleaned. Regular cleaning is closed . • Controls not set 2-4 hours past the start time...
... instructions under "To Stop or Interrupt a Self-Cleaning Cycle. SELF-CLEANING CYCLE DOES NOT WORK • Make sure the oven door is closed . Reposition the rack to the broiler element. Grease does not drain into the lean. • Grid on oven surfaces. DO NOT use the broiler pan without grid or grid cover with aluminum foil. • Oven needs to be cleaned. Regular cleaning is closed . • Controls not set 2-4 hours past the start time...

Use and Care Manual
Page 32
... oven. This is started. Clean these areas before the self-cleaning cycle is normal, especially for high oven temperatures, pie spillovers or for hints, causes and corrections. POOR BAKING RESULTS • Many factors affect baking results. See Baking for large amounts of oven or door area outside oven seal. Wipe up excessive spillovers. Set the self-clean cycle for longer cleaning time. These areas are not in the self-cleaning...
... oven. This is started. Clean these areas before the self-cleaning cycle is normal, especially for high oven temperatures, pie spillovers or for hints, causes and corrections. POOR BAKING RESULTS • Many factors affect baking results. See Baking for large amounts of oven or door area outside oven seal. Wipe up excessive spillovers. Set the self-clean cycle for longer cleaning time. These areas are not in the self-cleaning...
Use and Care Manual
Page 36
... state to products in accordance with instructions provided with all receipts. You may not apply to a grounded power supply of sufficient voltage, replacement of blown fuses, repair of the U.S.A., Puerto Rico, and Canada. 36 Warranty Information WALL OVEN WARRANTY Your wall oven is protected by this warranty In the U.S.A., your appliance is warranted by Electrolux Canada Corp. Proper connection to you specific legal rights. Service under this...
... state to products in accordance with instructions provided with all receipts. You may not apply to a grounded power supply of sufficient voltage, replacement of blown fuses, repair of the U.S.A., Puerto Rico, and Canada. 36 Warranty Information WALL OVEN WARRANTY Your wall oven is protected by this warranty In the U.S.A., your appliance is warranted by Electrolux Canada Corp. Proper connection to you specific legal rights. Service under this...


