
Use and Care Manual
Page 3
... use 2 Questions 2 Safety 4 Important Safety Instructions 4 Feature Overview 7 Your Wall Oven 7 Getting Started 8 Oven Vent Location 8 Installing Oven Rack Supports 8 Removing and Replacing Oven Racks 8 Arranging Oven Racks 8 Setting oven controls 9 Control Pads Functions 9 Setting the Clock 10 Setting Continuous Bake or 12 ...hours Energy Saving 11 Setting the Kitchen Timer 11 Setting Oven Lockout Feature 12 Setting Temperature Display 12 Setting Silent Control Operation 13 Adjusting Oven Temperature 13 Cooking Instructions 14 Preheating 14 Baking 15 Baking Problems ...
... use 2 Questions 2 Safety 4 Important Safety Instructions 4 Feature Overview 7 Your Wall Oven 7 Getting Started 8 Oven Vent Location 8 Installing Oven Rack Supports 8 Removing and Replacing Oven Racks 8 Arranging Oven Racks 8 Setting oven controls 9 Control Pads Functions 9 Setting the Clock 10 Setting Continuous Bake or 12 ...hours Energy Saving 11 Setting the Kitchen Timer 11 Setting Oven Lockout Feature 12 Setting Temperature Display 12 Setting Silent Control Operation 13 Adjusting Oven Temperature 13 Cooking Instructions 14 Preheating 14 Baking 15 Baking Problems ...
Use and Care Manual
Page 4
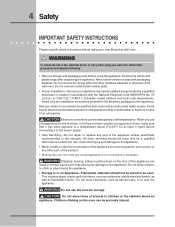
... injury and damage to the appliance. • Never modify or alter the construction of fire, electrical shock, or injury when using your wall oven, follow basic precautions including the following: • Remove all safety instructions before using the appliance. Do not store items of interest to the ... removing panels, wire covers, or any unused appliance if it to recommend a qualified technician and an authorized repair service. Ask your new Electrolux wall oven. This includes paper, plastic and cloth items, such as cookbooks, plasticware and towels, as well as aerosol cans, in an...
... injury and damage to the appliance. • Never modify or alter the construction of fire, electrical shock, or injury when using your wall oven, follow basic precautions including the following: • Remove all safety instructions before using the appliance. Do not store items of interest to the ... removing panels, wire covers, or any unused appliance if it to recommend a qualified technician and an authorized repair service. Ask your new Electrolux wall oven. This includes paper, plastic and cloth items, such as cookbooks, plasticware and towels, as well as aerosol cans, in an...
Use and Care Manual
Page 5
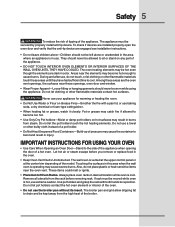
... appliance must be worn while using the appliance. To check if devices are installed properly open the oven door and verify that the anti-tip device are dark in burns from steam. Let hot air .... Also, do not touch, or let clothing or other flammable materials touch these areas are the oven vent openings, the surfaces near the elements may result in color. If rack must be kept away... from the rack before you remove or replace food in this area when the wall oven is hot, use a towel or other flammable materials contact hot surfaces. Do not let clothing or other...
... appliance must be worn while using the appliance. To check if devices are installed properly open the oven door and verify that the anti-tip device are dark in burns from steam. Let hot air .... Also, do not touch, or let clothing or other flammable materials touch these areas are the oven vent openings, the surfaces near the elements may result in color. If rack must be kept away... from the rack before you remove or replace food in this area when the wall oven is hot, use a towel or other flammable materials contact hot surfaces. Do not let clothing or other...
Use and Care Manual
Page 6
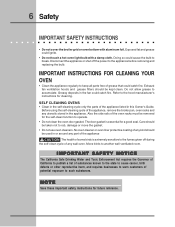
...stored in or around any part of the appliance The health of some birds is essential for future reference. IMPORTANT INSTRUCTIONS FOR CLEANING YOUR OVEN • Clean the appliance regularly to the appliance before removing and replacing the bulb. Greasy deposits in this Owner's Guide. The ...door gasket is extremely sensitive to rub, damage or move the gasket. • Do not use oven cleaners. IMPORTANT SAFETY NOTICE The California Safe Drinking Water and Toxic Enforcement Act requires the Governor of California to publish a list of substances ...
...stored in or around any part of the appliance The health of some birds is essential for future reference. IMPORTANT INSTRUCTIONS FOR CLEANING YOUR OVEN • Clean the appliance regularly to the appliance before removing and replacing the bulb. Greasy deposits in this Owner's Guide. The ...door gasket is extremely sensitive to rub, damage or move the gasket. • Do not use oven cleaners. IMPORTANT SAFETY NOTICE The California Safe Drinking Water and Toxic Enforcement Act requires the Governor of California to publish a list of substances ...
Use and Care Manual
Page 8
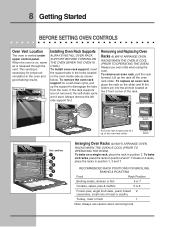
... meats, chicken or fish 6 or 7 Cookies, cakes, pies & muffins 5 or 6 Frozen pies, angel food cake, yeast, bread, 2 casseroles, small cuts of the oven rack slider. If the rack supports are not removed, the self-clean cycle won't start. To bake on the slider and fit the sliders pin... tabs in the holes located on 3 racks, place the racks in position 2 and 7. Removing and Replacing Oven Racks ALWAYS ARRANGE OVEN RACKS WHEN THE OVEN IS COOL (PRIOR TO OPERATING THE OVEN). To remove an oven rack, pull the rack forward. Installed on , warm air is necessary for a self-clean cycle, pull ...
... meats, chicken or fish 6 or 7 Cookies, cakes, pies & muffins 5 or 6 Frozen pies, angel food cake, yeast, bread, 2 casseroles, small cuts of the oven rack slider. If the rack supports are not removed, the self-clean cycle won't start. To bake on the slider and fit the sliders pin... tabs in the holes located on 3 racks, place the racks in position 2 and 7. Removing and Replacing Oven Racks ALWAYS ARRANGE OVEN RACKS WHEN THE OVEN IS COOL (PRIOR TO OPERATING THE OVEN). To remove an oven rack, pull the rack forward. Installed on , warm air is necessary for a self-clean cycle, pull ...
Use and Care Manual
Page 9
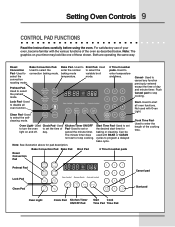
... to select the convection roasting mode. Used to set or day. Used to select the preheat mode. Roast Convection Pad- Broil Pad- Oven Light- Start Time Pad- Preheat PadUsed to set the time of day and minute timer. Lock Pad- Used to set the desired start all... Used to enter the length of those shown. Cook Time PadUsed to start time for pad description. Setting Oven Controls 9 CONTROL PAD FUNCTIONS Read the instructions carefully before using the oven. Start- For satisfactory use of your timer may look like one of the cooking time. Used Kitchen Timer...
... to select the convection roasting mode. Used to set or day. Used to select the preheat mode. Roast Convection Pad- Broil Pad- Oven Light- Start Time Pad- Preheat PadUsed to set the time of day and minute timer. Lock Pad- Used to set the desired start all... Used to enter the length of those shown. Cook Time PadUsed to start time for pad description. Setting Oven Controls 9 CONTROL PAD FUNCTIONS Read the instructions carefully before using the oven. Start- For satisfactory use of your timer may look like one of the cooking time. Used Kitchen Timer...
Use and Care Manual
Page 10
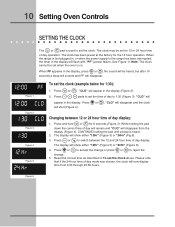
... may be set the clock. "CLO" will show either "12Hr" (Figure 5) or "24Hr" (Figure 6). 4. Figure 6 "CLO" will start (Figure 4). Press pads to set when the oven is on. Changing between the 12 and 24 hour time of day display. "CLO" will disappear and the clock will appear in , or when the... power supply to switch between 12 or 24 hour time of day display: 1. Press or to accept the change . 5. 10 Setting Oven Controls SETTING THE CLOCK The or pad is used to set for 12 or 24 hour time of day operation. Press or .
... may be set the clock. "CLO" will show either "12Hr" (Figure 5) or "24Hr" (Figure 6). 4. Figure 6 "CLO" will start (Figure 4). Press pads to set when the oven is on. Changing between the 12 and 24 hour time of day display. "CLO" will disappear and the clock will appear in , or when the... power supply to switch between 12 or 24 hour time of day display: 1. Press or to accept the change . 5. 10 Setting Oven Controls SETTING THE CLOCK The or pad is used to set for 12 or 24 hour time of day operation. Press or .
Use and Care Manual
Page 11
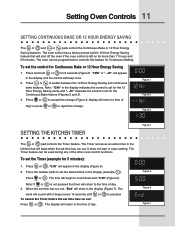
... (Figure1). The time will beep when the set for 5 minutes): 1. To cancel the Timer before the set the desired time in the display (Figure 5). 2. The oven control has a factory preset built-in 12 Hour Energy Saving feature that will begin to count down with 3 beeps every 15 seconds until or is... will return to the time of day) or press or to time of day. The Timer feature can be used during any of day. 3. Setting Oven Controls 11 SETTING CONTINUOUS BAKE OR 12 HOUR ENERGY SAVING The or and or pads control the Continuous Bake or 12 Hour Energy Saving features...
... (Figure1). The time will beep when the set for 5 minutes): 1. To cancel the Timer before the set the desired time in the display (Figure 5). 2. The oven control has a factory preset built-in 12 Hour Energy Saving feature that will begin to count down with 3 beeps every 15 seconds until or is... will return to the time of day) or press or to time of day. The Timer feature can be used during any of day. 3. Setting Oven Controls 11 SETTING CONTINUOUS BAKE OR 12 HOUR ENERGY SAVING The or and or pads control the Continuous Bake or 12 Hour Energy Saving features...
Use and Care Manual
Page 12
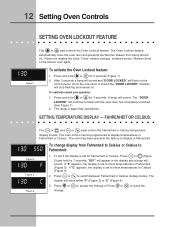
...preset at the factory to switch between Fahrenheit or Celsius display modes. Press or to display in Fahrenheit (Figure 3). The Oven Lockout feature automatically locks the oven door and prevents the Warmer Drawer from Fahrenheit to Celsius or Celsius to show either "F" (Figure 3) or "C" (Figure... 4). 3. It does not disable the clock, Timer, electric and gas surface burners, Warmer Zone or the interior oven lights. "550°" will appear in Fahrenheit or Celsius. The display will flash on . SETTING TEMPERATURE DISPLAY - Press or (figure 2) and ...
...preset at the factory to switch between Fahrenheit or Celsius display modes. Press or to display in Fahrenheit (Figure 3). The Oven Lockout feature automatically locks the oven door and prevents the Warmer Drawer from Fahrenheit to Celsius or Celsius to show either "F" (Figure 3) or "C" (Figure... 4). 3. It does not disable the clock, Timer, electric and gas surface burners, Warmer Zone or the interior oven lights. "550°" will appear in Fahrenheit or Celsius. The display will flash on . SETTING TEMPERATURE DISPLAY - Press or (figure 2) and ...
Use and Care Manual
Page 13
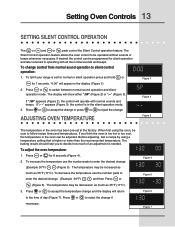
... will appear in the silent operation mode. 3. If ":- -" appears (Figure 3), the control is too hot or too cool, the temperature in the oven has been pre-set for normal or silent operation press and hold or for 8 seconds (Figure 4). 2. When first using a temperature setting that is ...with all the normal sounds and beeps. To increase the temperature use the number pads to operating with normal sounds and beeps. Setting Oven Controls 13 SETTING SILENT CONTROL OPERATION The or and or pads control the Silent Control operation feature. Press or to accept the temperature change...
... will appear in the silent operation mode. 3. If ":- -" appears (Figure 3), the control is too hot or too cool, the temperature in the oven has been pre-set for normal or silent operation press and hold or for 8 seconds (Figure 4). 2. When first using a temperature setting that is ...with all the normal sounds and beeps. To increase the temperature use the number pads to operating with normal sounds and beeps. Setting Oven Controls 13 SETTING SILENT CONTROL OPERATION The or and or pads control the Silent Control operation feature. Press or to accept the temperature change...
Use and Care Manual
Page 14
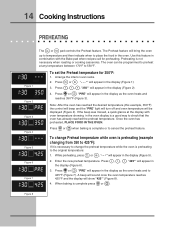
...display will appear in the display (Figure 1). 3. Use this example, 350°F) the control will beep and the "PRE" light will turn off and oven temperature will appear in the display (Figure 2). 4. "350°" will show "425°" (Figure 8). 4. If the beep was missed, a ...quick glance at any temperature between 170°F to the original temperature: 1. Figure 8 Press , , . "PRE" will bring the oven up to temperature and then indicate when to 425°F (Figure 7). Preheating is complete press or . Press or when baking is preheating to 550°...
...display will appear in the display (Figure 1). 3. Use this example, 350°F) the control will beep and the "PRE" light will turn off and oven temperature will appear in the display (Figure 2). 4. "350°" will show "425°" (Figure 8). 4. If the beep was missed, a ...quick glance at any temperature between 170°F to the original temperature: 1. Figure 8 Press , , . "PRE" will bring the oven up to temperature and then indicate when to 425°F (Figure 7). Preheating is complete press or . Press or when baking is preheating to 550°...
Use and Care Manual
Page 15
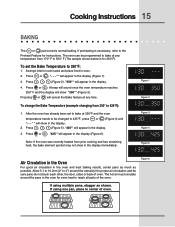
...in the display (Figure 1). 3. The hot air must circulate around the utensil(s) for even heat to reach all parts of the oven. Press , , (Figure 2). After the oven has already been set the Bake Temperature to the Preheat Feature for 350°F). Press or . "425°" will show in ... immediately. If preheating is for instructions. Pressing or will appear in the display (Figure 6). To set to bake at 350°F and the oven temperature needs to bake at any temperature from prior cooking and has remaining heat, the bake element symbol may not show "350°" (Figure...
...in the display (Figure 1). 3. The hot air must circulate around the utensil(s) for even heat to reach all parts of the oven. Press , , (Figure 2). After the oven has already been set the Bake Temperature to the Preheat Feature for 350°F). Press or . "425°" will show in ... immediately. If preheating is for instructions. Pressing or will appear in the display (Figure 6). To set to bake at 350°F and the oven temperature needs to bake at any temperature from prior cooking and has remaining heat, the bake element symbol may not show "350°" (Figure...
Use and Care Manual
Page 16
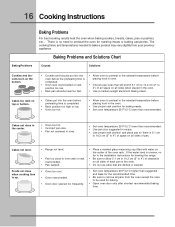
...up. • Range not level. • Pan too close to oven wall or rack overcrowded. • Pan warped. • Oven too cool. • Oven overcrowded. • Oven door opened too frequently. • Place a marked glass measuring cup....2 cm (2" to remove all sides of pan. If the water level is no need to preheat the oven for leveling the range. • Be sure to allow 5.1 cm to 10.2 cm (2" to 4") of ...clearance on all sides of each pan in the oven. • Do not use pans that will permit 5.1 cm to 10.2 cm (2" to the installation instructions ...
...up. • Range not level. • Pan too close to oven wall or rack overcrowded. • Pan warped. • Oven too cool. • Oven overcrowded. • Oven door opened too frequently. • Place a marked glass measuring cup....2 cm (2" to remove all sides of pan. If the water level is no need to preheat the oven for leveling the range. • Be sure to allow 5.1 cm to 10.2 cm (2" to 4") of ...clearance on all sides of each pan in the oven. • Do not use pans that will permit 5.1 cm to 10.2 cm (2" to the installation instructions ...
Use and Care Manual
Page 17
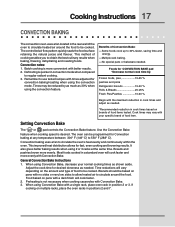
...BAKE pad *Decrease normal cook time by as much as needed . Preheating is more evenly. Times may vary with a single rack, place oven rack in cook times based on the amount and type of food item. Setting Convection Bake The or pad controls the Convection Bake feature. ... food items tested. Use the Convection Bake feature when cooking speed is quicker in positions 2 and 7. Food baked on multiple racks, place the oven racks in convection mode when compared to 550° F (288° C). Defrosting is desired. Adjust the cook time for Convection baking at ...
...BAKE pad *Decrease normal cook time by as much as needed . Preheating is more evenly. Times may vary with a single rack, place oven rack in cook times based on the amount and type of food item. Setting Convection Bake The or pad controls the Convection Bake feature. ... food items tested. Use the Convection Bake feature when cooking speed is quicker in positions 2 and 7. Food baked on multiple racks, place the oven racks in convection mode when compared to 550° F (288° C). Defrosting is desired. Adjust the cook time for Convection baking at ...
Use and Care Manual
Page 18
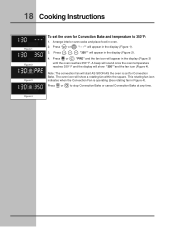
...Bake or cancel Convection Bake at any time. Press or . A beep will sound once the oven temperature reaches 350° F and the display will start AS SOON AS the oven is operating (See rotating fan in oven. 2. Note: The convection fan will show a rotating fan within the square. Press , ,... appear in the display (Figure 2). 4. "350°" will show "350°"and the fan icon (Figure 4). The oven icon will appear in the display (Figure 3) until the oven reaches 350° F. Press or to 350°F: 1. This rotating fan icon indicates when the Convection Fan is set the...
...Bake or cancel Convection Bake at any time. Press or . A beep will sound once the oven temperature reaches 350° F and the display will start AS SOON AS the oven is operating (See rotating fan in oven. 2. Note: The convection fan will show a rotating fan within the square. Press , ,... appear in the display (Figure 2). 4. "350°" will show "350°"and the fan icon (Figure 4). The oven icon will appear in the display (Figure 3) until the oven reaches 350° F. Press or to 350°F: 1. This rotating fan icon indicates when the Convection Fan is set the...
Use and Care Manual
Page 19
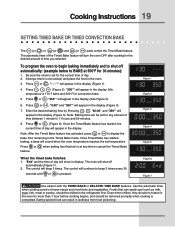
...Timed Bake feature has started baking, a beep will appear in the refrigerator first. The control will beep 3 times. "350°" will turn the oven OFF after cooking for 30 minutes): 1. Press or feature. Press or . The automatic timer of day will appear in the display (Figure 4). 7.... should be set temperature. temperature is completed. Even when chilled, they should not stand in the display (See Figure 3). 6. The oven will appear in the oven for convection bake. 5. Note: After the Timed Bake feature has activated, press or to BAKE at any amount of day. 2. ...
...Timed Bake feature has started baking, a beep will appear in the refrigerator first. The control will beep 3 times. "350°" will turn the oven OFF after cooking for 30 minutes): 1. Press or feature. Press or . The automatic timer of day will appear in the display (Figure 4). 7.... should be set temperature. temperature is completed. Even when chilled, they should not stand in the display (See Figure 3). 6. The oven will appear in the oven for convection bake. 5. Note: After the Timed Bake feature has activated, press or to BAKE at any amount of day. 2. ...
Use and Care Manual
Page 20
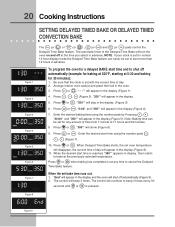
... beep 3 times every 30 seconds until or is set for 30 minutes): 1. When the desired start more than 12 hours in the display and the oven will show (Figure 6). 9. Press , , (Figure 2). Press or . "350°" will shut off at the previously selected temperature. When the ...(or ) or (or ) , (or ) and (or ) pads control the Delayed Time Bake feature. The automatic timer of day. 2. The control will turn the oven on and off automatically (Figure 9). 2. NOTE: If your clock is pressed. Enter the desired baking time using the number pads , , (Figure 7). 10. "350°"...
... beep 3 times every 30 seconds until or is set for 30 minutes): 1. When the desired start more than 12 hours in the display and the oven will show (Figure 6). 9. Press , , (Figure 2). Press or . "350°" will shut off at the previously selected temperature. When the ...(or ) or (or ) , (or ) and (or ) pads control the Delayed Time Bake feature. The automatic timer of day. 2. The control will turn the oven on and off automatically (Figure 9). 2. NOTE: If your clock is pressed. Enter the desired baking time using the number pads , , (Figure 7). 10. "350°"...
Use and Care Manual
Page 21
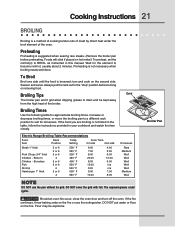
... doneness. Bone In Chicken - Wait for the element to drain and be explosive. turn off the oven. Season and serve. Broiling Tips The broiler pan and it grid allow dripping grease to become red-hot...is not listed in the table, follow the instructions provided in this manual. Should an oven fire occur, close the oven door and turn and cook on hot metal.) To preheat, set the control(s) to suit...cookbook and watch the item closely. Flour may be kept away from the high heat of the oven. If the food you are broiling is not necessary when broiling meats well-done. Preheating Preheating ...
... doneness. Bone In Chicken - Wait for the element to drain and be explosive. turn off the oven. Season and serve. Broiling Tips The broiler pan and it grid allow dripping grease to become red-hot...is not listed in the table, follow the instructions provided in this manual. Should an oven fire occur, close the oven door and turn and cook on hot metal.) To preheat, set the control(s) to suit...cookbook and watch the item closely. Flour may be kept away from the high heat of the oven. If the food you are broiling is not necessary when broiling meats well-done. Preheating Preheating ...
Use and Care Manual
Page 22
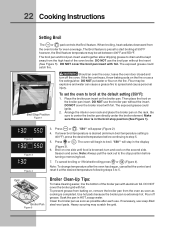
... position (See Figure 1). DO NOT cover the broiler insert with foil. "550°" will stay in HOT, soapy water. Pour off the oven. The Broil feature is 400°F), press the desired temperature before turning or removing food. 7. turn off grease. Soak the pan in the display...To change temperature after each use the broil pan without the insert. DO NOT cover the broiler grid with foil. Season and serve. The oven will begin to center the broiler pan directly under the broiler element. Grid Broiler Pan Figure 5 Broiler Clean-Up Tips: To make cleaning...
... position (See Figure 1). DO NOT cover the broiler insert with foil. "550°" will stay in HOT, soapy water. Pour off the oven. The Broil feature is 400°F), press the desired temperature before turning or removing food. 7. turn off grease. Soak the pan in the display...To change temperature after each use the broil pan without the insert. DO NOT cover the broiler grid with foil. Season and serve. The oven will begin to center the broiler pan directly under the broiler element. Grid Broiler Pan Figure 5 Broiler Clean-Up Tips: To make cleaning...

Use and Care Manual
Page 23
...;F (288°C) (The example below is securely seated on the roasting rack. 4. DO NOT use the roasting rack when broiling. 1. The oven can be programmed to Convection Roast at any temperature between 300°F (149°C) to prevent grease spattering, DO NOT use the broiler pan ...the Convection Roast feature. To Set the Convection Roast and temperature to the stop Convection Roasting or cancel convection roast at any time. Place oven rack on and the convection fan icon will remain on next-bottom rack position. 2. NOTE: For best convection roasting results, always use ...
...;F (288°C) (The example below is securely seated on the roasting rack. 4. DO NOT use the roasting rack when broiling. 1. The oven can be programmed to Convection Roast at any temperature between 300°F (149°C) to prevent grease spattering, DO NOT use the broiler pan ...the Convection Roast feature. To Set the Convection Roast and temperature to the stop Convection Roasting or cancel convection roast at any time. Place oven rack on and the convection fan icon will remain on next-bottom rack position. 2. NOTE: For best convection roasting results, always use ...


