Quick Install Guide
Page 6
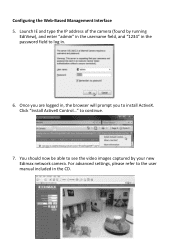
to the user manual included in . 6. Click "Install ActiveX Control..." Configuring the Web-Based Management Interface 5. For advanced settings, please refer to continue. 7. You should now be able to install ActiveX. Once you are logged in, the browser will prompt you to see the video images captured by running EdiView), and enter "admin" in the username field, and "1234" in the password field to log in the CD. 5 Launch IE and type the IP address of the camera (found by your new Edimax network camera.
to the user manual included in . 6. Click "Install ActiveX Control..." Configuring the Web-Based Management Interface 5. For advanced settings, please refer to continue. 7. You should now be able to install ActiveX. Once you are logged in, the browser will prompt you to see the video images captured by running EdiView), and enter "admin" in the username field, and "1234" in the password field to log in the CD. 5 Launch IE and type the IP address of the camera (found by your new Edimax network camera.

Quick Install Guide
Page 7
... sticker on the bottom of the camera says MAC:xxxxxxxxxxxxxx. 2. Go to get MAC address. 3. Note: Each network camera comes with a Smartphone 8. Note: You may also find MAC address. 6 Log onto the camera web configuration page (Default IP:192.168.2.3). Viewing the Camera with a Cloud ID card which contains the camera's Cloud ID (MAC address), username...
... sticker on the bottom of the camera says MAC:xxxxxxxxxxxxxx. 2. Go to get MAC address. 3. Note: Each network camera comes with a Smartphone 8. Note: You may also find MAC address. 6 Log onto the camera web configuration page (Default IP:192.168.2.3). Viewing the Camera with a Cloud ID card which contains the camera's Cloud ID (MAC address), username...
Manual
Page 3
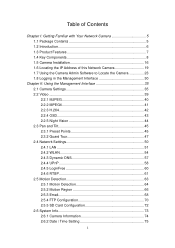
...Familiar with Your Network Camera 5 1.1 Package Contents 5 1.2 Introduction 6 1.3 Product Features 7 1.4 Key Components 8 1.5 Camera Installation 16 1.6 Locating the IP Address of this Network Camera 19 1.7 Using the Camera Admin Software to Locate the Camera 23 1.8 Logging in the Management Interface 30 Chapter II: Using the Management Interface 35 2.1 Camera Settings 35 2.2 ...63 2.5.1 Motion Detection 64 2.5.2 Motion Region 66 2.5.3 Email 68 2.5.4 FTP Configuration 70 2.5.5 SD Card Configuration 72 2.6 System Info 73 2.6.1 Camera Information 74 2.6.2 Date / Time Setting 75 2
...Familiar with Your Network Camera 5 1.1 Package Contents 5 1.2 Introduction 6 1.3 Product Features 7 1.4 Key Components 8 1.5 Camera Installation 16 1.6 Locating the IP Address of this Network Camera 19 1.7 Using the Camera Admin Software to Locate the Camera 23 1.8 Logging in the Management Interface 30 Chapter II: Using the Management Interface 35 2.1 Camera Settings 35 2.2 ...63 2.5.1 Motion Detection 64 2.5.2 Motion Region 66 2.5.3 Email 68 2.5.4 FTP Configuration 70 2.5.5 SD Card Configuration 72 2.6 System Info 73 2.6.1 Camera Information 74 2.6.2 Date / Time Setting 75 2
Manual
Page 8
...IP address to least sensitive). With supplied video surveillance software, you can connect up to 16 users, and you need is detected. Anti-flicker function (eliminates flash caused by Email or FTP when motion is a browser like video conference or environment monitor. Supports Dynamic DNS (used to 16 video cameras... with a fixed Internet address). Configurable motion detection sensitivity (6 levels from most sensitive to the camera also. Usage and event logging. 7 Wired and wireless network (IC-7110W only, 802.11b / 802.11g / 802.11n) support Wireless data encryption (WEP / WPA...
...IP address to least sensitive). With supplied video surveillance software, you can connect up to 16 users, and you need is detected. Anti-flicker function (eliminates flash caused by Email or FTP when motion is a browser like video conference or environment monitor. Supports Dynamic DNS (used to 16 video cameras... with a fixed Internet address). Configurable motion detection sensitivity (6 levels from most sensitive to the camera also. Usage and event logging. 7 Wired and wireless network (IC-7110W only, 802.11b / 802.11g / 802.11n) support Wireless data encryption (WEP / WPA...

Manual
Page 20
If the left three fields of the IP address of your computer first: 1. If you wish to assign another IP address to this network camera is not 192.168.2, you have to log onto the web configuration interface of your computer is 192.168.2.3. Click „Start‟ -> „Control Panel‟ 19 1.6 Locating the IP Address of this Network Camera Default IP address of this network camera, you ‟ll have to change the IP address of the camera first.
If the left three fields of the IP address of your computer first: 1. If you wish to assign another IP address to this network camera is not 192.168.2, you have to log onto the web configuration interface of your computer is 192.168.2.3. Click „Start‟ -> „Control Panel‟ 19 1.6 Locating the IP Address of this Network Camera Default IP address of this network camera, you ‟ll have to change the IP address of the camera first.
Manual
Page 23
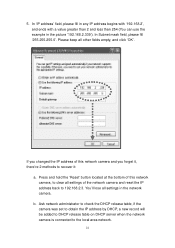
... by DHCP, a new record will be added to DHCP release table on DHCP server when the network camera is connected to 192.168.2.3. In „IP address‟ field, please fill in any IP address begins with „192.168.2‟, and ends with a value greater than 2 and less than 254 (You can... use the example in the network camera. If you changed the IP address of this network camera, to clear all settings of this network camera and you forget it, there‟re 2 methods to recover it: a. You‟ll lose all other...
... by DHCP, a new record will be added to DHCP release table on DHCP server when the network camera is connected to 192.168.2.3. In „IP address‟ field, please fill in any IP address begins with „192.168.2‟, and ends with a value greater than 2 and less than 254 (You can... use the example in the network camera. If you changed the IP address of this network camera, to clear all settings of this network camera and you forget it, there‟re 2 methods to recover it: a. You‟ll lose all other...

Manual
Page 25
... be displayed. Double-click Ediview finder installer, and click „Run‟ when you‟re prompted: 2. 1. To preview the image of network camera, please click the icon indicated by white arrow, and provide username / password, and a snapshot will list all Ediamx network... cameras found on local network, with their IP address and MAC address: You can click icon to find network cameras on local network again, or select an network camera and click Icon to configure it (see next step).
... be displayed. Double-click Ediview finder installer, and click „Run‟ when you‟re prompted: 2. 1. To preview the image of network camera, please click the icon indicated by white arrow, and provide username / password, and a snapshot will list all Ediamx network... cameras found on local network, with their IP address and MAC address: You can click icon to find network cameras on local network again, or select an network camera and click Icon to configure it (see next step).
Manual
Page 30
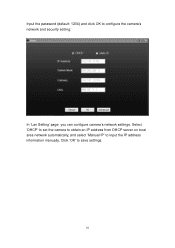
Click „OK‟ to configure the camera‟s network and security setting: In „Lan Setting‟ page, you can configure camera‟s network settings. Input the password (default: 1234) and click OK to save settings. 29 Select „DHCP‟ to set the camera to obtain an IP address from DHCP server on local area network automatically, and select „Manual IP‟ to input the IP address information manually.
Click „OK‟ to configure the camera‟s network and security setting: In „Lan Setting‟ page, you can configure camera‟s network settings. Input the password (default: 1234) and click OK to save settings. 29 Select „DHCP‟ to set the camera to obtain an IP address from DHCP server on local area network automatically, and select „Manual IP‟ to input the IP address information manually.
Manual
Page 31
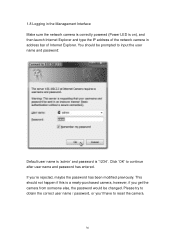
... Interface Make sure the network camera is correctly powered (Power LED is a newly-purchased camera, however, if you get the camera from someone else, the password would be prompted to reset the camera. 30 You should not happen if this is on), and then launch Internet Explorer and type the IP address of the network... camera in address bar of Internet Explorer. Please try to obtain the correct user name / password, or you ‟re rejected, maybe the password has been ...
... Interface Make sure the network camera is correctly powered (Power LED is a newly-purchased camera, however, if you get the camera from someone else, the password would be prompted to reset the camera. 30 You should not happen if this is on), and then launch Internet Explorer and type the IP address of the network... camera in address bar of Internet Explorer. Please try to obtain the correct user name / password, or you ‟re rejected, maybe the password has been ...
Manual
Page 53
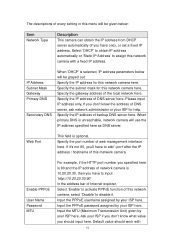
... know the address of DNS server, ask network administrator or your ISP for this network camera here. The descriptions of every setting in the address bar of Internet explorer. IP Address Subnet Mask Gateway Primary DNS Secondary DNS When „DHCP‟ is optional. ...Select „DHCP‟ to obtain IP address automatically or „Static IP Address‟ to assign this network camera, select „Disable‟ to activate PPPoE function of this network camera with 52 Specify the IP address of backup DNS server here. Select „Enable...
... know the address of DNS server, ask network administrator or your ISP for this network camera here. The descriptions of every setting in the address bar of Internet explorer. IP Address Subnet Mask Gateway Primary DNS Secondary DNS When „DHCP‟ is optional. ...Select „DHCP‟ to obtain IP address automatically or „Static IP Address‟ to assign this network camera, select „Disable‟ to activate PPPoE function of this network camera with 52 Specify the IP address of backup DNS server here. Select „Enable...
Manual
Page 58
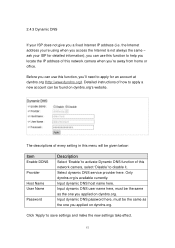
... (i.e. Before you can use this function to help you locate the IP address of every setting in this menu will be the same as the one you applied on dyndns.... name here. the Internet address you‟re using when you access the Internet is available currently. Detailed instructions of this network camera, select „Disable‟ to disable it. Input dynamic DNS user name here, must be found on dyndns.org. Input ... If your ISP for an account at dyndns.org (http://www.dyndns.org). The descriptions of this network camera when you‟re away from home or office.
... (i.e. Before you can use this function to help you locate the IP address of every setting in this menu will be the same as the one you applied on dyndns.... name here. the Internet address you‟re using when you access the Internet is available currently. Detailed instructions of this network camera, select „Disable‟ to disable it. Input dynamic DNS user name here, must be found on dyndns.org. Input ... If your ISP for an account at dyndns.org (http://www.dyndns.org). The descriptions of this network camera when you‟re away from home or office.
Manual
Page 59
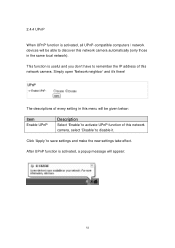
This function is useful and you don‟t have to remember the IP address of every setting in the same local network). Click „Apply‟ to save settings and make the new settings take effect. Simply open &#...8222;Network neighbor‟ and it . After UPnP function is activated, a popup message will be able to discover this network camera automatically (only those in this menu will appear: 58 2.4.4 UPnP When UPnP function is activated, all UPnP-compatible computers / network devices will be given below...
This function is useful and you don‟t have to remember the IP address of every setting in the same local network). Click „Apply‟ to save settings and make the new settings take effect. Simply open &#...8222;Network neighbor‟ and it . After UPnP function is activated, a popup message will be able to discover this network camera automatically (only those in this menu will appear: 58 2.4.4 UPnP When UPnP function is activated, all UPnP-compatible computers / network devices will be given below...
Manual
Page 61
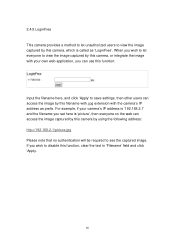
... by using the following address: http://192.168.2.1/picture.jpg Please note that no authentication will be required to disable this camera, or integrate the image with your camera‟s IP address is „192.168.2.1‟ and the filename you set here is called as prefix. When you wish to ...let everyone on the web can access the image by this filename with .jpg extension with the camera‟s IP address as „LoginFree‟. If you can use this function: Input the filename here, and click „Apply‟ to save settings,...
... by using the following address: http://192.168.2.1/picture.jpg Please note that no authentication will be required to disable this camera, or integrate the image with your camera‟s IP address is „192.168.2.1‟ and the filename you set here is called as prefix. When you wish to ...let everyone on the web can access the image by this filename with .jpg extension with the camera‟s IP address as „LoginFree‟. If you can use this function: Input the filename here, and click „Apply‟ to save settings,...
Manual
Page 66
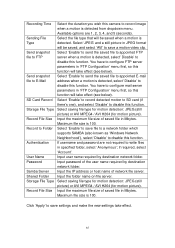
... File Size Record to Folder Authentication User Name Password Samba Server Shared Folder Storage File Type Record File Size Select the duration you wish this camera to record image when a motion is detected, select‟ Disable‟ to disable this function. Select „Enable‟ to send ...address when a motion is detected from dropdown menu. Maximum file size is detected. Input user name required by destination network folder. Input the IP address or host name of saved file in „FTP Configuration‟ menu first, so this function. Input the maximum file size of the...
... File Size Record to Folder Authentication User Name Password Samba Server Shared Folder Storage File Type Record File Size Select the duration you wish this camera to record image when a motion is detected, select‟ Disable‟ to disable this function. Select „Enable‟ to send ...address when a motion is detected from dropdown menu. Maximum file size is detected. Input user name required by destination network folder. Input the IP address or host name of saved file in „FTP Configuration‟ menu first, so this function. Input the maximum file size of the...

Manual
Page 69
... ISP. Input the Email address of the SMTP server (the server that delivers the Email for you) here. Input the IP address or host name of mail sender, this network camera by sender‟s Email address. You can identify the mail sent from this menu will help you ‟re using in... this camera from unknown sender, it's recommended to identify the Email sent by this will be given below: Item Recipient E-Mail Address E-Mail Subject SMTP Server Description ...
... ISP. Input the Email address of the SMTP server (the server that delivers the Email for you) here. Input the IP address or host name of mail sender, this network camera by sender‟s Email address. You can identify the mail sent from this menu will help you ‟re using in... this camera from unknown sender, it's recommended to identify the Email sent by this will be given below: Item Recipient E-Mail Address E-Mail Subject SMTP Server Description ...
Manual
Page 95
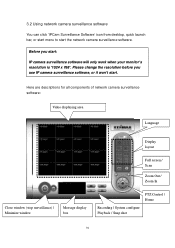
... display box PTZ Control / Home Recording / System configure Playback / Snap shot 94 Before you use IP camera surveillance software, or it won't start : IP camera surveillance software will only work when your monitor's resolution is '1024 x 768'. 3.2 Using network camera surveillance software You can click „IPCam Surveillance Software‟ icon from desktop, quick launch...
... display box PTZ Control / Home Recording / System configure Playback / Snap shot 94 Before you use IP camera surveillance software, or it won't start : IP camera surveillance software will only work when your monitor's resolution is '1024 x 768'. 3.2 Using network camera surveillance software You can click „IPCam Surveillance Software‟ icon from desktop, quick launch...
Manual
Page 98
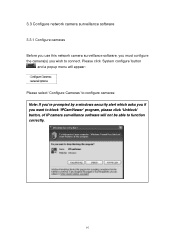
3.3 Configure network camera surveillance software 3.3.1 Configure cameras Before you use this network camera surveillance software, you must configure the camera(s) you want to block 'IPCamViewer' program, please click 'Unblock' button, of IP camera surveillance software will appear: Please select „Configure Cameras‟ to configure cameras: Note: If you're prompted by a windows security alert which asks you if you wish to function correctly. 97 Please click „System configure‟ button and a popup menu will not be able to connect.
3.3 Configure network camera surveillance software 3.3.1 Configure cameras Before you use this network camera surveillance software, you must configure the camera(s) you want to block 'IPCamViewer' program, please click 'Unblock' button, of IP camera surveillance software will appear: Please select „Configure Cameras‟ to configure cameras: Note: If you're prompted by a windows security alert which asks you if you wish to function correctly. 97 Please click „System configure‟ button and a popup menu will not be able to connect.

Manual
Page 135
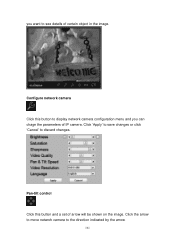
Sharpness: Select video sharpness (1 to 5, lowest to Lowest, select a lower video quality will help when network speed is slow). Tilt Speed: Select camera pan & tilt movement speed. Video Quality: (Highest to highest). Click camera you wish to delete of the IP Click „Delete‟ button to save changes To delete an existing IP camera, click „Edit‟ button. Click 'Done' to delete IP camera 134
Sharpness: Select video sharpness (1 to 5, lowest to Lowest, select a lower video quality will help when network speed is slow). Tilt Speed: Select camera pan & tilt movement speed. Video Quality: (Highest to highest). Click camera you wish to delete of the IP Click „Delete‟ button to save changes To delete an existing IP camera, click „Edit‟ button. Click 'Done' to delete IP camera 134
Manual
Page 160
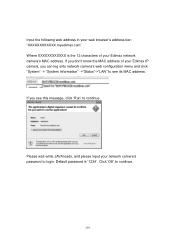
...; to continue. 159 Click „OK‟ to continue Please wait while JAVA loads, and please input your Edimax IP camera, you see its MAC address. Input the following web address in your Edimax network camera‟s MAC address. If you don‟t know the MAC address of your web browser‟s address bar: "XXXXXXXXXXXX...
...; to continue. 159 Click „OK‟ to continue Please wait while JAVA loads, and please input your Edimax IP camera, you see its MAC address. Input the following web address in your Edimax network camera‟s MAC address. If you don‟t know the MAC address of your web browser‟s address bar: "XXXXXXXXXXXX...
Manual
Page 162
Pan-tilt control Click this button to see details of certain object in the image. Click the arrow to move network camera to discard changes. Click „Apply‟ to save changes or click „Cancel‟ to the direction indicated by the arrow. 161 Configure network camera Click this button and a set of arrow will be shown on the image. you want to display network camera configuration menu and you can chage the parameters of IP camera.
Pan-tilt control Click this button to see details of certain object in the image. Click the arrow to move network camera to discard changes. Click „Apply‟ to save changes or click „Cancel‟ to the direction indicated by the arrow. 161 Configure network camera Click this button and a set of arrow will be shown on the image. you want to display network camera configuration menu and you can chage the parameters of IP camera.

