Datasheet
Page 1
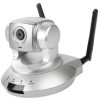
... motion is a powerful mobile surveillance system. Built in these areas, the camera takes a snapshot / recording automatically and sends the image / video clipping of the events to remote site through web browser and listen the sound from the remote site. With the intelligent multi-area motion detection function, it monitors your network settings in the viewing area. UPnP allows Windows XP/Vista users access the Internet camera with pre-recording + post-recording function, the IC-7000PT(n) V2 can view and control remotely via a browser or Edimax utility...
... motion is a powerful mobile surveillance system. Built in these areas, the camera takes a snapshot / recording automatically and sends the image / video clipping of the events to remote site through web browser and listen the sound from the remote site. With the intelligent multi-area motion detection function, it monitors your network settings in the viewing area. UPnP allows Windows XP/Vista users access the Internet camera with pre-recording + post-recording function, the IC-7000PT(n) V2 can view and control remotely via a browser or Edimax utility...
Datasheet
Page 2
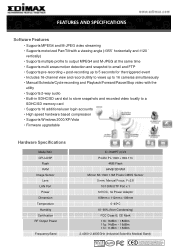
.../Forward/Pause/Stop video with the utility • Supports 2-way audio • Built-in SDHC/SD card slot to store snapshots and recorded video locally to a SDHC/SD memory card • Supports 16 additional user login accounts • High speed hardware based compression • Supports Windows 2000/XP/Vista • Firmware upgradable Hardware Specifications Model NO. CPU+DSP Flash RAM Image Sensor Lens LAN Port Power Dimension Temperature Humidity Certification RF Output Power Frequency Band IC...
.../Forward/Pause/Stop video with the utility • Supports 2-way audio • Built-in SDHC/SD card slot to store snapshots and recorded video locally to a SDHC/SD memory card • Supports 16 additional user login accounts • High speed hardware based compression • Supports Windows 2000/XP/Vista • Firmware upgradable Hardware Specifications Model NO. CPU+DSP Flash RAM Image Sensor Lens LAN Port Power Dimension Temperature Humidity Certification RF Output Power Frequency Band IC...

Quick Install Guide
Page 3
... QIG. Any software described in this manual are subject to view the terms of eachlicense. Should the programs prove defective following their respective holders. You can download the firmware-files at http://www.edimax.com under "Download" page. This company makes no representations or warranties, either expressed or implied, with respect to the User's Manual on the CD-ROM. all necessary servicing, repair, and any...
... QIG. Any software described in this manual are subject to view the terms of eachlicense. Should the programs prove defective following their respective holders. You can download the firmware-files at http://www.edimax.com under "Download" page. This company makes no representations or warranties, either expressed or implied, with respect to the User's Manual on the CD-ROM. all necessary servicing, repair, and any...
Quick Install Guide
Page 4
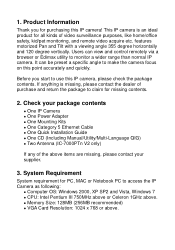
... the camera focus on this IP camera, please check the package contents. Check your package contents One IP Camera One Power Adapter One Mounting Kits One Category 5 Ethernet Cable One Quick Installation Guide One CD (Including Manual/Utility/Multi-Language QIG) Two Antenna (IC-7000PTn V2 only) If any of video surveillance purposes, like home/office safety, kid/pet monitoring, and remote video acquire...
... the camera focus on this IP camera, please check the package contents. Check your package contents One IP Camera One Power Adapter One Mounting Kits One Category 5 Ethernet Cable One Quick Installation Guide One CD (Including Manual/Utility/Multi-Language QIG) Two Antenna (IC-7000PTn V2 only) If any of video surveillance purposes, like home/office safety, kid/pet monitoring, and remote video acquire...
Quick Install Guide
Page 5
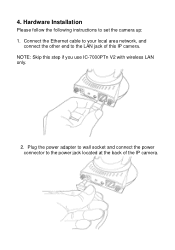
NOTE: Skip this IP camera. Plug the power adapter to wall socket and connect the power connector to the power jack located at the back of this step if you use IC-7000PTn V2 with wireless LAN only. 2. 4. Connect the Ethernet cable to your local area network, and connect the other end to set the camera up: 1. Hardware Installation Please follow the following instructions to the LAN jack of the IP camera.
NOTE: Skip this IP camera. Plug the power adapter to wall socket and connect the power connector to the power jack located at the back of this step if you use IC-7000PTn V2 with wireless LAN only. 2. 4. Connect the Ethernet cable to your local area network, and connect the other end to set the camera up: 1. Hardware Installation Please follow the following instructions to the LAN jack of the IP camera.
Quick Install Guide
Page 6
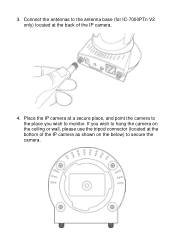
If you wish to secure the camera. 3. Place the IP camera at the bottom of the IP camera. 4. Connect the antennas to the antenna base (for IC-7000PTn V2 only) located at the back of the IP camera as shown on the ceiling or wall, please use the tripod connector (located at a secure place, and point the camera to the place you wish to hang the camera on the below) to monitor.
If you wish to secure the camera. 3. Place the IP camera at the bottom of the IP camera. 4. Connect the antennas to the antenna base (for IC-7000PTn V2 only) located at the back of the IP camera as shown on the ceiling or wall, please use the tripod connector (located at a secure place, and point the camera to the place you wish to hang the camera on the below) to monitor.
Quick Install Guide
Page 7
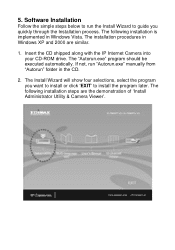
... Install Wizard will show four selections, select the program you quickly through the Installation process. 5. The following installation steps are similar. 1. Insert the CD shipped along with the IP Internet Camera into your CD-ROM drive. The following installation is implemented in Windows XP and 2000 are the demonstration of „Install Administrator Utility & Camera Viewer‟. The installation procedures in Windows Vista. If not, run the Install Wizard to guide you...
... Install Wizard will show four selections, select the program you quickly through the Installation process. 5. The following installation steps are similar. 1. Insert the CD shipped along with the IP Internet Camera into your CD-ROM drive. The following installation is implemented in Windows XP and 2000 are the demonstration of „Install Administrator Utility & Camera Viewer‟. The installation procedures in Windows Vista. If not, run the Install Wizard to guide you...
Quick Install Guide
Page 8
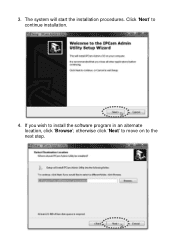
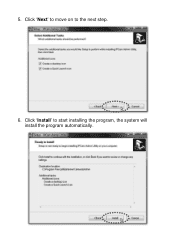
otherwise click „Next‟ to move on to continue installation. 4. Click „Next‟ to the next step. If you wish to install the software program in an alternate location, click „Browse‟; The system will start the installation procedures. 3.
otherwise click „Next‟ to move on to continue installation. 4. Click „Next‟ to the next step. If you wish to install the software program in an alternate location, click „Browse‟; The system will start the installation procedures. 3.
Quick Install Guide
Page 9
Click „Next‟ to move on to start installing the program, the system will install the program automatically. Click „Install‟ to the next step. 6. 5.
Click „Next‟ to move on to start installing the program, the system will install the program automatically. Click „Install‟ to the next step. 6. 5.
Quick Install Guide
Page 10
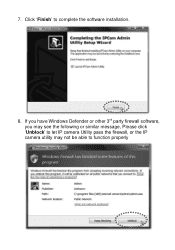
Click „Finish‟ to function properly 7. If you have Windows Defender or other 3rd party firewall software, you may see the following or similar message, Please click „Unblock‟ to let IP camera Utility pass the firewall, or the IP camera utility may not be able to complete the software installation. 8.
Click „Finish‟ to function properly 7. If you have Windows Defender or other 3rd party firewall software, you may see the following or similar message, Please click „Unblock‟ to let IP camera Utility pass the firewall, or the IP camera utility may not be able to complete the software installation. 8.
Quick Install Guide
Page 11
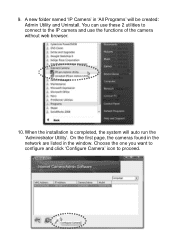
You can use these 2 utilities to connect to proceed. When the installation is completed, the system will be created: Admin Utility and Uninstall. Choose the one you want to configure and click „Configure Camera‟ icon to the IP camera and use the functions of the camera without web browser. 10. A new folder named „IP Camera‟ in the window. On the first page, the cameras found in the network are listed in „All Programs‟ will auto run the „Administrator Utility‟. 9.
You can use these 2 utilities to connect to proceed. When the installation is completed, the system will be created: Admin Utility and Uninstall. Choose the one you want to configure and click „Configure Camera‟ icon to the IP camera and use the functions of the camera without web browser. 10. A new folder named „IP Camera‟ in the window. On the first page, the cameras found in the network are listed in „All Programs‟ will auto run the „Administrator Utility‟. 9.

Quick Install Guide
Page 12
... not change it), and the default password is „1234‟, and then click „OK‟ to apply the configuration. The default user name is working through the network (TCP/IP Protocol). IP Camera is „admin‟ (you can accept the suggested value or enter the value manually. The wizard program will detect the IP address status of your network automatically and suggest a free IP address...
... not change it), and the default password is „1234‟, and then click „OK‟ to apply the configuration. The default user name is working through the network (TCP/IP Protocol). IP Camera is „admin‟ (you can accept the suggested value or enter the value manually. The wizard program will detect the IP address status of your network automatically and suggest a free IP address...
Quick Install Guide
Page 13
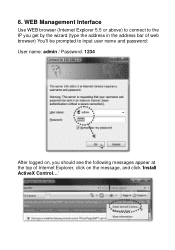
6. WEB Management Interface Use WEB browser (Internet Explorer 5.5 or above) to connect to the IP you get by the wizard (type the address in the address bar of web browser) You‟ll be prompted to input user name and password: User name: admin / Password: 1234 After logged on, you should see the following messages appear at the top of Internet Explorer, click on the message, and click „Install ActiveX Control...‟
6. WEB Management Interface Use WEB browser (Internet Explorer 5.5 or above) to connect to the IP you get by the wizard (type the address in the address bar of web browser) You‟ll be prompted to input user name and password: User name: admin / Password: 1234 After logged on, you should see the following messages appear at the top of Internet Explorer, click on the message, and click „Install ActiveX Control...‟
Quick Install Guide
Page 14
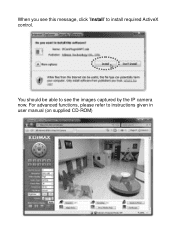
For advanced functions, please refer to install required ActiveX control. You should be able to see this message, click ‟Install‟ to instructions given in user manual (on supplied CD-ROM) When you see the images captured by the IP camera now.
For advanced functions, please refer to install required ActiveX control. You should be able to see this message, click ‟Install‟ to instructions given in user manual (on supplied CD-ROM) When you see the images captured by the IP camera now.

Quick Install Guide
Page 15
... the mutual recognition of their conformity (R&TTE) The R&TTE Directive repeals and replaces in Austria, Belgium, Denmark, Finland, France, Germany, Greece, Ireland, Italy...times to the dangers of electric shock and static electricity when working with the utmost care for the safety of those who install and use it. EU Countries Intended for Use The ETSI version of this device is intended for use...use None EU Countries not intended for home and office use in EFTA member states: Iceland, Liechtenstein, Norway, and Switzerland. The ETSI version of this device is also authorized for use...
... the mutual recognition of their conformity (R&TTE) The R&TTE Directive repeals and replaces in Austria, Belgium, Denmark, Finland, France, Germany, Greece, Ireland, Italy...times to the dangers of electric shock and static electricity when working with the utmost care for the safety of those who install and use it. EU Countries Intended for Use The ETSI version of this device is intended for use...use None EU Countries not intended for home and office use in EFTA member states: Iceland, Liechtenstein, Norway, and Switzerland. The ETSI version of this device is also authorized for use...
CE DoC
Page 1
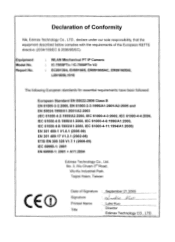
WLAN Mechanical PT IP Camera IC-7000PTn / IC-7000PTn V2 EC891304, EH891605, ER891605AC, ER891605Al, L891605L1018 The following European standards... (2002-08) ETSI EN 300 328 V1.7.1 (2006-05) IEC 60950-1: 2001 EN 60950-1: 2001 + A11:2004 Edimax Technology Co., Ltd. Taipei Hsien, Taiwan CE Date of the European R&TTE directive (2004/108/EC & 2006/95/EC...). Report No. No. 3, Wu Chuan 3rd Road, Wu-Ku Industrial Park. Declaration of Conformity We, Edimax Technology Co., LTD., declare under our sole responsibility, that the equipment described below complies with the requirements of ...
WLAN Mechanical PT IP Camera IC-7000PTn / IC-7000PTn V2 EC891304, EH891605, ER891605AC, ER891605Al, L891605L1018 The following European standards... (2002-08) ETSI EN 300 328 V1.7.1 (2006-05) IEC 60950-1: 2001 EN 60950-1: 2001 + A11:2004 Edimax Technology Co., Ltd. Taipei Hsien, Taiwan CE Date of the European R&TTE directive (2004/108/EC & 2006/95/EC...). Report No. No. 3, Wu Chuan 3rd Road, Wu-Ku Industrial Park. Declaration of Conformity We, Edimax Technology Co., LTD., declare under our sole responsibility, that the equipment described below complies with the requirements of ...


