Datasheet
Page 2
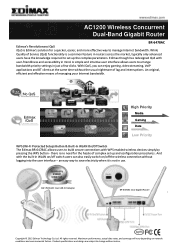
... time without the usual nightmare of lag and interruptions. No QoS Edimax iQoS High Priority Media Gaming Data Low Priority WPS (Wi-Fi Protected Setup) Button & Built-In WLAN On/Off Switch The Edimax BR-6478AC allows users to arrange bandwidth priority settings in use. EW-7822UAC ...11ac USB 3.0 Adapter BR-6478AC 11ac Gigabit Router Copyright © 2012 Edimax Technology Co. Edimax though has redesigned QoS with WPS...
... time without the usual nightmare of lag and interruptions. No QoS Edimax iQoS High Priority Media Gaming Data Low Priority WPS (Wi-Fi Protected Setup) Button & Built-In WLAN On/Off Switch The Edimax BR-6478AC allows users to arrange bandwidth priority settings in use. EW-7822UAC ...11ac USB 3.0 Adapter BR-6478AC 11ac Gigabit Router Copyright © 2012 Edimax Technology Co. Edimax though has redesigned QoS with WPS...
User Manual
Page 2
... Status...2 I ‐2. Status...27 III‐3‐2. PPPoE ...33 III‐3‐3‐1‐4. Reset to Factory Default Settings 22 III. Setup Wizard ...28 III‐3‐3. Disable...48 III‐3‐5‐1‐2. Dynamic IP ...30 III‐3‐3‐1‐2. Back Panel...3 ...5 II‐1. Wi‐Fi Router Mode ...8 II‐2. DDNS ...40 III‐3‐4. Product Information 1 I ‐4. WPS Setup ...22 II‐5. PPTP...35 III‐3‐3‐1‐5. WISP ...39 III‐3‐3‐2. WPS...54 III‐3‐5‐4....
... Status...2 I ‐2. Status...27 III‐3‐2. PPPoE ...33 III‐3‐3‐1‐4. Reset to Factory Default Settings 22 III. Setup Wizard ...28 III‐3‐3. Disable...48 III‐3‐5‐1‐2. Dynamic IP ...30 III‐3‐3‐1‐2. Back Panel...3 ...5 II‐1. Wi‐Fi Router Mode ...8 II‐2. DDNS ...40 III‐3‐4. Product Information 1 I ‐4. WPS Setup ...22 II‐5. PPTP...35 III‐3‐3‐1‐5. WISP ...39 III‐3‐3‐2. WPS...54 III‐3‐5‐4....

User Manual
Page 9
... and that the power LED and WAN LED are required for a Wi‐Fi network with the SSID "edimax.setup" and connect to begin the setup process. 5 iOS 4 or Android 4 and above are lit. If not, the device is set to on a smartphone or tablet. 4.Open a web browser and if you ...do not automatically arrive at the "Get Started" screen shown below, enter the URL http://edimax.setup and click "Get Started" to it. II. Installation 1.Plug the included power adapter into the device's 5V DC power port and the other end into...
... and that the power LED and WAN LED are required for a Wi‐Fi network with the SSID "edimax.setup" and connect to begin the setup process. 5 iOS 4 or Android 4 and above are lit. If not, the device is set to on a smartphone or tablet. 4.Open a web browser and if you ...do not automatically arrive at the "Get Started" screen shown below, enter the URL http://edimax.setup and click "Get Started" to it. II. Installation 1.Plug the included power adapter into the device's 5V DC power port and the other end into...
User Manual
Page 10
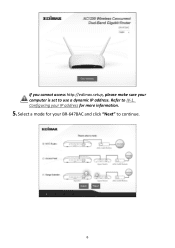
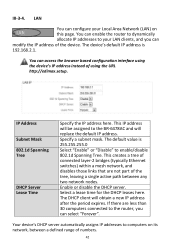
If you cannot access http://edimax.setup, please make sure your BR‐6478AC and click "Next" to continue. 6 Configuring your IP address for more information. 5.Select a mode for your computer is set to IV‐1. Refer to use a dynamic IP address.
If you cannot access http://edimax.setup, please make sure your BR‐6478AC and click "Next" to continue. 6 Configuring your IP address for more information. 5.Select a mode for your computer is set to IV‐1. Refer to use a dynamic IP address.

User Manual
Page 11
Wi‐Fi Router Access Point Range Extender The device connects to your modem and provides 2.4GHz and/or 5GHz Internet (wireless and Ethernet) access for your network devices. The device connects wirelessly to your network devices. The device connects to an existing router via Ethernet cable and provides 2.4GHz and/or 5GHz Internet (wireless and Ethernet) access for your existing 2.4GHz and/or 5GHz network and repeats the wireless signal(s). 6.Follow the on‐screen instructions to the appropriate following chapter: 7 For more information, please refer to complete setup.
Wi‐Fi Router Access Point Range Extender The device connects to your modem and provides 2.4GHz and/or 5GHz Internet (wireless and Ethernet) access for your network devices. The device connects wirelessly to your network devices. The device connects to an existing router via Ethernet cable and provides 2.4GHz and/or 5GHz Internet (wireless and Ethernet) access for your existing 2.4GHz and/or 5GHz network and repeats the wireless signal(s). 6.Follow the on‐screen instructions to the appropriate following chapter: 7 For more information, please refer to complete setup.
User Manual
Page 15
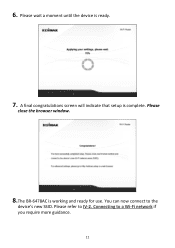
You can now connect to a Wi‐Fi network if you require more guidance. 11 Connecting to the device's new SSID. 6. Please wait a moment until the device is working and ready for use. Please close the browser window. 8.The BR‐6478AC is ready. 7. Please refer to IV‐2. A final congratulations screen will indicate that setup is complete.
You can now connect to a Wi‐Fi network if you require more guidance. 11 Connecting to the device's new SSID. 6. Please wait a moment until the device is working and ready for use. Please close the browser window. 8.The BR‐6478AC is ready. 7. Please refer to IV‐2. A final congratulations screen will indicate that setup is complete.
User Manual
Page 18
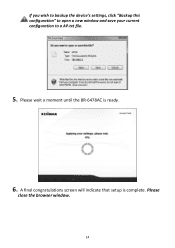
If you wish to backup the device's settings, click "Backup this configuration" to open a new window and save your current configuration to a AP.txt file. 5. Please wait a moment until the BR‐6478AC is complete. A final congratulations screen will indicate that setup is ready. 6. Please close the browser window. 14
If you wish to backup the device's settings, click "Backup this configuration" to open a new window and save your current configuration to a AP.txt file. 5. Please wait a moment until the BR‐6478AC is complete. A final congratulations screen will indicate that setup is ready. 6. Please close the browser window. 14
User Manual
Page 25
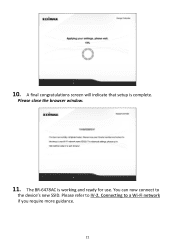
A final congratulations screen will indicate that setup is working and ready for use. Connecting to the device's new SSID. The BR‐6478AC is complete. You can now connect to a Wi‐Fi network if you require more guidance. 21 Please refer to IV‐2. Please close the browser window. 11. 10.
A final congratulations screen will indicate that setup is working and ready for use. Connecting to the device's new SSID. The BR‐6478AC is complete. You can now connect to a Wi‐Fi network if you require more guidance. 21 Please refer to IV‐2. Please close the browser window. 11. 10.
User Manual
Page 26
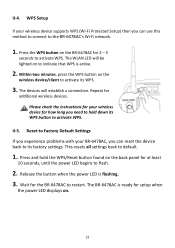
...the WPS button on to indicate that WPS is active. 2. The devices will be lighted on the BR‐6478AC for the BR‐6478AC to default. 1. II‐5. WPS Setup If your BR‐6478AC, you can use this method to connect to activate WPS. Repeat for how long you can reset ...the device back to flash. 2. The BR‐6478AC is flashing. 3. Press and hold down its factory settings. ...
...the WPS button on to indicate that WPS is active. 2. The devices will be lighted on the BR‐6478AC for the BR‐6478AC to default. 1. II‐5. WPS Setup If your BR‐6478AC, you can use this method to connect to activate WPS. Repeat for how long you can reset ...the device back to flash. 2. The BR‐6478AC is flashing. 3. Press and hold down its factory settings. ...
User Manual
Page 27
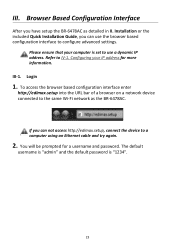
Login 1. Browser Based Configuration Interface After you have setup the BR‐6478AC as the BR‐6478AC. Configuring your computer is "1234". 23 To access the browser based configuration interface enter http://edimax.setup into the URL bar of a browser on a network device connected to configure advanced settings. III. You will be prompted for more information. Refer...;Fi network as detailed in II. Installation or the included Quick Installation Guide, you can use a dynamic IP address. If you can not access http://edimax.setup, connect the device to IV‐1.
Login 1. Browser Based Configuration Interface After you have setup the BR‐6478AC as the BR‐6478AC. Configuring your computer is "1234". 23 To access the browser based configuration interface enter http://edimax.setup into the URL bar of a browser on a network device connected to configure advanced settings. III. You will be prompted for more information. Refer...;Fi network as detailed in II. Installation or the included Quick Installation Guide, you can use a dynamic IP address. If you can not access http://edimax.setup, connect the device to IV‐1.

User Manual
Page 32
... mode. Installation. Follow the on‐screen instructions to back up the basic functions and settings of the device, or you can run the setup wizard again to help you will help you to set up your current settings and then reset the device back to begin... "Run Wizard" to its factory default settings. 2. After the device has reset you to switch the device to II. Switch to the URL "http://Edimax.Setup" in a web browser. 28 Reconnect to the device's default SSID "edimax.setup" and go to Router/AP/Range Extender: 1. III‐3‐2. For guidance about using the...
... mode. Installation. Follow the on‐screen instructions to back up the basic functions and settings of the device, or you can run the setup wizard again to help you will help you to set up your current settings and then reset the device back to begin... "Run Wizard" to its factory default settings. 2. After the device has reset you to switch the device to II. Switch to the URL "http://Edimax.Setup" in a web browser. 28 Reconnect to the device's default SSID "edimax.setup" and go to Router/AP/Range Extender: 1. III‐3‐2. For guidance about using the...

User Manual
Page 33
3. Refer to setup your device in a different mode. Installation Step 3 onwards for help if needed. 29 Follow the on‐screen wizard to II.
3. Refer to setup your device in a different mode. Installation Step 3 onwards for help if needed. 29 Follow the on‐screen wizard to II.

User Manual
Page 34
Click on an item from the submenu to WAN and DDNS settings. WAN Setup Select a Wide Area Network (WAN) connection mode and configure the settings. Dynamic IP Select "Dynamic IP". III‐3‐3. Internet The "Internet" menu provides access to view and/or configure the settings. If you are unsure about your connection type, contact your Internet service provider assigns IP address automatically using DHCP (Dynamic Host Configuration Protocol). 30 III‐3‐3‐1‐1. If your ISP. III‐3‐3‐1.
Click on an item from the submenu to WAN and DDNS settings. WAN Setup Select a Wide Area Network (WAN) connection mode and configure the settings. Dynamic IP Select "Dynamic IP". III‐3‐3. Internet The "Internet" menu provides access to view and/or configure the settings. If you are unsure about your connection type, contact your Internet service provider assigns IP address automatically using DHCP (Dynamic Host Configuration Protocol). 30 III‐3‐3‐1‐1. If your ISP. III‐3‐3‐1.
User Manual
Page 46
...address. Your device's DHCP server automatically assigns IP addresses to the router, you can access the browser based configuration interface using the URL http://edimax.setup. You can modify the IP address of connected layer‐2 bridges (typically Ethernet switches) within a mesh network, and disables those links .... 42 Enable or disable the DHCP server. LAN You can enable the router to dynamically allocate IP addresses to the BR‐6478AC and will obtain a new IP address after the period expires. You can configure your LAN clients, and you can select "Forever".
...address. Your device's DHCP server automatically assigns IP addresses to the router, you can access the browser based configuration interface using the URL http://edimax.setup. You can modify the IP address of connected layer‐2 bridges (typically Ethernet switches) within a mesh network, and disables those links .... 42 Enable or disable the DHCP server. LAN You can enable the router to dynamically allocate IP addresses to the BR‐6478AC and will obtain a new IP address after the period expires. You can configure your LAN clients, and you can select "Forever".
User Manual
Page 56
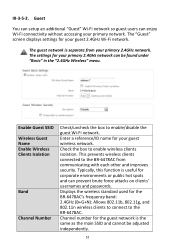
... prevent brute force attacks on clients' usernames and passwords. Displays the wireless standard used for your guest wireless network. Guest You can setup an additional "Guest" Wi‐Fi network so guest users can be adjusted independently. 52 The guest network is the same as ...Guest Name Enable Wireless Clients Isolation Band Channel Number Check/uncheck the box to the BR‐6478AC. Check the box to the BR‐6478AC from your primary network. The "Guest" screen displays settings for the BR‐6478AC's frequency band: 2.4GHz (B+G+N): Allows 802.11b, 802.11g, and 802.11n ...
... prevent brute force attacks on clients' usernames and passwords. Displays the wireless standard used for your guest wireless network. Guest You can setup an additional "Guest" Wi‐Fi network so guest users can be adjusted independently. 52 The guest network is the same as ...Guest Name Enable Wireless Clients Isolation Band Channel Number Check/uncheck the box to the BR‐6478AC. Check the box to the BR‐6478AC from your primary network. The "Guest" screen displays settings for the BR‐6478AC's frequency band: 2.4GHz (B+G+N): Allows 802.11b, 802.11g, and 802.11n ...

User Manual
Page 58
... follow the device's wireless settings. 54 Displays the WPS PIN code of the device. The configuration mode of the device. WPS Wi‐Fi Protected Setup is displayed here. SSID Displays the SSID (ESSID) of the device's WPS setting is a simple way to establish connections between the two devices for a wireless...
... follow the device's wireless settings. 54 Displays the WPS PIN code of the device. The configuration mode of the device. WPS Wi‐Fi Protected Setup is displayed here. SSID Displays the SSID (ESSID) of the device's WPS setting is a simple way to establish connections between the two devices for a wireless...
User Manual
Page 72
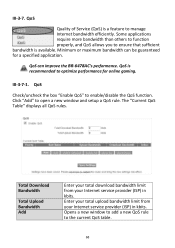
...;3‐7‐1. The "Current QoS Table" displays all QoS rules. Minimum or maximum bandwidth can improve the BR‐6478AC's performance. QoS is available. QoS Quality of Service (QoS) is a feature to open a new window and setup a QoS rule. Click "Add" to manage Internet bandwidth efficiently. Total Download Bandwidth Total Upload Bandwidth Add...
...;3‐7‐1. The "Current QoS Table" displays all QoS rules. Minimum or maximum bandwidth can improve the BR‐6478AC's performance. QoS is available. QoS Quality of Service (QoS) is a feature to open a new window and setup a QoS rule. Click "Add" to manage Internet bandwidth efficiently. Total Download Bandwidth Total Upload Bandwidth Add...
User Manual
Page 87
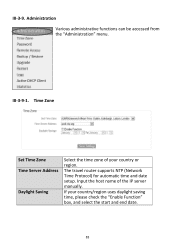
Time Zone Set Time Zone Time Server Address Daylight Saving Select the time zone of the IP server manually. The travel router supports NTP (Network Time Protocol) for automatic time and date setup. If your country or region. III‐3‐9. Administration Various administrative functions can be accessed from the "Administration" menu. III‐3‐9‐1. Input the host name of your country/region uses daylight saving time, please check the "Enable Function" box, and select the start and end date. 83
Time Zone Set Time Zone Time Server Address Daylight Saving Select the time zone of the IP server manually. The travel router supports NTP (Network Time Protocol) for automatic time and date setup. If your country or region. III‐3‐9. Administration Various administrative functions can be accessed from the "Administration" menu. III‐3‐9‐1. Input the host name of your country/region uses daylight saving time, please check the "Enable Function" box, and select the start and end date. 83

User Manual
Page 93
...to the device which is set to its original value after the device is properly configured. 89 You can access the URL http://Edimax.Setup in IV‐1‐2. You can obtain an IP address automatically from a DHCP server. Appendix IV‐1. IV. Configuring your IP... address back to use a dynamic IP address by following IV‐1‐1. The BR‐6478AC's default IP address is set to the URL http://Edimax.Setup please ensure your network during setup or using the browser based configuration interface (refer to III‐3‐4. Please remember to change...
...to the device which is set to its original value after the device is properly configured. 89 You can access the URL http://Edimax.Setup in IV‐1‐2. You can obtain an IP address automatically from a DHCP server. Appendix IV‐1. IV. Configuring your IP... address back to use a dynamic IP address by following IV‐1‐1. The BR‐6478AC's default IP address is set to the URL http://Edimax.Setup please ensure your network during setup or using the browser based configuration interface (refer to III‐3‐4. Please remember to change...
User Manual
Page 107
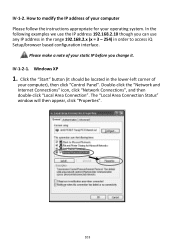
... Connections", and then double‐click "Local Area Connection". The "Local Area Connection Status" window will then appear, click "Properties". 103 How to access iQ Setup/browser based configuration interface. Click the "Start" button (it . Windows XP 1. In the following examples we use the IP address 192.168.2.10 though you...
... Connections", and then double‐click "Local Area Connection". The "Local Area Connection Status" window will then appear, click "Properties". 103 How to access iQ Setup/browser based configuration interface. Click the "Start" button (it . Windows XP 1. In the following examples we use the IP address 192.168.2.10 though you...
