
Quick Install Guide
Page 3
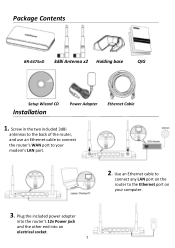
Plug the included power adapter into the router's 12v Power jack and the other end into an electrical socket. 2 Package Contents BR-6475nD 3dBi Antenna x2 Holding base QIG x2 x2 Setup Wizard CD Installation Power Adapter Ethernet Cable 1. Screw in the two included 3dBi antennas to the back of the router, and use an Ethernet cable to connect the router's WAN port to the Ethernet port on the router to your computer. 3. Use an Ethernet cable to connect any LAN port on your modem's LAN port. 2.
Plug the included power adapter into the router's 12v Power jack and the other end into an electrical socket. 2 Package Contents BR-6475nD 3dBi Antenna x2 Holding base QIG x2 x2 Setup Wizard CD Installation Power Adapter Ethernet Cable 1. Screw in the two included 3dBi antennas to the back of the router, and use an Ethernet cable to connect the router's WAN port to the Ethernet port on the router to your computer. 3. Use an Ethernet cable to connect any LAN port on your modem's LAN port. 2.

Quick Install Guide
Page 4
Power LAN 1 - 4 WAN 5. When the wizard begins, select your CD drive and double click the "Ezmax.exe" file to start the wizard. 6. The setup wizard will guide you through the installation process. Click "Next" to continue. 7. Ensure that the Power LED, WAN LED and corresponding LAN LED on your computer. Note: If the setup wizard doesn't run automatically, please browse your language. 4. Insert the setup wizard CD into a CD-ROM drive on the router are lit. Click "Next" to continue. 3 If not, the router is not properly connected.
Power LAN 1 - 4 WAN 5. When the wizard begins, select your CD drive and double click the "Ezmax.exe" file to start the wizard. 6. The setup wizard will guide you through the installation process. Click "Next" to continue. 7. Ensure that the Power LED, WAN LED and corresponding LAN LED on your computer. Note: If the setup wizard doesn't run automatically, please browse your language. 4. Insert the setup wizard CD into a CD-ROM drive on the router are lit. Click "Next" to continue. 3 If not, the router is not properly connected.

Quick Install Guide
Page 5
... a new password in this password, please make a note of 1234 by resetting the router back to factory defaults, see Troubleshooting. 4 8. not the password to connect to configure the settings - If you forget, you wish to change this case "BR-6475nD". 10. Click "Apply" and then "Ok". Note: This is the password to login... the default password 1234 in the field labeled "Current Password" and then if you can reset the password back to your product type - Select your router to the router's Wi-Fi network(s).
... a new password in this password, please make a note of 1234 by resetting the router back to factory defaults, see Troubleshooting. 4 8. not the password to connect to configure the settings - If you forget, you wish to change this case "BR-6475nD". 10. Click "Apply" and then "Ok". Note: This is the password to login... the default password 1234 in the field labeled "Current Password" and then if you can reset the password back to your product type - Select your router to the router's Wi-Fi network(s).

Quick Install Guide
Page 6
Select your Internet Service Provider (ISP). 12. For most users, "Cable Modem" is the same as your computer, you are unsure, please contact your Internet connection type and click "Next". If you received a host name and MAC address from your computer's MAC address and then click "Apply" to the Internet. 5 11. Please wait while the router connects to continue. 13. If you are a dynamic IP user, then select "Cable Modem". If you can click "Clone" to clone your ISP, enter them here and click "Apply". If you are sure the MAC address is the correct setting.
Select your Internet Service Provider (ISP). 12. For most users, "Cable Modem" is the same as your computer, you are unsure, please contact your Internet connection type and click "Next". If you received a host name and MAC address from your computer's MAC address and then click "Apply" to the Internet. 5 11. Please wait while the router connects to continue. 13. If you are a dynamic IP user, then select "Cable Modem". If you can click "Clone" to clone your ISP, enter them here and click "Apply". If you are sure the MAC address is the correct setting.

Quick Install Guide
Page 7
.... An ESSID is finished, click "Complete!" Click "Apply". 16. Please wait while the router is connected your available Wi-Fi networks to connect to continue. 6 Later, when the router is fully operational, you will need to configure the ESSID and Wireless Security - Please enter separate... ESSIDs for the router's 2.4GHz mode and 5GHz mode. and then click "Next" to the wireless router. please select "ESSID" from your default...
.... An ESSID is finished, click "Complete!" Click "Apply". 16. Please wait while the router is connected your available Wi-Fi networks to connect to continue. 6 Later, when the router is fully operational, you will need to configure the ESSID and Wireless Security - Please enter separate... ESSIDs for the router's 2.4GHz mode and 5GHz mode. and then click "Next" to the wireless router. please select "ESSID" from your default...

Quick Install Guide
Page 8
This password will be required when you need to unplug the Ethernet cable connecting the router and your router's connection. Then, to connect to the BR-6475nD's wireless networks, you connect to save the new passwords. and then click "EXIT" in the system tray and select "Connect to ... Wi-Fi networks by clicking the icon along the top right of the router's 2.4GHz and 5GHz networks. Then enter a password for the router to access the internet and check your computer. Click "Apply" to the router wirelessly. When it is finished, click "Complete!" 17. Please wait for...
This password will be required when you need to unplug the Ethernet cable connecting the router and your router's connection. Then, to connect to the BR-6475nD's wireless networks, you connect to save the new passwords. and then click "EXIT" in the system tray and select "Connect to ... Wi-Fi networks by clicking the icon along the top right of the router's 2.4GHz and 5GHz networks. Then enter a password for the router to access the internet and check your computer. Click "Apply" to the router wirelessly. When it is finished, click "Complete!" 17. Please wait for...
Quick Install Guide
Page 10
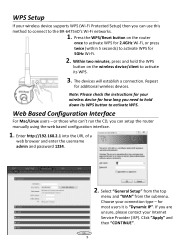
... configuration interface. 1. Choose your wireless device for how long you need to hold the WPS button on the router once to activate WPS for 2.4GHz Wi-Fi, or press twice (within 5 seconds) to the BR-6475nD's Wi-Fi networks. 1. Web Based Configuration Interface For Mac/Linux users - Within two minutes, press and hold...
... configuration interface. 1. Choose your wireless device for how long you need to hold the WPS button on the router once to activate WPS for 2.4GHz Wi-Fi, or press twice (within 5 seconds) to the BR-6475nD's Wi-Fi networks. 1. Web Based Configuration Interface For Mac/Linux users - Within two minutes, press and hold...

Quick Install Guide
Page 12
... save the changes, click "OK" when it has finished. 8. Or if your router's connection. After configuring "Security Settings" for the "5GHz" network, click "APPLY" instead of "CONTINUE". To connect to the BR-6475nD's wireless networks, please refer to access the BR-6475nD's 5GHz Wi-Fi network - Exit the web based configuration interface and you can...
... save the changes, click "OK" when it has finished. 8. Or if your router's connection. After configuring "Security Settings" for the "5GHz" network, click "APPLY" instead of "CONTINUE". To connect to the BR-6475nD's wireless networks, please refer to access the BR-6475nD's 5GHz Wi-Fi network - Exit the web based configuration interface and you can...

Quick Install Guide
Page 14
... its factory default settings and use the default username admin and default password 1234. 13 When the router restarts, all settings will be reset. 4. To reset the router back to factory default settings? How do I forgot my password. For Windows XP/2000: Go to flash. Click Network and Internet... Connections > Network Connections. Reset the router to its factory default settings, press and hold the WPS/Reset button for over 10 seconds, until the power LED begins to Start > Control ...
... its factory default settings and use the default username admin and default password 1234. 13 When the router restarts, all settings will be reset. 4. To reset the router back to factory default settings? How do I forgot my password. For Windows XP/2000: Go to flash. Click Network and Internet... Connections > Network Connections. Reset the router to its factory default settings, press and hold the WPS/Reset button for over 10 seconds, until the power LED begins to Start > Control ...
Quick Install Guide
Page 17
... equipment described below complies with the requirements of Signature: January 14th, 2011 Signature: Printed Name: Title: Albert Chang Director Edimax Technology Co., Ltd. 16 Equipment: 300Mbps Wireless Dual-Band Gigabit iQ Router Model No.: BR-6475nD The following European standards for essential requirements have been followed: Directives 1999/5/EC Spectrum : EMC : Safety (LVD) : ETSI... 50385:2002 Directives 2006/95/EC Safety (LVD) : IEC 60950-1:2005 (2nd Edition); EN 301 489-17 V2.1.1 (2009-05); EN 60950-1:2006+A11:2009 Edimax Technology Co., Ltd.
... equipment described below complies with the requirements of Signature: January 14th, 2011 Signature: Printed Name: Title: Albert Chang Director Edimax Technology Co., Ltd. 16 Equipment: 300Mbps Wireless Dual-Band Gigabit iQ Router Model No.: BR-6475nD The following European standards for essential requirements have been followed: Directives 1999/5/EC Spectrum : EMC : Safety (LVD) : ETSI... 50385:2002 Directives 2006/95/EC Safety (LVD) : IEC 60950-1:2005 (2nd Edition); EN 301 489-17 V2.1.1 (2009-05); EN 60950-1:2006+A11:2009 Edimax Technology Co., Ltd.

User Manual
Page 3
... 5 1‐2 Safety Information ...6 1‐3 System Requirements ...7 1‐4 Package Contents ...7 1‐5 Getting familiar with your new wireless broadband router 8 CHAPTER II: SYSTEM AND NETWORK SETUP 10 2‐1 Establishing a network connection...10 2‐2 Setting client computers to obtain IP addresses automatically ...8208;3 Windows XP IP address setup 17 2‐2‐4 Windows Vista IP address setup 19 2‐3 Connecting to broadband router via web browser 21 2‐4 Using "Quick Setup"...26 2‐4‐1 Using "Dynamic IP" as broadband connection type ...
... 5 1‐2 Safety Information ...6 1‐3 System Requirements ...7 1‐4 Package Contents ...7 1‐5 Getting familiar with your new wireless broadband router 8 CHAPTER II: SYSTEM AND NETWORK SETUP 10 2‐1 Establishing a network connection...10 2‐2 Setting client computers to obtain IP addresses automatically ...8208;3 Windows XP IP address setup 17 2‐2‐4 Windows Vista IP address setup 19 2‐3 Connecting to broadband router via web browser 21 2‐4 Using "Quick Setup"...26 2‐4‐1 Using "Dynamic IP" as broadband connection type ...

User Manual
Page 6
... system, four gigabit LAN ports, and concurrent dual‐band (2.4GHz and 5GHz) functionality. With the Edimax BR‐6475nD Wireless Dual‐Band Gigabit iQ Router, all your computers and network devices can set up wireless security in a matter of minutes. Its easy...you will have a secure wireless connection in slide switch to 5 times further z Features iQoS for purchasing the Edimax BR‐6475nD Wireless Dual‐Band Gigabit iQ Router! CHAPTER I: PRODUCT INFORMATION 1‐1 Introduction and Safety Information Thank you for quick and easy bandwidth management z ...
... system, four gigabit LAN ports, and concurrent dual‐band (2.4GHz and 5GHz) functionality. With the Edimax BR‐6475nD Wireless Dual‐Band Gigabit iQ Router, all your computers and network devices can set up wireless security in a matter of minutes. Its easy...you will have a secure wireless connection in slide switch to 5 times further z Features iQoS for purchasing the Edimax BR‐6475nD Wireless Dual‐Band Gigabit iQ Router! CHAPTER I: PRODUCT INFORMATION 1‐1 Introduction and Safety Information Thank you for quick and easy bandwidth management z ...

User Manual
Page 7
... in the sun. 3. Please contact your safety: 1. Disconnect any problems. 8. If you experience any connected cables from the router before pulling the router with your dealer for help . 9. 1‐2 Safety Information Please follow the following safety instructions to ensure your dealer if you... want to hang this router and its accessories out of the reach of children. 6. Edimax's warranty does not cover damages caused by misuse. 5. Please keep this router on paper, cloth, or other flammable materials. 7. This...
... in the sun. 3. Please contact your safety: 1. Disconnect any problems. 8. If you experience any connected cables from the router before pulling the router with your dealer for help . 9. 1‐2 Safety Information Please follow the following safety instructions to ensure your dealer if you... want to hang this router and its accessories out of the reach of children. 6. Edimax's warranty does not cover damages caused by misuse. 5. Please keep this router on paper, cloth, or other flammable materials. 7. This...

User Manual
Page 8
... check if there is anything missing in the package, and contact your dealer to claim the missing item(s): z Edimax BR‐6475nD Wireless Dual‐Band Gigabit iQ Router (1 pcs) z Quick installation guide (1 pcs) z 3dBi detachable antenna (2 pcs) z CD with multi‐language setup wizard, multi‐language quick installation guide, and user manual...
... check if there is anything missing in the package, and contact your dealer to claim the missing item(s): z Edimax BR‐6475nD Wireless Dual‐Band Gigabit iQ Router (1 pcs) z Quick installation guide (1 pcs) z 3dBi detachable antenna (2 pcs) z CD with multi‐language setup wizard, multi‐language quick installation guide, and user manual...

User Manual
Page 9
1‐5 Getting familiar with your new wireless broadband router Front Panel LED Name Light Status Description PWR On Router switched on and correctly powered Off 2.4GHz On Router not powered or not correctly powered 2.4GHz wireless connectivity activated Off 2.4GHz wireless connectivity not activated 5GHz LAN LINK...OFF Switch WPS/Reset Button Description Connects to the supplied 3dBi detachable antennas Switches the wireless signal on and off Resets the router to factory default settings or starts WPS function (press this button and hold for 20 seconds to clear all settings or press...
1‐5 Getting familiar with your new wireless broadband router Front Panel LED Name Light Status Description PWR On Router switched on and correctly powered Off 2.4GHz On Router not powered or not correctly powered 2.4GHz wireless connectivity activated Off 2.4GHz wireless connectivity not activated 5GHz LAN LINK...OFF Switch WPS/Reset Button Description Connects to the supplied 3dBi detachable antennas Switches the wireless signal on and off Resets the router to factory default settings or starts WPS function (press this button and hold for 20 seconds to clear all settings or press...

User Manual
Page 11
Connect the power adapter to the wall socket, and then connect it to build a network connection between your new broadband router, computers, and other network devices: 1. CHAPTER II: SYSTEM AND NETWORK SETUP 2‐1 Establishing a network connection Please follow the following instructions to the "12V" socket on the back panel of the router's "LAN" ports with an Ethernet cable. 2. Connect your computer to the router's "WAN" port with an Ethernet cable. 3. Connect your xDSL or cable modem to one of the router. 10
Connect the power adapter to the wall socket, and then connect it to build a network connection between your new broadband router, computers, and other network devices: 1. CHAPTER II: SYSTEM AND NETWORK SETUP 2‐1 Establishing a network connection Please follow the following instructions to the "12V" socket on the back panel of the router's "LAN" ports with an Ethernet cable. 2. Connect your computer to the router's "WAN" port with an Ethernet cable. 3. Connect your xDSL or cable modem to one of the router. 10

User Manual
Page 22
... bar and press "Enter". 2. Please input "192.168.2.1" in the "Password" field. Click the "OK" button to broadband router via web browser You can access the broadband router's web‐based configuration interface via any connected computer with a web browser (Internet Explorer 5.x or above, Firefox, Opera, or ... to enter the web configuration interface. 21 You should see the following authentication window: NOTE: If you cannot access the broadband router's web‐based configuration interface, the IP address you have inputted may be incorrect. If you have previously changed the...
... bar and press "Enter". 2. Please input "192.168.2.1" in the "Password" field. Click the "OK" button to broadband router via web browser You can access the broadband router's web‐based configuration interface via any connected computer with a web browser (Internet Explorer 5.x or above, Firefox, Opera, or ... to enter the web configuration interface. 21 You should see the following authentication window: NOTE: If you cannot access the broadband router's web‐based configuration interface, the IP address you have inputted may be incorrect. If you have previously changed the...

User Manual
Page 23
... Connection IP Address Mode IP Address Subnet Mask Default Gateway MAC Address Primary DNS Secondary DNS Displays how this broadband router currently obtains IP addresses Displays the IP address of the WAN connection Displays the subnet mask of the WAN connection Displays... Wireless Configuration Mode Displays the operation mode of time this router has been switched on Hardware Version Displays this broadband router's hardware version (useful when you need technical service) Boot Code Displays this broadband router's boot code version (useful Version when you need technical service...
... Connection IP Address Mode IP Address Subnet Mask Default Gateway MAC Address Primary DNS Secondary DNS Displays how this broadband router currently obtains IP addresses Displays the IP address of the WAN connection Displays the subnet mask of the WAN connection Displays... Wireless Configuration Mode Displays the operation mode of time this router has been switched on Hardware Version Displays this broadband router's hardware version (useful when you need technical service) Boot Code Displays this broadband router's boot code version (useful Version when you need technical service...

User Manual
Page 25
Click the "Start" button, then click "Run". 2. If this router's DHCP server function is enabled, please follow the following instructions to find this router's IP address: 1. Input "cmd", and then click "OK". 24
Click the "Start" button, then click "Run". 2. If this router's DHCP server function is enabled, please follow the following instructions to find this router's IP address: 1. Input "cmd", and then click "OK". 24

User Manual
Page 26
..." to the beginning of this chapter and recheck every step of the above fails, reset the broadband router. 25 3. Use the IP address following procedures: z Recheck the cable connection between the computer and the router. z Go to access this illustrated example. Please note that the IP address you find may be different...
..." to the beginning of this chapter and recheck every step of the above fails, reset the broadband router. 25 3. Use the IP address following procedures: z Recheck the cable connection between the computer and the router. z Go to access this illustrated example. Please note that the IP address you find may be different...


