
Quick Install Guide
Page 3
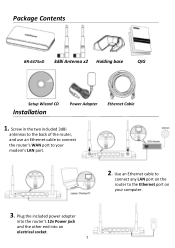
Package Contents BR-6475nD 3dBi Antenna x2 Holding base QIG x2 x2 Setup Wizard CD Installation Power Adapter Ethernet Cable 1. Screw in the two included 3dBi antennas to the back of the router, and use an Ethernet cable to connect the router's WAN port to the Ethernet port on the router to your computer. 3. Use an Ethernet cable to connect any LAN port on your modem's LAN port. 2. Plug the included power adapter into the router's 12v Power jack and the other end into an electrical socket. 2
Package Contents BR-6475nD 3dBi Antenna x2 Holding base QIG x2 x2 Setup Wizard CD Installation Power Adapter Ethernet Cable 1. Screw in the two included 3dBi antennas to the back of the router, and use an Ethernet cable to connect the router's WAN port to the Ethernet port on the router to your computer. 3. Use an Ethernet cable to connect any LAN port on your modem's LAN port. 2. Plug the included power adapter into the router's 12v Power jack and the other end into an electrical socket. 2

Quick Install Guide
Page 5
... "Ok". not the password to connect to change this case "BR-6475nD". 10. Enter the default password 1234 in this password, please make a note of 1234 by resetting the router back to configure the settings - If you forget, you can reset the password back to its default value of the new password. Select your router to factory defaults, see Troubleshooting. 4 Note: This is the password to login to your product type - 8. in the...
... "Ok". not the password to connect to change this case "BR-6475nD". 10. Enter the default password 1234 in this password, please make a note of 1234 by resetting the router back to configure the settings - If you forget, you can reset the password back to its default value of the new password. Select your router to factory defaults, see Troubleshooting. 4 Note: This is the password to login to your product type - 8. in the...
Quick Install Guide
Page 10
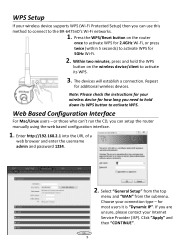
... for 5GHz Wi-Fi. 2. WPS Setup If your wireless device supports WPS (Wi-Fi Protected Setup) then you can setup the router manually using the web based configuration interface. 1. Repeat for most users it is "Dynamic IP". Web Based Configuration Interface For Mac/Linux users - Enter http://192.168.2.1 into the URL of a web browser and enter the username admin and password 1234. 2. If you are unsure, please contact your Internet Service Provider (ISP).
... for 5GHz Wi-Fi. 2. WPS Setup If your wireless device supports WPS (Wi-Fi Protected Setup) then you can setup the router manually using the web based configuration interface. 1. Repeat for most users it is "Dynamic IP". Web Based Configuration Interface For Mac/Linux users - Enter http://192.168.2.1 into the URL of a web browser and enter the username admin and password 1234. 2. If you are unsure, please contact your Internet Service Provider (ISP).

Quick Install Guide
Page 12
... configuring "Security Settings" for the "5GHz" network, click "APPLY" instead of "CONTINUE". To connect to the BR-6475nD's wireless networks, please refer to access the internet and check your wireless device supports WPS, you can use the WPS button (see previous section). 11 which will restart and save the changes, click "OK" when it has finished. 8. The system will be the password to access the BR-6475nD's 5GHz Wi-Fi network - Exit the web based configuration interface...
... configuring "Security Settings" for the "5GHz" network, click "APPLY" instead of "CONTINUE". To connect to the BR-6475nD's wireless networks, please refer to access the internet and check your wireless device supports WPS, you can use the WPS button (see previous section). 11 which will restart and save the changes, click "OK" when it has finished. 8. The system will be the password to access the BR-6475nD's 5GHz Wi-Fi network - Exit the web based configuration interface...
Quick Install Guide
Page 13
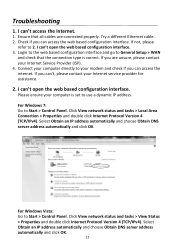
... connection type is set to your Internet Service Provider (ISP). 4. Click View network status and tasks > Local Area Connection > Properties and double click Internet Protocol Version 4 (TCP/IPv4). Login to the web based configuration interface and go to Start > Control Panel. Try a different Ethernet cable. 2. Check if you are connected properly. For Windows Vista: Go to General Setup > WAN and check that all cables are unsure, please contact your modem and check if you can access the internet. Troubleshooting 1. If you can 't access the Internet...
... connection type is set to your Internet Service Provider (ISP). 4. Click View network status and tasks > Local Area Connection > Properties and double click Internet Protocol Version 4 (TCP/IPv4). Login to the web based configuration interface and go to Start > Control Panel. Try a different Ethernet cable. 2. Check if you are connected properly. For Windows Vista: Go to General Setup > WAN and check that all cables are unsure, please contact your modem and check if you can access the internet. Troubleshooting 1. If you can 't access the Internet...

Quick Install Guide
Page 14
... Obtain DNS server address automatically and click OK. 3. When the router restarts, all settings will be reset. 4. Reset the router to flash. To reset the router back to its factory default settings, press and hold the WPS/Reset button for over 10 seconds, until the power LED begins to its factory default settings and use the default username admin and default password 1234. 13 How do I forgot my password. I reset my router to Start > Control Panel. Click Network and Internet Connections > Network Connections. For Windows XP/2000: Go to factory default settings?
... Obtain DNS server address automatically and click OK. 3. When the router restarts, all settings will be reset. 4. Reset the router to flash. To reset the router back to its factory default settings, press and hold the WPS/Reset button for over 10 seconds, until the power LED begins to its factory default settings and use the default username admin and default password 1234. 13 How do I forgot my password. I reset my router to Start > Control Panel. Click Network and Internet Connections > Network Connections. For Windows XP/2000: Go to factory default settings?

Quick Install Guide
Page 15
... therefore be allowed at all times to which can be determined by turning the equipment off and on the side near the center, as PDAs or lap pads is restricted for use with the specific antenna tested in the application for an uncontrolled environment. EU Countries Intended for Use The ETSI version of March 9, 1999 on a circuit...
... therefore be allowed at all times to which can be determined by turning the equipment off and on the side near the center, as PDAs or lap pads is restricted for use with the specific antenna tested in the application for an uncontrolled environment. EU Countries Intended for Use The ETSI version of March 9, 1999 on a circuit...

User Manual
Page 3
...;5 Getting familiar with your new wireless broadband router 8 CHAPTER II: SYSTEM AND NETWORK SETUP 10 2‐1 Establishing a network connection...10 2‐2 Setting client computers to obtain IP addresses automatically 12 2‐2‐1 Windows 95/98/Me IP address setup 13 2‐2‐2 Windows 2000 IP address setup 15 2‐2‐3 Windows XP IP address setup 17 2‐2‐4 Windows Vista IP address setup 19 2‐3 Connecting to broadband router via web browser 21 2‐4 Using "Quick Setup"...26...
...;5 Getting familiar with your new wireless broadband router 8 CHAPTER II: SYSTEM AND NETWORK SETUP 10 2‐1 Establishing a network connection...10 2‐2 Setting client computers to obtain IP addresses automatically 12 2‐2‐1 Windows 95/98/Me IP address setup 13 2‐2‐2 Windows 2000 IP address setup 15 2‐2‐3 Windows XP IP address setup 17 2‐2‐4 Windows Vista IP address setup 19 2‐3 Connecting to broadband router via web browser 21 2‐4 Using "Quick Setup"...26...

User Manual
Page 6
...;Band Gigabit iQ Router, all your computers and network devices can be connected to this broadband router without additional cabling. The Edimax BR‐6475nD Wireless Dual‐Band Gigabit iQ Router makes setting up a network environment in no time. CHAPTER I: PRODUCT INFORMATION 1‐1 Introduction and Safety Information Thank you for quick and easy bandwidth management z Built‐in slide switch to enable/disable wireless signal 5 With the WPS (Wi‐Fi Protected Setup...
...;Band Gigabit iQ Router, all your computers and network devices can be connected to this broadband router without additional cabling. The Edimax BR‐6475nD Wireless Dual‐Band Gigabit iQ Router makes setting up a network environment in no time. CHAPTER I: PRODUCT INFORMATION 1‐1 Introduction and Safety Information Thank you for quick and easy bandwidth management z Built‐in slide switch to enable/disable wireless signal 5 With the WPS (Wi‐Fi Protected Setup...

User Manual
Page 9
... connected LAN activity (transferring data) Gigabit LAN connectivity activated Gigabit LAN connectivity not activated WAN port connected WAN port not connected WAN activity (transferring data) WAN On 1000M Off Gigabit WAN connectivity activated Gigabit WAN connectivity not activated Back Panel Item Name Antenna Connectors Wireless Signal ON/OFF Switch WPS/Reset Button Description Connects to the supplied 3dBi detachable antennas Switches the wireless signal on and off Resets the router to factory default settings or starts WPS function (press this button and hold for 20 seconds to clear...
... connected LAN activity (transferring data) Gigabit LAN connectivity activated Gigabit LAN connectivity not activated WAN port connected WAN port not connected WAN activity (transferring data) WAN On 1000M Off Gigabit WAN connectivity activated Gigabit WAN connectivity not activated Back Panel Item Name Antenna Connectors Wireless Signal ON/OFF Switch WPS/Reset Button Description Connects to the supplied 3dBi detachable antennas Switches the wireless signal on and off Resets the router to factory default settings or starts WPS function (press this button and hold for 20 seconds to clear...

User Manual
Page 11
CHAPTER II: SYSTEM AND NETWORK SETUP 2‐1 Establishing a network connection Please follow the following instructions to build a network connection between your computer to one of the router. 10 Connect the power adapter to the wall socket, and then connect it to the router's "WAN" port with an Ethernet cable. 3. Connect your xDSL or cable modem to the "12V" socket on the back panel of the router's "LAN" ports with an Ethernet cable. 2. Connect your new broadband router, computers, and other network devices: 1.
CHAPTER II: SYSTEM AND NETWORK SETUP 2‐1 Establishing a network connection Please follow the following instructions to build a network connection between your computer to one of the router. 10 Connect the power adapter to the wall socket, and then connect it to the router's "WAN" port with an Ethernet cable. 3. Connect your xDSL or cable modem to the "12V" socket on the back panel of the router's "LAN" ports with an Ethernet cable. 2. Connect your new broadband router, computers, and other network devices: 1.

User Manual
Page 23
... broadband router's boot code version (useful Version when you need technical service) Runtime Code Displays this broadband router currently obtains IP addresses Displays the IP address of the WAN connection Displays the subnet mask of the WAN connection Displays the IP address of the WAN connection's default gateway Displays the physical address of the WAN port Displays the IP address of the first DNS server Displays the IP address of the second (backup) DNS server Wireless Configuration Mode Displays the operation mode of the wireless access point...
... broadband router's boot code version (useful Version when you need technical service) Runtime Code Displays this broadband router currently obtains IP addresses Displays the IP address of the WAN connection Displays the subnet mask of the WAN connection Displays the IP address of the WAN connection's default gateway Displays the physical address of the WAN port Displays the IP address of the first DNS server Displays the IP address of the second (backup) DNS server Wireless Configuration Mode Displays the operation mode of the wireless access point...

User Manual
Page 34
... Gateway Connection ID MTU BEZEQ‐ISRAEL Connection Type Description Input the user name assigned by your network connection here. Input the password assigned by your ISP requires you are in Israel and using BEZEQ network services. "Connect on Demand" only connects to the Internet only when the "Connect" button on this connection a name (optional). Enter the primary and secondary DNS addresses assigned by your ISP here. Configure the "PPTP Settings" section. "Manual" connects...
... Gateway Connection ID MTU BEZEQ‐ISRAEL Connection Type Description Input the user name assigned by your network connection here. Input the password assigned by your ISP requires you are in Israel and using BEZEQ network services. "Connect on Demand" only connects to the Internet only when the "Connect" button on this connection a name (optional). Enter the primary and secondary DNS addresses assigned by your ISP here. Configure the "PPTP Settings" section. "Manual" connects...

User Manual
Page 37
..." is clicked. Access you are 3 options: Idle Time Out 1. Item Name User ID Password L2TP Gateway MTU Connection Type Description Input the user name assigned by your Internet service provider if you to the Internet only when the "Connect" button on Demand" only connects to your network connection here. "Connect on this page is clicked, and disconnects when the "Disconnect" button is selected. 4. NOTE: These settings must be configured according to...
..." is clicked. Access you are 3 options: Idle Time Out 1. Item Name User ID Password L2TP Gateway MTU Connection Type Description Input the user name assigned by your Internet service provider if you to the Internet only when the "Connect" button on Demand" only connects to your network connection here. "Connect on this page is clicked, and disconnects when the "Disconnect" button is selected. 4. NOTE: These settings must be configured according to...

User Manual
Page 39
2‐4‐6 Using "WISP" as broadband connection type 1. If your Internet service provider's requirements. Click "OK" to establish a connection. Item Name WISP ESSID Wireless Band Channel Number Site Survey Security Description Enable or disable the WISP function. Select a wireless access point from the list, and click "Done" to complete setup. 38 Clicking "Refresh" will appear. Input the name of your Internet service provider's wireless access point. Set the wireless frequency range in the window. Configure the security settings in accordance...
2‐4‐6 Using "WISP" as broadband connection type 1. If your Internet service provider's requirements. Click "OK" to establish a connection. Item Name WISP ESSID Wireless Band Channel Number Site Survey Security Description Enable or disable the WISP function. Select a wireless access point from the list, and click "Done" to complete setup. 38 Clicking "Refresh" will appear. Input the name of your Internet service provider's wireless access point. Set the wireless frequency range in the window. Configure the security settings in accordance...

User Manual
Page 46
... broadband router. If your country or region. Click "Apply" to save the changes. Click "Continue" to restart. Input the host name or IP address of your country/region uses daylight saving time, please check the "Enable Function" box, and select the start and end date. Item Name Set Time Zone Time Server Address Daylight Saving Description Please select the time zone of the NTP server here...
... broadband router. If your country or region. Click "Apply" to save the changes. Click "Continue" to restart. Input the host name or IP address of your country/region uses daylight saving time, please check the "Enable Function" box, and select the start and end date. Item Name Set Time Zone Time Server Address Daylight Saving Description Please select the time zone of the NTP server here...

User Manual
Page 47
..." to restart. It takes about 60 seconds for confirmation. 3‐1‐2 Password Settings You can change the router's default login password ("1234") here. Item Name Current Password New Password Confirm Password Description Input the current password here. The default value is advised to do so to prevent others from logging in to save the changes and restart the broadband router. Click "Continue" to configure other settings. 46
..." to restart. It takes about 60 seconds for confirmation. 3‐1‐2 Password Settings You can change the router's default login password ("1234") here. Item Name Current Password New Password Confirm Password Description Input the current password here. The default value is advised to do so to prevent others from logging in to save the changes and restart the broadband router. Click "Continue" to configure other settings. 46

User Manual
Page 55
DNS Address DNS Address 1 and 2 Enable Dual‐WAN Access Select "Use the following IP address" if your ISP requires that you to do so. Enter the primary and secondary DNS addresses assigned by your ISP here. Input the MTU value of your Internet service. There are in Israel and using BEZEQ network services. Item Name User ID Password PPTP Gateway Connection ID MTU BEZEQ‐ISRAEL Connection Type Description Input the user name assigned by...
DNS Address DNS Address 1 and 2 Enable Dual‐WAN Access Select "Use the following IP address" if your ISP requires that you to do so. Enter the primary and secondary DNS addresses assigned by your ISP here. Input the MTU value of your Internet service. There are in Israel and using BEZEQ network services. Item Name User ID Password PPTP Gateway Connection ID MTU BEZEQ‐ISRAEL Connection Type Description Input the user name assigned by...

User Manual
Page 58
.... Configure the "L2TP Settings" section. Item Name User ID Password L2TP Gateway MTU Connection Type Description Input the user name assigned by your Internet service provider if you are 3 options: Idle Time Out 1. Input the MTU value of time the router waits before shutting down an idle connection. There are not sure what to select. "Manual" connects to the Internet only when the "Connect" button on Demand" only connects to the Internet when...
.... Configure the "L2TP Settings" section. Item Name User ID Password L2TP Gateway MTU Connection Type Description Input the user name assigned by your Internet service provider if you are 3 options: Idle Time Out 1. Input the MTU value of time the router waits before shutting down an idle connection. There are not sure what to select. "Manual" connects to the Internet only when the "Connect" button on Demand" only connects to the Internet when...

User Manual
Page 110
... the protocol type here (TCP or UDP). if multiple ports are involved, input starting / ending port number in the QoS table. If you're creating a QoS rule for a specific type of traffic, you can delete all values you 'll see the following messages: Please click 'Apply' to 65535); If the QoS table is normal 109 After you click 'Apply' button, you just entered. Click 'add' button to input port range above...
... the protocol type here (TCP or UDP). if multiple ports are involved, input starting / ending port number in the QoS table. If you're creating a QoS rule for a specific type of traffic, you can delete all values you 'll see the following messages: Please click 'Apply' to 65535); If the QoS table is normal 109 After you click 'Apply' button, you just entered. Click 'add' button to input port range above...


