Datasheet
Page 1
... with IEEE 802.11b/g/n standards. Wireless 802.11n Standard (data rates up the router within minutes. WPS (Wi-Fi Protected Setup) Button The EDIMAX BR-6428nS has a one-click WPS (Wi-Fi Protected Setup) button to help you to set up to 253 wired or wireless clients to other non-green 300Mbps routers. Product specifications...
... with IEEE 802.11b/g/n standards. Wireless 802.11n Standard (data rates up the router within minutes. WPS (Wi-Fi Protected Setup) Button The EDIMAX BR-6428nS has a one-click WPS (Wi-Fi Protected Setup) button to help you to set up to 253 wired or wireless clients to other non-green 300Mbps routers. Product specifications...
Datasheet
Page 2
Copyright © 2012 Edimax Technology Co. www.edimax.com 300Mbps Wireless Broadband Router FEATURES & TECHNICAL SPECIFICATIONS BR-6428nS FUNCTIONS HARDWARE INTERFACE Supports AP, AP Client, Bridge, Bridge+WDS 1 x RJ-45 WAN port and Universal Repeater modes 4 x RJ-45 Fast ...11n (40MHz): -68dBm, 11n (20MHz): -71dBm, 11g: -74dBm, 11b: -87dBm MEMORY 4 MB NOR Flash 16 MB SDRAM INSTALLATION KIT Multi-language EZMax Setup Wizard HUMIDITY & TEMPERATURE 10-90% (Non-condensing) 0~45oC POWER ADAPTER DIMENSIONS CERTIFICATIONS DC 5V, 1A 134(W) x 88(D) x 26 (H) mm CE, FCC NETWORK...
Copyright © 2012 Edimax Technology Co. www.edimax.com 300Mbps Wireless Broadband Router FEATURES & TECHNICAL SPECIFICATIONS BR-6428nS FUNCTIONS HARDWARE INTERFACE Supports AP, AP Client, Bridge, Bridge+WDS 1 x RJ-45 WAN port and Universal Repeater modes 4 x RJ-45 Fast ...11n (40MHz): -68dBm, 11n (20MHz): -71dBm, 11g: -74dBm, 11b: -87dBm MEMORY 4 MB NOR Flash 16 MB SDRAM INSTALLATION KIT Multi-language EZMax Setup Wizard HUMIDITY & TEMPERATURE 10-90% (Non-condensing) 0~45oC POWER ADAPTER DIMENSIONS CERTIFICATIONS DC 5V, 1A 134(W) x 88(D) x 26 (H) mm CE, FCC NETWORK...
User Manual
Page 2
... this product can be reproduced, transmitted, transcribed, stored in a retrieval system, or translated into any language or computer language, in Edimax products are distributed without the obligation to the GNU General Public License (GPL) or GNU Lesser General Public License (LGPL). All brand... or licensed as is. Edimax Technology Co., Ltd. No part of each license. Any software described in the software. Edimax Technology Co., Ltd. The product you have purchased and the setup screen may be found under the "Download" page at the Edimax website (www.edimax.com). 1 The firmware ...
... this product can be reproduced, transmitted, transcribed, stored in a retrieval system, or translated into any language or computer language, in Edimax products are distributed without the obligation to the GNU General Public License (GPL) or GNU Lesser General Public License (LGPL). All brand... or licensed as is. Edimax Technology Co., Ltd. No part of each license. Any software described in the software. Edimax Technology Co., Ltd. The product you have purchased and the setup screen may be found under the "Download" page at the Edimax website (www.edimax.com). 1 The firmware ...

User Manual
Page 3
... Safety Information 4 1‐2 Safety Information ...5 1‐3 System Requirements ...6 1‐4 Package Contents ...6 1‐5 Getting familiar with your new wireless broadband router 7 CHAPTER II: SYSTEM AND NETWORK SETUP ...9 2‐1 Establishing a network connection...9 2‐2 Setting client computers to obtain IP addresses automatically 11 2‐2‐1 Windows 95/98/Me IP address...
... Safety Information 4 1‐2 Safety Information ...5 1‐3 System Requirements ...6 1‐4 Package Contents ...6 1‐5 Getting familiar with your new wireless broadband router 7 CHAPTER II: SYSTEM AND NETWORK SETUP ...9 2‐1 Establishing a network connection...9 2‐2 Setting client computers to obtain IP addresses automatically 11 2‐2‐1 Windows 95/98/Me IP address...
User Manual
Page 5
... the Edimax BR‐6428nS Wireless Broadband Router! With the Edimax BR‐6428nS Wireless Broadband Router, all your computers and network devices can transfer files at a very affordable price. The Edimax BR‐6428nS Wireless ...Broadband Router makes setting up a network environment in no time. Other features: z High throughput Internet access z Supports up to 253 users z 4 LAN ports (10/100M) and 1 WAN port (10/100M) z IEEE 802.11b/g/n WLAN capable z Supports WISP mode z Supports DHCP (server/client) for easy client IP‐address setup...
... the Edimax BR‐6428nS Wireless Broadband Router! With the Edimax BR‐6428nS Wireless Broadband Router, all your computers and network devices can transfer files at a very affordable price. The Edimax BR‐6428nS Wireless ...Broadband Router makes setting up a network environment in no time. Other features: z High throughput Internet access z Supports up to 253 users z 4 LAN ports (10/100M) and 1 WAN port (10/100M) z IEEE 802.11b/g/n WLAN capable z Supports WISP mode z Supports DHCP (server/client) for easy client IP‐address setup...
User Manual
Page 7
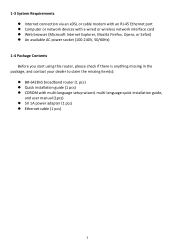
..., please check if there is anything missing in the package, and contact your dealer to claim the missing item(s): z BR‐6428nS broadband router (1 pcs) z Quick installation guide (1 pcs) z CDROM with multi‐language setup wizard, multi‐language quick installation guide, and user manual (1pcs) z 5V 1A power adapter (1 pcs) z Ethernet cable...
..., please check if there is anything missing in the package, and contact your dealer to claim the missing item(s): z BR‐6428nS broadband router (1 pcs) z Quick installation guide (1 pcs) z CDROM with multi‐language setup wizard, multi‐language quick installation guide, and user manual (1pcs) z 5V 1A power adapter (1 pcs) z Ethernet cable...
User Manual
Page 10
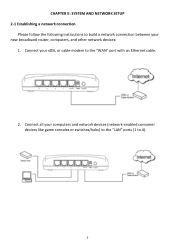
CHAPTER II: SYSTEM AND NETWORK SETUP 2‐1 Establishing a network connection Please follow the following instructions to build a network connection between your computers and network devices (network‐enabled consumer devices like game consoles or switches/hubs) to the "LAN" ports (1 to the "WAN" port with an Ethernet cable. 2. Connect all your new broadband router, computers, and other network devices: 1. Connect your xDSL or cable modem to 4). 9
CHAPTER II: SYSTEM AND NETWORK SETUP 2‐1 Establishing a network connection Please follow the following instructions to build a network connection between your computers and network devices (network‐enabled consumer devices like game consoles or switches/hubs) to the "LAN" ports (1 to the "WAN" port with an Ethernet cable. 2. Connect all your new broadband router, computers, and other network devices: 1. Connect your xDSL or cable modem to 4). 9
User Manual
Page 13
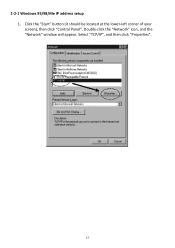
Double‐click the "Network" icon, and the "Network" window will appear. Select "TCP/IP", and then click "Properties". 12 Click the "Start" button (it should be located at the lower‐left corner of your screen), then click "Control Panel". 2‐2‐1 Windows 95/98/Me IP address setup 1.
Double‐click the "Network" icon, and the "Network" window will appear. Select "TCP/IP", and then click "Properties". 12 Click the "Start" button (it should be located at the lower‐left corner of your screen), then click "Control Panel". 2‐2‐1 Windows 95/98/Me IP address setup 1.
User Manual
Page 15
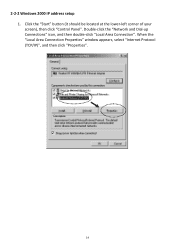
Click the "Start" button (it should be located at the lower‐left corner of your screen), then click "Control Panel". When the "Local Area Connection Properties" window appears, select "Internet Protocol (TCP/IP)", and then click "Properties". 14 Double‐click the "Network and Dial‐up Connections" icon, and then double‐click "Local Area Connection". 2‐2‐2 Windows 2000 IP address setup 1.
Click the "Start" button (it should be located at the lower‐left corner of your screen), then click "Control Panel". When the "Local Area Connection Properties" window appears, select "Internet Protocol (TCP/IP)", and then click "Properties". 14 Double‐click the "Network and Dial‐up Connections" icon, and then double‐click "Local Area Connection". 2‐2‐2 Windows 2000 IP address setup 1.
User Manual
Page 17
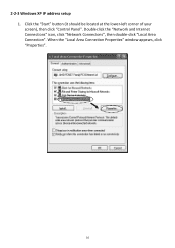
Click the "Start" button (it should be located at the lower‐left corner of your screen), then click "Control Panel". Double‐click the "Network and Internet Connections" icon, click "Network Connections", then double‐click "Local Area Connection". When the "Local Area Connection Properties" window appears, click "Properties". 16 2‐2‐3 Windows XP IP address setup 1.
Click the "Start" button (it should be located at the lower‐left corner of your screen), then click "Control Panel". Double‐click the "Network and Internet Connections" icon, click "Network Connections", then double‐click "Local Area Connection". When the "Local Area Connection Properties" window appears, click "Properties". 16 2‐2‐3 Windows XP IP address setup 1.
User Manual
Page 19
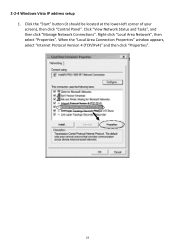
Click "View Network Status and Tasks", and then click "Manage Network Connections". When the "Local Area Connection Properties" window appears, select "Internet Protocol Version 4 (TCP/IPv4)" and then click "Properties". 18 Right‐click "Local Area Network", then select "Properties". Click the "Start" button (it should be located at the lower‐left corner of your screen), then click "Control Panel". 2‐2‐4 Windows Vista IP address setup 1.
Click "View Network Status and Tasks", and then click "Manage Network Connections". When the "Local Area Connection Properties" window appears, select "Internet Protocol Version 4 (TCP/IPv4)" and then click "Properties". 18 Right‐click "Local Area Network", then select "Properties". Click the "Start" button (it should be located at the lower‐left corner of your screen), then click "Control Panel". 2‐2‐4 Windows Vista IP address setup 1.
User Manual
Page 21
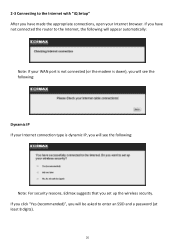
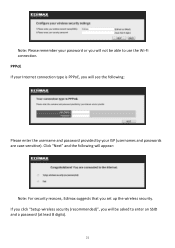
... will appear automatically: Note: If your WAN port is not connected (or the modem is down), you will see the following : Note: For security reasons, Edimax suggests that you set up the wireless security. If you have made the appropriate connections, open your Internet connection type is dynamic IP, you will... see the following : Dynamic IP If your Internet browser. 2‐3 Connecting to the Internet with "iQ Setup" After you have not connected the router to enter an SSID and a password (at least 8 digits). 20
... will appear automatically: Note: If your WAN port is not connected (or the modem is down), you will see the following : Note: For security reasons, Edimax suggests that you set up the wireless security. If you have made the appropriate connections, open your Internet connection type is dynamic IP, you will... see the following : Dynamic IP If your Internet browser. 2‐3 Connecting to the Internet with "iQ Setup" After you have not connected the router to enter an SSID and a password (at least 8 digits). 20
User Manual
Page 22
Note: Please remember your password or you will be able to enter an SSID and a password (at least 8 digits). 21 If you click "Setup wireless security (recommended)", you set up the wireless security. PPPoE If your ISP (usernames and passwords are case‐sensitive). Click "Next" and the following will see the following: Please enter the username and password provided by your Internet connection type is PPPoE, you will appear: Note: For security reasons, Edimax suggests that you will not be asked to use the Wi‐Fi connection.
Note: Please remember your password or you will be able to enter an SSID and a password (at least 8 digits). 21 If you click "Setup wireless security (recommended)", you set up the wireless security. PPPoE If your ISP (usernames and passwords are case‐sensitive). Click "Next" and the following will see the following: Please enter the username and password provided by your Internet connection type is PPPoE, you will appear: Note: For security reasons, Edimax suggests that you will not be asked to use the Wi‐Fi connection.
User Manual
Page 26
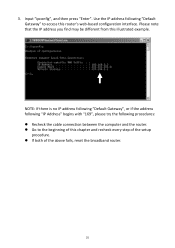
... IP address you find may be different from this router's web‐based configuration interface. z Go to access this illustrated example. z If both of the setup procedure. Use the IP address following procedures: z Recheck the cable connection between the computer and the router. NOTE: If there is no IP address following...
... IP address you find may be different from this router's web‐based configuration interface. z Go to access this illustrated example. z If both of the setup procedure. Use the IP address following procedures: z Recheck the cable connection between the computer and the router. NOTE: If there is no IP address following...
User Manual
Page 27
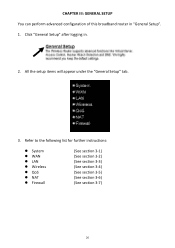
All the setup items will appear under the "General Setup" tab. 3. Click "General Setup" after logging in "General Setup". 1. CHAPTER III: GENERAL SETUP You can perform advanced configuration of this broadband router in . 2. Refer to the following list for further instructions: z System z WAN z LAN z Wireless z QoS z NAT z Firewall (See section 3‐1) (See section 3‐2) (See section 3‐3) (See section 3‐4) (See section 3‐5) (See section 3‐6) (See section 3‐7) 26
All the setup items will appear under the "General Setup" tab. 3. Click "General Setup" after logging in "General Setup". 1. CHAPTER III: GENERAL SETUP You can perform advanced configuration of this broadband router in . 2. Refer to the following list for further instructions: z System z WAN z LAN z Wireless z QoS z NAT z Firewall (See section 3‐1) (See section 3‐2) (See section 3‐3) (See section 3‐4) (See section 3‐5) (See section 3‐6) (See section 3‐7) 26
User Manual
Page 28
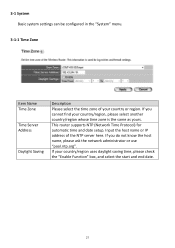
... the host name, please ask the network administrator or use "pool.ntp.org". This router supports NTP (Network Time Protocol) for automatic time and date setup.
... the host name, please ask the network administrator or use "pool.ntp.org". This router supports NTP (Network Time Protocol) for automatic time and date setup.
User Manual
Page 30
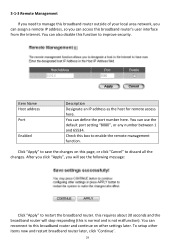
... outside of your local area network, you can assign a remote IP address, so you can also disable this function to discard all the changes. To setup other settings later. Check this box to restart the broadband router. Item Name Host address Port Enabled Description Designate an IP address as the host...
... outside of your local area network, you can assign a remote IP address, so you can also disable this function to discard all the changes. To setup other settings later. Check this box to restart the broadband router. Item Name Host address Port Enabled Description Designate an IP address as the host...
User Manual
Page 31
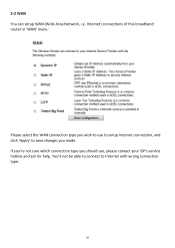
You'll not be able to connect to save changes you made. If you're not sure which connection type you wish to use , please contact your ISP's service hotline and ask for help. 3‐2 WAN You can setup WAN (Wide Area Network, i.e. Internet) connections of this broadband router in 'WAN' menu: Please select the WAN connection type you should use to setup Internet connection, and click 'Apply' to Internet with wrong connection type. 30
You'll not be able to connect to save changes you made. If you're not sure which connection type you wish to use , please contact your ISP's service hotline and ask for help. 3‐2 WAN You can setup WAN (Wide Area Network, i.e. Internet) connections of this broadband router in 'WAN' menu: Please select the WAN connection type you should use to setup Internet connection, and click 'Apply' to Internet with wrong connection type. 30
User Manual
Page 32
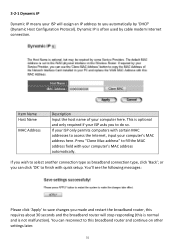
... click 'Apply' to this broadband router and continue on other settings later. 31 Press "Clone Mac address" to fill the MAC address field with quick setup. Dynamic IP is optional and only required if your ISP will stop responding (this requires about 30 seconds and the broadband router will assign an...
... click 'Apply' to this broadband router and continue on other settings later. 31 Press "Clone Mac address" to fill the MAC address field with quick setup. Dynamic IP is optional and only required if your ISP will stop responding (this requires about 30 seconds and the broadband router will assign an...
User Manual
Page 33
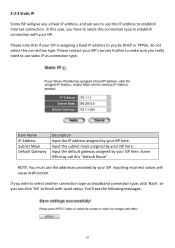
... IP address to you have to select another connection type as connection type. Some ISPs may call this IP address to establish connection with quick setup. You'll see the following messages: 32 Item Name IP Address Subnet Mask Default Gateway Description Input the IP address assigned by DHCP or PPPoE...
... IP address to you have to select another connection type as connection type. Some ISPs may call this IP address to establish connection with quick setup. You'll see the following messages: 32 Item Name IP Address Subnet Mask Default Gateway Description Input the IP address assigned by DHCP or PPPoE...
