
User Manual
Page 2
... 32" LED-LCD TV Contents CHILD SAFETY 1 Important safety instructions 2 Warnings 2 Cautions 2 Installing the stand or wall-mount bracket 4 Installing the stand 4 Installing a wall-mount bracket 4 TV components 5 Package contents 5 Front 5 Back and Side 5 Remote control 6 Making connections 7 What connection should I use 7 Connecting power 7 Connecting a cable or satellite box 8 Connecting an antenna or cable TV (no box 10 Connecting a DVD or Blu-ray player 11 Connecting a VCR 13 Connecting a camcorder or game console 13 Connecting a computer 14 Connecting a USB flash drive...
... 32" LED-LCD TV Contents CHILD SAFETY 1 Important safety instructions 2 Warnings 2 Cautions 2 Installing the stand or wall-mount bracket 4 Installing the stand 4 Installing a wall-mount bracket 4 TV components 5 Package contents 5 Front 5 Back and Side 5 Remote control 6 Making connections 7 What connection should I use 7 Connecting power 7 Connecting a cable or satellite box 8 Connecting an antenna or cable TV (no box 10 Connecting a DVD or Blu-ray player 11 Connecting a VCR 13 Connecting a camcorder or game console 13 Connecting a computer 14 Connecting a USB flash drive...
User Manual
Page 3
... digital closed captioning styles 29 Adjusting time settings 30 Setting the clock 30 Setting the sleep timer 31 Adjusting menu settings 31 Selecting the menu language 31 Labeling an input source 31 Restoring settings to the defaults 32 Maintaining 32 Cleaning the TV cabinet 32 Cleaning the TV screen 32 Troubleshooting 33 Video and audio 33 Remote control 34 General 34 Specifications 35 Programming universal remote controls 36 Programming a different universal remote control 36 Common universal remote control codes 36 Legal notices 37 One-year limited warranty - Dynex...
... digital closed captioning styles 29 Adjusting time settings 30 Setting the clock 30 Setting the sleep timer 31 Adjusting menu settings 31 Selecting the menu language 31 Labeling an input source 31 Restoring settings to the defaults 32 Maintaining 32 Cleaning the TV cabinet 32 Cleaning the TV screen 32 Troubleshooting 33 Video and audio 33 Remote control 34 General 34 Specifications 35 Programming universal remote controls 36 Programming a different universal remote control 36 Common universal remote control codes 36 Legal notices 37 One-year limited warranty - Dynex...
User Manual
Page 6
... be located in your TV. These servicing instructions are inside. Class I apparatus to a grounding-type, three-prong outlet. 17 Remote control batteries should be grounded to qualified service technicians. Unauthorized substitutions may cause skin inflammation. • If the liquid gets in the vicinity of the polarized or grounding-type plug. Power source Operate your TV. Handling the LCD panel • Your TV's screen is located on...
... be located in your TV. These servicing instructions are inside. Class I apparatus to a grounding-type, three-prong outlet. 17 Remote control batteries should be grounded to qualified service technicians. Unauthorized substitutions may cause skin inflammation. • If the liquid gets in the vicinity of the polarized or grounding-type plug. Power source Operate your TV. Handling the LCD panel • Your TV's screen is located on...
User Manual
Page 7
... and built-up static charges. Specifically, it on, or make sure that the antenna or cable system is connected to the breeze from the TV. Occasionally, a few non-active pixels may result in damage and will form on the screen as a fixed blue, green, or red point. Condensation Moisture will often require extensive work by a qualified technician to restore...
... and built-up static charges. Specifically, it on, or make sure that the antenna or cable system is connected to the breeze from the TV. Occasionally, a few non-active pixels may result in damage and will form on the screen as a fixed blue, green, or red point. Condensation Moisture will often require extensive work by a qualified technician to restore...
User Manual
Page 10
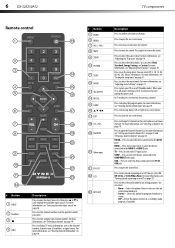
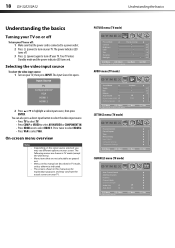
... sleep timer. For more information, see "Turning closed captioning on -screen menu. Press to open the on or off (Standby mode). 6 DX-32E250A12 TV components Remote control # Button 5 ENTER 6 MENU 7 VOL +/VOL - 8 MUTE 9 ZOOM 10 PICTURE 11 SLEEP 12 AUDIO 13 (power) 14 RECALL 15 GUIDE 16 17 EXIT 18 CH +/CH- 19 FAVORITE 20 Video input 21 CH-LIST 22 CCD # Button 1 INPUT 2 Numbers 3 4 INFO Description Press to open the Favorite Channel list. Press to restore the sound...
... sleep timer. For more information, see "Turning closed captioning on -screen menu. Press to open the on or off (Standby mode). 6 DX-32E250A12 TV components Remote control # Button 5 ENTER 6 MENU 7 VOL +/VOL - 8 MUTE 9 ZOOM 10 PICTURE 11 SLEEP 12 AUDIO 13 (power) 14 RECALL 15 GUIDE 16 17 EXIT 18 CH +/CH- 19 FAVORITE 20 Video input 21 CH-LIST 22 CCD # Button 1 INPUT 2 Numbers 3 4 INFO Description Press to open the Favorite Channel list. Press to restore the sound...
User Manual
Page 12
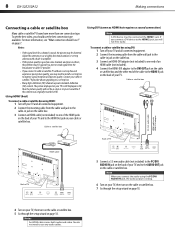
Adjust the antenna or use ?" The picture displayed on your cable or satellite TV provider about upgrading to use the best connection type available. Cable or satellite box 3.5 mm audio cable HDMI cable with a built-in HD. Contact your TV is good on some channels and poor on page 18. Notes An HDMI cable carries both audio and video. To get the best video, you may be distorted. If you connect a DVI device to the HDMI 2 jack...
Adjust the antenna or use ?" The picture displayed on your cable or satellite TV provider about upgrading to use the best connection type available. Cable or satellite box 3.5 mm audio cable HDMI cable with a built-in HD. Contact your TV is good on some channels and poor on page 18. Notes An HDMI cable carries both audio and video. To get the best video, you may be distorted. If you connect a DVI device to the HDMI 2 jack...

User Manual
Page 21
... time The first time you turn on your viewing area. The Setup Wizard guides you selected Manual for Mode, set the time by TV source 4 Press or to highlight Mode, then press or to select Manual (to set the date and time manually) or Auto (to set the date and time automatically from a TV signal source based on your TV searches for channels. The Choose Your Time Setting screen opens. Setup Wizard Choose Your TV Source Antenna Cable Cable/Satellite Box 0 Digital Channels 0 Analog Channels Scanning for digital channels Channel scan...
... time The first time you turn on your viewing area. The Setup Wizard guides you selected Manual for Mode, set the time by TV source 4 Press or to highlight Mode, then press or to select Manual (to set the date and time manually) or Auto (to set the date and time automatically from a TV signal source based on your TV searches for channels. The Choose Your Time Setting screen opens. Setup Wizard Choose Your TV Source Antenna Cable Cable/Satellite Box 0 Digital Channels 0 Analog Channels Scanning for digital channels Channel scan...
User Manual
Page 22
... power indicator LED turns off. 3 Press (power) again to turn on your TV. Input Source TV Component/AV VGA HDMI 1 HDMI 2 2 Press or to affect sound quality Menu Back Exit Exit SETTINGS menu (TV mode) Parental Controls Closed Caption Time Menu Settings Input Labels Computer Settings Component Settings PICTURE AUDIO SETTINGS CHANNELS Move Select Set various TV options Menu Back Exit Exit CHANNELS menu (TV mode) Auto Channel Search Add/Skip Channels Favorites Channel Labels Channel Strength Audio Only Auto Zoom PICTURE AUDIO SETTINGS CHANNELS Off On Move Select Adjust channel...
... power indicator LED turns off. 3 Press (power) again to turn on your TV. Input Source TV Component/AV VGA HDMI 1 HDMI 2 2 Press or to affect sound quality Menu Back Exit Exit SETTINGS menu (TV mode) Parental Controls Closed Caption Time Menu Settings Input Labels Computer Settings Component Settings PICTURE AUDIO SETTINGS CHANNELS Move Select Set various TV options Menu Back Exit Exit CHANNELS menu (TV mode) Auto Channel Search Add/Skip Channels Favorites Channel Labels Channel Strength Audio Only Auto Zoom PICTURE AUDIO SETTINGS CHANNELS Off On Move Select Adjust channel...
User Manual
Page 23
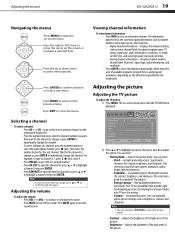
...memorized channel list. • Press the number buttons to enter the channel number you manually adjust picture settings such as channel number, video input source, and resolution. • Digital channel information-Displays the channel number, station name, channel label, broadcast program name, TV rating, signal type, audio information, resolution, CC mode, current time, and current program start and end times. • Analog channel information-Displays channel number, channel label (if preset), signal type, audio information, and resolution. • Press GUIDE to close the menu. Note...
...memorized channel list. • Press the number buttons to enter the channel number you manually adjust picture settings such as channel number, video input source, and resolution. • Digital channel information-Displays the channel number, station name, channel label, broadcast program name, TV rating, signal type, audio information, resolution, CC mode, current time, and current program start and end times. • Analog channel information-Displays channel number, channel label (if preset), signal type, audio information, and resolution. • Press GUIDE to close the menu. Note...
User Manual
Page 24
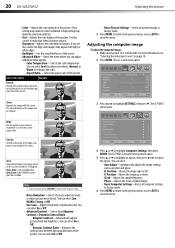
...; Overscan-Adjusts the picture's reproduction rate. A low setting may be set this option to enhance the reds). • Aspect Ratio-Selects the aspect ratio of the picture. Auto: Automatically adjusts the image based on -screen menu opens. You can also press ZOOM to select the aspect ratio. • Noise Reduction-Selects the noise reduction mode to close the menu. Parental Controls Closed Caption Time Menu Settings Input Labels Computer Settings Component Settings PICTURE AUDIO SETTINGS CHANNELS Move Select Set various...
...; Overscan-Adjusts the picture's reproduction rate. A low setting may be set this option to enhance the reds). • Aspect Ratio-Selects the aspect ratio of the picture. Auto: Automatically adjusts the image based on -screen menu opens. You can also press ZOOM to select the aspect ratio. • Noise Reduction-Selects the noise reduction mode to close the menu. Parental Controls Closed Caption Time Menu Settings Input Labels Computer Settings Component Settings PICTURE AUDIO SETTINGS CHANNELS Move Select Set various...

User Manual
Page 28
... picture degradation. Picture Mode Contrast Brightness Color Tint Sharpness Backlight PICTURE AUDIO SETTINGS CHANNELS Energy Savings 50 50 58 0 +10 43 Move Select Menu Back Adjust settings to affect picture quality Exit Exit 2 Press or to close the menu. The Enter Password screen opens. Auto Channel Search Add/Skip Channels Favorites Channel Labels Channel Strength Audio Only Auto Zoom PICTURE AUDIO SETTINGS CHANNELS Off On Move Select Menu Back Display signal strength of the program (with Parental Controls highlighted. When set or change the password to a number...
... picture degradation. Picture Mode Contrast Brightness Color Tint Sharpness Backlight PICTURE AUDIO SETTINGS CHANNELS Energy Savings 50 50 58 0 +10 43 Move Select Menu Back Adjust settings to affect picture quality Exit Exit 2 Press or to close the menu. The Enter Password screen opens. Auto Channel Search Add/Skip Channels Favorites Channel Labels Channel Strength Audio Only Auto Zoom PICTURE AUDIO SETTINGS CHANNELS Off On Move Select Menu Back Display signal strength of the program (with Parental Controls highlighted. When set or change the password to a number...

User Manual
Page 29
... the password again. Parental Controls Closed Caption Time Menu Settings Input Labels Computer Settings Component Settings PICTURE AUDIO SETTINGS CHANNELS Move Select Set TV parental controls Menu Back Exit Exit Move Select Menu Back Enter your 4-digit password. Exit Exit 6 Press the number buttons to highlight SETTINGS, then press . Locking control buttons When the button lock is turned On, the buttons on the TV and only operate the TV with Parental Controls highlighted. To lock control buttons: 1 Press MENU. The SETTINGS menu opens with the remote control 5 Press...
... the password again. Parental Controls Closed Caption Time Menu Settings Input Labels Computer Settings Component Settings PICTURE AUDIO SETTINGS CHANNELS Move Select Set TV parental controls Menu Back Exit Exit Move Select Menu Back Enter your 4-digit password. Exit Exit 6 Press the number buttons to highlight SETTINGS, then press . Locking control buttons When the button lock is turned On, the buttons on the TV and only operate the TV with Parental Controls highlighted. To lock control buttons: 1 Press MENU. The SETTINGS menu opens with the remote control 5 Press...

User Manual
Page 30
...the number buttons to enter the four-digit password. PICTURE Button Lock Block Unrated TV USA Parental Locks Canadian Parental Locks Change Password RRT5 Reset RRT5 AUDIO On Off SETTINGS CHANNELS Move Select Menu Back Restrict movie and TV programs by US Ratings Exit Exit 5 Press or to highlight USA Parental Locks, then press ENTER. (To set parental controls for Canadian ratings. Default is 0000. The menu opens with Parental Controls highlighted. Parental Controls Closed Caption Time Menu Settings Input Labels Computer Settings Component Settings PICTURE AUDIO...
...the number buttons to enter the four-digit password. PICTURE Button Lock Block Unrated TV USA Parental Locks Canadian Parental Locks Change Password RRT5 Reset RRT5 AUDIO On Off SETTINGS CHANNELS Move Select Menu Back Restrict movie and TV programs by US Ratings Exit Exit 5 Press or to highlight USA Parental Locks, then press ENTER. (To set parental controls for Canadian ratings. Default is 0000. The menu opens with Parental Controls highlighted. Parental Controls Closed Caption Time Menu Settings Input Labels Computer Settings Component Settings PICTURE AUDIO...

User Manual
Page 31
... content-based ratings. To download rating information: 1 Press MENU. The SETTINGS menu opens with Parental Controls highlighted. Enter Password PICTURE AUDIO SETTINGS CHANNELS Move Select Menu Back Enter your 4-digit password. The on-screen menu opens. Exit Exit U.S. When you block a rating, that rating and all or Note to select the rating. Picture Mode Contrast Brightness Color Tint Sharpness Backlight PICTURE AUDIO SETTINGS CHANNELS Energy Savings 50 50 58 0 +10 43 Move Select Menu Back Adjust settings...
... content-based ratings. To download rating information: 1 Press MENU. The SETTINGS menu opens with Parental Controls highlighted. Enter Password PICTURE AUDIO SETTINGS CHANNELS Move Select Menu Back Enter your 4-digit password. The on-screen menu opens. Exit Exit U.S. When you block a rating, that rating and all or Note to select the rating. Picture Mode Contrast Brightness Color Tint Sharpness Backlight PICTURE AUDIO SETTINGS CHANNELS Energy Savings 50 50 58 0 +10 43 Move Select Menu Back Adjust settings...
User Manual
Page 37
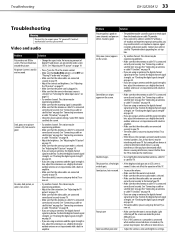
... incoming signal is compatible. • Make sure that the correct picture mode is connected while another channel. Contact authorized service personnel. Video and audio Problem Solution Picture does not fill the screen. There are using an antenna, the digital channel signal may be bad. Dark, poor, or no box)" on page 8 or "Connecting an antenna or cable TV (no picture (screen is lit), but poor color • Adjust the contrast, color, and brightness settings. See "Adjusting the TV picture...
... incoming signal is compatible. • Make sure that the correct picture mode is connected while another channel. Contact authorized service personnel. Video and audio Problem Solution Picture does not fill the screen. There are using an antenna, the digital channel signal may be bad. Dark, poor, or no box)" on page 8 or "Connecting an antenna or cable TV (no picture (screen is lit), but poor color • Adjust the contrast, color, and brightness settings. See "Adjusting the TV picture...
User Manual
Page 38
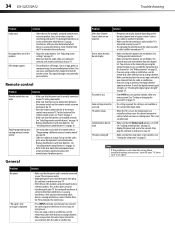
... "Setting parental control levels." • Make sure that the Button Lock option is correctly connected to Off. Trouble programming your existing universal remote control. • See instructions and a table of damage is in accessed. Try turning off one device at a time to the channel list. See "Locking control buttons" on page 25. • Unplug the power cord, wait a few seconds, then plug the cord back in "Programming a different universal remote control" on your warranty. Try turning off one device at a time to change channels...
... "Setting parental control levels." • Make sure that the Button Lock option is correctly connected to Off. Trouble programming your existing universal remote control. • See instructions and a table of damage is in accessed. Try turning off one device at a time to the channel list. See "Locking control buttons" on page 25. • Unplug the power cord, wait a few seconds, then plug the cord back in "Programming a different universal remote control" on your warranty. Try turning off one device at a time to change channels...
User Manual
Page 39
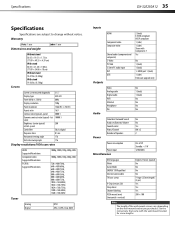
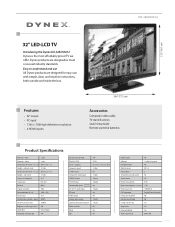
HDMI port 1 (back) 1 (side) Firmware upgrade only Audio Video Analog audio Digital audio WiFi Ethernet Headphone INc No 1 (back) 1 (back) No No No No Power Simulated Surround Sound Audyssey Dynamic Volume Sound Leveler Watts/Channel Number of Speakers No No Yes 8W x 2 2 Power consumption Power input Miscellaneous On: 67 W Standby: < 1 W 120V/60Hz OSD languages INlink Game Mode ENERGY STAR qualified Internet connectable TV base screws V-Chip (version 2.0) Sleep timer Channel labeling VESA mount (mm) (horizontal × vertical) English, French, Spanish No No No No...
HDMI port 1 (back) 1 (side) Firmware upgrade only Audio Video Analog audio Digital audio WiFi Ethernet Headphone INc No 1 (back) 1 (back) No No No No Power Simulated Surround Sound Audyssey Dynamic Volume Sound Leveler Watts/Channel Number of Speakers No No Yes 8W x 2 2 Power consumption Power input Miscellaneous On: 67 W Standby: < 1 W 120V/60Hz OSD languages INlink Game Mode ENERGY STAR qualified Internet connectable TV base screws V-Chip (version 2.0) Sleep timer Channel labeling VESA mount (mm) (horizontal × vertical) English, French, Spanish No No No No...
User Manual
Page 40
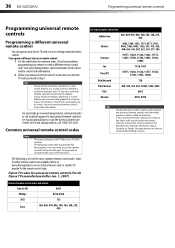
... manually program it using the Dynex TV remote to "teach" the commands one at : www.Dynexproducts.com or check with a new or existing universal remote control. To program a different universal remote control: 1 See the table below for the remote control code. See your universal remote control's instructions for details. • If your universal remote control has a "Learn" feature, you can operate your universal remote control's instructions for other remote controls are available online at a time. The following is a list of the universal remote control, and the model number...
... manually program it using the Dynex TV remote to "teach" the commands one at : www.Dynexproducts.com or check with a new or existing universal remote control. To program a different universal remote control: 1 See the table below for the remote control code. See your universal remote control's instructions for details. • If your universal remote control has a "Learn" feature, you can operate your universal remote control's instructions for other remote controls are available online at a time. The following is a list of the universal remote control, and the model number...
User Manual
Page 43
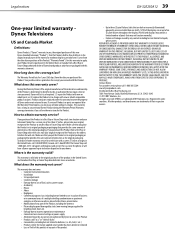
... any part of the product • Up to three (3) pixel failures (dots that are trademarks of their respective owners. Contact Dynex: For customer service please call 1-800-663-2275. Registered in ). • Damage due to incorrect operation or maintenance • Connection to an incorrect voltage or power supply • Attempted repair by any Best Buy or Future Shop store. The Warranty...
... any part of the product • Up to three (3) pixel failures (dots that are trademarks of their respective owners. Contact Dynex: For customer service please call 1-800-663-2275. Registered in ). • Damage due to incorrect operation or maintenance • Connection to an incorrect voltage or power supply • Attempted repair by any Best Buy or Future Shop store. The Warranty...
Brochure
Page 1
... Shared audio inputs (component & composite) 3.5 mm PC audio input RF input Video output Analog audio output Digital audio output (optical) Media card slot INlink WiFi 176° 8.5 ms NTSC, ATSC, 8-VSB, Clear-QAM 1 (side) No 1 (side) 2 (back) 1 (back) Yes 1 (back) Yes No 1 (back) 1 (back) No No No Ethernet port USB port Headphone jack Watts/channel # of speakers Simulated surround sound Sound leveler Power consumption Power consumption-in standby Power inputs: AC OSD languages Energy Star qualified Internet connectable V-Chip (version 2.0) Sleep timer Channel labeling VESA mount...
... Shared audio inputs (component & composite) 3.5 mm PC audio input RF input Video output Analog audio output Digital audio output (optical) Media card slot INlink WiFi 176° 8.5 ms NTSC, ATSC, 8-VSB, Clear-QAM 1 (side) No 1 (side) 2 (back) 1 (back) Yes 1 (back) Yes No 1 (back) 1 (back) No No No Ethernet port USB port Headphone jack Watts/channel # of speakers Simulated surround sound Sound leveler Power consumption Power consumption-in standby Power inputs: AC OSD languages Energy Star qualified Internet connectable V-Chip (version 2.0) Sleep timer Channel labeling VESA mount...


