Warranty (English)
Page 1
... • Commercial use • Modification of any part of the product • Plasma display panel damaged by this warranty become the property of Dynex and are required after the Warranty Period expires, you sell or otherwise transfer the product. Make sure that you notify Dynex during the Warranty Period. This warranty does not cover: • Customer instruction • Installation • Set up adjustments • Cosmetic...
... • Commercial use • Modification of any part of the product • Plasma display panel damaged by this warranty become the property of Dynex and are required after the Warranty Period expires, you sell or otherwise transfer the product. Make sure that you notify Dynex during the Warranty Period. This warranty does not cover: • Customer instruction • Installation • Set up adjustments • Cosmetic...
User Manual (English)
Page 2
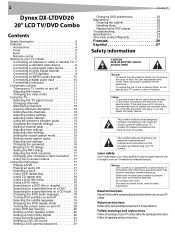
... remove the cover or attempt to qualified service personnel. The laser is present within your TV combo because of possible eye injury. 2 Dynex DX-LTDVD20 20" LCD TV/DVD Combo Contents Safety information 2 Features 4 Accessories 4 Front 4 Back 5 Remote control 5 Setting up your TV combo 7 Connecting an antenna or cable or satellite TV 7 Connecting a standard video device 8 Connecting a component video device 8 Connecting a Dolby Digital decoder 9 Connecting a DTS decoder 9 Connecting an MPEG audio decoder 10 Connecting a digital audio input...
... remove the cover or attempt to qualified service personnel. The laser is present within your TV combo because of possible eye injury. 2 Dynex DX-LTDVD20 20" LCD TV/DVD Combo Contents Safety information 2 Features 4 Accessories 4 Front 4 Back 5 Remote control 5 Setting up your TV combo 7 Connecting an antenna or cable or satellite TV 7 Connecting a standard video device 8 Connecting a component video device 8 Connecting a Dolby Digital decoder 9 Connecting a DTS decoder 9 Connecting an MPEG audio decoder 10 Connecting a digital audio input...

User Manual (English)
Page 3
... a fixed blue, green, or red point. Wall or ceiling mount When mounting the your TV combo on a wall or ceiling, make sure that you install the your TV combo according to the method recommended by a qualified technician to restore your TV combo to your TV combo. Adjust only those controls that are required, make sure that the service technician uses replacement parts specified...
... a fixed blue, green, or red point. Wall or ceiling mount When mounting the your TV combo on a wall or ceiling, make sure that you install the your TV combo according to the method recommended by a qualified technician to restore your TV combo to your TV combo. Adjust only those controls that are required, make sure that the service technician uses replacement parts specified...

User Manual (English)
Page 4
...; YPbPr cable • Power cord • Remote control and batteries Front 1 2 3 4 5 6 7 No. 1 2 3 4 5 6 7 8 9 10 11 12 OPEN/ CLOSE PLA Y ST OP DISC IN NEXT PREV 89 CH CH VOL VOL MENU INPUT POWER PHONES INPUT 2 VIDEO L AUDIO R 10 11 12 13 14 Component Description OPEN/CLOSE PLAY STOP Disc IN indicator NEXT PREV Disc slot Power/Standby indicator IR sensor CH+/CH- Insert a DVD or CD to change to...
...; YPbPr cable • Power cord • Remote control and batteries Front 1 2 3 4 5 6 7 No. 1 2 3 4 5 6 7 8 9 10 11 12 OPEN/ CLOSE PLA Y ST OP DISC IN NEXT PREV 89 CH CH VOL VOL MENU INPUT POWER PHONES INPUT 2 VIDEO L AUDIO R 10 11 12 13 14 Component Description OPEN/CLOSE PLAY STOP Disc IN indicator NEXT PREV Disc slot Power/Standby indicator IR sensor CH+/CH- Insert a DVD or CD to change to...

User Manual (English)
Page 5
... change to TV mode. 3 DVD Press to change to DVD mode. 4 Numbers 5 • 6 MUTE Press to select the closed caption mode while in on and off or press to view a minor digital TV channel. Press to adjust the volume. 8 MTS/SAP Press to select Stereo, Mono, or SAP mode. 9 GUIDE Press to open your TV combo on -screen menus. Features 5 No. Component 13 INPUT 14 POWER Back Description Press to select the AV signal input. Jack 1 HDMI INPUT 2 AUDIO PC INPUT 3 VGA PC INPUT 4 COAXIAL (digital audio) 5 INPUT...
... change to TV mode. 3 DVD Press to change to DVD mode. 4 Numbers 5 • 6 MUTE Press to select the closed caption mode while in on and off or press to view a minor digital TV channel. Press to adjust the volume. 8 MTS/SAP Press to select Stereo, Mono, or SAP mode. 9 GUIDE Press to open your TV combo on -screen menus. Features 5 No. Component 13 INPUT 14 POWER Back Description Press to select the AV signal input. Jack 1 HDMI INPUT 2 AUDIO PC INPUT 3 VGA PC INPUT 4 COAXIAL (digital audio) 5 INPUT...
User Manual (English)
Page 6
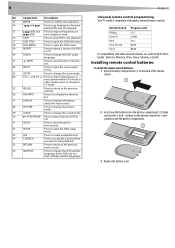
... For compatibility with popular universal remote controls. Features Universal remote control programming Your TV combo is compatible with other modes, press to change to TV mode. 25 RECALL Press to return to the previous channel. 26 FAVORITE Press to to display the favorites list. 27 DISPLAY Press to display information about the input source. 28 PICTURE Press to change the picture mode. 29 AUDIO Press to change the sound mode. 30 PLAY/PAUSE Press to play or pause a DVD...
... For compatibility with popular universal remote controls. Features Universal remote control programming Your TV combo is compatible with other modes, press to change to TV mode. 25 RECALL Press to return to the previous channel. 26 FAVORITE Press to to display the favorites list. 27 DISPLAY Press to display information about the input source. 28 PICTURE Press to change the picture mode. 29 AUDIO Press to change the sound mode. 30 PLAY/PAUSE Press to play or pause a DVD...
User Manual (English)
Page 7
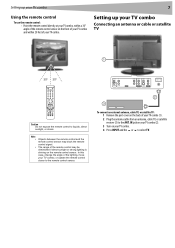
... remote control signal. CR / PR Y COAXIAL CB / PB INPUT AUDIO L AUDIO L VIDEO AUDIO L R R R OUTPUT S-VIDEO INPUT 1 A N T. Note • • Objects between the remote control and the remote control sensor may be diminished if direct sunlight or strong lighting is shining on the remote control sensor. I N 2 3 To connect an external antenna, cable TV, or satellite TV: 1 Remove the port cover on your TV combo Connecting an antenna or cable or satellite TV 1 Caution Do not expose the remote control to the remote control...
... remote control signal. CR / PR Y COAXIAL CB / PB INPUT AUDIO L AUDIO L VIDEO AUDIO L R R R OUTPUT S-VIDEO INPUT 1 A N T. Note • • Objects between the remote control and the remote control sensor may be diminished if direct sunlight or strong lighting is shining on the remote control sensor. I N 2 3 To connect an external antenna, cable TV, or satellite TV: 1 Remove the port cover on your TV combo Connecting an antenna or cable or satellite TV 1 Caution Do not expose the remote control to the remote control...

User Manual (English)
Page 11
...; S-Video • Component • DVD • HDMI • VGA Using the TV Selecting the TV signal source To select the TV signal source: 1 Press TV MENU, then press or to the previous channel: • Press RECALL. To select the video mode: • Press INPUT one or more times to the left of the 0 button), then press the number button for the minor channel. To enter a channel number directly: • Press the number buttons on the remote control. Changing the video mode...
...; S-Video • Component • DVD • HDMI • VGA Using the TV Selecting the TV signal source To select the TV signal source: 1 Press TV MENU, then press or to the previous channel: • Press RECALL. To select the video mode: • Press INPUT one or more times to the left of the 0 button), then press the number button for the minor channel. To enter a channel number directly: • Press the number buttons on the remote control. Changing the video mode...

User Manual (English)
Page 12
... 704x480 AUDIO 1/1(L+R) BART-TV 2005/05/20 08:00 08:00-12:00 TV-14 / IQ-NL FTA NL No Event Information 4 Press DISPLAY one or more times to memorize channels. Press ENTER again. Your TV combo scans for digital channels. 2 Press TV MENU on the remote control until you have programmed your TV combo needs to close. A checkmark disappears, and the screen turns black. To select...
... 704x480 AUDIO 1/1(L+R) BART-TV 2005/05/20 08:00 08:00-12:00 TV-14 / IQ-NL FTA NL No Event Information 4 Press DISPLAY one or more times to memorize channels. Press ENTER again. Your TV combo scans for digital channels. 2 Press TV MENU on the remote control until you have programmed your TV combo needs to close. A checkmark disappears, and the screen turns black. To select...
User Manual (English)
Page 13
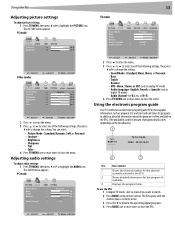
... more times to change the setting: • Sound Mode-Standard, Music, Movie, or Personal. • Bass • Treble • Balance • MTS-Mono, Stereo, or SAP (only in analog TV mode) • Audio Language-English, French, or Spanish (only in digital TV mode) • Audio Channel-L+R, L+L, or R+R. 4 Press TV MENU one of program details varies depending on the remote control. The PICTURE menu appears. Description 1 Shows the channel number for the channel currently selected...
... more times to change the setting: • Sound Mode-Standard, Music, Movie, or Personal. • Bass • Treble • Balance • MTS-Mono, Stereo, or SAP (only in analog TV mode) • Audio Language-English, French, or Spanish (only in digital TV mode) • Audio Channel-L+R, L+L, or R+R. 4 Press TV MENU one of program details varies depending on the remote control. The PICTURE menu appears. Description 1 Shows the channel number for the channel currently selected...
User Manual (English)
Page 14
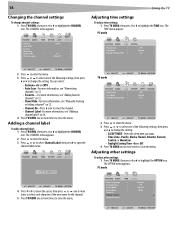
...or to change the setting. PC mode PICTURE AUDIO Menu Language Transparency Color Mode Zoom Mode Advance Closed Caption Restore Default TIME : : : : OPTION English Off Normal Wide : SELECT : ADJUST TV MENU : RETURN The TIME menu appears. Channel Label TIME : OPTION LOCK CHANNEL CATV : 5-1 KTLA-DT Using the TV Adjusting time settings To adjust time settings: 1 Press TV MENU, then press or to highlight the CHANNEL icon. 14 Changing the channel settings To change channel settings: 1 Press TV MENU, then press or to change the setting: • SLEEP TIMER-Select the sleep time you...
...or to change the setting. PC mode PICTURE AUDIO Menu Language Transparency Color Mode Zoom Mode Advance Closed Caption Restore Default TIME : : : : OPTION English Off Normal Wide : SELECT : ADJUST TV MENU : RETURN The TIME menu appears. Channel Label TIME : OPTION LOCK CHANNEL CATV : 5-1 KTLA-DT Using the TV Adjusting time settings To adjust time settings: 1 Press TV MENU, then press or to highlight the CHANNEL icon. 14 Changing the channel settings To change channel settings: 1 Press TV MENU, then press or to change the setting: • SLEEP TIMER-Select the sleep time you...

User Manual (English)
Page 15
.... 3 Press TV MENU one of the following settings, then press or to change the setting. TV mode : SELECT : ADJUST TV MENU : RETURN 2 Press to enter the menu. 3 Press or to select one or more times to highlight Option, then press . Using the TV TV mode PICTURE AUDIO Menu Language Transparency Color Mode Zoom Mode Advance Closed Caption Restore Default TIME : : : : OPTION LOCK CHANNEL English Off Warm Wide 15 Note In AV1, AV2, and S-Video modes, Advanced Selection and Option...
.... 3 Press TV MENU one of the following settings, then press or to change the setting. TV mode : SELECT : ADJUST TV MENU : RETURN 2 Press to enter the menu. 3 Press or to select one or more times to highlight Option, then press . Using the TV TV mode PICTURE AUDIO Menu Language Transparency Color Mode Zoom Mode Advance Closed Caption Restore Default TIME : : : : OPTION LOCK CHANNEL English Off Warm Wide 15 Note In AV1, AV2, and S-Video modes, Advanced Selection and Option...

User Manual (English)
Page 16
... rating menu. PICTURE AUDIO TIME OPTION LOCK CHANNEL ALL TV-Y TV-Y7 TV-G TV-PG TV-14 TV-MA TV RATING FV V S L D : Block : SELECT ENTER : ADJUST 3 Press , , , or to input the new password again. You can select: • Change Password-For more information, see "Setting the RRT rating" on the remote control (the default password is 9999). The lock icon appears. • Lock-Rating is blocked. • Unlock-Rating is set the type...
... rating menu. PICTURE AUDIO TIME OPTION LOCK CHANNEL ALL TV-Y TV-Y7 TV-G TV-PG TV-14 TV-MA TV RATING FV V S L D : Block : SELECT ENTER : ADJUST 3 Press , , , or to input the new password again. You can select: • Change Password-For more information, see "Setting the RRT rating" on the remote control (the default password is 9999). The lock icon appears. • Lock-Rating is blocked. • Unlock-Rating is set the type...
User Manual (English)
Page 17
..., with the label facing forward. The DVD player reads the DVD and displays the opening menu. 4 Press the . , , or to highlight a menu item, then press PLAY. 5 During playback: • Press to close the menu. The on -screen menus. Changing your computer's video resolution: 1 Click Start, then click Control Panel. 2 Double-click Display. The Display Properties dialog box opens. 3 Click the Settings tab. You can select: • CHAPTER (repeats the current...
..., with the label facing forward. The DVD player reads the DVD and displays the opening menu. 4 Press the . , , or to highlight a menu item, then press PLAY. 5 During playback: • Press to close the menu. The on -screen menus. Changing your computer's video resolution: 1 Click Start, then click Control Panel. 2 Double-click Display. The Display Properties dialog box opens. 3 Click the Settings tab. You can select: • CHAPTER (repeats the current...
User Manual (English)
Page 18
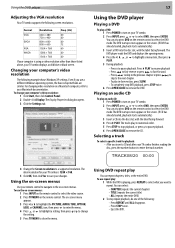
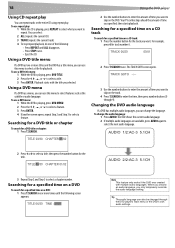
... select what you selected. TITLE 06/30 TIME : -:--:-- To use a DVD menu: 1 While the DVD is playing, press DVD TITLE. 2 Press the . , , or to select a title. 3 Press ENTER. AUDIO 1/2:AC-3 5.1CH 2 Press or to select a title, then press the number button for a DVD title or chapter: 1 Press T.SEARCH. For example, press 6 for track number 6. 18 Using the DVD player Using CD repeat play You can use this menu to select features such as the subtitle...
... select what you selected. TITLE 06/30 TIME : -:--:-- To use a DVD menu: 1 While the DVD is playing, press DVD TITLE. 2 Press the . , , or to select a title. 3 Press ENTER. AUDIO 1/2:AC-3 5.1CH 2 Press or to select a title, then press the number button for a DVD title or chapter: 1 Press T.SEARCH. For example, press 6 for track number 6. 18 Using the DVD player Using CD repeat play You can use this menu to select features such as the subtitle...
User Manual (English)
Page 20
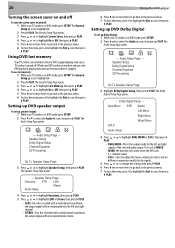
... in DVD mode, press SETUP. 2 Press or to highlight the Exit icon, then press PLAY. The Speaker Setup Page opens. -- Setting up DVD Dolby Digital To set to MIXED MONO, the function only works when the DVD uses 5.1-channel sound. • D.R.C-Select to adjust the linear compression rate to obtain different compression results for the left and right channel. • STEREO-On a disc recorded with a multichannel soundtrack, the output signal...
... in DVD mode, press SETUP. 2 Press or to highlight the Exit icon, then press PLAY. The Speaker Setup Page opens. -- Setting up DVD Dolby Digital To set to MIXED MONO, the function only works when the DVD uses 5.1-channel sound. • D.R.C-Select to adjust the linear compression rate to obtain different compression results for the left and right channel. • STEREO-On a disc recorded with a multichannel soundtrack, the output signal...
User Manual (English)
Page 21
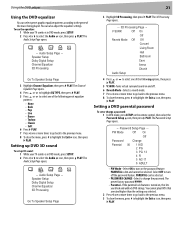
... Audio Setup Page opens. -- Audio Setup Page -Speaker Setup Dolby Digital Setup Channel Equalizer 3D Processing Go To Speaker Setup Page 3 Highlight 3D Processing, then press PLAY. Setting a DVD parental password To set up DVD 3D sound To set or change the password. Setting up 3D sound: 1 While your TV combo is turned on the remote control, then select the Password Setup icon, then press PLAY. Password Setup Page -- The preset factory password 99999. • Parental-If the parental lock feature is in DVD mode, press SETUP. 2 Press or to change a password: 1 In DVD...
... Audio Setup Page opens. -- Audio Setup Page -Speaker Setup Dolby Digital Setup Channel Equalizer 3D Processing Go To Speaker Setup Page 3 Highlight 3D Processing, then press PLAY. Setting a DVD parental password To set up DVD 3D sound To set or change the password. Setting up 3D sound: 1 While your TV combo is turned on the remote control, then select the Password Setup icon, then press PLAY. Password Setup Page -- The preset factory password 99999. • Parental-If the parental lock feature is in DVD mode, press SETUP. 2 Press or to change a password: 1 In DVD...

User Manual (English)
Page 23
... player To remove the old DVD player: 1 Turn off your TV combo, then unplug the power cord. 2 Place cushioning, such as a towel, on a flat surface, then place your work area. 3 Remove the four screws (1). 4 Slide the DVD cover in the direction of the arrow (D). 5 Replace the four screws (1). Make sure that you place cushioning between the screen and the surface you are using as shown in the direction...
... player To remove the old DVD player: 1 Turn off your TV combo, then unplug the power cord. 2 Place cushioning, such as a towel, on a flat surface, then place your work area. 3 Remove the four screws (1). 4 Slide the DVD cover in the direction of the arrow (D). 5 Replace the four screws (1). Make sure that you place cushioning between the screen and the surface you are using as shown in the direction...
User Manual (English)
Page 24
... the cable is set to the computer and TV. Picture is OK, but no color. Check the program's color features because it to the optimum resolution for about an hour to Mono. If all cable connections. Specifications LCD Dimension Panel Resolution Viewing angle Contrast ratio Brightness (cd/m2) With stand Without stand Weight TV TV standard Tuning system Power Sound Terminals Frequency range Stereo CATV Input Consumption (Max.) Output A/V in Component PC in HDMI Antenna in DVD player Signal System...
... the cable is set to the computer and TV. Picture is OK, but no color. Check the program's color features because it to the optimum resolution for about an hour to Mono. If all cable connections. Specifications LCD Dimension Panel Resolution Viewing angle Contrast ratio Brightness (cd/m2) With stand Without stand Weight TV TV standard Tuning system Power Sound Terminals Frequency range Stereo CATV Input Consumption (Max.) Output A/V in Component PC in HDMI Antenna in DVD player Signal System...

User Manual (English)
Page 27
... a television with new or rebuilt parts; This Product must pay all faults • Consumables, such as you own your original receipt and the Product to the address listed on the receipt you received with this warranty statement. This warranty lasts as long as fuses or batteries • Products where the factory applied serial number has been altered or removed REPAIR REPLACEMENT...
... a television with new or rebuilt parts; This Product must pay all faults • Consumables, such as you own your original receipt and the Product to the address listed on the receipt you received with this warranty statement. This warranty lasts as long as fuses or batteries • Products where the factory applied serial number has been altered or removed REPAIR REPLACEMENT...


