User Manual (English)
Page 2
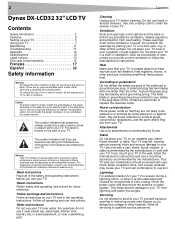
... purpose of electric shock, do not remove the cover or back. A grounding type plug has two blades and a grounding prong. 2 Dynex DX-LCD32 32" LCD TV Contents Safety information 2 Features 4 Setting up your TV 5 Using your TV 7 Maintaining 11 Troubleshooting 11 Appendix 12 Specifications 12 Legal notices 13 One year limited warranty 15 Français 17 Espa...
... purpose of electric shock, do not remove the cover or back. A grounding type plug has two blades and a grounding prong. 2 Dynex DX-LCD32 32" LCD TV Contents Safety information 2 Features 4 Setting up your TV 5 Using your TV 7 Maintaining 11 Troubleshooting 11 Appendix 12 Specifications 12 Legal notices 13 One year limited warranty 15 Français 17 Espa...

User Manual (English)
Page 3
.... Object and liquid entry Never push objects of cable entry as the original part. Replacement parts When replacement parts are required, make sure that your TV is provided to call the CATV system installer's attention to Article 820-40 of the NEC that provides guidelines for the grounding electrode. 7 6 5 ... marking label. Adjust only those controls that could result in fire, electric shock, personal injury, or other controls may appear on your TV exhibits a distinct change in performance. Safety check After completing any kind on the screen as close to the point of any way....
.... Object and liquid entry Never push objects of cable entry as the original part. Replacement parts When replacement parts are required, make sure that your TV is provided to call the CATV system installer's attention to Article 820-40 of the NEC that provides guidelines for the grounding electrode. 7 6 5 ... marking label. Adjust only those controls that could result in fire, electric shock, personal injury, or other controls may appear on your TV exhibits a distinct change in performance. Safety check After completing any kind on the screen as close to the point of any way....

User Manual (English)
Page 4
...the video image for information on screen menu. Lets you adjust the brightness and contrast without opening the on setting up arrow. Press to change TV channels. In Menu mode, functions as the down arrow. Press to freeze the video image. You can select MONO, STEREO, or SAP. ...the brightness or contrast adjustment. Press to toggle between the VGA and HDMI modes. For more information, see "Setting the sleep timer" on your TV or put it into Standby mode. Press to cycle through the available input sources. See "Setting parental controls" on page 8 for long periods ...
...the video image for information on screen menu. Lets you adjust the brightness and contrast without opening the on setting up arrow. Press to change TV channels. In Menu mode, functions as the down arrow. Press to freeze the video image. You can select MONO, STEREO, or SAP. ...the brightness or contrast adjustment. Press to toggle between the VGA and HDMI modes. For more information, see "Setting the sleep timer" on your TV or put it into Standby mode. Press to cycle through the available input sources. See "Setting parental controls" on page 8 for long periods ...
User Manual (English)
Page 5
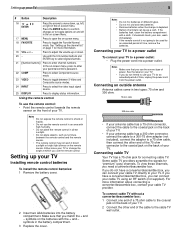
.... Connecting an outside antenna Antenna cables come in an area with a cloth. Either move down . 20 - Notes • • Make sure that you use your TV or change the angle at which you match the + and - Using the remote control To use the remote control in two types: 75 ohm and... and off in the battery compartment. 3 Replace the cover. Press the ENTER button to confirm changes or to toggle options on the back of your TV. • If your antenna cable has a 300 ohm connector, connect the cable to a 300-75 ohm adapter (not included), connect the adapter to a 75 ohm...
.... Connecting an outside antenna Antenna cables come in an area with a cloth. Either move down . 20 - Notes • • Make sure that you use your TV or change the angle at which you match the + and - Using the remote control To use the remote control in two types: 75 ohm and... and off in the battery compartment. 3 Replace the cover. Press the ENTER button to confirm changes or to toggle options on the back of your TV. • If your antenna cable has a 300 ohm connector, connect the cable to a 300-75 ohm adapter (not included), connect the adapter to a 75 ohm...
User Manual (English)
Page 6
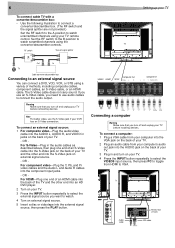
... computer's audio out jack into the S-Video jack on the back of methods, including composite cables, component cables, an S-Video cable, or an HDMI cable. TV TV Composite Out HDMI2 HDMI1 SPDIF Video L R Component 1 L R Y Pb/Cb Pr/Cr Video L R L R Y Pb/Cb Pr/Cr Connecting a computer ...the Y, Pb, and Pr video cables and the Audio L and Audio R cables into the component input jacks. - 6 Setting up your TV To connect cable TV with a converter/descrambler box: • Use the following illustration to connect a converter/descrambler box. (The RF switch and the signal splitter...
... computer's audio out jack into the S-Video jack on the back of methods, including composite cables, component cables, an S-Video cable, or an HDMI cable. TV TV Composite Out HDMI2 HDMI1 SPDIF Video L R Component 1 L R Y Pb/Cb Pr/Cr Video L R L R Y Pb/Cb Pr/Cr Connecting a computer ...the Y, Pb, and Pr video cables and the Audio L and Audio R cables into the component input jacks. - 6 Setting up your TV To connect cable TV with a converter/descrambler box: • Use the following illustration to connect a converter/descrambler box. (The RF switch and the signal splitter...
User Manual (English)
Page 7
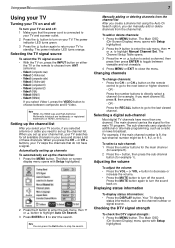
...Multimedia Interface are trademarks or registered trademarks of these channels. Setting up the channel list: 1 Press the MENU button. or CH + buttons, your TV skips the channels that the power cord is 8, the sub-channel number might be 8-1, 8-2, or 8-3. The main channel carries the signal for ...8226; Video8 (HDMI1) • Video9 (HDMI2) If you want channel 83, press 8, then press 3). - OR - Using your TV 7 Using your TV Turning your TV on and off To turn your TV on and off the sound. Manually adding or deleting channels from the channel list After you create a channel list using...
...Multimedia Interface are trademarks or registered trademarks of these channels. Setting up the channel list: 1 Press the MENU button. or CH + buttons, your TV skips the channels that the power cord is 8, the sub-channel number might be 8-1, 8-2, or 8-3. The main channel carries the signal for ...8226; Video8 (HDMI1) • Video9 (HDMI2) If you want channel 83, press 8, then press 3). - OR - Using your TV 7 Using your TV Turning your TV on and off To turn your TV on and off the sound. Manually adding or deleting channels from the channel list After you create a channel list using...
User Manual (English)
Page 8
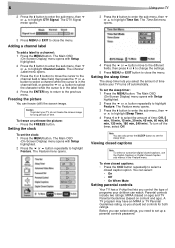
...button repeatedly to the previous menu. Note You can freeze (still) the screen image. Parental controls include two ratings: MPAA (based on age) and TV Parental Guidelines (based on content and age). The Time Set menu opens. 3 Press MENU or EXIT to highlight Feature. The Feature menu opens. 3...channel: 1 Press the MENU button. To view closed captions: • Press the CCD button repeatedly to set controls for long periods of programs your TV 3 Press the button to enter the sub-menu, then or to highlight Channel Labels. Adding a channel label To add a label to select the ...
...button repeatedly to the previous menu. Note You can freeze (still) the screen image. Parental controls include two ratings: MPAA (based on age) and TV Parental Guidelines (based on content and age). The Time Set menu opens. 3 Press MENU or EXIT to highlight Feature. The Feature menu opens. 3...channel: 1 Press the MENU button. To view closed captions: • Press the CCD button repeatedly to set controls for long periods of programs your TV 3 Press the button to enter the sub-menu, then or to highlight Channel Labels. Adding a channel label To add a label to select the ...
User Manual (English)
Page 9
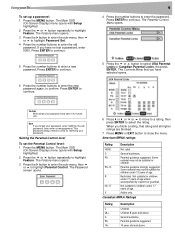
... or EXIT button to close the menu. Parental guidance suggested . 14 years old and above Parental guidance strongly suggested. The Password screen opens. Using your TV To set the Parental Control level: 1 Press the MENU button. The Feature menu opens. 3 Press the button to enter the sub-menu, then or to...
... or EXIT button to close the menu. Parental guidance suggested . 14 years old and above Parental guidance strongly suggested. The Password screen opens. Using your TV To set the Parental Control level: 1 Press the MENU button. The Feature menu opens. 3 Press the button to enter the sub-menu, then or to...
User Manual (English)
Page 10
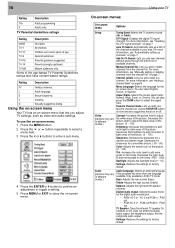
...-Adjusts the high sounds (treble). Balance-Adjusts the right and left speaker volumes. PCM out. • PCM: AC-3 in ATSC TV mode. Settings-Restores the settings to adjust the white areas of the channels available in different modes.) Contrast-Increases the picture level to... level to close the on page 7. Bass-Adjusts the low sounds (bass). TV Speaker-Turns the internal TV speaker On (default) or Off. TV Parental Guidelines ratings Rating Description NONE TV-Y TV-Y7 TV-G TV-PG TV-14 TV-MA Not rated. Parental guidance suggested. Mature audiences only. Some of age. ...
...-Adjusts the high sounds (treble). Balance-Adjusts the right and left speaker volumes. PCM out. • PCM: AC-3 in ATSC TV mode. Settings-Restores the settings to adjust the white areas of the channels available in different modes.) Contrast-Increases the picture level to... level to close the on page 7. Bass-Adjusts the low sounds (bass). TV Speaker-Turns the internal TV speaker On (default) or Off. TV Parental Guidelines ratings Rating Description NONE TV-Y TV-Y7 TV-G TV-PG TV-14 TV-MA Not rated. Parental guidance suggested. Mature audiences only. Some of age. ...

User Manual (English)
Page 11
.... • Make sure that are too hot or too cold, because the cabinet may warp or the screen may malfunction. • Storage temperatures are 32° to 122°F (0° to 50°C). • Working temperatures are 41° to 104°F (5° to another connected device ...symbols on page 8. symbols in direct sunlight or near a heat source. Caution Avoid the following, because it may be caused by obstructions to repair your TV. • Make sure that the incoming signal is compatible. • Make sure the antenna is selected. • Make sure that the video cables...
.... • Make sure that are too hot or too cold, because the cabinet may warp or the screen may malfunction. • Storage temperatures are 32° to 122°F (0° to 50°C). • Working temperatures are 41° to 104°F (5° to another connected device ...symbols on page 8. symbols in direct sunlight or near a heat source. Caution Avoid the following, because it may be caused by obstructions to repair your TV. • Make sure that the incoming signal is compatible. • Make sure the antenna is selected. • Make sure that the video cables...
User Manual (English)
Page 12
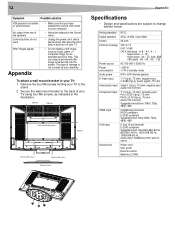
... Channel coverage Power source Power consumption Audio power S-Video input Video/audio input Component input HDMI input VGA input Accessories NTSC ATSC, 8-VSB, Clear-QAM 32-inch VHF: 2-13 UHF: 14-69 CATV: Mid band - A-8 ~ A-1, A ~ I Super band - 12 Appendix Symptom Possible solution VGA picture is not ... mount bracket to the back of time. J ~ W Hyper band - Appendix To attach a wall mount bracket to your TV: 1 Remove the four M6 screws holding your TV using four M6 screws, as indicated in the illustration. 200 mm 200 mm Attach wall bracket here 200 mm Remove M6 screws...
... Channel coverage Power source Power consumption Audio power S-Video input Video/audio input Component input HDMI input VGA input Accessories NTSC ATSC, 8-VSB, Clear-QAM 32-inch VHF: 2-13 UHF: 14-69 CATV: Mid band - A-8 ~ A-1, A ~ I Super band - 12 Appendix Symptom Possible solution VGA picture is not ... mount bracket to the back of time. J ~ W Hyper band - Appendix To attach a wall mount bracket to your TV: 1 Remove the four M6 screws holding your TV using four M6 screws, as indicated in the illustration. 200 mm 200 mm Attach wall bracket here 200 mm Remove M6 screws...
User Manual (English)
Page 13
...which the receiver is connected. • Consult the dealer or an experienced radio or TV technician for a Class B digital device, pursuant to Part 15 of the FCC Rules. Copyright © 2007 Dynex. Specifications and features are trademarks or registered trademarks of Best Buy Enterprise Services, Inc.... Cables Connections to this device that to which can radiate radio frequency energy and, if not installed and used . DYNEX and the DYNEX logo are not expressly approved by one or more of the Canadian Interference-Causing Equipment Regulations. This equipment generates, uses and ...
...which the receiver is connected. • Consult the dealer or an experienced radio or TV technician for a Class B digital device, pursuant to Part 15 of the FCC Rules. Copyright © 2007 Dynex. Specifications and features are trademarks or registered trademarks of Best Buy Enterprise Services, Inc.... Cables Connections to this device that to which can radiate radio frequency energy and, if not installed and used . DYNEX and the DYNEX logo are not expressly approved by one or more of the Canadian Interference-Causing Equipment Regulations. This equipment generates, uses and ...


