User Manual (English)
Page 2
Dynex DX-LCD26-09 26" LCDTV 720P Contents Safety information 4 Features 5 Front 5 Remote control 5 Setting up your TV 6 Installing remote control batteries 6 Connecting your TV to a power outlet 6 Connecting an outside antenna 7 Connecting cable TV 7 Connecting to an external signal source 7 Connecting a computer 8 Using your TV 8 Turning your TV on and off 8 Selecting the TV ...10 Setting parental controls 10 Using the on-screen menu 11 On-screen menus 11 Maintaining 12 Cleaning your TV 12 Troubleshooting 13 Specifications 14 One-year limited warranty 15 Español 17 2
Dynex DX-LCD26-09 26" LCDTV 720P Contents Safety information 4 Features 5 Front 5 Remote control 5 Setting up your TV 6 Installing remote control batteries 6 Connecting your TV to a power outlet 6 Connecting an outside antenna 7 Connecting cable TV 7 Connecting to an external signal source 7 Connecting a computer 8 Using your TV 8 Turning your TV on and off 8 Selecting the TV ...10 Setting parental controls 10 Using the on-screen menu 11 On-screen menus 11 Maintaining 12 Cleaning your TV 12 Troubleshooting 13 Specifications 14 One-year limited warranty 15 Español 17 2
User Manual (English)
Page 3
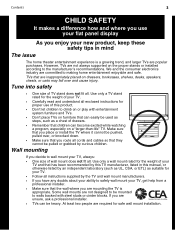
... are not always supported on or play with steel studs or cinder blocks. Make sure that can easily be pulled or grabbed by the TV and wall mount manufacturers. • If you have any doubts about your ability to climb on the proper stands or installed according to ...making home entertainment enjoyable and safe. Some wall mounts are not designed to be mounted to walls backed with entertainment system furniture and TVs. • Don't place TVs on dressers, bookcases, shelves, desks, speakers, chests, or carts may fall over , or knocked down. • Make sure that you route ...
... are not always supported on or play with steel studs or cinder blocks. Make sure that can easily be pulled or grabbed by the TV and wall mount manufacturers. • If you have any doubts about your ability to climb on the proper stands or installed according to ...making home entertainment enjoyable and safe. Some wall mounts are not designed to be mounted to walls backed with entertainment system furniture and TVs. • Don't place TVs on dressers, bookcases, shelves, desks, speakers, chests, or carts may fall over , or knocked down. • Make sure that you route ...
User Manual (English)
Page 4
... cracked wire insulation are important operating and maintenance instructions in particular, specifies that the antenna or cable system is provided for your TV has been exposed to rain or moisture, does not operate normally, or has been dropped. Protect the power cord from physical...of the mast and supporting structure, grounding of the lead-in wire to an antenna discharge unit, size of grounding conductors, location of your TV, and have a qualified electrician install a separate circuit breaker. These non-active pixels do not adversely affect the performance of these instructions. ...
... cracked wire insulation are important operating and maintenance instructions in particular, specifies that the antenna or cable system is provided for your TV has been exposed to rain or moisture, does not operate normally, or has been dropped. Protect the power cord from physical...of the mast and supporting structure, grounding of the lead-in wire to an antenna discharge unit, size of grounding conductors, location of your TV, and have a qualified electrician install a separate circuit breaker. These non-active pixels do not adversely affect the performance of these instructions. ...
User Manual (English)
Page 5
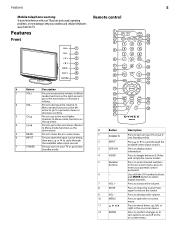
...9 VOL - 10 MENU 11 12 ENTER Description Press to turn options on and off in the on your cordless and cellular telephones away from the TV. Press to move down arrow. 5 MENU Press to show the on-screen menu. 6 INPUT Press to open the on your parental control password....to the next higher channel. Press to restore the sound. Press again to increase the volume. Use with your TV picture and sound, operating problems, or even damage, keep your TV or put it into Standby mode. Press to cycle through the available video input sources. 7 POWER Press to ...
...9 VOL - 10 MENU 11 12 ENTER Description Press to turn options on and off in the on your cordless and cellular telephones away from the TV. Press to move down arrow. 5 MENU Press to show the on-screen menu. 6 INPUT Press to open the on your parental control password....to the next higher channel. Press to restore the sound. Press again to increase the volume. Use with your TV picture and sound, operating problems, or even damage, keep your TV or put it into Standby mode. Press to cycle through the available video input sources. 7 POWER Press to ...

User Manual (English)
Page 6
.... Notes: Do not mix batteries of power. You can adjust these settings without opening the on the batteries with the + and - Either move your TV. symbols on -screen menu. symbols in the channel list. 24 FAVORITE Press to the next lower channel in the battery compartment. 3 Replace the cover....If the batteries leak, clean the battery compartment with high humidity. Press again to select the Bass or Treble setting. Do not use your TV. Do not freeze the video image for an extended period of time. You may not work if direct sunlight or bright light shines on ...
.... Notes: Do not mix batteries of power. You can adjust these settings without opening the on the batteries with the + and - Either move your TV. symbols on -screen menu. symbols in the channel list. 24 FAVORITE Press to the next lower channel in the battery compartment. 3 Replace the cover....If the batteries leak, clean the battery compartment with high humidity. Press again to select the Bass or Treble setting. Do not use your TV. Do not freeze the video image for an extended period of time. You may not work if direct sunlight or bright light shines on ...
User Manual (English)
Page 7
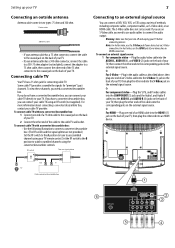
...pay) channels. The S-Video cable does not carry sound. Note: For better video, use audio cables to the coaxial jack on the back of your TV. To view these channels, you can connect a DVD, VCD, VCR, or STB using the converter/descrambler controls. If you do not have a ...converter/descrambler box, you need to use the S-Video jack if your cable TV provider. For more information about connecting a converter/descrambler box, contact your device has an S-Video connection. Set the RF switch to the B position...
...pay) channels. The S-Video cable does not carry sound. Note: For better video, use audio cables to the coaxial jack on the back of your TV. To view these channels, you can connect a DVD, VCD, VCR, or STB using the converter/descrambler controls. If you do not have a ...converter/descrambler box, you need to use the S-Video jack if your cable TV provider. For more information about connecting a converter/descrambler box, contact your device has an S-Video connection. Set the RF switch to the B position...
User Manual (English)
Page 8
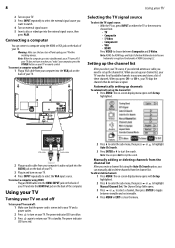
... Composite and S-Video. To add or delete channels: 1 Press MENU. Automatically setting up channels To automatically set up your channel list, your TV searches for all available channels in and turn off To turn on -screen display menu opens with Setup highlighted. Note: HDMI, the HDMI logo...When the computer goes into the VGA jack on the back of HDMI Licensing LLC. Note: You can manually add or delete channels from : • TV • Composite • S-Video • Component • VGA • HDMI Press VIDEO to choose between viewable and not viewable. 4 Press MENU ...
... Composite and S-Video. To add or delete channels: 1 Press MENU. Automatically setting up channels To automatically set up your channel list, your TV searches for all available channels in and turn off To turn on -screen display menu opens with Setup highlighted. Note: HDMI, the HDMI logo...When the computer goes into the VGA jack on the back of HDMI Licensing LLC. Note: You can manually add or delete channels from : • TV • Composite • S-Video • Component • VGA • HDMI Press VIDEO to choose between viewable and not viewable. 4 Press MENU ...
User Manual (English)
Page 9
...Set. The on -screen display menu opens with Setup highlighted. 2 Press or repeatedly to the next lower or higher channel. Caution: To protect your TV 9 Changing channels To change the settings. 5 Press MENU or EXIT to close the menu. 4 Press or move the cursor to the label field,... a sub-channel: 1 Press the number buttons for the main channel (for example 8). 2 Press -, then press the sub-channel button (for the main TV program. Displaying status information To display status information: • Press DISPLAY. The Channel Label menu opens. 3 Press or to move the cursor to the channel...
...Set. The on -screen display menu opens with Setup highlighted. 2 Press or repeatedly to the next lower or higher channel. Caution: To protect your TV 9 Changing channels To change the settings. 5 Press MENU or EXIT to close the menu. 4 Press or move the cursor to the label field,... a sub-channel: 1 Press the number buttons for the main channel (for example 8). 2 Press -, then press the sub-channel button (for the main TV program. Displaying status information To display status information: • Press DISPLAY. The Channel Label menu opens. 3 Press or to move the cursor to the channel...

User Manual (English)
Page 10
.... Viewing closed captions Note: To select or customize digital closed caption option. Parental controls include two ratings: MPAA (based on age) and TV Parental Guidelines (based on -screen display menu opens with Setup highlighted. 2 Press or repeatedly to select the rating. If you should set ...or to enter a new password. Press ENTER to continue. 5 Press the number buttons to highlight Parental Control. Caution: Write down your TV Setting the Parental Control level To set controls for future use the Digital Captions or Digital Closed Caption sub-menus in the Feature menu. ...
.... Viewing closed captions Note: To select or customize digital closed caption option. Parental controls include two ratings: MPAA (based on age) and TV Parental Guidelines (based on -screen display menu opens with Setup highlighted. 2 Press or repeatedly to select the rating. If you should set ...or to enter a new password. Press ENTER to continue. 5 Press the number buttons to highlight Parental Control. Caution: Write down your TV Setting the Parental Control level To set controls for future use the Digital Captions or Digital Closed Caption sub-menus in the Feature menu. ...
User Manual (English)
Page 11
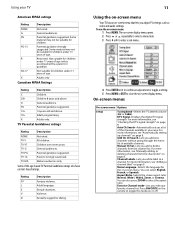
...Parental guidance strongly suggested . Not suitable for children under 17 years of the age-based TV Parental Guidelines ratings also have content-based ratings. PG Parental guidance suggested . TV-Y7 TV-G TV-PG TV-14 TV-MA Children over seven years. Parents strongly cautioned. Rating FV L S V D Description.... You can also press ZOOM to a channel. G General audiences. Restricted. X Adults only. DTV Signal-Displays the digital TV signal strength. Menu Language-Selects the language for children under 17 years of available channels. Some material may not be suitable for...
...Parental guidance strongly suggested . Not suitable for children under 17 years of the age-based TV Parental Guidelines ratings also have content-based ratings. PG Parental guidance suggested . TV-Y7 TV-G TV-PG TV-14 TV-MA Children over seven years. Parents strongly cautioned. Rating FV L S V D Description.... You can also press ZOOM to a channel. G General audiences. Restricted. X Adults only. DTV Signal-Displays the digital TV signal strength. Menu Language-Selects the language for children under 17 years of available channels. Some material may not be suitable for...
User Manual (English)
Page 12
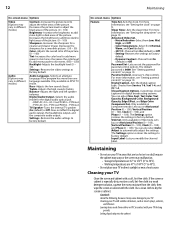
... if the program has more than one language available. Only available in - Treble-Adjusts the high sounds (treble). PCM out/PCM in ATSC TV mode. For more information, see "Setting the clock" on page 10. For more information, see "Setting parental controls" on page 10....Caption Options-Customizes closed captions for long periods. The Settings option restores the settings to factory default. Cleaning your TV Clean the screen and cabinet with your TV for digital broadcasting systems. You can also select Auto Adjust to automatically adjust the settings. CautionS: Avoid the ...
... if the program has more than one language available. Only available in - Treble-Adjusts the high sounds (treble). PCM out/PCM in ATSC TV mode. For more information, see "Setting the clock" on page 10. For more information, see "Setting parental controls" on page 10....Caption Options-Customizes closed captions for long periods. The Settings option restores the settings to factory default. Cleaning your TV Clean the screen and cabinet with your TV for digital broadcasting systems. You can also select Auto Adjust to automatically adjust the settings. CautionS: Avoid the ...
User Manual (English)
Page 13
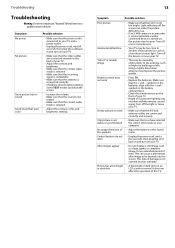
... No picture Good picture but no sound Good sound but poor color Possible solution • Make sure that the power cord is connected to your TV. • Make sure that the A/V and antenna cables are connected securely to the back of damage is connected correctly. • Check the closed ... signal. Make sure that the antenna is not covered by obstructions to the antenna, such as a hair dryer or neon light. This type of your TV. • Adjust the contrast and brightness. • Make sure that the correct video mode is selected. • Make sure that the incoming signal is...
... No picture Good picture but no sound Good sound but poor color Possible solution • Make sure that the power cord is connected to your TV. • Make sure that the A/V and antenna cables are connected securely to the back of damage is connected correctly. • Check the closed ... signal. Make sure that the antenna is not covered by obstructions to the antenna, such as a hair dryer or neon light. This type of your TV. • Adjust the contrast and brightness. • Make sure that the correct video mode is selected. • Make sure that the incoming signal is...
User Manual (English)
Page 14
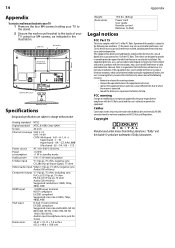
... V 50/60 Hz Power consumption 14 Appendix Appendix To attach a wall mount bracket to your TV: 1 Remove the four M4 screws holding your TV to the stand. 2 Secure the wall mount bracket to the back of your TV using four M4 screws, as indicated in the illustration. 200 mm M4 screws Attach wall...
... V 50/60 Hz Power consumption 14 Appendix Appendix To attach a wall mount bracket to your TV: 1 Remove the four M4 screws holding your TV to the stand. 2 Secure the wall mount bracket to the back of your TV using four M4 screws, as indicated in the illustration. 200 mm M4 screws Attach wall...


