User Manual (English)
Page 2
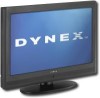
Dynex DX-LCD26-09 26" LCDTV 720P Contents Safety information 4 Features 5 Front 5 Remote control 5 Setting up your TV 6 Installing remote control batteries 6 Connecting your TV to a power outlet 6 Connecting an outside antenna 7 Connecting cable TV 7 Connecting to an external signal source 7...Adding a channel label 9 Freezing the picture 9 Setting the clock 9 Setting the sleep timer 10 Viewing closed captions 10 Setting parental controls 10 Using the on-screen menu 11 On-screen menus 11 Maintaining 12 Cleaning your TV 12 Troubleshooting 13 Specifications 14 One-year limited...
Dynex DX-LCD26-09 26" LCDTV 720P Contents Safety information 4 Features 5 Front 5 Remote control 5 Setting up your TV 6 Installing remote control batteries 6 Connecting your TV to a power outlet 6 Connecting an outside antenna 7 Connecting cable TV 7 Connecting to an external signal source 7...Adding a channel label 9 Freezing the picture 9 Setting the clock 9 Setting the sleep timer 10 Viewing closed captions 10 Setting parental controls 10 Using the on-screen menu 11 On-screen menus 11 Maintaining 12 Cleaning your TV 12 Troubleshooting 13 Specifications 14 One-year limited...
User Manual (English)
Page 5
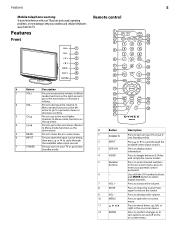
... put it into Standby mode. Press to increase the volume. Features Front 1 2 3 4 5 6 7 # Button Description 1 VOL+ Press to decrease the volume. Remote control 1 INPUT DISPLAY POWER 2 18 3 VIDEO COMP HDMI TV 19 4 123 20 5 456 789 RECALL 6 0 21 7 MUTE VOL CH 22 8 FAVORITE 9 VOL ...Standby mode. In Menu mode, functions as the left , or right in the on -screen menu. In the on your parental control password. Features 5 Mobile telephone warning To avoid interference with the 0-9 number buttons and ENTER button to select digital channels. Press to...
... put it into Standby mode. Press to increase the volume. Features Front 1 2 3 4 5 6 7 # Button Description 1 VOL+ Press to decrease the volume. Remote control 1 INPUT DISPLAY POWER 2 18 3 VIDEO COMP HDMI TV 19 4 123 20 5 456 789 RECALL 6 0 21 7 MUTE VOL CH 22 8 FAVORITE 9 VOL ...Standby mode. In Menu mode, functions as the left , or right in the on -screen menu. In the on your parental control password. Features 5 Mobile telephone warning To avoid interference with the 0-9 number buttons and ENTER button to select digital channels. Press to...

User Manual (English)
Page 6
... to freeze the video image. Do not freeze the video image for long periods of different types. Either move your TV Installing remote control batteries To install the remote control batteries: 1 Remove the battery cover. 2 Insert two AAA batteries into a power outlet. Setting up your TV or change the... of power. You may not work if direct sunlight or bright light shines on -screen menu. Do not use the remote control: • Point the remote control towards the remote sensor on your TV. Notes: Do not mix batteries of time. If chemicals touch your TV to select one of ...
... to freeze the video image. Do not freeze the video image for long periods of different types. Either move your TV Installing remote control batteries To install the remote control batteries: 1 Remove the battery cover. 2 Insert two AAA batteries into a power outlet. Setting up your TV or change the... of power. You may not work if direct sunlight or bright light shines on -screen menu. Do not use the remote control: • Point the remote control towards the remote sensor on your TV. Notes: Do not mix batteries of time. If chemicals touch your TV to select one of ...
User Manual (English)
Page 7
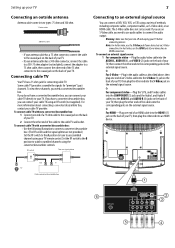
... jack on the external signal source. Connecting cable TV Your TV has a 75 ohm jack for "premium" (pay) channels. If you can connect your TV remote control. For best video, use an S-Video cable, you need to an external signal source You can connect your cable TV directly to connect the audio... use the HDMI jack if your cable TV provider. Warning: Make sure that you can connect a DVD, VCD, VCR, or STB using the converter/descrambler controls. Note: For better video, use audio cables to your TV before connecting devices.
... jack on the external signal source. Connecting cable TV Your TV has a 75 ohm jack for "premium" (pay) channels. If you can connect your TV remote control. For best video, use an S-Video cable, you need to an external signal source You can connect your cable TV directly to connect the audio... use the HDMI jack if your cable TV provider. Warning: Make sure that you can connect a DVD, VCD, VCR, or STB using the converter/descrambler controls. Note: For better video, use audio cables to your TV before connecting devices.
User Manual (English)
Page 8
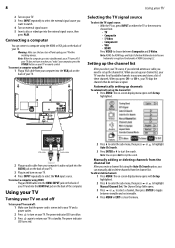
... sub-menu, then press or to highlight Auto Ch Search. 3 Press ENTER or to choose from the channel list After you "wake" your TV or remote control. To add or delete channels: 1 Press MENU. The Channel Setup Table opens. 3 Press or to select a channel, then press ENTER to toggle between Composite and... select the TV signal source: • With the TV on, press INPUT on your computer, press the POWER button on either the TV or the remote to start the search. When you press CH - The on the back of HDMI Licensing LLC. Connecting a computer You can connect a computer using VGA: 1 ...
... sub-menu, then press or to highlight Auto Ch Search. 3 Press ENTER or to choose from the channel list After you "wake" your TV or remote control. To add or delete channels: 1 Press MENU. The Channel Setup Table opens. 3 Press or to select a channel, then press ENTER to toggle between Composite and... select the TV signal source: • With the TV on, press INPUT on your computer, press the POWER button on either the TV or the remote to start the search. When you press CH - The on the back of HDMI Licensing LLC. Connecting a computer You can connect a computer using VGA: 1 ...
User Manual (English)
Page 9
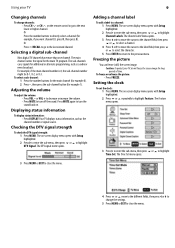
... additional or alternate programming, such as the channel number or signal source. Press MUTE again to the next lower or higher channel. The on the remote control to go to the previous menu. The Time Set menu opens. 3 Press MENU or EXIT to close the menu. 4 Press or move the cursor to...
... additional or alternate programming, such as the channel number or signal source. Press MUTE again to the next lower or higher channel. The on the remote control to go to the previous menu. The Time Set menu opens. 3 Press MENU or EXIT to close the menu. 4 Press or move the cursor to...
User Manual (English)
Page 13
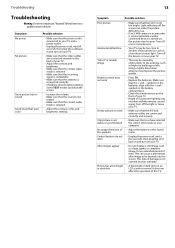
... selected. • Adjust the contrast, color, and brightness settings. 13 Symptom Possible solution Poor picture Horizontal dotted line "Ghost" or double image Remote control does not work • Unplug the power cord, wait a few bright or dark dots on your TV. • Adjust the contrast and ...sure that the + and - This type of • Adjust the balance in the battery compartment. • Clean the remote sensor on the batteries align with the remote control signal. Some TEXT modes can cause a permanent after image to be burned into the screen. Refer all service to a ...
... selected. • Adjust the contrast, color, and brightness settings. 13 Symptom Possible solution Poor picture Horizontal dotted line "Ghost" or double image Remote control does not work • Unplug the power cord, wait a few bright or dark dots on your TV. • Adjust the contrast and ...sure that the + and - This type of • Adjust the balance in the battery compartment. • Clean the remote sensor on the batteries align with the remote control signal. Some TEXT modes can cause a permanent after image to be burned into the screen. Refer all service to a ...
User Manual (English)
Page 14
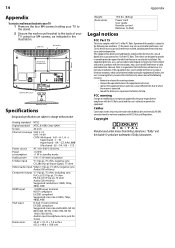
A-8 ~ A-1, A ~ I Super band - Analog standard NTSC Digital standard ATSC, 8-VSB, Clear-QAM Screen 26-inch Channel coverage VHF: 2-13 UHF: 14-69 CATV: Mid band - 14 Appendix Appendix To attach a wall mount bracket to your TV: 1 Remove the four M4 screws holding your TV to the stand. 2 Secure the wall mount bracket to the back of your TV using four M4 screws, as indicated in the illustration. 200 mm M4 screws Attach wall bracket here 200 mm Remove M4 screws Remove stand Specifications Design and specifications are subject to change without notice. J ~ W Hyper band - AA ~ ZZ,...
A-8 ~ A-1, A ~ I Super band - Analog standard NTSC Digital standard ATSC, 8-VSB, Clear-QAM Screen 26-inch Channel coverage VHF: 2-13 UHF: 14-69 CATV: Mid band - 14 Appendix Appendix To attach a wall mount bracket to your TV: 1 Remove the four M4 screws holding your TV to the stand. 2 Secure the wall mount bracket to the back of your TV using four M4 screws, as indicated in the illustration. 200 mm M4 screws Attach wall bracket here 200 mm Remove M4 screws Remove stand Specifications Design and specifications are subject to change without notice. J ~ W Hyper band - AA ~ ZZ,...


