User Manual (English)
Page 2
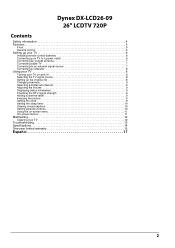
Dynex DX-LCD26-09 26" LCDTV 720P Contents Safety information 4 Features 5 Front 5 Remote control 5 Setting up your TV 6 Installing remote control batteries 6 Connecting your TV to a power outlet 6 Connecting ... the channel list 8 Changing channels 9 Selecting a digital sub-channel 9 Adjusting the volume 9 Displaying status information 9 Checking the DTV signal strength 9 Adding a channel label 9 Freezing the picture 9 Setting the clock 9 Setting the sleep timer 10 Viewing closed captions 10 Setting parental controls 10 Using the on-screen menu 11 On-screen menus...
Dynex DX-LCD26-09 26" LCDTV 720P Contents Safety information 4 Features 5 Front 5 Remote control 5 Setting up your TV 6 Installing remote control batteries 6 Connecting your TV to a power outlet 6 Connecting ... the channel list 8 Changing channels 9 Selecting a digital sub-channel 9 Adjusting the volume 9 Displaying status information 9 Checking the DTV signal strength 9 Adding a channel label 9 Freezing the picture 9 Setting the clock 9 Setting the sleep timer 10 Viewing closed captions 10 Setting parental controls 10 Using the on-screen menu 11 On-screen menus...
User Manual (English)
Page 5
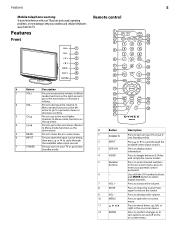
Use with your TV picture and sound, operating problems, or even damage, keep your parental control password. Press to open the input source menu, then press or to cycle through ... 22 8 FAVORITE 9 VOL CH 23 10 MENU 24 EXIT 25 11 ENTER 12 P-LOCK MTS/SAP CCD 13 26 ZOOM SLEEP FREEZE 14 27 15 PICTURE AUDIO 28 16 17 ZRC-102 # Button 1 POWER 2 INPUT 3 DISPLAY 4 VIDEO 5 Number buttons 6 - 7 VOL + 8 MUTE 9 VOL - 10 MENU 11 12 ENTER Description Press to enter...
Use with your TV picture and sound, operating problems, or even damage, keep your parental control password. Press to open the input source menu, then press or to cycle through ... 22 8 FAVORITE 9 VOL CH 23 10 MENU 24 EXIT 25 11 ENTER 12 P-LOCK MTS/SAP CCD 13 26 ZOOM SLEEP FREEZE 14 27 15 PICTURE AUDIO 28 16 17 ZRC-102 # Button 1 POWER 2 INPUT 3 DISPLAY 4 VIDEO 5 Number buttons 6 - 7 VOL + 8 MUTE 9 VOL - 10 MENU 11 12 ENTER Description Press to enter...

User Manual (English)
Page 6
...; Plug the power cord into the battery compartment. See the label on the remote sensor. In ATSC mode, press to select the audio language. 16 PICTURE Press to select the Bass or Treble setting. For more information, see "Viewing closed captions on setting up your TV Installing remote control batteries To...
...; Plug the power cord into the battery compartment. See the label on the remote sensor. In ATSC mode, press to select the audio language. 16 PICTURE Press to select the Bass or Treble setting. For more information, see "Viewing closed captions on setting up your TV Installing remote control batteries To...
User Manual (English)
Page 9
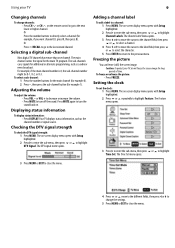
... display menu opens with Setup highlighted. 2 Press to enter the sub-menu, then press or to highlight DTV Signal. To freeze or unfreeze the picture: • Press FREEZE. Adjusting the volume To adjust the volume: • Press VOL - Displaying status information To display status information: •...for example, if you want channel 83, press 8, then press 3). Adding a channel label To add a label to highlight Time Set. Freezing the picture You can freeze (still) the screen image. Checking the DTV signal strength To check the DTV signal strength: 1 Press MENU. ENTER 3 Press to...
... display menu opens with Setup highlighted. 2 Press to enter the sub-menu, then press or to highlight DTV Signal. To freeze or unfreeze the picture: • Press FREEZE. Adjusting the volume To adjust the volume: • Press VOL - Displaying status information To display status information: •...for example, if you want channel 83, press 8, then press 3). Adding a channel label To add a label to highlight Time Set. Freezing the picture You can freeze (still) the screen image. Checking the DTV signal strength To check the DTV signal strength: 1 Press MENU. ENTER 3 Press to...
User Manual (English)
Page 12
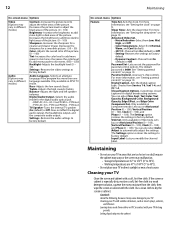
...Video (Options may vary in different modes.) Audio (Options may vary in different modes.) Contrast-Increases the picture level to adjust the white areas of the picture. PCM out. The Settings option restores the settings to factory default. If the screen or cabinet is 0000... may cause damage to automatically adjust the settings. For more than one language available. Decreases the sharpness for a smoother picture. (-50 ~ 50) Color-Adjusts the overall color of the picture. (0 ~ 100) Sharpness-Increases the sharpness for the digital audio optical jack. • RAW: AC-3 in contact...
...Video (Options may vary in different modes.) Audio (Options may vary in different modes.) Contrast-Increases the picture level to adjust the white areas of the picture. PCM out. The Settings option restores the settings to factory default. If the screen or cabinet is 0000... may cause damage to automatically adjust the settings. For more than one language available. Decreases the sharpness for a smoother picture. (-50 ~ 50) Color-Adjusts the overall color of the picture. (0 ~ 100) Sharpness-Increases the sharpness for the digital audio optical jack. • RAW: AC-3 in contact...
User Manual (English)
Page 13
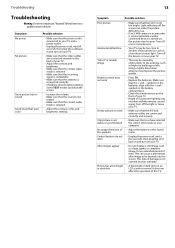
... operation of • Adjust the balance in and turn on the batteries align with the remote control signal. Symptom No power No picture Good picture but no sound Good sound but poor color Possible solution • Make sure that the video cables are connected correctly and securely....the Sound the speakers menu. After images appear • Do not display a still image, such as high-rise buildings or hills. VGA picture is normal. Make sure that you have selected the correct VGA mode on the front of damage is not too bright. Troubleshooting Troubleshooting Warning...
... operation of • Adjust the balance in and turn on the batteries align with the remote control signal. Symptom No power No picture Good picture but no sound Good sound but poor color Possible solution • Make sure that the video cables are connected correctly and securely....the Sound the speakers menu. After images appear • Do not display a still image, such as high-rise buildings or hills. VGA picture is normal. Make sure that you have selected the correct VGA mode on the front of damage is not too bright. Troubleshooting Troubleshooting Warning...


