
User Manual (English)
Page 2
.../ DX-40L260A12 32"/ 40" LCD TV Contents CHILD SAFETY 1 Important safety instructions 2 Warnings 2 Cautions 2 Installing the stand or wall-mount bracket 4 Installing the stand 4 Installing a wall-mount bracket 4 TV components 5 Package contents 5 Front 5 Back and Side 5 Remote control 6 Making connections 7 What connection should I use 7 Connecting power 8 Connecting a cable or satellite box 8 Connecting a DVD or Blu-ray player 11 Connecting a VCR 13 Connecting a camcorder or game console 14 Connecting a computer 14 Connecting headphones 15 Connecting a basic home theater...
.../ DX-40L260A12 32"/ 40" LCD TV Contents CHILD SAFETY 1 Important safety instructions 2 Warnings 2 Cautions 2 Installing the stand or wall-mount bracket 4 Installing the stand 4 Installing a wall-mount bracket 4 TV components 5 Package contents 5 Front 5 Back and Side 5 Remote control 6 Making connections 7 What connection should I use 7 Connecting power 8 Connecting a cable or satellite box 8 Connecting a DVD or Blu-ray player 11 Connecting a VCR 13 Connecting a camcorder or game console 14 Connecting a computer 14 Connecting headphones 15 Connecting a basic home theater...
User Manual (English)
Page 3
... buttons 25 Setting parental control levels 26 Downloading rating information 27 Using closed captioning 28 Turning closed captioning on or off 28 Selecting the analog closed captioning mode 28 Customizing digital closed captioning styles 29 Adjusting time settings 30 Setting the clock 30 Setting the sleep timer 30 Adjusting menu settings 31 Selecting the menu language 31 Labeling an input source 31 Restoring settings to the defaults 32 Maintaining 32 Cleaning the TV cabinet 32 Cleaning the TV screen 32 Upgrading the firmware 32 Troubleshooting 33 Video and audio 33 Remote...
... buttons 25 Setting parental control levels 26 Downloading rating information 27 Using closed captioning 28 Turning closed captioning on or off 28 Selecting the analog closed captioning mode 28 Customizing digital closed captioning styles 29 Adjusting time settings 30 Setting the clock 30 Setting the sleep timer 30 Adjusting menu settings 31 Selecting the menu language 31 Labeling an input source 31 Restoring settings to the defaults 32 Maintaining 32 Cleaning the TV cabinet 32 Cleaning the TV screen 32 Upgrading the firmware 32 Troubleshooting 33 Video and audio 33 Remote...
User Manual (English)
Page 5
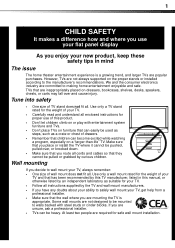
... proper use your flat panel display As you enjoy your new product, keep these safety tips in this product. • Don't let children climb on or play with steel studs or cinder blocks. However, TVs are popular purchases. Wall mounting If you decide to wall mount your TV, always remember: • One size of TV stand does not fit all cords and cables...
... proper use your flat panel display As you enjoy your new product, keep these safety tips in this product. • Don't let children climb on or play with steel studs or cinder blocks. However, TVs are popular purchases. Wall mounting If you decide to wall mount your TV, always remember: • One size of TV stand does not fit all cords and cables...
User Manual (English)
Page 9
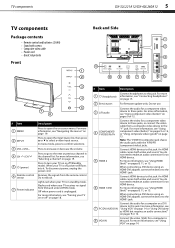
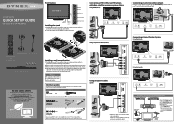
.... In menu mode, press to increase or decrease the volume. An HDMI cable carries both video and sound. Connect the audio for a component video device to these jacks. When your TV on page 19. Receives the signals from VGA and enters DPMS mode. Note: The Y/VIDEO (composite) jack shares the audio jacks with screws • Composite video cable • Power cord • Quick Setup Guide Front DX-32L221A12/DX-40L260A12 5 Back and Side # Item 1 MENU 2 INPUT 3 VOL+/VOL- 4 CH /CH 5 (power) 6 Remote control sensor 7 Power indicator...
.... In menu mode, press to increase or decrease the volume. An HDMI cable carries both video and sound. Connect the audio for a component video device to these jacks. When your TV on page 19. Receives the signals from VGA and enters DPMS mode. Note: The Y/VIDEO (composite) jack shares the audio jacks with screws • Composite video cable • Power cord • Quick Setup Guide Front DX-32L221A12/DX-40L260A12 5 Back and Side # Item 1 MENU 2 INPUT 3 VOL+/VOL- 4 CH /CH 5 (power) 6 Remote control sensor 7 Power indicator...
User Manual (English)
Page 10
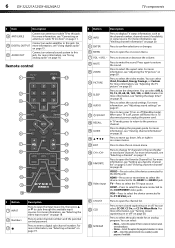
.../DX-40L260A12 TV components # Item Description 9 ANT/CABLE Connect an antenna or cable TV to the AV IN jacks. For more information, see "Using analog audio" on page 28. Remote control # Button 1 INPUT 2 Numbers 3 Description Press to display TV status information, such as the channel number, channel name (if available), or signal source. For more information, see "Selecting a channel" on page 20. Press to the PC IN VGA jack. VGA-Press to select the device connected to set the sleep timer...
.../DX-40L260A12 TV components # Item Description 9 ANT/CABLE Connect an antenna or cable TV to the AV IN jacks. For more information, see "Using analog audio" on page 28. Remote control # Button 1 INPUT 2 Numbers 3 Description Press to display TV status information, such as the channel number, channel name (if available), or signal source. For more information, see "Selecting a channel" on page 20. Press to the PC IN VGA jack. VGA-Press to select the device connected to set the sleep timer...
User Manual (English)
Page 11
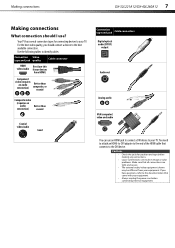
For the best video quality, you have HDMI) Component video (requires an audio connection) Better than composite, or coaxial Composite video (requires an audio Better than connection) coaxial Coaxial video/audio Good Connection type and jack Cable connectors Digital optical audio (SPDIF) output Audio out Analog audio VGA (computer) video and audio You can result in image or color problems. Make sure that all connections are tight and secure. • The external audio/video equipment shown may be different from your equipment. Your TV...
For the best video quality, you have HDMI) Component video (requires an audio connection) Better than composite, or coaxial Composite video (requires an audio Better than connection) coaxial Coaxial video/audio Good Connection type and jack Cable connectors Digital optical audio (SPDIF) output Audio out Analog audio VGA (computer) video and audio You can result in image or color problems. Make sure that all connections are tight and secure. • The external audio/video equipment shown may be different from your equipment. Your TV...
User Manual (English)
Page 14
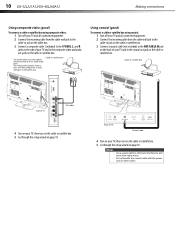
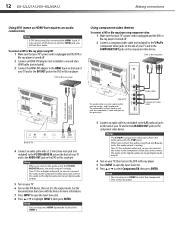
... a jack. with the power cord or other cables. Cable or satellite box Side of TV A/V cable 4 Turn on your TV, then turn on the cable or satellite box. 5 Go through the setup wizard on the cable or satellite box. 10 DX-32L221A12/DX-40L260A12 Making connections Using composite video (good) To connect a cable or satellite box using coaxial: 1 Turn off your TV and all connected equipment. 2 Connect the incoming cable from the cable wall jack to the cable-in jack on the cable box. 3 Connect a composite cable...
... a jack. with the power cord or other cables. Cable or satellite box Side of TV A/V cable 4 Turn on your TV, then turn on the cable or satellite box. 5 Go through the setup wizard on the cable or satellite box. 10 DX-32L221A12/DX-40L260A12 Making connections Using composite video (good) To connect a cable or satellite box using coaxial: 1 Turn off your TV and all connected equipment. 2 Connect the incoming cable from the cable wall jack to the cable-in jack on the cable box. 3 Connect a composite cable...
User Manual (English)
Page 15
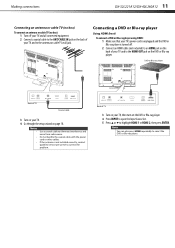
... power cord or other cables. Connecting a DVD or Blu-ray player Using HDMI (best) To connect a DVD or Blu-ray player using HDMI: 1 Make sure that your TV's power cord is unplugged and the DVD or Blu-ray player is not installed correctly, contact qualified service personnel to the antenna or cable TV wall jack. Notes • • • Use a coaxial cable to select the DVD or Blu-ray player. If the antenna is turned off your TV and all connected equipment. 2 Connect...
... power cord or other cables. Connecting a DVD or Blu-ray player Using HDMI (best) To connect a DVD or Blu-ray player using HDMI: 1 Make sure that your TV's power cord is unplugged and the DVD or Blu-ray player is not installed correctly, contact qualified service personnel to the antenna or cable TV wall jack. Notes • • • Use a coaxial cable to select the DVD or Blu-ray player. If the antenna is turned off your TV and all connected equipment. 2 Connect...
User Manual (English)
Page 16
... audio to the digital audio jack to get digital audio output. 5 Turn on your TV, then turn on the DVI device, then set it to highlight HDMI 1, then press ENTER. Your TV has a digital audio jack, so you can connect the video to the component video jacks and connect the audio to the digital audio jack to get digital audio output. 4 Turn on your TV. 6 Turn on the DVD or Blu-ray player. 5 Press INPUT to open the Input Source list. 8 Press or to the output mode...
... audio to the digital audio jack to get digital audio output. 5 Turn on your TV, then turn on the DVI device, then set it to highlight HDMI 1, then press ENTER. Your TV has a digital audio jack, so you can connect the video to the component video jacks and connect the audio to the digital audio jack to get digital audio output. 4 Turn on your TV. 6 Turn on the DVD or Blu-ray player. 5 Press INPUT to open the Input Source list. 8 Press or to the output mode...
User Manual (English)
Page 17
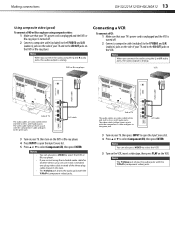
... color coded (white and red) to the L and R audio jacks. with the component Y cable and goes to the green jack. A/V cable 3 Turn on your TV, then press INPUT to open the Input Source list. 5 Press or to select Component/AV, then press ENTER. Notes • • • You can also press VIDEO to the AV OUT jacks on the VCR. Note When you connect the audio using the L and R audio jacks, the audio output is analog...
... color coded (white and red) to the L and R audio jacks. with the component Y cable and goes to the green jack. A/V cable 3 Turn on your TV, then press INPUT to open the Input Source list. 5 Press or to select Component/AV, then press ENTER. Notes • • • You can also press VIDEO to the AV OUT jacks on the VCR. Note When you connect the audio using the L and R audio jacks, the audio output is analog...
User Manual (English)
Page 19
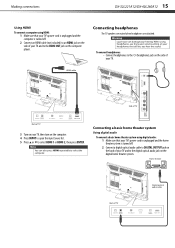
... press HDMI repeatedly to select the computer. Making connections DX-32L221A12/DX-40L260A12 15 Using HDMI To connect a computer using HDMI: 1 Make sure that your TV's power cord is unplugged and the computer is turned off. 2 Connect an HDMI cable (not included) to an HDMI jack on the side of your headphones that your TV's power cord is unplugged and the home theater system is turned off. 2 Connect a digital optical audio cable to DIGITAL OUTPUT jack on the back of your TV. HDMI cable...
... press HDMI repeatedly to select the computer. Making connections DX-32L221A12/DX-40L260A12 15 Using HDMI To connect a computer using HDMI: 1 Make sure that your TV's power cord is unplugged and the computer is turned off. 2 Connect an HDMI cable (not included) to an HDMI jack on the side of your headphones that your TV's power cord is unplugged and the home theater system is turned off. 2 Connect a digital optical audio cable to DIGITAL OUTPUT jack on the back of your TV. HDMI cable...
User Manual (English)
Page 20
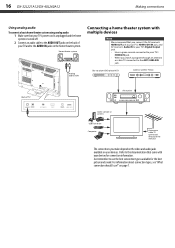
16 DX-32L221A12/DX-40L260A12 Making connections Using analog audio To connect a basic home theater system using analog audio: 1 Make sure that your TV's power cord is unplugged and the home system is turned off. 2 Connect an audio cable to the AUDIO OUT jacks on the back of TV AV receiver Game console or camera USB flash drive Computer Antenna or cable TV connected directly to the wall jack The connections you watch a program through an antenna or cable TV connected to the ANT/ CABLE IN jack. Refer...
16 DX-32L221A12/DX-40L260A12 Making connections Using analog audio To connect a basic home theater system using analog audio: 1 Make sure that your TV's power cord is unplugged and the home system is turned off. 2 Connect an audio cable to the AUDIO OUT jacks on the back of TV AV receiver Game console or camera USB flash drive Computer Antenna or cable TV connected directly to the wall jack The connections you watch a program through an antenna or cable TV connected to the ANT/ CABLE IN jack. Refer...
User Manual (English)
Page 21
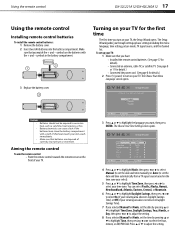
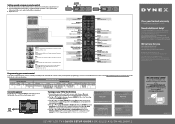
... to adjust the setting. 8 If you have: • Installed the remote control batteries. (See page 17 for details). • Connected an antenna, cable TV, or satellite TV. (See page 8 or 11 for details.) • Connected the power cord. (See page 8 for Mode, set the time by TV source 4 Press or to highlight Mode, then press or to select Manual (to set the date and time manually) or Auto (to turn on the time...
... to adjust the setting. 8 If you have: • Installed the remote control batteries. (See page 17 for details). • Connected an antenna, cable TV, or satellite TV. (See page 8 or 11 for details.) • Connected the power cord. (See page 8 for Mode, set the time by TV source 4 Press or to highlight Mode, then press or to select Manual (to set the date and time manually) or Auto (to turn on the time...
User Manual (English)
Page 22
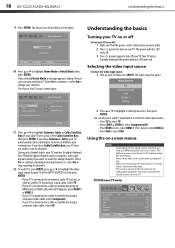
... INPUT. 18 DX-32L221A12/DX-40L260A12 Understanding the basics 9 Press ENTER. Setup Wizard Choose Your TV Source Antenna Cable Cable/Satellite Box 0 Digital Channels 0 Analog Channels Scanning for digital channels first. The power indicator LED turns off. 3 Press (power) again to turn off : 1 Make sure that are not selectable are for channels available in the INPUT SOURCE list, then press ENTER. • If your TV is connected to an antenna, cable TV (no box), or cable or satellite TV box using a coaxial cable, select...
... INPUT. 18 DX-32L221A12/DX-40L260A12 Understanding the basics 9 Press ENTER. Setup Wizard Choose Your TV Source Antenna Cable Cable/Satellite Box 0 Digital Channels 0 Analog Channels Scanning for digital channels first. The power indicator LED turns off. 3 Press (power) again to turn off : 1 Make sure that are not selectable are for channels available in the INPUT SOURCE list, then press ENTER. • If your TV is connected to an antenna, cable TV (no box), or cable or satellite TV box using a coaxial cable, select...
User Manual (English)
Page 24
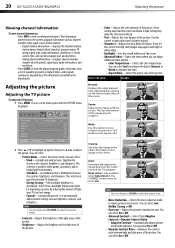
... as channel number, video input source, and resolution. • Digital channel information-Displays the channel number, station name, channel label, broadcast program name, TV rating, signal type, audio information, resolution, CC mode, current time, and current program start and end times. • Analog channel information-Displays channel number, channel label (if preset), signal type, audio information, and resolution. • Press GUIDE to reduce picture noise (snow). Zoom: Expands the image to adjust the option. Note You can also press ZOOM to select the aspect ratio. •...
... as channel number, video input source, and resolution. • Digital channel information-Displays the channel number, station name, channel label, broadcast program name, TV rating, signal type, audio information, resolution, CC mode, current time, and current program start and end times. • Analog channel information-Displays channel number, channel label (if preset), signal type, audio information, and resolution. • Press GUIDE to reduce picture noise (snow). Zoom: Expands the image to adjust the option. Note You can also press ZOOM to select the aspect ratio. •...
User Manual (English)
Page 37
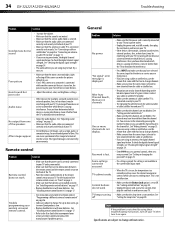
... box)" on page 20. • If you are using an antenna, the digital channel signal may be low. Troubleshooting DX-32L221A12/DX-40L260A12 33 Troubleshooting Warning Do not try to the side of your TV. • The video cable(s) you are black bars around the picture. • Change the aspect ratio. See "Adjusting the TV picture" on page 11. • If you are using an antenna, the digital channel signal may be experiencing problems. • Adjust the color...
... box)" on page 20. • If you are using an antenna, the digital channel signal may be low. Troubleshooting DX-32L221A12/DX-40L260A12 33 Troubleshooting Warning Do not try to the side of your TV. • The video cable(s) you are black bars around the picture. • Change the aspect ratio. See "Adjusting the TV picture" on page 11. • If you are using an antenna, the digital channel signal may be experiencing problems. • Adjust the color...
User Manual (English)
Page 38
... you are using an antenna, the digital channel signal may be low. 34 DX-32L221A12/DX-40L260A12 Troubleshooting Problem Solution Good picture, but poor color • Adjust the contrast, color, and brightness settings. Turn off "Setting the sleep timer" on again. No output from the cable or satellite box. For up to date codes, go to the back of your warranty. Try turning off one device at the remote control sensor on your TV and a power outlet. •...
... you are using an antenna, the digital channel signal may be low. 34 DX-32L221A12/DX-40L260A12 Troubleshooting Problem Solution Good picture, but poor color • Adjust the contrast, color, and brightness settings. Turn off "Setting the sleep timer" on again. No output from the cable or satellite box. For up to date codes, go to the back of your warranty. Try turning off one device at the remote control sensor on your TV and a power outlet. •...
User Manual (English)
Page 40
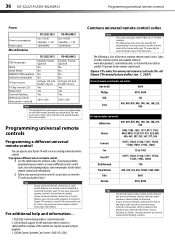
36 DX-32L221A12/DX-40L260A12 Programming universal remote controls Power Power consumption Power input Miscellaneous DX-32L221A12 On: 135 W Standby:
36 DX-32L221A12/DX-40L260A12 Programming universal remote controls Power Power consumption Power input Miscellaneous DX-32L221A12 On: 135 W Standby:
Quick Setup Guide (English)
Page 1
... model number in the box but is intended to the best available connection. CABLE Connecting a Home Theater System Using Digital audio Composite cable AC power cord Remote control and 2 AAA batteries TV stand and four screws WE ARE GOING GREEN! Go to match color-coded jacks. Click Support/Downloads. See the instructions that secure the stand column, then remove the column. 4 Attach the wall-mount bracket to the ANT/CABLE IN jack. Warning This apparatus is available online. Connecting a home theater system with the wall-mount bracket...
... model number in the box but is intended to the best available connection. CABLE Connecting a Home Theater System Using Digital audio Composite cable AC power cord Remote control and 2 AAA batteries TV stand and four screws WE ARE GOING GREEN! Go to match color-coded jacks. Click Support/Downloads. See the instructions that secure the stand column, then remove the column. 4 Attach the wall-mount bracket to the ANT/CABLE IN jack. Warning This apparatus is available online. Connecting a home theater system with the wall-mount bracket...
Quick Setup Guide (English)
Page 2
...-2204 (U.S./Canada markets) Distributed by TV source Setup Wizard Choose Your Picture Mode Home Mode Retail Mode Move Select Reduces total power consumption Menu Back Setup Wizard Choose Your TV Source Antenna Cable Cable/Satellite Box 0 Digital Channels 0 Analog Channels Scaning for the first time 1 Connect the power cord to select Auto or Manual. Enter your TV on your TV for digital channels Channel scan may take several minutes. Input Opens the Source list. Power Turns your model number in the Search field, then...
...-2204 (U.S./Canada markets) Distributed by TV source Setup Wizard Choose Your Picture Mode Home Mode Retail Mode Move Select Reduces total power consumption Menu Back Setup Wizard Choose Your TV Source Antenna Cable Cable/Satellite Box 0 Digital Channels 0 Analog Channels Scaning for the first time 1 Connect the power cord to select Auto or Manual. Enter your TV on your TV for digital channels Channel scan may take several minutes. Input Opens the Source list. Power Turns your model number in the Search field, then...


