FAQs (English)
Page 8
... bracket to the TV, then remove the stand column. 4. How do I attach my stand? DX-26L150A11 1. Lay the TV on the back of your TV using the four M6 screws provided with your TV...DX-32L150A11, DX-37L150A11, DX-46L150A11 1. Remove the stand from the TV to determine which device is plugged in. The supplied batteries are wrapped tightly in again, then turn on using remote or button on TV, LED flashing). Unplug the power cord, wait a few seconds, plug the cord... new ones. Align the stand with the bracket. DX-32L150A11, DX-37L150A11, DX-46L150A11 1.
... bracket to the TV, then remove the stand column. 4. How do I attach my stand? DX-26L150A11 1. Lay the TV on the back of your TV using the four M6 screws provided with your TV...DX-32L150A11, DX-37L150A11, DX-46L150A11 1. Remove the stand from the TV to determine which device is plugged in. The supplied batteries are wrapped tightly in again, then turn on using remote or button on TV, LED flashing). Unplug the power cord, wait a few seconds, plug the cord... new ones. Align the stand with the bracket. DX-32L150A11, DX-37L150A11, DX-46L150A11 1.

Firmware Installation Guide (English)
Page 2
...the USB device 16. The process is complete when the "Please Wait..." The upgrade is now complete. Reconnect the power cord to the wall outlet. 17. Insert USB device here 11. During the upgrade process, the power indicator will flicker in ) TV will flicker red and blue 13. the flickering of the... has been plugged in. Note: If the process takes more than 5 minutes, that means the upgrade failed. b. If the upgrade fails again contact Dynex at 1-800-305-2204. 14. disconnect the AC power wait 10 seconds, then reconnect the power cord to the wall outlet for a few seconds) a.
...the USB device 16. The process is complete when the "Please Wait..." The upgrade is now complete. Reconnect the power cord to the wall outlet. 17. Insert USB device here 11. During the upgrade process, the power indicator will flicker in ) TV will flicker red and blue 13. the flickering of the... has been plugged in. Note: If the process takes more than 5 minutes, that means the upgrade failed. b. If the upgrade fails again contact Dynex at 1-800-305-2204. 14. disconnect the AC power wait 10 seconds, then reconnect the power cord to the wall outlet for a few seconds) a.

Quick Setup Guide (English)
Page 1
Remote control and 2 AAA batteries AC power cord Component video cable Connecting a DVD or Blu-ray DVD player...Audio cable Note: Cable connectors and jacks are often color-coded. Universal remote control TV codes (for all Dynex TVs manufactured after Jan. 1, 2007) Universal remote control makers and models Philips PHDVD5, PH5DSS, PMDVR8, ... Front and side features 32", 37", 40", and 46" LCD TV QUICK SETUP GUIDE DX-32L150A11, DX-37L150A11, DX-40L130A11, and DX-46L150A11 Remote control Power sensor indicator Installing the stand 1 Remove the stand from damages and scratches. 2 Remove the...
Remote control and 2 AAA batteries AC power cord Component video cable Connecting a DVD or Blu-ray DVD player...Audio cable Note: Cable connectors and jacks are often color-coded. Universal remote control TV codes (for all Dynex TVs manufactured after Jan. 1, 2007) Universal remote control makers and models Philips PHDVD5, PH5DSS, PMDVR8, ... Front and side features 32", 37", 40", and 46" LCD TV QUICK SETUP GUIDE DX-32L150A11, DX-37L150A11, DX-40L130A11, and DX-46L150A11 Remote control Power sensor indicator Installing the stand 1 Remove the stand from damages and scratches. 2 Remove the...

User Manual (English)
Page 5
... 9 Do not defeat the safety purpose of the obsolete outlet. 10 Protect the power cord from the apparatus. 11 Only use caution when moving the cart/apparatus combination to avoid injury from the power outlet and refer servicing to qualified service technicians. If the screen breaks, be placed... service technician to perform routine safety checks to determine that your TV only from the power outlet and disconnect any cover or expose the device to rain or moisture. 2 DX-32L/37L/40L/46L Important safety instructions Important safety instructions CAUTION RISK OF ELECTRIC SHOCK DO...
... 9 Do not defeat the safety purpose of the obsolete outlet. 10 Protect the power cord from the apparatus. 11 Only use caution when moving the cart/apparatus combination to avoid injury from the power outlet and refer servicing to qualified service technicians. If the screen breaks, be placed... service technician to perform routine safety checks to determine that your TV only from the power outlet and disconnect any cover or expose the device to rain or moisture. 2 DX-32L/37L/40L/46L Important safety instructions Important safety instructions CAUTION RISK OF ELECTRIC SHOCK DO...
User Manual (English)
Page 7
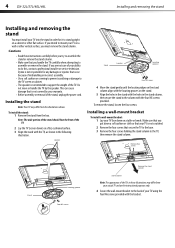
...using the Stand four M6 screws provided with the TV, as shown in the following illustration. Dynex is not intended to mount your TV face down a soft cushion or cloth so that secure... the stand. To install the stand: 1 Remove the stand from the illustrations shown. 4 DX-32L/37L/40L/46L Installing and removing the stand Installing and removing the stand You must install... by the speaker. Make sure that you intend to support the weight of the stand, unplug the power cord. If you put down on a table or bench. Cautions • Read these illustrations may differ ...
...using the Stand four M6 screws provided with the TV, as shown in the following illustration. Dynex is not intended to mount your TV face down a soft cushion or cloth so that secure... the stand. To install the stand: 1 Remove the stand from the illustrations shown. 4 DX-32L/37L/40L/46L Installing and removing the stand Installing and removing the stand You must install... by the speaker. Make sure that you intend to support the weight of the stand, unplug the power cord. If you put down on a table or bench. Cautions • Read these illustrations may differ ...

User Manual (English)
Page 8
In menu mode, press to move up or down. Unplug the power cord to open the on . For more information, see "Aiming the remote control" on page 8. Press to disconnect power. Do not block. Lights blue when your TV is in the box with your TV is ...control • Component video cable • Audio cable • AC power cord • AAA batteries (2) • Stand • Quick Start Guide Front Side DX-32L/37L/40L/46L 5 12 Item Name 1 Remote control sensor 2 Power indicator Description Receives signals from the remote control. TV components TV components Accessories...
In menu mode, press to move up or down. Unplug the power cord to open the on . For more information, see "Aiming the remote control" on page 8. Press to disconnect power. Do not block. Lights blue when your TV is in the box with your TV is ...control • Component video cable • Audio cable • AC power cord • AAA batteries (2) • Stand • Quick Start Guide Front Side DX-32L/37L/40L/46L 5 12 Item Name 1 Remote control sensor 2 Power indicator Description Receives signals from the remote control. TV components TV components Accessories...
User Manual (English)
Page 9
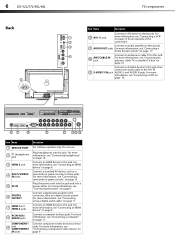
... audio cable" on page 9. Connect component video devices to these jacks. For more information, see "Connecting the power" on page 11. Plug headphones into this jack and into this jack. Plug the power cord into a power outlet. 6 DX-32L/37L/40L/46L Back TV components Item Name Description 10 AV1 IN jack Connect an AV...
... audio cable" on page 9. Connect component video devices to these jacks. For more information, see "Connecting the power" on page 11. Plug headphones into this jack and into this jack. Plug the power cord into a power outlet. 6 DX-32L/37L/40L/46L Back TV components Item Name Description 10 AV1 IN jack Connect an AV...
User Manual (English)
Page 10
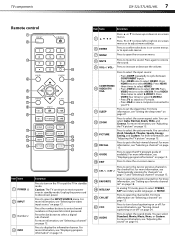
... in on -screen menu. 8 MUTE Press to open sub-menus. TV components DX-32L/37L/40L/46L 7 Remote control 1 2 3 14 4 15 5 6 7 16 8 9 17 18 10 11 19 12 20 13 21 22 Item Name 1 POWER 2 INPUT 3 Numbers/. 4 INFO Description Press to display the information banner. For... SOURCE menu. For more information, see "Adjusting the sound" on page 13. Press to restore the sound. 9 VOL+ / VOL- Unplug the power cord to select STEREO, SAP (secondary audio language), or MONO. For more information, see "Displaying program information" on page 16. In analog TV mode,...
... in on -screen menu. 8 MUTE Press to open sub-menus. TV components DX-32L/37L/40L/46L 7 Remote control 1 2 3 14 4 15 5 6 7 16 8 9 17 18 10 11 19 12 20 13 21 22 Item Name 1 POWER 2 INPUT 3 Numbers/. 4 INFO Description Press to display the information banner. For... SOURCE menu. For more information, see "Adjusting the sound" on page 13. Press to restore the sound. 9 VOL+ / VOL- Unplug the power cord to select STEREO, SAP (secondary audio language), or MONO. For more information, see "Displaying program information" on page 16. In analog TV mode,...
User Manual (English)
Page 12
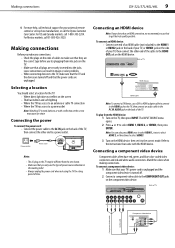
...power outlet. Making connections DX-32L/37L/40L/46L 9 4 For more help, call technical support for your universal remote control or set it to the correct mode. For Mexico markets, call 1-800-305-2204. Power outlet Power cord Notes: • The AC plug on the HDMI device, then set -top box manufacturer, or call the Dynex... Customer Care Center. Connecting an HDMI device Note: If your device has an HDMI connection, we recommend you only use the type of power source...
...power outlet. Making connections DX-32L/37L/40L/46L 9 4 For more help, call technical support for your universal remote control or set it to the correct mode. For Mexico markets, call 1-800-305-2204. Power outlet Power cord Notes: • The AC plug on the HDMI device, then set -top box manufacturer, or call the Dynex... Customer Care Center. Connecting an HDMI device Note: If your device has an HDMI connection, we recommend you only use the type of power source...
User Manual (English)
Page 13
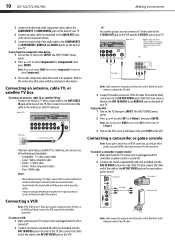
.... • If you can connect an S-Video cable to the AV1 IN AUDIO-L and AUDIO-R jacks on the back of the AV connection. 10 DX-32L/37L/40L/46L Making connections 3 Connect the other end of the component video cable to the COMPONENT1 or COMPONENT2 jacks on the back of... TV Note: Cables are often color-coded to connectors. The INPUT SOURCE menu opens. 2 Press or to white. Refer to the instructions that your TV's power cord is unplugged and the VCR is not good, contact a service technician to adjust the antenna. Video component cables • Best - Connecting a VCR Note: If ...
.... • If you can connect an S-Video cable to the AV1 IN AUDIO-L and AUDIO-R jacks on the back of the AV connection. 10 DX-32L/37L/40L/46L Making connections 3 Connect the other end of the component video cable to the COMPONENT1 or COMPONENT2 jacks on the back of... TV Note: Cables are often color-coded to connectors. The INPUT SOURCE menu opens. 2 Press or to white. Refer to the instructions that your TV's power cord is unplugged and the VCR is not good, contact a service technician to adjust the antenna. Video component cables • Best - Connecting a VCR Note: If ...
User Manual (English)
Page 14
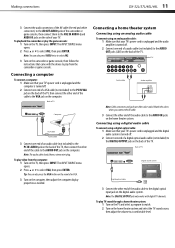
... OUT jacks (L&R) on the computer. Connecting a computer To connect a computer: 1 Make sure that your TV's power cord is unplugged and the computer is turned off . 2 Connect one end of a digital optical audio cable (not included...using a digital audio cable To connect using an analog audio cable: 1 Make sure that your TV's power cord is unplugged and the audio amplifier is turned off. 2 Connect one end of an audio cable (not ... the audio cable to the AUDIO IN jacks on the back of the TV. Making connections DX-32L/37L/40L/46L 11 3 Connect the audio connectors of the AV cable (the red ...
... OUT jacks (L&R) on the computer. Connecting a computer To connect a computer: 1 Make sure that your TV's power cord is unplugged and the computer is turned off . 2 Connect one end of a digital optical audio cable (not included...using a digital audio cable To connect using an analog audio cable: 1 Make sure that your TV's power cord is unplugged and the audio amplifier is turned off. 2 Connect one end of an audio cable (not ... the audio cable to the AUDIO IN jacks on the back of the TV. Making connections DX-32L/37L/40L/46L 11 3 Connect the audio connectors of the AV cable (the red ...
User Manual (English)
Page 16
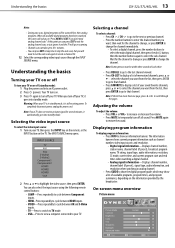
Understanding the basics DX-32L/37L/40L/46L 13 Notes: • During auto scan, digital programs will be within three seconds...or off To turn your TV on . 3 Press again to turn off (standby mode): 1 Plug the power cord into standby mode. Your TV turns on or off your TV, it is in standby mode, it goes into an AC...Sharpness Backlight Advanced Video Move Picture Audio Custom Setup Channel 70 40 60 0 50 30 Select MENU Exit To completely disconnect power, unplug the power cord. Selecting the video input source To select the video input source: 1 Turn on your TV, then press the INPUT...
Understanding the basics DX-32L/37L/40L/46L 13 Notes: • During auto scan, digital programs will be within three seconds...or off To turn your TV on . 3 Press again to turn off (standby mode): 1 Plug the power cord into standby mode. Your TV turns on or off your TV, it is in standby mode, it goes into an AC...Sharpness Backlight Advanced Video Move Picture Audio Custom Setup Channel 70 40 60 0 50 30 Select MENU Exit To completely disconnect power, unplug the power cord. Selecting the video input source To select the video input source: 1 Turn on your TV, then press the INPUT...
User Manual (English)
Page 32
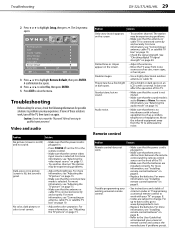
...Move the infrared equipment away from noise sources such as a cordless telephone or headphones. If none of the TV. • Make sure that the power cord is selected. For more information, see "Adjusting the TV picture" on the screen. • Adjust the antenna. • Move the TV away ...or stripes appear on page 15. For more information, see "Selecting the audio mode" on page 13. • Try another channel. Troubleshooting DX-32L/37L/40L/46L 29 2 Press or to problems you may experience. Parental Controls T ime Closed Caption Menu Settings VGA Settings Input Label Restore...
...Move the infrared equipment away from noise sources such as a cordless telephone or headphones. If none of the TV. • Make sure that the power cord is selected. For more information, see "Adjusting the TV picture" on the screen. • Adjust the antenna. • Move the TV away ...or stripes appear on page 15. For more information, see "Selecting the audio mode" on page 13. • Try another channel. Troubleshooting DX-32L/37L/40L/46L 29 2 Press or to problems you may experience. Parental Controls T ime Closed Caption Menu Settings VGA Settings Input Label Restore...
User Manual (English)
Page 33
...a class B digital device, pursuant to Part 15 of the FCC Rules. However, there is no guarantee that the channels are not hidden. 30 DX-32L/37L/40L/46L Maintenance General Problem Solution One or more information, see "Changing channel settings" on page 17. • Enter 9999 to access... will not occur in the current video input mode. • When the TV is not a malfunction. • Disconnect the power cord, wait a few seconds, then reconnect the power cord and turn on the TV. For more of this product is not solved by using a chemically treated cloth, read the instructions ...
...a class B digital device, pursuant to Part 15 of the FCC Rules. However, there is no guarantee that the channels are not hidden. 30 DX-32L/37L/40L/46L Maintenance General Problem Solution One or more information, see "Changing channel settings" on page 17. • Enter 9999 to access... will not occur in the current video input mode. • When the TV is not a malfunction. • Disconnect the power cord, wait a few seconds, then reconnect the power cord and turn on the TV. For more of this product is not solved by using a chemically treated cloth, read the instructions ...


