
Firmware Installation Guide (English)
Page 1
...: Do NOT change the name of your USB drive. then locate the corresponding Rev id of the TV (see photo below) and write down the Model and Rev id for Dynex Model DX‐24L150A11 1. Click on the "Support/Downloads" tab; Insert USB drive to starting your PC or Mac 4. Note: This file is...
...: Do NOT change the name of your USB drive. then locate the corresponding Rev id of the TV (see photo below) and write down the Model and Rev id for Dynex Model DX‐24L150A11 1. Click on the "Support/Downloads" tab; Insert USB drive to starting your PC or Mac 4. Note: This file is...

Firmware Installation Guide (English)
Page 2
... upgrade process (do not press any buttons on the remote or TV once the unit has been plugged in red and blue (see photo below); Reconnect the power cord to the wall outlet. 17. a. If the upgrade fails again contact Dynex at 1-800-305-2204. 14. disconnect the AC power wait 10... seconds, then reconnect the power cord to the wall outlet for a few seconds) a. Please remove the file from the USB drive and repeat the process. remove the USB device 16. the TV will display the message...
... upgrade process (do not press any buttons on the remote or TV once the unit has been plugged in red and blue (see photo below); Reconnect the power cord to the wall outlet. 17. a. If the upgrade fails again contact Dynex at 1-800-305-2204. 14. disconnect the AC power wait 10... seconds, then reconnect the power cord to the wall outlet for a few seconds) a. Please remove the file from the USB drive and repeat the process. remove the USB device 16. the TV will display the message...
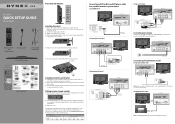
Quick Setup Guide (English)
Page 1
... Using digital audio cable: Back of TV HDMI cable (not included) TV stand and screws Quick Setup Guide 6 Secure the stand to the column with your TV using the screws provided with the bracket. 24" LCD TV QUICK SETUP GUIDE DX-24L150A11 Remote control and 2 AAA batteries AC...battery compartment cover on the batteries align with the holes in the battery compartment. 3 Replace the cover. Universal remote control TV codes (for all Dynex TVs manufactured after Jan. 1, 2007) Universal remote control makers and models Philips PHDVD5, PH5DSS, PMDVR8, PDVR8 RCA RCU807 One ...
... Using digital audio cable: Back of TV HDMI cable (not included) TV stand and screws Quick Setup Guide 6 Secure the stand to the column with your TV using the screws provided with the bracket. 24" LCD TV QUICK SETUP GUIDE DX-24L150A11 Remote control and 2 AAA batteries AC...battery compartment cover on the batteries align with the holes in the battery compartment. 3 Replace the cover. Universal remote control TV codes (for all Dynex TVs manufactured after Jan. 1, 2007) Universal remote control makers and models Philips PHDVD5, PH5DSS, PMDVR8, PDVR8 RCA RCU807 One ...
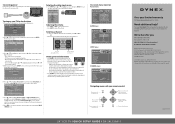
Quick Setup Guide (English)
Page 2
... from basic how-to steps to view an information banner. We're here for you selected Home Mode, the Choose your Picture Mode screen opens. DYNEX is a trademark of available programs, program times, and program summaries, depending on your User Guide! All other end to a power outlet. The...MENU Previous 2 Press or to select the menu language you want, then press ENTER. ENGLISH 10-0318 24" LCD TV I QUICK SETUP GUIDE I DX-24L150A11 Connecting power Connect the power cable to the AC IN jack on the screen or to adjust a selected item. The initial Setup Wizard opens...
... from basic how-to steps to view an information banner. We're here for you selected Home Mode, the Choose your Picture Mode screen opens. DYNEX is a trademark of available programs, program times, and program summaries, depending on your User Guide! All other end to a power outlet. The...MENU Previous 2 Press or to select the menu language you want, then press ENTER. ENGLISH 10-0318 24" LCD TV I QUICK SETUP GUIDE I DX-24L150A11 Connecting power Connect the power cable to the AC IN jack on the screen or to adjust a selected item. The initial Setup Wizard opens...
User Manual (English)
Page 2
ii Dynex DX-24L150A11 24" LCD TV Contents CHILD SAFETY 1 Important safety instructions 2 Warnings 2 Cautions 2 Installing and removing the stand 4 Installing the stand 4 Adjusting the viewing angle of the TV 4 Removing the stand column 4 Installing a wall-mount bracket 5 TV components 5 Accessories 5 Front 5 Side 5 Back 6 Remote control... computer 11 Connecting a home theater system 11 Connecting headphones 11 Turning on your TV for the first time 12 Understanding the basics 13 Turning your TV on or off 13 Selecting the video input source 13 Selecting a channel 13 Adjusting...
ii Dynex DX-24L150A11 24" LCD TV Contents CHILD SAFETY 1 Important safety instructions 2 Warnings 2 Cautions 2 Installing and removing the stand 4 Installing the stand 4 Adjusting the viewing angle of the TV 4 Removing the stand column 4 Installing a wall-mount bracket 5 TV components 5 Accessories 5 Front 5 Side 5 Back 6 Remote control... computer 11 Connecting a home theater system 11 Connecting headphones 11 Turning on your TV for the first time 12 Understanding the basics 13 Turning your TV on or off 13 Selecting the video input source 13 Selecting a channel 13 Adjusting...

User Manual (English)
Page 3
...Selecting the signal source 18 Hiding channels 18 Setting up a favorite channel list 18 Adding or changing a channel label 19 Checking digital TV signal strength 19 Setting parental controls 20 Turning parental controls on or off 20 Setting or changing the password 20 Turning the button ...parental control levels 22 Using closed captioning 24 Turning closed captioning on or off 24 Selecting the closed captioning mode 24 Customizing digital TV closed captioning styles 25 Adjusting time settings 26 Setting the date and time 26 Setting the sleep timer 27 Adjusting menu settings 27...
...Selecting the signal source 18 Hiding channels 18 Setting up a favorite channel list 18 Adding or changing a channel label 19 Checking digital TV signal strength 19 Setting parental controls 20 Turning parental controls on or off 20 Setting or changing the password 20 Turning the button ...parental control levels 22 Using closed captioning 24 Turning closed captioning on or off 24 Selecting the closed captioning mode 24 Customizing digital TV closed captioning styles 25 Adjusting time settings 26 Setting the date and time 26 Setting the sleep timer 27 Adjusting menu settings 27...
User Manual (English)
Page 4
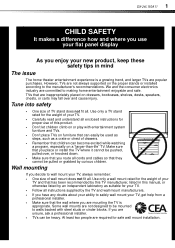
... be mounted to making home entertainment enjoyable and safe. Some wall mounts are not designed to be pushed, pulled over and cause injury. TVs that children can become excited while watching a program, especially on dressers, bookcases, shelves, desks, speakers, chests, or carts may fall ... from a professional installer. • Make sure that they cannot be pulled or grabbed by this TV manufacturer, listed in mind The issue The home theater entertainment experience is appropriate. DX-24L150A11 1 f CHILD SAFETY It makes a difference how and where you use of this manual, or...
... be mounted to making home entertainment enjoyable and safe. Some wall mounts are not designed to be pushed, pulled over and cause injury. TVs that children can become excited while watching a program, especially on dressers, bookcases, shelves, desks, speakers, chests, or carts may fall ... from a professional installer. • Make sure that they cannot be pulled or grabbed by this TV manufacturer, listed in mind The issue The home theater entertainment experience is appropriate. DX-24L150A11 1 f CHILD SAFETY It makes a difference how and where you use of this manual, or...
User Manual (English)
Page 5
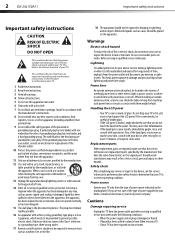
... any antenna or cable system. Install in fire, electric shock, personal injury, or other . Refer servicing to determine that your TV is damaged or frayed. • If liquid has been spilled or objects have fallen into your doctor after rinsing for replacement of... electrician for at plugs, convenience receptacles, and the point where they exit from the apparatus. 11 Only use this TV from tip-over. 2 DX-24L150A11 Important safety instructions Important safety instructions CAUTION RISK OF ELECTRIC SHOCK DO NOT OPEN This symbol indicates that dangerous voltage constituting...
... any antenna or cable system. Install in fire, electric shock, personal injury, or other . Refer servicing to determine that your TV is damaged or frayed. • If liquid has been spilled or objects have fallen into your doctor after rinsing for replacement of... electrician for at plugs, convenience receptacles, and the point where they exit from the apparatus. 11 Only use this TV from tip-over. 2 DX-24L150A11 Important safety instructions Important safety instructions CAUTION RISK OF ELECTRIC SHOCK DO NOT OPEN This symbol indicates that dangerous voltage constituting...
User Manual (English)
Page 6
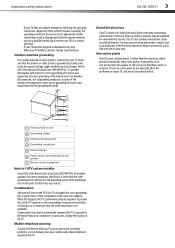
Important safety instructions DX-24L150A11 3 • If your TV does not operate normally by the operating instructions because incorrect adjustment of the National Electrical Code, ANSI/NFPA No. 40 provides guidance for environmental reasons. Your TV also contains material that are not considered defects. 1 2 3 4 5 7 6 1 Antenna lead... transistors, which provide exceptionally sharp video quality. In such cases, change in damage and will form on the TV if the TV is brought from cool surroundings into a warm room or if the temperature of the antenna-discharge unit, connection ...
Important safety instructions DX-24L150A11 3 • If your TV does not operate normally by the operating instructions because incorrect adjustment of the National Electrical Code, ANSI/NFPA No. 40 provides guidance for environmental reasons. Your TV also contains material that are not considered defects. 1 2 3 4 5 7 6 1 Antenna lead... transistors, which provide exceptionally sharp video quality. In such cases, change in damage and will form on the TV if the TV is brought from cool surroundings into a warm room or if the temperature of the antenna-discharge unit, connection ...
User Manual (English)
Page 7
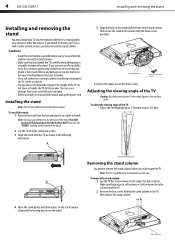
Dynex is not responsible for any damages or injuries that is not intended to the column with the three screws provided. This can cause damage that occur because of mishandling or incorrect assembly. • Use a soft cushion or covering to prevent scratching or damage to the TV screen or cabinet. •... the stand column You need to remove the stand column before you try to do this task. 4 DX-24L150A11 Installing and removing the stand Installing and removing the stand You must install your TV into the stand in order for it on a table or bench. Note: You must pay attention to...
Dynex is not responsible for any damages or injuries that is not intended to the column with the three screws provided. This can cause damage that occur because of mishandling or incorrect assembly. • Use a soft cushion or covering to prevent scratching or damage to the TV screen or cabinet. •... the stand column You need to remove the stand column before you try to do this task. 4 DX-24L150A11 Installing and removing the stand Installing and removing the stand You must install your TV into the stand in order for it on a table or bench. Note: You must pay attention to...

User Manual (English)
Page 8
... • AAA batteries (2) • Stand • Quick Start Guide Item Name 1 Remote control sensor 2 Power indicator Description Receives signals from the remote control. Front DX-24L150A11 5 12 Stand column 4 Secure the wall-mount bracket to open the INPUT SOURCE menu. TV components Installing a wall-mount bracket To install a wall-mount bracket: 1 Lay your...
... • AAA batteries (2) • Stand • Quick Start Guide Item Name 1 Remote control sensor 2 Power indicator Description Receives signals from the remote control. Front DX-24L150A11 5 12 Stand column 4 Secure the wall-mount bracket to open the INPUT SOURCE menu. TV components Installing a wall-mount bracket To install a wall-mount bracket: 1 Lay your...
User Manual (English)
Page 9
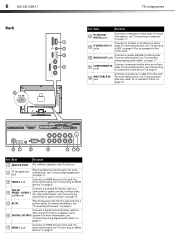
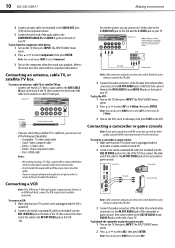
...jacks. For more information, see "Connecting a component video device" on page 9. 12 ANT/CABLE IN jack Connect an antenna or cable TV to this jack. For more information, see "Connecting using analog audio cable" on page 10 for an example of the connection. Do ... this jack and into this jack. For more information, see "Connecting an antenna, cable TV, or satellite TV box" on page 9. For more information, see "Connecting an HDMI device" on page 10. 6 DX-24L150A11 Back TV components Item Name Description 8 PC IN VGA/ AUDIO jacks Connect a computer to these ...
...jacks. For more information, see "Connecting a component video device" on page 9. 12 ANT/CABLE IN jack Connect an antenna or cable TV to this jack. For more information, see "Connecting using analog audio cable" on page 10 for an example of the connection. Do ... this jack and into this jack. For more information, see "Connecting an antenna, cable TV, or satellite TV box" on page 9. For more information, see "Connecting an HDMI device" on page 10. 6 DX-24L150A11 Back TV components Item Name Description 8 PC IN VGA/ AUDIO jacks Connect a computer to these ...
User Manual (English)
Page 10
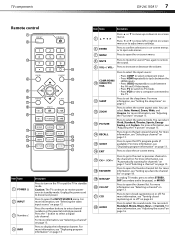
...sub-menus. For more information, see "Selecting the video input source" on page 13. Press to select the input source: COMP/HDMI/ 10 VIDEO/TV/ VGA • Press COMP to select component input. • Press HDMI repeatedly to cycle between the HDMI inputs. • Press VIDEO repeatedly ... to receive power even in the channel list. For more information, see "Turning closed captioning on or off " on page 24. TV components DX-24L150A11 7 Remote control 1 2 3 14 4 15 5 6 7 16 8 9 17 18 10 11 19 12 20 13 21 22 Item Name 1 POWER 2 INPUT 3 Numbers/. 4 INFO Description...
...sub-menus. For more information, see "Selecting the video input source" on page 13. Press to select the input source: COMP/HDMI/ 10 VIDEO/TV/ VGA • Press COMP to select component input. • Press HDMI repeatedly to cycle between the HDMI inputs. • Press VIDEO repeatedly ... to receive power even in the channel list. For more information, see "Turning closed captioning on or off " on page 24. TV components DX-24L150A11 7 Remote control 1 2 3 14 4 15 5 6 7 16 8 9 17 18 10 11 19 12 20 13 21 22 Item Name 1 POWER 2 INPUT 3 Numbers/. 4 INFO Description...
User Manual (English)
Page 11
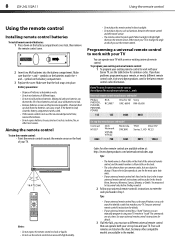
...DX-24L150A11 Using the remote control Using the remote control Installing remote control batteries To install remote control batteries: 1 Press down on the battery compartment cover lock, then remove the remote control cover. 2 Insert two AAA batteries into place. Chemicals that can leak from the batteries can operate your TV... Emerson, Memorex, Sansui, Sylvania, or Zenith. See your universal remote control's instructions for details. 3 If all Dynex TVs manufactured after Jan. 1, 2007) Universal remote control manufacturer and model Philips PHDVD5, PH5DSS, PMDVR8, PDVR8 RCA RCU807 ...
...DX-24L150A11 Using the remote control Using the remote control Installing remote control batteries To install remote control batteries: 1 Press down on the battery compartment cover lock, then remove the remote control cover. 2 Insert two AAA batteries into place. Chemicals that can leak from the batteries can operate your TV... Emerson, Memorex, Sansui, Sylvania, or Zenith. See your universal remote control's instructions for details. 3 If all Dynex TVs manufactured after Jan. 1, 2007) Universal remote control manufacturer and model Philips PHDVD5, PH5DSS, PMDVR8, PDVR8 RCA RCU807 ...
User Manual (English)
Page 12
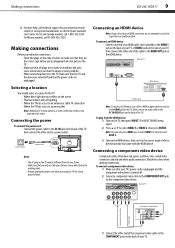
... on the HDMI device, then set -top box manufacturer, or call the Dynex Customer Care Center. The INPUT SOURCE menu opens. 2 Press or to a power outlet. Making connections DX-24L150A11 9 4 For more help, call technical support for a long period of the TV, then connect the other end to select HDMI 1 or HDMI 2, then press...
... on the HDMI device, then set -top box manufacturer, or call the Dynex Customer Care Center. The INPUT SOURCE menu opens. 2 Press or to a power outlet. Making connections DX-24L150A11 9 4 For more help, call technical support for a long period of the TV, then connect the other end to select HDMI 1 or HDMI 2, then press...
User Manual (English)
Page 13
...to the AV OUT VIDEO jack on the camcorder or game console. To playback the camcorder or play the VCR: 1 Turn on the TV, then press INPUT. 10 DX-24L150A11 Making connections 4 Connect an audio cable (not included) to the AUDIO OUT jacks (L/R) on the component device. 5 Connect the other cables... connection. Note: You can also press VIDEO twice to select AV2, then press ENTER. Connecting an antenna, cable TV, or satellite TV box To connect an antenna, cable TV, or satellite TV box: • Connect one end of a standard AV cable (not included) into the AV1 IN VIDEO jack ...
...to the AV OUT VIDEO jack on the camcorder or game console. To playback the camcorder or play the VCR: 1 Turn on the TV, then press INPUT. 10 DX-24L150A11 Making connections 4 Connect an audio cable (not included) to the AUDIO OUT jacks (L/R) on the component device. 5 Connect the other cables... connection. Note: You can also press VIDEO twice to select AV2, then press ENTER. Connecting an antenna, cable TV, or satellite TV box To connect an antenna, cable TV, or satellite TV box: • Connect one end of a standard AV cable (not included) into the AV1 IN VIDEO jack ...
User Manual (English)
Page 14
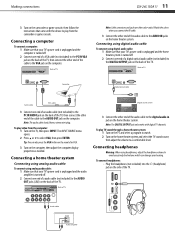
...cable AUDIO IN Audio amplifier Note: The DIGITAL OUTPUT jack only works with the device to play from the computer: 1 Turn on the TV, then press INPUT. Connecting using digital audio cable To connect using headphones, adjust the headphone volume to avoid excessively loud volume which can ... on the home theater system. Match the colors when you connect the AV cable. 3 Connect the other end of TV Note: Cable connectors and jacks are often color-coded. Making connections DX-24L150A11 11 3 Turn on the camcorder or game console, then follow the instructions that came with digital...
...cable AUDIO IN Audio amplifier Note: The DIGITAL OUTPUT jack only works with the device to play from the computer: 1 Turn on the TV, then press INPUT. Connecting using digital audio cable To connect using headphones, adjust the headphone volume to avoid excessively loud volume which can ... on the home theater system. Match the colors when you connect the AV cable. 3 Connect the other end of TV Note: Cable connectors and jacks are often color-coded. Making connections DX-24L150A11 11 3 Turn on the camcorder or game console, then follow the instructions that came with digital...
User Manual (English)
Page 15
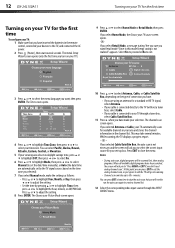
...pressing or to highlight Time, then press or to the TV, and connected the AC power. 2 Press (Power), then wait several minutes. 12 DX-24L150A11 Turning on your TV for the first time Turning on your TV for the first time To configure your TV: 1 Make sure that you have inserted the batteries ... on scanning. • Channel scan can press EXIT to select the menu language you are automatically set top box. OR - appears. While scanning, the TV displays a progress report. - Notes: • During auto scan, digital programs will ask you to "Press MENU or EXIT if you don't need to...
...pressing or to highlight Time, then press or to the TV, and connected the AC power. 2 Press (Power), then wait several minutes. 12 DX-24L150A11 Turning on your TV for the first time Turning on your TV for the first time To configure your TV: 1 Make sure that you have inserted the batteries ... on scanning. • Channel scan can press EXIT to select the menu language you are automatically set top box. OR - appears. While scanning, the TV displays a progress report. - Notes: • During auto scan, digital programs will ask you to "Press MENU or EXIT if you don't need to...
User Manual (English)
Page 16
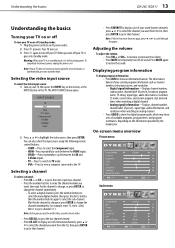
Understanding the basics DX-24L150A11 13 Understanding the basics Turning your TV on or off To turn your TV on . 3 Press again to turn off your TV. Your TV turns on or off (standby mode): 1 Plug the power cord into an AC power outlet. 2 Press (power). Wait for ...number, video input source, and resolution. • Digital signal information-Displays channel number, station name, channel label (if preset), broadcast program name, TV rating, signal type, audio information, resolution, CC mode, current time, and current program start and end times when watching a digital channel. •...
Understanding the basics DX-24L150A11 13 Understanding the basics Turning your TV on or off To turn your TV on . 3 Press again to turn off your TV. Your TV turns on or off (standby mode): 1 Plug the power cord into an AC power outlet. 2 Press (power). Wait for ...number, video input source, and resolution. • Digital signal information-Displays channel number, station name, channel label (if preset), broadcast program name, TV rating, signal type, audio information, resolution, CC mode, current time, and current program start and end times when watching a digital channel. •...
User Manual (English)
Page 17
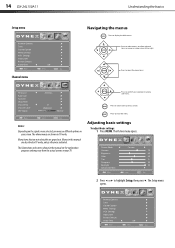
... F avorites Show/Hide Channel No. Menu items that are not selectable are described in TV mode. The Setup menu opens. The illustrations and screens shown in the manual are shown in TV mode, unless otherwise indicated. Press to highlight Setup, then press . Adjusting basic settings To... 50 30 Select MENU Exit 2 Press or to confirm your screen. Press to select menus, to display the Main menu. 14 DX-24L150A11 Understanding the basics Setup menu Parental Controls T ime Closed Caption Menu Settings VGA Settings Input Label Restore Default Audio Only Move Channel menu...
... F avorites Show/Hide Channel No. Menu items that are not selectable are described in TV mode. The Setup menu opens. The illustrations and screens shown in the manual are shown in TV mode, unless otherwise indicated. Press to highlight Setup, then press . Adjusting basic settings To... 50 30 Select MENU Exit 2 Press or to confirm your screen. Press to select menus, to display the Main menu. 14 DX-24L150A11 Understanding the basics Setup menu Parental Controls T ime Closed Caption Menu Settings VGA Settings Input Label Restore Default Audio Only Move Channel menu...


