
Firmware Installation Guide (English)
Page 1
... TV. 7. Insert USB drive to starting your PC or Mac 4. then locate the corresponding Rev id of the TV (see photo below) and write down the Model and Rev id for Dynex Model DX‐24L150A11 1. Tuner Firmware Update Process for use later in this process. 3. Note: Do NOT change the name of the file. Note: This file is To download firmware click on the...
... TV. 7. Insert USB drive to starting your PC or Mac 4. then locate the corresponding Rev id of the TV (see photo below) and write down the Model and Rev id for Dynex Model DX‐24L150A11 1. Tuner Firmware Update Process for use later in this process. 3. Note: Do NOT change the name of the file. Note: This file is To download firmware click on the...
Quick Setup Guide (English)
Page 1
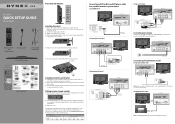
... stand column, then remove the stand column. 3 Secure the wall-mount bracket (not included) to the back of your remote control 1 While pressing the release button on the battery compartment cover on the antenna. Connecting a DVD or Blu-ray DVD player, cable box, satellite receiver or game station Using HDMI (best) Back of TV Audio cable Note: Cable connectors and jacks are often color-coded. 24" LCD TV QUICK SETUP GUIDE DX-24L150A11 Remote control and 2 AAA batteries AC power cord Component video cable Front and side features + - Universal remote control TV codes...
... stand column, then remove the stand column. 3 Secure the wall-mount bracket (not included) to the back of your remote control 1 While pressing the release button on the battery compartment cover on the antenna. Connecting a DVD or Blu-ray DVD player, cable box, satellite receiver or game station Using HDMI (best) Back of TV Audio cable Note: Cable connectors and jacks are often color-coded. 24" LCD TV QUICK SETUP GUIDE DX-24L150A11 Remote control and 2 AAA batteries AC power cord Component video cable Front and side features + - Universal remote control TV codes...
Quick Setup Guide (English)
Page 2
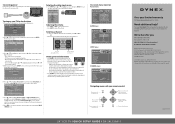
... Time Closed Caption Menu Settings VGA Settings Input Label Restore Default Audio Only Move Picture Audio Setup Channel Off Select MENU Exit CHANNEL menu TV Source Auto Scan Favorites Show/Hide Channel No. Press to the previous menu. Press to return to select menu options. Need additional help? DYNEX is a trademark of their respective owners. to change the setting. 4 When you want, then press ENTER. If you selected Cable/Satellite Box, you selected Home Mode, the Choose your TV and turn off the sound. ENGLISH 10-0318 24" LCD TV I QUICK SETUP GUIDE I DX-24L150A11...
... Time Closed Caption Menu Settings VGA Settings Input Label Restore Default Audio Only Move Picture Audio Setup Channel Off Select MENU Exit CHANNEL menu TV Source Auto Scan Favorites Show/Hide Channel No. Press to the previous menu. Press to return to select menu options. Need additional help? DYNEX is a trademark of their respective owners. to change the setting. 4 When you want, then press ENTER. If you selected Cable/Satellite Box, you selected Home Mode, the Choose your TV and turn off the sound. ENGLISH 10-0318 24" LCD TV I QUICK SETUP GUIDE I DX-24L150A11...
User Manual (English)
Page 2
...and removing the stand 4 Installing the stand 4 Adjusting the viewing angle of the TV 4 Removing the stand column 4 Installing a wall-mount bracket 5 TV components 5 Accessories 5 Front 5 Side 5 Back 6 Remote control 7 Using the remote control 8 Installing remote control batteries 8 Aiming the remote control 8 Programming a universal remote control to work with your TV 8 Making connections 9 Selecting a location 9 Connecting the power 9 Connecting an HDMI device 9 Connecting a component video device 9 Connecting an antenna, cable TV, or satellite TV box 10 Connecting a VCR...
...and removing the stand 4 Installing the stand 4 Adjusting the viewing angle of the TV 4 Removing the stand column 4 Installing a wall-mount bracket 5 TV components 5 Accessories 5 Front 5 Side 5 Back 6 Remote control 7 Using the remote control 8 Installing remote control batteries 8 Aiming the remote control 8 Programming a universal remote control to work with your TV 8 Making connections 9 Selecting a location 9 Connecting the power 9 Connecting an HDMI device 9 Connecting a component video device 9 Connecting an antenna, cable TV, or satellite TV box 10 Connecting a VCR...

User Manual (English)
Page 3
... 20 Turning parental controls on or off 20 Setting or changing the password 20 Turning the button lock on or off 21 Setting parental control levels 22 Using closed captioning 24 Turning closed captioning on or off 24 Selecting the closed captioning mode 24 Customizing digital TV closed captioning styles 25 Adjusting time settings 26 Setting the date and time 26 Setting the sleep timer 27 Adjusting menu settings 27 Selecting the menu language and transparency 27 Labeling an input source 28 Restoring default settings 28 Troubleshooting 28 Video and audio 28 Remote control 29...
... 20 Turning parental controls on or off 20 Setting or changing the password 20 Turning the button lock on or off 21 Setting parental control levels 22 Using closed captioning 24 Turning closed captioning on or off 24 Selecting the closed captioning mode 24 Customizing digital TV closed captioning styles 25 Adjusting time settings 26 Setting the date and time 26 Setting the sleep timer 27 Adjusting menu settings 27 Selecting the menu language and transparency 27 Labeling an input source 28 Restoring default settings 28 Troubleshooting 28 Video and audio 28 Remote control 29...
User Manual (English)
Page 4
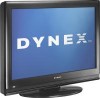
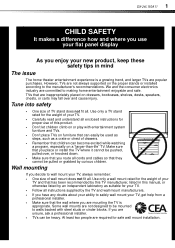
... proper use your flat panel display As you enjoy your ability to making home entertainment enjoyable and safe. DX-24L150A11 1 f CHILD SAFETY It makes a difference how and where you use of this manual, or otherwise listed by curious children. Some wall mounts are not designed to be mounted to walls backed with entertainment system furniture and TVs. • Don't place TVs on or play with...
... proper use your flat panel display As you enjoy your ability to making home entertainment enjoyable and safe. DX-24L150A11 1 f CHILD SAFETY It makes a difference how and where you use of this manual, or otherwise listed by curious children. Some wall mounts are not designed to be mounted to walls backed with entertainment system furniture and TVs. • Don't place TVs on or play with...

User Manual (English)
Page 8
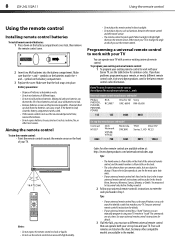
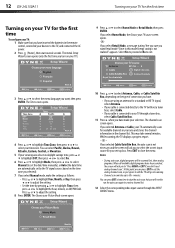
...: • Remote control • Component video cable • Audio cable • AC power cord • AAA batteries (2) • Stand • Quick Start Guide Item Name 1 Remote control sensor 2 Power indicator Description Receives signals from the remote control. Press to receive power even in the box with the bracket. Caution: The TV continues to turn on page 8. In menu mode, press to move right or left or to open the INPUT SOURCE menu. Unplug the power cord to increase...
...: • Remote control • Component video cable • Audio cable • AC power cord • AAA batteries (2) • Stand • Quick Start Guide Item Name 1 Remote control sensor 2 Power indicator Description Receives signals from the remote control. Press to receive power even in the box with the bracket. Caution: The TV continues to turn on page 8. In menu mode, press to move right or left or to open the INPUT SOURCE menu. Unplug the power cord to increase...
User Manual (English)
Page 11
... universal remote control, and the model number is not used for the most up to enter the code you found in Step 1. See your universal remote control's instructions for details. 3 If all Dynex TVs manufactured after Jan. 1, 2007) Universal remote control manufacturer and model Philips PHDVD5, PH5DSS, PMDVR8, PDVR8 RCA RCU807 One for All Sony URC-6690 RM-VL600 115 135 0464 8043 Set-top box manufacturer and model Comcast...
... universal remote control, and the model number is not used for the most up to enter the code you found in Step 1. See your universal remote control's instructions for details. 3 If all Dynex TVs manufactured after Jan. 1, 2007) Universal remote control manufacturer and model Philips PHDVD5, PH5DSS, PMDVR8, PDVR8 RCA RCU807 One for All Sony URC-6690 RM-VL600 115 135 0464 8043 Set-top box manufacturer and model Comcast...
User Manual (English)
Page 12
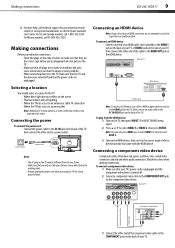
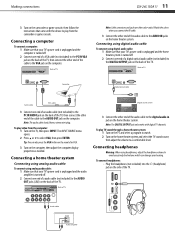
... connections can also press HDMI once to select HDMI 1 or twice to select HDMI 2. 3 Turn on the component video device. Connecting a component video device Component cables often have red, green, and blue color-coded video connectors and red and white audio connectors. Back of TV Component video device Component video cable Audio cable 3 Connect the other end of time. Making connections DX-24L150A11 9 4 For more help, call technical support for your TV. For Mexico markets, call 1-800-305-2204. Power outlet Power cord Notes: • The AC plug...
... connections can also press HDMI once to select HDMI 1 or twice to select HDMI 2. 3 Turn on the component video device. Connecting a component video device Component cables often have red, green, and blue color-coded video connectors and red and white audio connectors. Back of TV Component video device Component video cable Audio cable 3 Connect the other end of time. Making connections DX-24L150A11 9 4 For more help, call technical support for your TV. For Mexico markets, call 1-800-305-2204. Power outlet Power cord Notes: • The AC plug...
User Manual (English)
Page 13
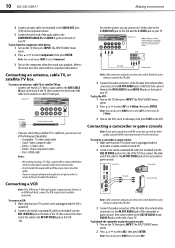
... AV cable (the red and white connectors) to the AV OUT AUDIO jacks of the camcorder or game console, then connect them to select Component. 3 Turn on the component video device and start playback. S-Video cable • Better - VCR AV cable S-Video cable Note: Cable connectors and jacks are using the HDMI connection instead of TV Camcorder SERVI CE PORT HDMI2 AV cable Game console L AUDIO R AV2 IN VIDEO Note: Cable connectors and jacks are often color-coded. The INPUT SOURCE menu opens...
... AV cable (the red and white connectors) to the AV OUT AUDIO jacks of the camcorder or game console, then connect them to select Component. 3 Turn on the component video device and start playback. S-Video cable • Better - VCR AV cable S-Video cable Note: Cable connectors and jacks are using the HDMI connection instead of TV Camcorder SERVI CE PORT HDMI2 AV cable Game console L AUDIO R AV2 IN VIDEO Note: Cable connectors and jacks are often color-coded. The INPUT SOURCE menu opens...
User Manual (English)
Page 14
... digital TV channels. Connecting a home theater system Connecting using analog audio cable To connect using headphones, adjust the headphone volume to avoid excessively loud volume which can also press the VGA button on the remote for VGA. 3 Turn on the home theater system and select the TV sound source, then adjust the volume to the AUDIO IN jacks on the computer. To play from the computer: 1 Turn on the camcorder or game console, then follow the instructions that your hearing. To connect headphones: • Plug...
... digital TV channels. Connecting a home theater system Connecting using analog audio cable To connect using headphones, adjust the headphone volume to avoid excessively loud volume which can also press the VGA button on the remote for VGA. 3 Turn on the home theater system and select the TV sound source, then adjust the volume to the AUDIO IN jacks on the computer. To play from the computer: 1 Turn on the camcorder or game console, then follow the instructions that your hearing. To connect headphones: • Plug...
User Manual (English)
Page 15
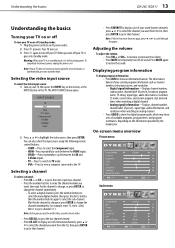
... at any time to stop the auto scan, but you will ask you to "Press MENU or EXIT if you don't need to run the auto scan again to create a channel list. 12 Select the corresponding video input source through a tuner box, select Cable/Satellite Box. 11 Press when you have made your set by the TV signal source, based on the time zone you selected). 7 If you select Manual mode, make the settings as follows...
... at any time to stop the auto scan, but you will ask you to "Press MENU or EXIT if you don't need to run the auto scan again to create a channel list. 12 Select the corresponding video input source through a tuner box, select Cable/Satellite Box. 11 Press when you have made your set by the TV signal source, based on the time zone you selected). 7 If you select Manual mode, make the settings as follows...
User Manual (English)
Page 16
... shows current program information such as channel number, video input source, and resolution. • Digital signal information-Displays channel number, station name, channel label (if preset), broadcast program name, TV rating, signal type, audio information, resolution, CC mode, current time, and current program start and end times when watching a digital channel. • Analog signal information-Displays channel number, channel label (if preset), signal type, audio information, and resolution when watching an analog channel. • Press GUIDE to temporarily turn off all sound.
... shows current program information such as channel number, video input source, and resolution. • Digital signal information-Displays channel number, station name, channel label (if preset), broadcast program name, TV rating, signal type, audio information, resolution, CC mode, current time, and current program start and end times when watching a digital channel. • Analog signal information-Displays channel number, channel label (if preset), signal type, audio information, and resolution when watching an analog channel. • Press GUIDE to temporarily turn off all sound.
User Manual (English)
Page 17
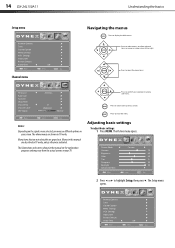
... TV mode, unless otherwise indicated. Adjusting basic settings To adjust basic settings: 1 Press MENU. The Picture menu opens. Channel Label DTV Signal: Picture Audio Antenna Setup Channel 2.1 WGBH-SD Normal Move Select MENU Exit Notes: Depending on the signal source selected, you may vary from the actual screens on your selection or enter a sub-menu. The Setup menu opens. Press to return to highlight Setup, then press . Press to display the Main menu. Parental Controls T ime Closed Caption Menu Settings VGA Settings Input Label Restore Default Audio Only...
... TV mode, unless otherwise indicated. Adjusting basic settings To adjust basic settings: 1 Press MENU. The Picture menu opens. Channel Label DTV Signal: Picture Audio Antenna Setup Channel 2.1 WGBH-SD Normal Move Select MENU Exit Notes: Depending on the signal source selected, you may vary from the actual screens on your selection or enter a sub-menu. The Setup menu opens. Press to return to highlight Setup, then press . Press to display the Main menu. Parental Controls T ime Closed Caption Menu Settings VGA Settings Input Label Restore Default Audio Only...

User Manual (English)
Page 18
... in VGA mode. Picture Mode Contrast Brightness Color T int Sharpness Backlight Advanced Video Move Picture Audio Custom Setup Channel 70 40 60 0 50 30 Select MENU Exit 4 Press or to adjust the option. You can select: • Auto (selects the correct aspect ratio automatically. Adjusting the picture DX-24L150A11 15 3 Press or to highlight an option, then press ENTER to close the menu. Also lets you set closed captioning on page 13. 2 Press MENU. Note: You can select: • Parental Controls-Control...
... in VGA mode. Picture Mode Contrast Brightness Color T int Sharpness Backlight Advanced Video Move Picture Audio Custom Setup Channel 70 40 60 0 50 30 Select MENU Exit 4 Press or to adjust the option. You can select: • Auto (selects the correct aspect ratio automatically. Adjusting the picture DX-24L150A11 15 3 Press or to highlight an option, then press ENTER to close the menu. Also lets you set closed captioning on page 13. 2 Press MENU. Note: You can select: • Parental Controls-Control...

User Manual (English)
Page 19
...or more times. 16 DX-24L150A11 Adjusting the sound 3 Press or to highlight VGA Settings, then press ENTER. Parental Controls T ime Closed Caption Menu Settings VGA Settings Input Label Restore Default Audio Only Move Picture Audio Setup Channel Off Select MENU Exit Sound Mode Bass Treble Balance Surround AVC Digital Output Audio Language Move Picture Audio Setup Channel Custom 57 50 0 Off Off RA W English Select MENU Exit 4 Press or to highlight Setup, then press . You can select: • Sound Mode-Selects the sound mode. Note: Mono is automatically selected if the program is...
...or more times. 16 DX-24L150A11 Adjusting the sound 3 Press or to highlight VGA Settings, then press ENTER. Parental Controls T ime Closed Caption Menu Settings VGA Settings Input Label Restore Default Audio Only Move Picture Audio Setup Channel Off Select MENU Exit Sound Mode Bass Treble Balance Surround AVC Digital Output Audio Language Move Picture Audio Setup Channel Custom 57 50 0 Off Off RA W English Select MENU Exit 4 Press or to highlight Setup, then press . You can select: • Sound Mode-Selects the sound mode. Note: Mono is automatically selected if the program is...

User Manual (English)
Page 23
...the program (with some exceptions, such as news and sports) and deny access to close the menu. 3 Press ENTER. Setting parental controls Parental controls let you must enter a password. Parental Controls T ime Closed Caption Menu Settings VGA Settings Input Label Restore Default Audio Only Move Picture Audio Setup Channel Off Select MENU Exit Parental Controls T ime Closed Caption Menu Settings VGA Settings Input Label Restore Default Audio Only Move Picture Audio Setup Channel Off Select MENU Exit Picture Mode Contrast Brightness Color T int Sharpness Backlight Advanced Video...
...the program (with some exceptions, such as news and sports) and deny access to close the menu. 3 Press ENTER. Setting parental controls Parental controls let you must enter a password. Parental Controls T ime Closed Caption Menu Settings VGA Settings Input Label Restore Default Audio Only Move Picture Audio Setup Channel Off Select MENU Exit Parental Controls T ime Closed Caption Menu Settings VGA Settings Input Label Restore Default Audio Only Move Picture Audio Setup Channel Off Select MENU Exit Picture Mode Contrast Brightness Color T int Sharpness Backlight Advanced Video...
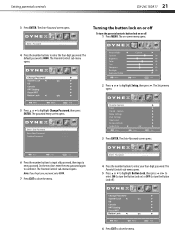
User Manual (English)
Page 24
...digit password. Move Select MENU Exit 6 Press the number buttons to highlight Setup, then press . Turning the button lock on or off : 1 Press MENU. Picture Mode Contrast Brightness Color T int Sharpness Backlight Advanced Video Move Picture Audio Custom Setup Channel 70 40 60 0 50 30 Select MENU Exit 2 Press or to input old password, then input a new password. Enter Old Password Enter New Password Confirm Password Picture Audio Setup Channel Parental Controls T ime Closed Caption Menu Settings VGA Settings Input Label Restore Default Audio Only Move Picture Audio Setup...
...digit password. Move Select MENU Exit 6 Press the number buttons to highlight Setup, then press . Turning the button lock on or off : 1 Press MENU. Picture Mode Contrast Brightness Color T int Sharpness Backlight Advanced Video Move Picture Audio Custom Setup Channel 70 40 60 0 50 30 Select MENU Exit 2 Press or to input old password, then input a new password. Enter Old Password Enter New Password Confirm Password Picture Audio Setup Channel Parental Controls T ime Closed Caption Menu Settings VGA Settings Input Label Restore Default Audio Only Move Picture Audio Setup...
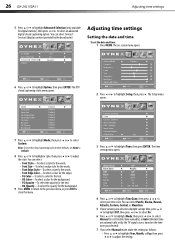
User Manual (English)
Page 29
...style. Adjusting time settings Setting the date and time To set by the broadcaster). The Setup menu opens. Parental Controls T ime Closed Caption Menu Settings VGA Settings Input Label Restore Default Audio Only Move Picture Audio Setup Channel Off Select MENU Exit 3 Press or to select Custom. You can select Service1 Service6 (displays content provided by the TV signal source, based on -screen menu opens. Mode Font Style Font Size Font Edge Style Font Edge Color FG Color BG Color FG Opacity BG Opacity Move Picture Audio Default Default Default Default Default Default Default...
...style. Adjusting time settings Setting the date and time To set by the broadcaster). The Setup menu opens. Parental Controls T ime Closed Caption Menu Settings VGA Settings Input Label Restore Default Audio Only Move Picture Audio Setup Channel Off Select MENU Exit 3 Press or to select Custom. You can select Service1 Service6 (displays content provided by the TV signal source, based on -screen menu opens. Mode Font Style Font Size Font Edge Style Font Edge Color FG Color BG Color FG Opacity BG Opacity Move Picture Audio Default Default Default Default Default Default Default...

User Manual (English)
Page 31
... -screen menu opens. Picture Mode Contrast Brightness Color T int Sharpness Backlight Advanced Video Move Picture Audio Custom Setup Channel 70 40 60 0 50 30 Select MENU Exit 2 Press or to highlight Restore Default, then press ENTER. For more characters. 7 To reset the label to factory default, press or to problems you have customized are reset. Follow the on-screen instructions. 8 Press EXIT to close the menu. Parental Controls T ime Closed Caption Menu Settings VGA Settings Input Label Restore Default Audio Only Move Picture Audio Setup Channel Off Select MENU...
... -screen menu opens. Picture Mode Contrast Brightness Color T int Sharpness Backlight Advanced Video Move Picture Audio Custom Setup Channel 70 40 60 0 50 30 Select MENU Exit 2 Press or to highlight Restore Default, then press ENTER. For more characters. 7 To reset the label to factory default, press or to problems you have customized are reset. Follow the on-screen instructions. 8 Press EXIT to close the menu. Parental Controls T ime Closed Caption Menu Settings VGA Settings Input Label Restore Default Audio Only Move Picture Audio Setup Channel Off Select MENU...


