
Literature/Product Sheet
Page 5
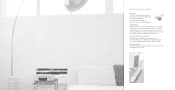
...operations - Help Menu Installed The Help Menu will help you to the terminal on useful and noticeable locations of the main unit and remote control. A Remote Controller for your TV screen. Easily connect them with the attached cords. they don't require complicated procedures. With portable players and iPod's,...subwoofer. The Quick Setup Sheet will let you play button after that simply enjoy! Easy set up to operate not only the S-101/S-301, but also TVs, cable TV tuners, satellite broadcasting tuners, iPods and USB portable music players - We also placed the most frequently used...
...operations - Help Menu Installed The Help Menu will help you to the terminal on useful and noticeable locations of the main unit and remote control. A Remote Controller for your TV screen. Easily connect them with the attached cords. they don't require complicated procedures. With portable players and iPod's,...subwoofer. The Quick Setup Sheet will let you play button after that simply enjoy! Easy set up to operate not only the S-101/S-301, but also TVs, cable TV tuners, satellite broadcasting tuners, iPods and USB portable music players - We also placed the most frequently used...
Literature/Product Sheet
Page 8
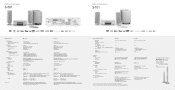
... monitor being used. yes / yes AL 24 Processing at STEREO/DIRECT mode, TIMER (EVERY DAY, ONCE, SLEEP), Picture Adjust (5 item) Floor Speaker Stand for S-101/S-301 ASF-S01 (Optional) Dimensions (W x H x D): 300 x 1,114 x 300 mm 11-51/64" x 43-55/64" x 11-51/64" (Speaker system included) Weight: 7.0 ...4 lbs 7 oz Subwoofer: 15.4 kg / 33 lbs 15 oz Denon original system cable x1, Denon original speaker cable x2, Video cable x1, FM indoor antenna x1, AM loop antenna x1, AC cable x1, iPod cable x1, Quick setup sheet x1, Remote Controller with battery x1, Table Top Speaker stand x2, Wall bracket x2...
... monitor being used. yes / yes AL 24 Processing at STEREO/DIRECT mode, TIMER (EVERY DAY, ONCE, SLEEP), Picture Adjust (5 item) Floor Speaker Stand for S-101/S-301 ASF-S01 (Optional) Dimensions (W x H x D): 300 x 1,114 x 300 mm 11-51/64" x 43-55/64" x 11-51/64" (Speaker system included) Weight: 7.0 ...4 lbs 7 oz Subwoofer: 15.4 kg / 33 lbs 15 oz Denon original system cable x1, Denon original speaker cable x2, Video cable x1, FM indoor antenna x1, AM loop antenna x1, AC cable x1, iPod cable x1, Quick setup sheet x1, Remote Controller with battery x1, Table Top Speaker stand x2, Wall bracket x2...
Owners Manual
Page 4
... (for main unit only 26 Listening to preset stations 26 Presetting stations that have been tuned in and giving names to stations (for remote control unit only 27 Playing the iPod Connecting the iPod 28 Playback 28 Viewing the slideshow (Only for iPods equipped with the Photo function 29... 32 Operating the surround functions Playing Dolby Digital and DTS surround sound (with digital inputs only 32 2-channel mode settings 33 Paying in the DENON original surround modes 33, 34 Playback using the Dolby Headphone mode 34 Using the "HELP" menu 35 Using the sleep timer Setting the clock...
... (for main unit only 26 Listening to preset stations 26 Presetting stations that have been tuned in and giving names to stations (for remote control unit only 27 Playing the iPod Connecting the iPod 28 Playback 28 Viewing the slideshow (Only for iPods equipped with the Photo function 29... 32 Operating the surround functions Playing Dolby Digital and DTS surround sound (with digital inputs only 32 2-channel mode settings 33 Paying in the DENON original surround modes 33, 34 Playback using the Dolby Headphone mode 34 Using the "HELP" menu 35 Using the sleep timer Setting the clock...

Owners Manual
Page 5
... proceeding. This remarkable component has been engineered to the S-301: q Operating instructions (with Quick setup sheet 1 w Warranty (for choosing the DENON S-301 DVD Home Theater System. As this manual before you begin hookup and operation that you for North America model only 1 e Service station list 1 r Remote control unit (RC-1005 1 t R6P/AA batteries 2 y Power supply...
... proceeding. This remarkable component has been engineered to the S-301: q Operating instructions (with Quick setup sheet 1 w Warranty (for choosing the DENON S-301 DVD Home Theater System. As this manual before you begin hookup and operation that you for North America model only 1 e Service station list 1 r Remote control unit (RC-1005 1 t R6P/AA batteries 2 y Power supply...

Owners Manual
Page 9
... and block the disc tray. • Be careful not to let your fingers get fingerprints on the main unit and remote control unit simultaneously. The Region number for displaying menus on the S-301. Be careful not to get caught when the disc tray is closing. • Do not place anything but this distance...
... and block the disc tray. • Be careful not to let your fingers get fingerprints on the main unit and remote control unit simultaneously. The Region number for displaying menus on the S-301. Be careful not to get caught when the disc tray is closing. • Do not place anything but this distance...
Owners Manual
Page 10
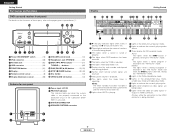
.../STANDBY switch 13) w iPod connector 28) e Portable jack 30) r USB connector 30) t FUNCTION button 31) y Display 7) u Remote control sensor 6) i Display illuminance sensor 56) o VOLUME control knob 14) !0 Headphones jack (PHONES 34) !1 SKIP (8, 9) buttons 21) TUNING +, - i Flashes when remote control signals are being output. !9 Lights when the video (or audio) signals is output via HDMI connector...
.../STANDBY switch 13) w iPod connector 28) e Portable jack 30) r USB connector 30) t FUNCTION button 31) y Display 7) u Remote control sensor 6) i Display illuminance sensor 56) o VOLUME control knob 14) !0 Headphones jack (PHONES 34) !1 SKIP (8, 9) buttons 21) TUNING +, - i Flashes when remote control signals are being output. !9 Lights when the video (or audio) signals is output via HDMI connector...
Owners Manual
Page 11
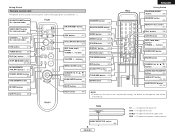
... 19) SLEEP button 36) Front ON/STANDBY button 13) AUX button 31) STILL/PAUSE (3) button 20) SKIP (8, 9) buttons 21) TUNING +, - buttons 26) VOLUME +, - Getting Started Remote control unit • For details on the opposite side will be activated too.
... 19) SLEEP button 36) Front ON/STANDBY button 13) AUX button 31) STILL/PAUSE (3) button 20) SKIP (8, 9) buttons 21) TUNING +, - buttons 26) VOLUME +, - Getting Started Remote control unit • For details on the opposite side will be activated too.

Owners Manual
Page 15
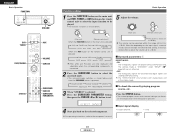
...301 includes a built-in clock function, so plug its power supply cord into a wall AC outlet to which electricity is only for an extended period of time. • If the battery fluid should be sure to use it for verifying operation. Notes on batteries: • Use R6P/AA batteries in the remote control...Replace it with new ones approximately once a year, though this depends on . Easy Setup and Operation Inserting the batteries q Remove the remote control unit's rear cover. w Set two R6P/AA batteries in the battery compartment in the battery compartment. • To prevent damage or ...
...301 includes a built-in clock function, so plug its power supply cord into a wall AC outlet to which electricity is only for an extended period of time. • If the battery fluid should be sure to use it for verifying operation. Notes on batteries: • Use R6P/AA batteries in the remote control...Replace it with new ones approximately once a year, though this depends on . Easy Setup and Operation Inserting the batteries q Remove the remote control unit's rear cover. w Set two R6P/AA batteries in the battery compartment in the battery compartment. • To prevent damage or ...

Owners Manual
Page 17
... off the audio output temporarily. Doing so will open. 2 To turn off . w Press the VOLUME button on the remote control unit, or adjust the volume up or down via the front panel VOLUME control knob. • If appears on the TV screen while buttons are being operated, that operation is not possible on... the S-301 or with that disc. • The disc keeps turning while the menu screen is shown on the TV...
... off the audio output temporarily. Doing so will open. 2 To turn off . w Press the VOLUME button on the remote control unit, or adjust the volume up or down via the front panel VOLUME control knob. • If appears on the TV screen while buttons are being operated, that operation is not possible on... the S-301 or with that disc. • The disc keeps turning while the menu screen is shown on the TV...
Owners Manual
Page 20
...8226; When connected to the connected monitor. PROGRESSIVE: Select this when using the ADV-S301 connected to the S-301. Video settings • Use the HDMI button on the remote control unit to set the resolution according to a DVI-D compatible monitor, the output is necessary that both the ... changing the switch. • Choose settings according to the TV to be output properly due to use the HELP button on the remote control unit to an HDMI type TV. ENGLISH Connecting Other Sources Connecting a component connections (Better than S-Video picture quality) DF HDMI/PROGRESSIVE...
...8226; When connected to the connected monitor. PROGRESSIVE: Select this when using the ADV-S301 connected to the S-301. Video settings • Use the HDMI button on the remote control unit to set the resolution according to a DVI-D compatible monitor, the output is necessary that both the ... changing the switch. • Choose settings according to the TV to be output properly due to use the HELP button on the remote control unit to an HDMI type TV. ENGLISH Connecting Other Sources Connecting a component connections (Better than S-Video picture quality) DF HDMI/PROGRESSIVE...
Owners Manual
Page 21
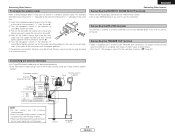
... core wire twisted tightly together into the hole at the side of the F-type, connect using the F-type antenna adapter (Option). Consult your DENON dealer if you want to switch to use this connector. FM outdoor antenna Direction of broadcasting station Black AM loop antenna White (Supplied) FM ... or AUX2 inputs. • Turn the DC 12V voltage on and off and the bass sound may be off for wired remote control. Connecting the TRIGGER OUT terminal • S-301 is used , do not disconnect the AM loop antenna. • Make sure AM loop antenna lead terminals do not touch ...
... core wire twisted tightly together into the hole at the side of the F-type, connect using the F-type antenna adapter (Option). Consult your DENON dealer if you want to switch to use this connector. FM outdoor antenna Direction of broadcasting station Black AM loop antenna White (Supplied) FM ... or AUX2 inputs. • Turn the DC 12V voltage on and off and the bass sound may be off for wired remote control. Connecting the TRIGGER OUT terminal • S-301 is used , do not disconnect the AM loop antenna. • Make sure AM loop antenna lead terminals do not touch ...

Owners Manual
Page 24
... 1 button to resume normal playback. • In some cases the menu screen may reappear when the 6 or 7 button is pressed during menu playback on the remote control unit. • The picture moves forward one frame each time the button is pressed: For DVD video discs : Title ←→ Chapter For DVD...
... 1 button to resume normal playback. • In some cases the menu screen may reappear when the 6 or 7 button is pressed during menu playback on the remote control unit. • The picture moves forward one frame each time the button is pressed: For DVD video discs : Title ←→ Chapter For DVD...

Owners Manual
Page 26
... MP3/WMA files may change the position of the folders and the order of the remote control can be played if they have not been finalized can display up to 63 capital ...the sound quality. FOLDER TRACK REPEAT FOLDER REPEAT 23 ENGLISH On the S-301, we recommend using the NUMBER buttons on the remote control unit can be displayed properly. • Be sure to add the ... are recommended. For details, refer to the writing software's usage instructions. • With the S-301 it is recommended. • Direct track selection using MP3 files recorded with bit rates of discs that...
... MP3/WMA files may change the position of the folders and the order of the remote control can be played if they have not been finalized can display up to 63 capital ...the sound quality. FOLDER TRACK REPEAT FOLDER REPEAT 23 ENGLISH On the S-301, we recommend using the NUMBER buttons on the remote control unit can be displayed properly. • Be sure to add the ... are recommended. For details, refer to the writing software's usage instructions. • With the S-301 it is recommended. • Direct track selection using MP3 files recorded with bit rates of discs that...

Owners Manual
Page 29
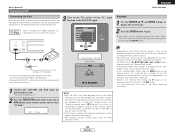
...tuning mode. (When this is done, "PRESET" is completed. • If an FM station cannot be input directly pressing the NUMBER buttons on the remote control unit) once. • The CURSOR 0 and 1 buttons function in . Tuning will not stop the auto tuning function, press the + or -...COMPLETED" appears once searching is flashes for approximately 5 seconds.) 2 Auto tuning • When one of the + or - button on the main unit and remote control unit. The mode can be heard when using the manual "Preset memory" ( page 27) operation. • When the auto preset function is flashes for...
...tuning mode. (When this is done, "PRESET" is completed. • If an FM station cannot be input directly pressing the NUMBER buttons on the remote control unit) once. • The CURSOR 0 and 1 buttons function in . Tuning will not stop the auto tuning function, press the + or -...COMPLETED" appears once searching is flashes for approximately 5 seconds.) 2 Auto tuning • When one of the + or - button on the main unit and remote control unit. The mode can be heard when using the manual "Preset memory" ( page 27) operation. • When the auto preset function is flashes for...

Owners Manual
Page 30
... "P0-", flashes, and the preset number input mode is displayed. • If you have input. • The preset number indicator, "P0- FM-DENON 5 Press the CURSOR • or ª button to select the preset number, then press the ENTER button to input that have already been input. ...; Preset stations can be given names with up to 8 characters (letters, numbers and symbols). • Preset stations using the NUMBER buttons on the remote control unit. Press the CURSOR • or ª button to select the preset number, then press the ENTER button again to store that station at ...
... "P0-", flashes, and the preset number input mode is displayed. • If you have input. • The preset number indicator, "P0- FM-DENON 5 Press the CURSOR • or ª button to select the preset number, then press the ENTER button to input that have already been input. ...; Preset stations can be given names with up to 8 characters (letters, numbers and symbols). • Preset stations using the NUMBER buttons on the remote control unit. Press the CURSOR • or ª button to select the preset number, then press the ENTER button again to store that station at ...
Owners Manual
Page 31
... Turn the iPod's power on. 2 Press the FUNCTION button on the main unit or AUX button on the remote control unit to select "IN iPod". The display can be operated with the S-301's remote control unit and the buttons on the main unit. Reconnect it. • The maximum battery charge output from the ... the list of the connector facing up. 1 Connect the ADV-S301 and iPod using the S-301's remote control unit and the buttons on the main unit, but it may not be controlled with the buttons on the remote control unit and on the main unit. 3 Turn on the TV's power. In this direction. ...
... Turn the iPod's power on. 2 Press the FUNCTION button on the main unit or AUX button on the remote control unit to select "IN iPod". The display can be operated with the S-301's remote control unit and the buttons on the main unit. Reconnect it. • The maximum battery charge output from the ... the list of the connector facing up. 1 Connect the ADV-S301 and iPod using the S-301's remote control unit and the buttons on the main unit, but it may not be controlled with the buttons on the remote control unit and on the main unit. 3 Turn on the TV's power. In this direction. ...

Owners Manual
Page 32
... recommend either pressing the ON/STANDBY switch to set the S-301's power to the standby mode, or pressing the FUNCTION button on the main unit or the DVD, TUNER or AUX button on the remote control unit and setting the input function to play. •...1 2 6, 7 RETURN ENTER ON/STANDBY AUX 3 8, 9 CURSOR MENU/GUIDE ENTER RANDOM REP 1/ALL 8, 9 CURSOR 2 The buttons on the remote control unit correspond to the previous menu. Pause the track. Fast-forward the track. Remote control unit buttons 1 2 3 MENU/GUIDE 9 8 7 6 •, ª, 0, 1 ENTER RETURN REP 1/ALL RANDOM iPod buttons 13 - 13...
... recommend either pressing the ON/STANDBY switch to set the S-301's power to the standby mode, or pressing the FUNCTION button on the main unit or the DVD, TUNER or AUX button on the remote control unit and setting the input function to play. •...1 2 6, 7 RETURN ENTER ON/STANDBY AUX 3 8, 9 CURSOR MENU/GUIDE ENTER RANDOM REP 1/ALL 8, 9 CURSOR 2 The buttons on the remote control unit correspond to the previous menu. Pause the track. Fast-forward the track. Remote control unit buttons 1 2 3 MENU/GUIDE 9 8 7 6 •, ª, 0, 1 ENTER RETURN REP 1/ALL RANDOM iPod buttons 13 - 13...

Owners Manual
Page 33
... for at "Listening to 2-channel stereo signals before being recorded. For instructions on that operation of the S-301's input mode or surround mode. NOTE: Cautions during analog recording of the Portable Audio are selected. •...the S-301's input mode, surround mode or surround parameters during recording. Playing a MP3, WMA or WAV file on the mass storage 1 Press the FUNCTION button on the main unit or AUX button on the remote control unit ...the FUNCTION button on the main unit or AUX button on the remote control unit to play MP3, WMA and WAV files on the portable audio player.
... for at "Listening to 2-channel stereo signals before being recorded. For instructions on that operation of the S-301's input mode or surround mode. NOTE: Cautions during analog recording of the Portable Audio are selected. •...the S-301's input mode, surround mode or surround parameters during recording. Playing a MP3, WMA or WAV file on the mass storage 1 Press the FUNCTION button on the main unit or AUX button on the remote control unit ...the FUNCTION button on the main unit or AUX button on the remote control unit to play MP3, WMA and WAV files on the portable audio player.
Owners Manual
Page 34
...Press the SURROUND PARAMETER button, then press the CURSOR 0 or 1 button to +18 dB. DIRECT ON OFF 4 Start playback on the remote control unit is pressed: iPod AUX3 USB AUX2 Portable (Front IN) AUX1 iPod, USB and Portable are converted into digital signals and undergo DSP ...up to the component's manual. 2 Input signal display • DOLBY DIGITAL • DTS 31 ENGLISH Basic Operation (Main unit) (Remote control unit) (Main unit) (Remote control unit) When the FUNCTION button on the main unit is pressed: DVD TUNER AUX3 iPod AUX2 USB Portable (Front IN) AUX1 When...
...Press the SURROUND PARAMETER button, then press the CURSOR 0 or 1 button to +18 dB. DIRECT ON OFF 4 Start playback on the remote control unit is pressed: iPod AUX3 USB AUX2 Portable (Front IN) AUX1 iPod, USB and Portable are converted into digital signals and undergo DSP ...up to the component's manual. 2 Input signal display • DOLBY DIGITAL • DTS 31 ENGLISH Basic Operation (Main unit) (Remote control unit) (Main unit) (Remote control unit) When the FUNCTION button on the main unit is pressed: DVD TUNER AUX3 iPod AUX2 USB Portable (Front IN) AUX1 When...

Owners Manual
Page 35
... playback discs) • Dolby Digital multi-channel sources • DTS sources 1 Select the digital input function (DVD, AUX1, AUX2 or AUX3 digital input). (Main unit) (Remote control unit) 2 Press the DVS/CINEMA button to "DTS". When "ON" is selected, the "NIGHT" mode is too bright. • This function only works in the...
... playback discs) • Dolby Digital multi-channel sources • DTS sources 1 Select the digital input function (DVD, AUX1, AUX2 or AUX3 digital input). (Main unit) (Remote control unit) 2 Press the DVS/CINEMA button to "DTS". When "ON" is selected, the "NIGHT" mode is too bright. • This function only works in the...


