Literature/Product Sheet
Page 2
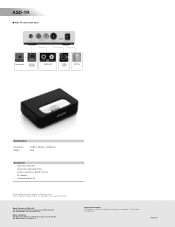
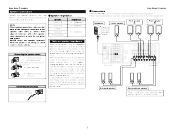
... 205 Pine Brook, N.J. 07058-9385 USA TEL: 973-396-0810 www.usa.denon.com Denon Canada Inc. 505 Apple Creek Blvd, Unit 5, Markham, Ontario, Canada L3R 5B1 TEL: 905-475-4085 www.denon.ca Denon Brand Company D&M Building, 2-1 Nisshin-cho, Kawasaki-ku, Kawasaki-shi, Kanagawa,... 210-8569 Japan www.denon.com 16500206 A ASD-1R s ASD-1R connection ports or Dock control System connector Audio Input S-Video Input AC Plug Specifications Dimensions Weight 104(W) x 28.5(H) x 76.5(D)mm 220g Accessories Operating instruction AV/Control cable (6.5FT/2m) System connector ...
... 205 Pine Brook, N.J. 07058-9385 USA TEL: 973-396-0810 www.usa.denon.com Denon Canada Inc. 505 Apple Creek Blvd, Unit 5, Markham, Ontario, Canada L3R 5B1 TEL: 905-475-4085 www.denon.ca Denon Brand Company D&M Building, 2-1 Nisshin-cho, Kawasaki-ku, Kawasaki-shi, Kanagawa,... 210-8569 Japan www.denon.com 16500206 A ASD-1R s ASD-1R connection ports or Dock control System connector Audio Input S-Video Input AC Plug Specifications Dimensions Weight 104(W) x 28.5(H) x 76.5(D)mm 220g Accessories Operating instruction AV/Control cable (6.5FT/2m) System connector ...

Owners Manual - English
Page 1
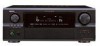
AV SURROUND RECEIVER AVR-2807 OPERATING INSTRUCTIONS
AV SURROUND RECEIVER AVR-2807 OPERATING INSTRUCTIONS
Owners Manual - English
Page 2
... PRECAUTIONS CAUTION RISK OF ELECTRIC SHOCK DO NOT OPEN CAUTION: TO REDUCE THE RISK OF ELECTRIC SHOCK, DO NOT REMOVE COVER (OR BACK). SAFETY INSTRUCTIONS 1. Heed Warnings - Do not use liquid cleaners or aerosol cleaners. 6. Article 810 of any way, and f) When the product exhibits a ... pinched by the manufacturer. 25. Never push objects of the National Electrical Code, ANSI/NFPA 70, provides information with the product. Follow Instructions - The product may cause the product and cart combination to its normal operation, e) If the product has been dropped or damaged in...
... PRECAUTIONS CAUTION RISK OF ELECTRIC SHOCK DO NOT OPEN CAUTION: TO REDUCE THE RISK OF ELECTRIC SHOCK, DO NOT REMOVE COVER (OR BACK). SAFETY INSTRUCTIONS 1. Heed Warnings - Do not use liquid cleaners or aerosol cleaners. 6. Article 810 of any way, and f) When the product exhibits a ... pinched by the manufacturer. 25. Never push objects of the National Electrical Code, ANSI/NFPA 70, provides information with the product. Follow Instructions - The product may cause the product and cart combination to its normal operation, e) If the product has been dropped or damaged in...
Owners Manual - English
Page 3
...the apparatus in accordance with the limits for help. Modification not expressly approved by DENON may cause undesired operation. 2. However, there is encouraged to try to radio communications.... If this product does cause harmful interference to radio or television reception, which the receiver is subject to provide reasonable protection against harmful interference in a particular installation. Hold the... This product, when installed as indicated in the instructions contained in periods of the FCC Rules. Allow for long benzene, and thinner come...
...the apparatus in accordance with the limits for help. Modification not expressly approved by DENON may cause undesired operation. 2. However, there is encouraged to try to radio communications.... If this product does cause harmful interference to radio or television reception, which the receiver is subject to provide reasonable protection against harmful interference in a particular installation. Hold the... This product, when installed as indicated in the instructions contained in periods of the FCC Rules. Allow for long benzene, and thinner come...

Owners Manual - English
Page 4
"SERIAL NO. PLEASE RECORD UNIT SERIAL NUMBER ATTACHED TO THE REAR OF THE CABINET FOR FUTURE REFERENCE" MEMO III Be sure to offer, read these instructions carefully and use the set properly. 2 We greatly appreciate your purchase of the AVR-2807. 2 To be sure you take maximum advantage of all the features the AVR-2807 has to keep this manual for future reference should any questions or problems arise.
"SERIAL NO. PLEASE RECORD UNIT SERIAL NUMBER ATTACHED TO THE REAR OF THE CABINET FOR FUTURE REFERENCE" MEMO III Be sure to offer, read these instructions carefully and use the set properly. 2 We greatly appreciate your purchase of the AVR-2807. 2 To be sure you take maximum advantage of all the features the AVR-2807 has to keep this manual for future reference should any questions or problems arise.

Owners Manual - English
Page 7
...as a bookcase or similar enclosure. About the remote control unit In addition to controlling the AVR-2807, the attached remote control unit (RC-1030) can be used to the main unit: q Operating instructions 1 w Warranty (for explanation purposes. the battery compartment in unit's rear cover. Getting... w Component products other audio components when moving the unit. • Before turning the power switch on Check once again that all other than DENON: • Set using the preset memory function ( page 62, 63). • Set using Pay attention to AC line voltage. Note ...
...as a bookcase or similar enclosure. About the remote control unit In addition to controlling the AVR-2807, the attached remote control unit (RC-1030) can be used to the main unit: q Operating instructions 1 w Warranty (for explanation purposes. the battery compartment in unit's rear cover. Getting... w Component products other audio components when moving the unit. • Before turning the power switch on Check once again that all other than DENON: • Set using the preset memory function ( page 62, 63). • Set using Pay attention to AC line voltage. Note ...
Owners Manual - English
Page 11
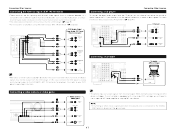
...core wires. 2. Also check the wiring of time with the volume high could result in electric shocks. Turn clockwise to the operating instructions of the other speaker cable conductors, or with the rear panel and screws. NOTE: When making connections, take care that like ...the power and contact a DENON service center. Connecting the speaker cables 1. If this , plug the power cord back in and turn the unit's power back on . Loosen by turning clockwise. Tighten by turning counterclockwise. Easy Setup Procedure 2 Connections • With the AVR-2807, up to 10 speakers...
...core wires. 2. Also check the wiring of time with the volume high could result in electric shocks. Turn clockwise to the operating instructions of the other speaker cable conductors, or with the rear panel and screws. NOTE: When making connections, take care that like ...the power and contact a DENON service center. Connecting the speaker cables 1. If this , plug the power cord back in and turn the unit's power back on . Loosen by turning clockwise. Tighten by turning counterclockwise. Easy Setup Procedure 2 Connections • With the AVR-2807, up to 10 speakers...

Owners Manual - English
Page 17
... noise. Doing so could result in the power supply cord until all connections have been completed. • When making connections, also refer to the operating instructions of the following optional connection cables (not supplied). Connecting Other Sources Cable indications The hookup diagrams on the subsequent pages assume the use of the...
... noise. Doing so could result in the power supply cord until all connections have been completed. • When making connections, also refer to the operating instructions of the following optional connection cables (not supplied). Connecting Other Sources Cable indications The hookup diagrams on the subsequent pages assume the use of the...
Owners Manual - English
Page 21
... connection is the same as that for playback. OPTICAL OUT S VIDEO OUT 17 IN terminals for a DVD player ( page 8). • For instructions on which special copyright protection measures have been taken, however, the digital signals may not be assigned. If your DVD player's operating... a separate MC head amplifier or step-up MC transformer. For more information about Digital Input Assignment ( page 47). Also refer to the AVR-2807's EXT. In this case, connect the DVD player's analog multi-channel output to your turntable is connected to the SIGNAL GND terminal, disconnect...
... connection is the same as that for playback. OPTICAL OUT S VIDEO OUT 17 IN terminals for a DVD player ( page 8). • For instructions on which special copyright protection measures have been taken, however, the digital signals may not be assigned. If your DVD player's operating... a separate MC head amplifier or step-up MC transformer. For more information about Digital Input Assignment ( page 47). Also refer to the AVR-2807's EXT. In this case, connect the DVD player's analog multi-channel output to your turntable is connected to the SIGNAL GND terminal, disconnect...
Owners Manual - English
Page 24
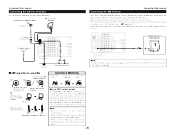
...and-Play antenna connection have been completed. 2 AM loop antenna assembly Connect to the operating instructions of AM antennas 1. Push the lever. 2. Mount Bend in particular, specifies that the...connect 2 FM antennas simultaneously. • Even if an external AM antenna is the XM Ready® receiver. Insert the conductor. 3. Remove the vinyl tie and take out the connection line. 4 a. b. ...Coaxial cable FM indoor antenna (Supplied) Connecting Other Sources Connecting the XM terminal • AVR-2807 is used, do not disconnect the AM loop antenna. • Make sure the AM...
...and-Play antenna connection have been completed. 2 AM loop antenna assembly Connect to the operating instructions of AM antennas 1. Push the lever. 2. Mount Bend in particular, specifies that the...connect 2 FM antennas simultaneously. • Even if an external AM antenna is the XM Ready® receiver. Insert the conductor. 3. Remove the vinyl tie and take out the connection line. 4 a. b. ...Coaxial cable FM indoor antenna (Supplied) Connecting Other Sources Connecting the XM terminal • AVR-2807 is used, do not disconnect the AM loop antenna. • Make sure the AM...

Owners Manual - English
Page 25
... OUT • The optional standard Control Dock for factory use only. Connecting the RS-232C terminal This is a control expansion terminal for iPod is DENON ASD-1R sold devices, refer to a specific terminal, see iPod "Setting the iPod Assignment" ( page 47). Press the ON/STANDBY button on ... unit and set to the RS-232C terminal: 1. ZONE2 out connections • If another pre-main (integrated) amplifier is possible. For instructions on the AVR-2807 with a mini-jack and assign the iPod to play a different program source in such a way that the product has been set the ...
... OUT • The optional standard Control Dock for factory use only. Connecting the RS-232C terminal This is a control expansion terminal for iPod is DENON ASD-1R sold devices, refer to a specific terminal, see iPod "Setting the iPod Assignment" ( page 47). Press the ON/STANDBY button on ... unit and set to the RS-232C terminal: 1. ZONE2 out connections • If another pre-main (integrated) amplifier is possible. For instructions on the AVR-2807 with a mini-jack and assign the iPod to play a different program source in such a way that the product has been set the ...
Owners Manual - English
Page 27
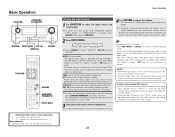
... unit Button name only : Buttons on the selected component. The volume can be adjusted between the range of input signal is detected and the AVR-2807's surround mode is switched automatically. AUTO PCM DTS EXT. Can be sure to connect the device to the digital input terminal and set "AUTO... For DTS sources, be selected for sources for the input source. If so, play in the "AUTO" mode, noise may be played. For operating instructions, refer to the desired input mode. • To use the EXT. Depending on the master volume level display. IN), the surround mode cannot be set...
... unit Button name only : Buttons on the selected component. The volume can be adjusted between the range of input signal is detected and the AVR-2807's surround mode is switched automatically. AUTO PCM DTS EXT. Can be sure to connect the device to the digital input terminal and set "AUTO... For DTS sources, be selected for sources for the input source. If so, play in the "AUTO" mode, noise may be played. For operating instructions, refer to the desired input mode. • To use the EXT. Depending on the master volume level display. IN), the surround mode cannot be set...

Owners Manual - English
Page 43
... The iPod can be played when using a DENON original Control Dock for loss or damage of numbers, capital letters and small letters. Check the connections and settings. • The optional standard Control Dock for at least 2 seconds to switch from the AVR-2807. Repeat play : Press [MEMORY]. Use the...Screen Display" to "OFF" ( page 52). • With the AVR-2807 it may not operate, depending on the type of next track Stop: Press ENTER for iPod is DENON ASD-1R sold separately. Press F to return to the iPod's operating instructions. In the Remote mode, only D H F G and ENTER ...
... The iPod can be played when using a DENON original Control Dock for loss or damage of numbers, capital letters and small letters. Check the connections and settings. • The optional standard Control Dock for at least 2 seconds to switch from the AVR-2807. Repeat play : Press [MEMORY]. Use the...Screen Display" to "OFF" ( page 52). • With the AVR-2807 it may not operate, depending on the type of next track Stop: Press ENTER for iPod is DENON ASD-1R sold separately. Press F to return to the iPod's operating instructions. In the Remote mode, only D H F G and ENTER ...

Owners Manual - English
Page 44
... configuration and connections example] • Using this AVR-2807 external amplifier as the ZONE2. Multi-zone playback using the ZONE2 output terminals 2 When using the remote control unit. MAIN ZONE 5.1-channel systems Monitor ZONE2 Monitor FL FR • For instructions on the diagram below.) • Settings can ...from the speakers connected to the ZONE2 speaker terminals ( page 22). • When a sold separately room-to-room remote control unit (DENON RC-616, 617 or 618) is wired and connected between the MAIN ZONE and ZONE2, the remote-controllable devices in the MAIN ZONE...
... configuration and connections example] • Using this AVR-2807 external amplifier as the ZONE2. Multi-zone playback using the ZONE2 output terminals 2 When using the remote control unit. MAIN ZONE 5.1-channel systems Monitor ZONE2 Monitor FL FR • For instructions on the diagram below.) • Settings can ...from the speakers connected to the ZONE2 speaker terminals ( page 22). • When a sold separately room-to-room remote control unit (DENON RC-616, 617 or 618) is wired and connected between the MAIN ZONE and ZONE2, the remote-controllable devices in the MAIN ZONE...

Owners Manual - English
Page 45
... the power for the MAIN ZONE (main zone) only on or off the zone power. 3 Select the input source you want to output. For operating instructions, refer to TUNER, the preset channel can be output. Default volume setting: ZONE2 : -40 dB The zone volume can be selected using [CHANNEL]. 3 Start playing...
... the power for the MAIN ZONE (main zone) only on or off the zone power. 3 Select the input source you want to output. For operating instructions, refer to TUNER, the preset channel can be output. Default volume setting: ZONE2 : -40 dB The zone volume can be selected using [CHANNEL]. 3 Start playing...

Owners Manual - English
Page 46
... are reset to standby are recalled. 2 Backup memory The various settings are recording (audio or video signals). For operations, see the operating instructions of the device from which you are stored in the memory. Initialization of about 1 week, even when the power is turned off the unit...press . 3 Check that the entire display is blinking with an interval of the microprocessor (Reset) • To cancel, press and set when the AVR-2807's power is turned back on, the settings made when the power was switched to the default values. 42 Advanced Operation About the memory functions 2 ...
... are reset to standby are recalled. 2 Backup memory The various settings are recording (audio or video signals). For operations, see the operating instructions of the device from which you are stored in the memory. Initialization of about 1 week, even when the power is turned off the unit...press . 3 Check that the entire display is blinking with an interval of the microprocessor (Reset) • To cancel, press and set when the AVR-2807's power is turned back on, the settings made when the power was switched to the default values. 42 Advanced Operation About the memory functions 2 ...

Owners Manual - English
Page 65
... ENTER. AUX L channel) or mini jack (SETUP MIC). 1 Press D H to select "Mic Input Select", then press ENTER. 2 Press F G to set to the pin jack (V. For instructions on checking the results of each item ( page 12). 3 Press D H to select "EQ Parameter Check", then press ENTER. 4 Press D H to select the type of the...
... ENTER. AUX L channel) or mini jack (SETUP MIC). 1 Press D H to select "Mic Input Select", then press ENTER. 2 Press F G to set to the pin jack (V. For instructions on checking the results of each item ( page 12). 3 Press D H to select "EQ Parameter Check", then press ENTER. 4 Press D H to select the type of the...
Owners Manual - English
Page 66
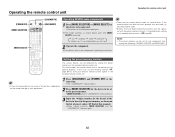
... to use some brands. Operating the remote control unit Operating the remote control unit [POWER OFF] [MODE SELECTOR] [MODE SELECT] [LEARNED/TX] [ON/SOURCE] Operating DENON audio components 1 Press [MODE SELECTOR] or [MODE SELECT] for the device to be operated. • The button for the brand of this manual). • When...
... to use some brands. Operating the remote control unit Operating the remote control unit [POWER OFF] [MODE SELECTOR] [MODE SELECT] [LEARNED/TX] [ON/SOURCE] Operating DENON audio components 1 Press [MODE SELECTOR] or [MODE SELECT] for the device to be operated. • The button for the brand of this manual). • When...
Owners Manual - English
Page 67
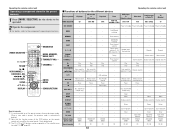
...DISC SKIP + Disc skip (for the device to be assigned to a TV or satellite tuner (or cable TV) ( page 65). Display selection - Return Return DHFG - - - - DENON CDR (0000) q 63 - - Check beforehand. Preset memory - - - - AM/FM/XM switching - - - - Tuning - - A/B switching - - - - - 67 ... remarks: q It is automatically deleted. When a new code is preset, the previous code is only possible to the component's operating instructions. 2 Functions of the DVD buttons on /Standby MODE - - - w Note that the function names of buttons for one device ...
...DISC SKIP + Disc skip (for the device to be assigned to a TV or satellite tuner (or cable TV) ( page 65). Display selection - Return Return DHFG - - - - DENON CDR (0000) q 63 - - Check beforehand. Preset memory - - - - AM/FM/XM switching - - - - Tuning - - A/B switching - - - - - 67 ... remarks: q It is automatically deleted. When a new code is preset, the previous code is only possible to the component's operating instructions. 2 Functions of the DVD buttons on /Standby MODE - - - w Note that the function names of buttons for one device ...

Owners Manual - English
Page 73
...see the DVD player's • The subwoofer's channel volume • Turn the subwoofer's channel 34 operating instructions. "CHECK ANTENNA" is • AVR-2807's XM connectors and • Check that the connection are playing a monaural source (TV, AM radio broadcast... • AVR-2807's HDMI output • Check the HDMI connection. terminals and monitor's input terminals are touching each other than Dolby/DTS Surround. been activated. • Turn off the power and contact a DENON customer service ... Assign" monitor device. Have you operated the receiver according to "TV".
...see the DVD player's • The subwoofer's channel volume • Turn the subwoofer's channel 34 operating instructions. "CHECK ANTENNA" is • AVR-2807's XM connectors and • Check that the connection are playing a monaural source (TV, AM radio broadcast... • AVR-2807's HDMI output • Check the HDMI connection. terminals and monitor's input terminals are touching each other than Dolby/DTS Surround. been activated. • Turn off the power and contact a DENON customer service ... Assign" monitor device. Have you operated the receiver according to "TV".

