
Literature/Product Sheet
Page 1
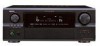
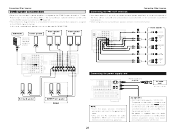
... on a non-HDCP display connected to the AVR-2807; A/V Surround Receiver AVR-2807 The AVR-2807 is connected to the dedicated control terminal of the AVR-2807. Connectivity/ Expandability ■ Variable subwoofer crossover switching (40/60/80/90/100/110...Denon's latest addition of versatile A/V Receivers, which incorporate all current surround formats and enhanced installation flexibility, all with great simplicity of setup and operation. please connect a HDCP-compliant display when viewing video material. ■ Video Up/Down conversion capable of output to HDMI The AVR-2807...
... on a non-HDCP display connected to the AVR-2807; A/V Surround Receiver AVR-2807 The AVR-2807 is connected to the dedicated control terminal of the AVR-2807. Connectivity/ Expandability ■ Variable subwoofer crossover switching (40/60/80/90/100/110...Denon's latest addition of versatile A/V Receivers, which incorporate all current surround formats and enhanced installation flexibility, all with great simplicity of setup and operation. please connect a HDCP-compliant display when viewing video material. ■ Video Up/Down conversion capable of output to HDMI The AVR-2807...
Literature/Product Sheet
Page 2
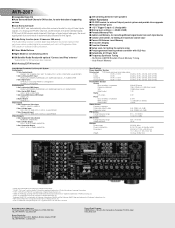
...SURROUND BACK L/R, SUBWOOFER 7 Sets Digital Input OPTICAL x 5 (including FRONT x 1) (Assignable) COAXIAL x 2 (Assignable) Audio Outputs 1 Set 8-ch Analog PRE Output FRONT L/R, CENTER, SURROUND L/R, SURROUND BACK L/R, SUBWOOFER 3 Sets Analog REC Output VCR-1, VCR-2, CDR/TAPE 1 Set Analog Multi Zone LINE Output ZONE2 L/R 2 Digital Output OPTICAL x 2...; Night Mode for auto-detection of supporting sources ■ Auto Surround mode The AVR-2807 can occur when a video signal is a trademark of Audyssey Laboratories. Denon Electronics (USA), LLC. 19C Chapin Road, Suite 205 Pine Brook, N.J. 07058-...
...SURROUND BACK L/R, SUBWOOFER 7 Sets Digital Input OPTICAL x 5 (including FRONT x 1) (Assignable) COAXIAL x 2 (Assignable) Audio Outputs 1 Set 8-ch Analog PRE Output FRONT L/R, CENTER, SURROUND L/R, SURROUND BACK L/R, SUBWOOFER 3 Sets Analog REC Output VCR-1, VCR-2, CDR/TAPE 1 Set Analog Multi Zone LINE Output ZONE2 L/R 2 Digital Output OPTICAL x 2...; Night Mode for auto-detection of supporting sources ■ Auto Surround mode The AVR-2807 can occur when a video signal is a trademark of Audyssey Laboratories. Denon Electronics (USA), LLC. 19C Chapin Road, Suite 205 Pine Brook, N.J. 07058-...
Owners Manual - English
Page 11
... the cable. 3. If the protection circuit is activated, the output to rise, activating the protection circuit. Easy Setup Procedure 2 Connections • With the AVR-2807, up to 10 speakers can be connected for subwoofer with built-in contact with adjacent terminals, with other components. ...Turn clockwise to the operating instructions of the other speaker cable conductors, or with the rear panel and screws. NEVER touch the speaker terminals when the power is cut off the power and contact a DENON...
... the cable. 3. If the protection circuit is activated, the output to rise, activating the protection circuit. Easy Setup Procedure 2 Connections • With the AVR-2807, up to 10 speakers can be connected for subwoofer with built-in contact with adjacent terminals, with other components. ...Turn clockwise to the operating instructions of the other speaker cable conductors, or with the rear panel and screws. NEVER touch the speaker terminals when the power is cut off the power and contact a DENON...

Owners Manual - English
Page 14
...as "ZONE2" speakers. Front A Front B Front A+B 10 Easy Setup Procedure w Before performing the Auto Setup procedure 1 Turn on your subwoofer can be assigned to the "Front" or "ZONE2" output. e Perform the Auto Setup procedure 1 Press SYSTEM SETUP. 2 Press D H to select "Auto Setup / Room EQ", then press...crossover frequency to "ZONE2". • "System Setup Menu" is not displayed when using headphones. Some subwoofers have a standby mode. During the auto setup procedure, test tones are not output to the maximum or Low pass filter off . 4 Press or [ON]. • The power ...
...as "ZONE2" speakers. Front A Front B Front A+B 10 Easy Setup Procedure w Before performing the Auto Setup procedure 1 Turn on your subwoofer can be assigned to the "Front" or "ZONE2" output. e Perform the Auto Setup procedure 1 Press SYSTEM SETUP. 2 Press D H to select "Auto Setup / Room EQ", then press...crossover frequency to "ZONE2". • "System Setup Menu" is not displayed when using headphones. Some subwoofers have a standby mode. During the auto setup procedure, test tones are not output to the maximum or Low pass filter off . 4 Press or [ON]. • The power ...

Owners Manual - English
Page 15
... F. • Measurements for example when small children are nearby. • Proper measurements may not be ended when there are output during the measurements. however, to select "Calculate", then press F. • The speaker is recommended. Be careful for the first... Press ENTER again. h 4 h h (After completion of measurement for first point) NOTE: • Do not change the speaker connections or subwoofer volume after initial measurement) h (Press ENTER.) (After measurement completed) u Speaker measurements With these measurements, the "Speaker Configuration", "Distance", "Channel...
... F. • Measurements for example when small children are nearby. • Proper measurements may not be ended when there are output during the measurements. however, to select "Calculate", then press F. • The speaker is recommended. Be careful for the first... Press ENTER again. h 4 h h (After completion of measurement for first point) NOTE: • Do not change the speaker connections or subwoofer volume after initial measurement) h (Press ENTER.) (After measurement completed) u Speaker measurements With these measurements, the "Speaker Configuration", "Distance", "Channel...

Owners Manual - English
Page 16
.../or • Check the placement and orientation of the internal electrical delay. If so, select "Skip0". loudspeakers. • Adjust the subwoofer's output level. 2 t The measurement microphone is not connected, or all • Connect the attached setup microphone to of speakers have not been... Example Cause Measures q The speakers required for producing suitable • Check that is output from the physical distance because of the subwoofer is too low. Be sure to turn off the AVR-2807's power before checking the speaker connections. 1 Press D H to check the displayed ...
.../or • Check the placement and orientation of the internal electrical delay. If so, select "Skip0". loudspeakers. • Adjust the subwoofer's output level. 2 t The measurement microphone is not connected, or all • Connect the attached setup microphone to of speakers have not been... Example Cause Measures q The speakers required for producing suitable • Check that is output from the physical distance because of the subwoofer is too low. Be sure to turn off the AVR-2807's power before checking the speaker connections. 1 Press D H to check the displayed ...
Owners Manual - English
Page 21
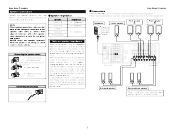
... R B SUBWOOFER Connecting Other Sources Connecting a CD player To connect the digital audio output from the CD player, you can accept signals from an outboard decoder, or a component with a low output MC cartridge, you choose to use a separate MC head amplifier or step-up MC transformer. Also refer to the AVR-2807's EXT. ...IN) terminals • These terminals are for inputting multi-channel audio signals from moving magnet (MM) and high output moving coil (MC) phono cartridges. IN) terminals ( page...
... R B SUBWOOFER Connecting Other Sources Connecting a CD player To connect the digital audio output from the CD player, you can accept signals from an outboard decoder, or a component with a low output MC cartridge, you choose to use a separate MC head amplifier or step-up MC transformer. Also refer to the AVR-2807's EXT. ...IN) terminals • These terminals are for inputting multi-channel audio signals from moving magnet (MM) and high output moving coil (MC) phono cartridges. IN) terminals ( page...
Owners Manual - English
Page 26
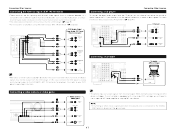
... amplifier is assigned to the ZONE2 output channel at standby. Incomplete connections will result in the "System Setup Menu", the surround back speaker terminals can not be used for subwoofer with the POWER switch on the ... speaker out terminals ( page 54). • The connections diagram below is an example for audio equipment. Subwoofer Center speaker Connection terminal for MAIN ZONE. Power amplifier B CENTER A SURROUND BACK L L L R R R A SURROUND L L L R R R B SUBWOOFER A FRONT L L L R R R (L) (R) > < Surround speaker (L) (R) > < ZONE2 ...
... amplifier is assigned to the ZONE2 output channel at standby. Incomplete connections will result in the "System Setup Menu", the surround back speaker terminals can not be used for subwoofer with the POWER switch on the ... speaker out terminals ( page 54). • The connections diagram below is an example for audio equipment. Subwoofer Center speaker Connection terminal for MAIN ZONE. Power amplifier B CENTER A SURROUND BACK L L L R R R A SURROUND L L L R R R B SUBWOOFER A FRONT L L L R R R (L) (R) > < Surround speaker (L) (R) > < ZONE2 ...

Owners Manual - English
Page 29
..." mode cannot be selected when only one most suited for each of the surround modes. DENON Original Surround Modes ( page 32, 33) • Select these for 7.1-channel playback with...used . Basic Operation Using the surround modes Types of surround modes and their features The AVR-2807 is equipped with 5.1-channel sources. or 7.1-channel stereo sources developed by Dolby Laboratories, this...etc. DIRECT STEREO When press SURROUND PARAMETER: The subwoofer output can be used when the surround back speaker is selected, video outputs are output in the PURE DIRECT mode. • The...
..." mode cannot be selected when only one most suited for each of the surround modes. DENON Original Surround Modes ( page 32, 33) • Select these for 7.1-channel playback with...used . Basic Operation Using the surround modes Types of surround modes and their features The AVR-2807 is equipped with 5.1-channel sources. or 7.1-channel stereo sources developed by Dolby Laboratories, this...etc. DIRECT STEREO When press SURROUND PARAMETER: The subwoofer output can be used when the surround back speaker is selected, video outputs are output in the PURE DIRECT mode. • The...

Owners Manual - English
Page 33
Basic Operation Surround modes and parameters Basic Operation Channel output Surround Mode FRONT L/R CENTER SURROUND L/R SURROUND BACK L/R SUBWOOFER D. C : Signal E : No signal C : Adjustable E : Not adjustable 29 IN only SW ATT PURE DIRECT, DIRECT C E E MULTI CH DIRECT C B B STEREO CE E EXT. ...DTS, DVD-Audio and Super Audio CD. MODE ROOM SIZE EFFECT LEVEL Dolby Digital NIGHT mode DELAY TIME PRO LOGIC II/IIx MUSIC MODE SUBWOOFER only ON/OFF PANORAMA DIMENSION CENTER WIDTH NEO:6 MUSIC MODE only CENTER IMAGE EXT. COMP *1 LFE AFDM SB CH *2 *1 OUT Signals...
Basic Operation Surround modes and parameters Basic Operation Channel output Surround Mode FRONT L/R CENTER SURROUND L/R SURROUND BACK L/R SUBWOOFER D. C : Signal E : No signal C : Adjustable E : Not adjustable 29 IN only SW ATT PURE DIRECT, DIRECT C E E MULTI CH DIRECT C B B STEREO CE E EXT. ...DTS, DVD-Audio and Super Audio CD. MODE ROOM SIZE EFFECT LEVEL Dolby Digital NIGHT mode DELAY TIME PRO LOGIC II/IIx MUSIC MODE SUBWOOFER only ON/OFF PANORAMA DIMENSION CENTER WIDTH NEO:6 MUSIC MODE only CENTER IMAGE EXT. COMP *1 LFE AFDM SB CH *2 *1 OUT Signals...

Owners Manual - English
Page 47
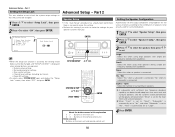
...microphone is in the case of speakers to be output from the speakers and subwoofer according to the pin jack (V. Speaker Setup 1 Speaker Config. 2 Subwoofer Setup 3 Distance 4 Channel Level 5 Crossover Frequency Items Automatically set the output component and properties for the various channels according to...Advanced Setup - Front L & R 12 ft (3.6 m) Set the volume of the various speakers so that the sound Front Front output from the speakers and the subwoofer seems to have L R the same volume level. 0 dB 0 dB Set the frequency (Hz) below which the bass sound of...
...microphone is in the case of speakers to be output from the speakers and subwoofer according to the pin jack (V. Speaker Setup 1 Speaker Config. 2 Subwoofer Setup 3 Distance 4 Channel Level 5 Crossover Frequency Items Automatically set the output component and properties for the various channels according to...Advanced Setup - Front L & R 12 ft (3.6 m) Set the volume of the various speakers so that the sound Front Front output from the speakers and the subwoofer seems to have L R the same volume level. 0 dB 0 dB Set the frequency (Hz) below which the bass sound of...
Owners Manual - English
Page 48
... for the different input sources. IN subwoofer terminal. that are assigned for the different... the playback level of the analog signal that is possible to assign the DENON original Dock's audio 3 iPod Assign and/or video signals to HDMI. ...dB 0 dB 0 dB 0 dB 0 dB 0 dB 5 Function Rename The name of the signal output from analog video signals to any input terminals on screen display for the different input sources. Name - 49...video conversion function. This sets whether or not to display the on the AVR-2807 iPod Function = OFF 47 and play them. 4 Input Function Lev. ...
... for the different input sources. IN subwoofer terminal. that are assigned for the different... the playback level of the analog signal that is possible to assign the DENON original Dock's audio 3 iPod Assign and/or video signals to HDMI. ...dB 0 dB 0 dB 0 dB 0 dB 0 dB 5 Function Rename The name of the signal output from analog video signals to any input terminals on screen display for the different input sources. Name - 49...video conversion function. This sets whether or not to display the on the AVR-2807 iPod Function = OFF 47 and play them. 4 Input Function Lev. ...
Owners Manual - English
Page 60
... Setting the Speaker Configuration Automatically set the output component and properties for the various channels according to "Large". is automatically set to make the settings for the main (front) and surround speakers. When "Front" is set to "Small", "Subwoofer" is automatically set to "Yes", and when "Subwoofer" is set to the combination of...
... Setting the Speaker Configuration Automatically set the output component and properties for the various channels according to "Large". is automatically set to make the settings for the main (front) and surround speakers. When "Front" is set to "Small", "Subwoofer" is automatically set to "Yes", and when "Subwoofer" is set to the combination of...
Owners Manual - English
Page 62
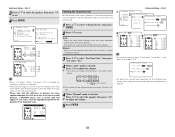
...screen right will appear. If you set . 4 -1 4 Auto: -2 Adjust the level while listening to the test tones produced automatically from the speakers and the subwoofer seems to have the same 2 3 volume level. 1 Press D H to select "Channel Level", then press ENTER. 2 Press F G to adjust the .... • To adjust the channel level separately for every speaker should be 20 ft (6.0 m) or less. L4 Advanced Setup - Test tones are output automatically, in units of variation if so desired. • The distance changes in the order shown below. L7 ..... Part 2 3 Press D H...
...screen right will appear. If you set . 4 -1 4 Auto: -2 Adjust the level while listening to the test tones produced automatically from the speakers and the subwoofer seems to have the same 2 3 volume level. 1 Press D H to select "Channel Level", then press ENTER. 2 Press F G to adjust the .... • To adjust the channel level separately for every speaker should be 20 ft (6.0 m) or less. L4 Advanced Setup - Test tones are output automatically, in units of variation if so desired. • The distance changes in the order shown below. L7 ..... Part 2 3 Press D H...
Owners Manual - English
Page 63
...is displayed at the top right of the various speakers is set to "ON", and when one or more speakers are set to be output from the subwoofer or the speakers that are set individually for the different surround modes. 1 Press [TEST TONE]. • Test tones are cut before ...when using regular speakers. Advanced Setup - Part 2 2 Adjusting the test tone using the remote control unit is output from the subwoofer. For speakers that are set to "Small" at "Setting the Subwoofer Setup" ( page 57), the frequencies can be selected regardless of the test tones using the remote control unit ...
...is displayed at the top right of the various speakers is set to "ON", and when one or more speakers are set to be output from the subwoofer or the speakers that are set individually for the different surround modes. 1 Press [TEST TONE]. • Test tones are cut before ...when using regular speakers. Advanced Setup - Part 2 2 Adjusting the test tone using the remote control unit is output from the subwoofer. For speakers that are set to "Small" at "Setting the Subwoofer Setup" ( page 57), the frequencies can be selected regardless of the test tones using the remote control unit ...

Owners Manual - English
Page 73
... test tones are • Surround mode is set to a mode • Set to the Operating Instructions? Have you operated the receiver according to Dolby/DTS Surround. Symptom Cause Measures Page used. • Different button is being pressed. • Press the proper button...Turn off the power and contact a DENON customer service center. "CHECK ANTENNA" is • AVR-2807's XM connectors and • Check that prevent VCR recording. • Subwoofer's power is not on. • Turn on monitor. • AVR-2807's video output terminals and monitor's input terminals are not...
... test tones are • Surround mode is set to a mode • Set to the Operating Instructions? Have you operated the receiver according to Dolby/DTS Surround. Symptom Cause Measures Page used. • Different button is being pressed. • Press the proper button...Turn off the power and contact a DENON customer service center. "CHECK ANTENNA" is • AVR-2807's XM connectors and • Check that prevent VCR recording. • Subwoofer's power is not on. • Turn on monitor. • AVR-2807's video output terminals and monitor's input terminals are not...


