Owners Manual
Page 2
...system is connected to dangerous voltage or other ). NOTE This product has been tested and found to comply with Part 15 of any kind into this product,... the antenna or cable system. Unauthorized substitutions may cause harmful interference to correct the interference by DENON may cause hazards. 7. NO USER-SERVICEABLE PARTS INSIDE. FCC INFORMATION (For US customers) 1....on an unstable cart, stand, tripod, bracket, or table. Any mounting of any interference received, including interference that produce heat. For products intended to qualified service personnel. 21. This ...
...system is connected to dangerous voltage or other ). NOTE This product has been tested and found to comply with Part 15 of any kind into this product,... the antenna or cable system. Unauthorized substitutions may cause harmful interference to correct the interference by DENON may cause hazards. 7. NO USER-SERVICEABLE PARTS INSIDE. FCC INFORMATION (For US customers) 1....on an unstable cart, stand, tripod, bracket, or table. Any mounting of any interference received, including interference that produce heat. For products intended to qualified service personnel. 21. This ...

Owners Manual
Page 4
... error messages 10 Playing a DVD with an immense array of features, before you begin hookup and operation that you for choosing the DENON AVR-1706 A/V Surround Receiver. IN) terminals 16 Turning the sound off temporarily (MUTING 16 Listening over headphones 17 Combining the currently playing sound with home theater ...Setting the Speaker Configuration 38, 39 Setting the Delay Time 39, 40 Setting the Subwoofer Mode and Crossover Frequency 40 Setting the Test Tone 41 Setting the Digital In Assignment 42 Setting the Video Input Mode 42 Setting the Audio Delay 43 Setting the Auto ...
... error messages 10 Playing a DVD with an immense array of features, before you begin hookup and operation that you for choosing the DENON AVR-1706 A/V Surround Receiver. IN) terminals 16 Turning the sound off temporarily (MUTING 16 Listening over headphones 17 Combining the currently playing sound with home theater ...Setting the Speaker Configuration 38, 39 Setting the Delay Time 39, 40 Setting the Subwoofer Mode and Crossover Frequency 40 Setting the Test Tone 41 Setting the Digital In Assignment 42 Setting the Video Input Mode 42 Setting the Audio Delay 43 Setting the Auto ...

Owners Manual
Page 7
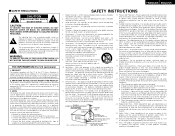
... 32) Tuner system/System buttons 29, 34) ENGLISH Easy Setup and Operation • This section contains the basic steps necessary to configure the AVR-1706 according to the pages given in the Dolby Surround Pro Logic II(x) mode. • The DTS NEO:6 Cinema or Music mode can be ... the functions of the measurement result. Easy setup flow Connecting the speakers. Cursor buttons 9, 19, 33) STATUS/DISPLAY button 17, 23, 33) TEST TONE button 41) VIDEO SELECT button 17) Input mode selector buttons 16~18) SURROUND PARAMETER/System button 19, 33) CH SELECT/ENTER button 20,...
... 32) Tuner system/System buttons 29, 34) ENGLISH Easy Setup and Operation • This section contains the basic steps necessary to configure the AVR-1706 according to the pages given in the Dolby Surround Pro Logic II(x) mode. • The DTS NEO:6 Cinema or Music mode can be ... the functions of the measurement result. Easy setup flow Connecting the speakers. Cursor buttons 9, 19, 33) STATUS/DISPLAY button 17, 23, 33) TEST TONE button 41) VIDEO SELECT button 17) Input mode selector buttons 16~18) SURROUND PARAMETER/System button 19, 33) CH SELECT/ENTER button 20,...

Owners Manual
Page 11
.... 3 Press the POWER switch. ¢ ON: The power turns on and off and the indicator is output during the auto setup procedure. NOTE: • A loud test tone is off from each speaker. 1 Connect the microphone for Auto Setup at the actual listening position which will be planning night time measurements, and...
.... 3 Press the POWER switch. ¢ ON: The power turns on and off and the indicator is output during the auto setup procedure. NOTE: • A loud test tone is off from each speaker. 1 Connect the microphone for Auto Setup at the actual listening position which will be planning night time measurements, and...
Owners Manual
Page 41
... selected for the front speakers, "Large" cannot be used . • You can change the settings using the buttons on the remote control unit. • The AVR-1706 is equipped with an alpha numeric front panel display that can also be selected for the center speaker. 3 Press the CURSOR F or G button to select... your surround speaker type, then press the ENTER or CURSOR H button to switch to the surround back speaker setting. *TEST TONE Yes< Currently selected line Large Small None 5 Press the SETUP button to check and adjust settings.
... selected for the front speakers, "Large" cannot be used . • You can change the settings using the buttons on the remote control unit. • The AVR-1706 is equipped with an alpha numeric front panel display that can also be selected for the center speaker. 3 Press the CURSOR F or G button to select... your surround speaker type, then press the ENTER or CURSOR H button to switch to the surround back speaker setting. *TEST TONE Yes< Currently selected line Large Small None 5 Press the SETUP button to check and adjust settings.

Owners Manual
Page 43
... 2 Press the CURSOR F or G button to select the crossover frequency, then press the ENTER or CURSOR H button to enter the setting and switch to the Test Tone setting. 40Hz *Cr.Over 80Hz 60Hz 80Hz 100Hz 120Hz 250Hz 200Hz 150Hz 2 Assignment of low frequency signal range The signals produced from the subwoofer...
... 2 Press the CURSOR F or G button to select the crossover frequency, then press the ENTER or CURSOR H button to enter the setting and switch to the Test Tone setting. 40Hz *Cr.Over 80Hz 60Hz 80Hz 100Hz 120Hz 250Hz 200Hz 150Hz 2 Assignment of low frequency signal range The signals produced from the subwoofer...

Owners Manual
Page 44
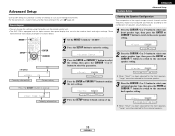
...only effective in the memory. 1 Press the STANDARD button to select the STANDARD (DOLBY/DTS SURROUND) modes. 2 Press the TEST TONE button. • Test tones are output from which you activate a particular surround sound mode, your preferred channel level adjustments for adjusting channel levels within ... different speakers. 3 Press the CURSOR F or G button to adjust so that the volume of those modes. ENGLISH Advanced Setup Setting the Test Tone • Use this mode a master channel level adjustment mode. • After you have completed the system setup channel level adjustments,...
...only effective in the memory. 1 Press the STANDARD button to select the STANDARD (DOLBY/DTS SURROUND) modes. 2 Press the TEST TONE button. • Test tones are output from which you activate a particular surround sound mode, your preferred channel level adjustments for adjusting channel levels within ... different speakers. 3 Press the CURSOR F or G button to adjust so that the volume of those modes. ENGLISH Advanced Setup Setting the Test Tone • Use this mode a master channel level adjustment mode. • After you have completed the system setup channel level adjustments,...

Owners Manual
Page 47
... the frequency (Hz) below which the audio signals are produced from the factory) System Setup 1 Auto Setup Set this to be output from the subwoofer. 6 Test Tone This adjusts the volume of the signals output from the speakers and the frequency response. 3 Delay Time This parameter is for optimizing the timing...
... the frequency (Hz) below which the audio signals are produced from the factory) System Setup 1 Auto Setup Set this to be output from the subwoofer. 6 Test Tone This adjusts the volume of the signals output from the speakers and the frequency response. 3 Delay Time This parameter is for optimizing the timing...