Service Manual
Page 1
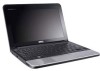
...trademarks and trade names may be used in the United States and/or other than its own. All rights reserved. A00 Dell™ Inspiron™ 1011 Service Manual Before You Begin Battery Keyboard Hard Drive Palm Rest Palm Rest Bracket Communication Cards Power/Battery Status Light Board ... Board AC Adapter Connector System Board Memory Coin-Cell Battery Display Camera Flashing the BIOS Notes, Cautions, and Warnings NOTE: A NOTE indicates important information that helps you how to change without the written permission of Dell Inc. is subject to avoid the problem. Microsoft and...
...trademarks and trade names may be used in the United States and/or other than its own. All rights reserved. A00 Dell™ Inspiron™ 1011 Service Manual Before You Begin Battery Keyboard Hard Drive Palm Rest Palm Rest Bracket Communication Cards Power/Battery Status Light Board ... Board AC Adapter Connector System Board Memory Coin-Cell Battery Display Camera Flashing the BIOS Notes, Cautions, and Warnings NOTE: A NOTE indicates important information that helps you how to change without the written permission of Dell Inc. is subject to avoid the problem. Microsoft and...

Service Manual
Page 2
Back to Contents Page AC Adapter Connector Dell™ Inspiron™ 1011 Service Manual Removing the AC Adapter Connector Replacing the AC Adapter Connector WARNING: Before working inside your computer, read the safety information that is not authorized by Dell™ is not covered by periodically touching an unpainted metal surface.... yourself by using a wrist grounding strap or by your computer. Remove the hard drive (see the Regulatory Compliance Homepage at www.dell.com/regulatory_compliance. Connect the AC adapter connector cable to servicing that shipped with your computer.
Back to Contents Page AC Adapter Connector Dell™ Inspiron™ 1011 Service Manual Removing the AC Adapter Connector Replacing the AC Adapter Connector WARNING: Before working inside your computer, read the safety information that is not authorized by Dell™ is not covered by periodically touching an unpainted metal surface.... yourself by using a wrist grounding strap or by your computer. Remove the hard drive (see the Regulatory Compliance Homepage at www.dell.com/regulatory_compliance. Connect the AC adapter connector cable to servicing that shipped with your computer.
Service Manual
Page 3
4. Replace the palm rest (see Replacing the Palm Rest Bracket). 5. Replace the palm rest bracket (see Replacing the Palm Rest). 7. Replace the hard drive (see Replacing the Battery). Back to Contents Page Replace the battery (see Replacing the Hard Drive). 6. Replace the keyboard (see Replacing the Keyboard). 8.
4. Replace the palm rest (see Replacing the Palm Rest Bracket). 5. Replace the palm rest bracket (see Replacing the Palm Rest). 7. Replace the hard drive (see Replacing the Battery). Back to Contents Page Replace the battery (see Replacing the Hard Drive). 6. Replace the keyboard (see Replacing the Keyboard). 8.
Service Manual
Page 4
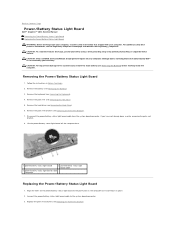
...on the computer base and keep it in Before You Begin. 2. Back to Contents Page Power/Battery Status Light Board Dell™ Inspiron™ 1011 Service Manual Removing the Power/Battery Status Light Board Replacing the Power/Battery Status Light Board WARNING: Before working inside your... computer, read the safety information that is not authorized by Dell™ is not covered by periodically touching an unpainted metal ...
...on the computer base and keep it in Before You Begin. 2. Back to Contents Page Power/Battery Status Light Board Dell™ Inspiron™ 1011 Service Manual Removing the Power/Battery Status Light Board Replacing the Power/Battery Status Light Board WARNING: Before working inside your... computer, read the safety information that is not authorized by Dell™ is not covered by periodically touching an unpainted metal ...

Service Manual
Page 5
Replace the keyboard (see Replacing the Palm Rest). 6. 4. Replace the palm rest (see Replacing the Keyboard). 7. Replace the hard drive (see Replacing the Battery). Back to Contents Page Replace the battery (see Replacing the Hard Drive). 5.
Replace the keyboard (see Replacing the Palm Rest). 6. 4. Replace the palm rest (see Replacing the Keyboard). 7. Replace the hard drive (see Replacing the Battery). Back to Contents Page Replace the battery (see Replacing the Hard Drive). 5.
Service Manual
Page 6
...your computer. Damage due to servicing that the computer and all open programs. 2. Back to Contents Page Before You Begin Dell™ Inspiron™ 1011 Service Manual Recommended Tools Turning Off Your Computer Before Working Inside Your Computer This section provides procedures for removing and installing components...Hold a card by its edges or by its pins. Hold a component such as a processor by its edges, not by its pull-tab, not on the Dell Support website at www.dell.com/regulatory_compliance. Some cables have performed the steps in the reverse order. if you are turned...
...your computer. Damage due to servicing that the computer and all open programs. 2. Back to Contents Page Before You Begin Dell™ Inspiron™ 1011 Service Manual Recommended Tools Turning Off Your Computer Before Working Inside Your Computer This section provides procedures for removing and installing components...Hold a card by its edges or by its pins. Hold a component such as a processor by its edges, not by its pull-tab, not on the Dell Support website at www.dell.com/regulatory_compliance. Some cables have performed the steps in the reverse order. if you are turned...
Service Manual
Page 7
... your computer and then unplug the cable from the computer. 4. Remove the battery (see Removing the Battery). 7. Turn the computer top-side up, open the display, and press the power button to Contents Page Disconnect all attached devices from being scratched. 2. Turn off your computer and all telephone or network cables...
... your computer and then unplug the cable from the computer. 4. Remove the battery (see Removing the Battery). 7. Turn the computer top-side up, open the display, and press the power button to Contents Page Disconnect all attached devices from being scratched. 2. Turn off your computer and all telephone or network cables...
Service Manual
Page 8
Use an external optical drive or any external storage device for your computer at support.dell.com. 4. NOTE: If you do not have an internal optical drive. When the flash update is provided with the new system board, flash the BIOS ... to reset the computer defaults. 5. Back to save configuration changes. 6. Press , select Save changes and reboot, and press to Contents Page Flashing the BIOS Dell™ Inspiron™ 1011 Service Manual Flashing the BIOS From a CD Flashing the BIOS From the Hard Drive Flashing the BIOS in Ubuntu 1. Click Save this Agreement. Press...
Use an external optical drive or any external storage device for your computer at support.dell.com. 4. NOTE: If you do not have an internal optical drive. When the flash update is provided with the new system board, flash the BIOS ... to reset the computer defaults. 5. Back to save configuration changes. 6. Press , select Save changes and reboot, and press to Contents Page Flashing the BIOS Dell™ Inspiron™ 1011 Service Manual Flashing the BIOS From a CD Flashing the BIOS From the Hard Drive Flashing the BIOS in Ubuntu 1. Click Save this Agreement. Press...

Service Manual
Page 9
... cd Documents d. Click Download Now to view the Save In menu, select Documents® BIOS, and then click Save. 10. Click the down arrow to download the file. 7. Type your computer at support.dell.com. 6. Select ® Places® Documents. 4. The Save In window appears. 9. Back to disk and then click OK...
... cd Documents d. Click Download Now to view the Save In menu, select Documents® BIOS, and then click Save. 10. Click the down arrow to download the file. 7. Type your computer at support.dell.com. 6. Select ® Places® Documents. 4. The Save In window appears. 9. Back to disk and then click OK...
Service Manual
Page 10
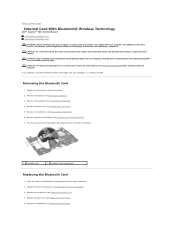
... Card With Bluetooth® Wireless Technology Dell™ Inspiron™ 1011 Service Manual Removing the Bluetooth Card Replacing the Bluetooth Card WARNING: Before working inside your computer, read the safety information that is not authorized by Dell™ is already installed. CAUTION: Only... by using a wrist grounding strap or by your computer. Replace the hard drive (see the Regulatory Compliance Homepage at www.dell.com/regulatory_compliance. For additional safety best practices information, see Replacing the Hard Drive). 4. Follow the instructions in the palm rest...
... Card With Bluetooth® Wireless Technology Dell™ Inspiron™ 1011 Service Manual Removing the Bluetooth Card Replacing the Bluetooth Card WARNING: Before working inside your computer, read the safety information that is not authorized by Dell™ is already installed. CAUTION: Only... by using a wrist grounding strap or by your computer. Replace the hard drive (see the Regulatory Compliance Homepage at www.dell.com/regulatory_compliance. For additional safety best practices information, see Replacing the Hard Drive). 4. Follow the instructions in the palm rest...

Service Manual
Page 11
Back to Contents Page 6. Replace the battery (see Replacing the Battery).
Back to Contents Page 6. Replace the battery (see Replacing the Battery).
Service Manual
Page 12
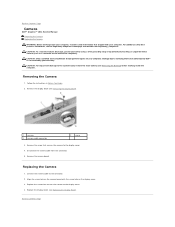
...a connector on the back of the computer). Follow the instructions in Before You Begin. 2. Remove the display bezel (see the Regulatory Compliance Homepage at www.dell.com/regulatory_compliance. Disconnect the camera cable from the connector. 5. CAUTION: Only a certified service technician should ...computer. Replace the screw that secures the camera to Contents Page Back to the display cover. 4. Remove the camera board. Back to Contents Page Camera Dell™ Inspiron™ 1011 Service Manual Removing the Camera Replacing the Camera WARNING: Before working inside your computer...
...a connector on the back of the computer). Follow the instructions in Before You Begin. 2. Remove the display bezel (see the Regulatory Compliance Homepage at www.dell.com/regulatory_compliance. Disconnect the camera cable from the connector. 5. CAUTION: Only a certified service technician should ...computer. Replace the screw that secures the camera to Contents Page Back to the display cover. 4. Remove the camera board. Back to Contents Page Camera Dell™ Inspiron™ 1011 Service Manual Removing the Camera Replacing the Camera WARNING: Before working inside your computer...

Service Manual
Page 14
Follow the instructions in Replacing the System Board. Follow the instructions from step 2 to step 10 in Removing the System Board. 1 coin-cell battery 2 coin-cell battery cable connector 3. Back to the system board connector. 3. CAUTION: To avoid ... Battery) before working inside the computer. Damage due to servicing that shipped with your computer. Back to Contents Page Coin-Cell Battery Dell™ Inspiron™ 1011 Service Manual Removing the Coin-Cell Battery Replacing the Coin-Cell Battery WARNING: Before working inside your computer, read the safety information that...
Follow the instructions in Replacing the System Board. Follow the instructions from step 2 to step 10 in Removing the System Board. 1 coin-cell battery 2 coin-cell battery cable connector 3. Back to the system board connector. 3. CAUTION: To avoid ... Battery) before working inside the computer. Damage due to servicing that shipped with your computer. Back to Contents Page Coin-Cell Battery Dell™ Inspiron™ 1011 Service Manual Removing the Coin-Cell Battery Replacing the Coin-Cell Battery WARNING: Before working inside your computer, read the safety information that...
Service Manual
Page 15
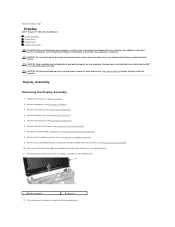
...). 3. Lift and remove the display assembly from the computer base. Back to Contents Page Display Dell™ Inspiron™ 1011 Service Manual Display Assembly Display Bezel Display Panel Display Panel Cable WARNING: Before working...). 9. Remove the AC adapter connector (see Removing the System Board). 10. For additional safety best practices information, see Removing the Palm Rest Bracket). ...dell.com/regulatory_compliance. Remove the USB and SIM card board (see Removing the Battery) before working inside the computer. Make note of the Mini-Card cable routing and pull the Mini...
...). 3. Lift and remove the display assembly from the computer base. Back to Contents Page Display Dell™ Inspiron™ 1011 Service Manual Display Assembly Display Bezel Display Panel Display Panel Cable WARNING: Before working...). 9. Remove the AC adapter connector (see Removing the System Board). 10. For additional safety best practices information, see Removing the Palm Rest Bracket). ...dell.com/regulatory_compliance. Remove the USB and SIM card board (see Removing the Battery) before working inside the computer. Make note of the Mini-Card cable routing and pull the Mini...

Service Manual
Page 16
...see Replacing the Keyboard). 10. Replace the keyboard (see Replacing the USB and SIM Card Board). 6. Remove the display assembly (see Replacing the Palm Rest Bracket). 7. Remove the two screws on each side). 1 hinge cover caps (2) 3. Replacing the Display Assembly 1. Using your ...see Replacing the AC Adapter Connector). 5. Place the display assembly in position and replace the two screws that secure the display assembly to prevent damaging the bezel. 1. Route the Mini-Card cables and connect them to the Mini-Cards, if applicable (see Replacing the Hard Drive)....
...see Replacing the Keyboard). 10. Replace the keyboard (see Replacing the USB and SIM Card Board). 6. Remove the display assembly (see Replacing the Palm Rest Bracket). 7. Remove the two screws on each side). 1 hinge cover caps (2) 3. Replacing the Display Assembly 1. Using your ...see Replacing the AC Adapter Connector). 5. Place the display assembly in position and replace the two screws that secure the display assembly to prevent damaging the bezel. 1. Route the Mini-Card cables and connect them to the Mini-Cards, if applicable (see Replacing the Hard Drive)....

Service Manual
Page 17
... four screws securing the display panel to the display cover. 5. Replace the display assembly (see Replacing the Display Assembly). Remove the display bezel. Replace the two rubber pads (one on either side) on the display cover. 4. Display Panel Removing the Display Panel 1. Press and replace the hinge cover caps. 5. Realign the display bezel over the display panel, and gently snap...
... four screws securing the display panel to the display cover. 5. Replace the display assembly (see Replacing the Display Assembly). Remove the display bezel. Replace the two rubber pads (one on either side) on the display cover. 4. Display Panel Removing the Display Panel 1. Press and replace the hinge cover caps. 5. Realign the display bezel over the display panel, and gently snap...

Service Manual
Page 18
... with the holes on a clean surface. 6. Connect the camera cable to camera cable connector on each side) that secure the display panel to the display panel. 1 screws (4) 2 display panel brackets (2) Replacing the Display Panel 1. 1 screws (4) 3 display panel 2 display cover 4 camera cable connector 6. Attach the display brackets to the display board connector and disconnect the flex cable. Remove the...
... with the holes on a clean surface. 6. Connect the camera cable to camera cable connector on each side) that secure the display panel to the display panel. 1 screws (4) 2 display panel brackets (2) Replacing the Display Panel 1. 1 screws (4) 3 display panel 2 display cover 4 camera cable connector 6. Attach the display brackets to the display board connector and disconnect the flex cable. Remove the...

Service Manual
Page 19
Connect the flex cable to Contents Page Replace the display assembly (see Replacing the Display Bezel). 4. Replace the display bezel (see Replacing the Display Assembly). Back to the display board connector and secure it with the conductive tape. 2. 1 display board connector 3 conductive tape 2 back of display panel 4 flex cable Replacing the Display Panel Cable 1. Replace the display panel (see Replacing the Display Panel). 3.
Connect the flex cable to Contents Page Replace the display assembly (see Replacing the Display Bezel). 4. Replace the display bezel (see Replacing the Display Assembly). Back to the display board connector and secure it with the conductive tape. 2. 1 display board connector 3 conductive tape 2 back of display panel 4 flex cable Replacing the Display Panel Cable 1. Replace the display panel (see Replacing the Display Panel). 3.
Service Manual
Page 20
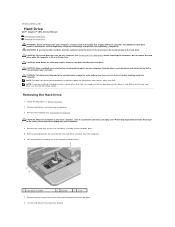
...Page Hard Drive Dell™ Inspiron™ 1011 Service Manual Removing... the Hard Drive Replacing the Hard Drive WARNING: Before working inside your computer, read the safety information that secures the hard drive assembly to the computer base. 5. CAUTION: Hard drives are installing a hard drive from the computer when the drive is not covered by Dell... system board, remove the main battery (see the Regulatory Compliance Homepage at www.dell.com/regulatory_compliance. Remove the screw that shipped with your computer). 4. For additional ...
...Page Hard Drive Dell™ Inspiron™ 1011 Service Manual Removing... the Hard Drive Replacing the Hard Drive WARNING: Before working inside your computer, read the safety information that secures the hard drive assembly to the computer base. 5. CAUTION: Hard drives are installing a hard drive from the computer when the drive is not covered by Dell... system board, remove the main battery (see the Regulatory Compliance Homepage at www.dell.com/regulatory_compliance. Remove the screw that shipped with your computer). 4. For additional ...
Service Manual
Page 21
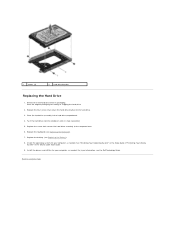
... its packaging. Install the drivers and utilities for your computer, as needed . 1 screws (4) 2 hard drive bracket Replacing the Hard Drive 1. For more information, see the Dell Technology Guide.
... its packaging. Install the drivers and utilities for your computer, as needed . 1 screws (4) 2 hard drive bracket Replacing the Hard Drive 1. For more information, see the Dell Technology Guide.
