
Service Manual
Page 3
Contents 1 Technical Overview 7 Inside View of Your XPS One™ A2420 Computer . . . . . 7 2 Before You Begin 9 Recommended Tools 9 Turning Off Your Computer 9 Safety Instructions 9 3 Replacing the Computer Cover 11 4 Replacing the Stand 13 5 Replacing the Top Shield 15 6 Replacing Memory Module(s 17 7 Replacing Drives 19 Replacing the Hard Drive 19 Replacing the Optical Drive 21 Contents 3
Contents 1 Technical Overview 7 Inside View of Your XPS One™ A2420 Computer . . . . . 7 2 Before You Begin 9 Recommended Tools 9 Turning Off Your Computer 9 Safety Instructions 9 3 Replacing the Computer Cover 11 4 Replacing the Stand 13 5 Replacing the Top Shield 15 6 Replacing Memory Module(s 17 7 Replacing Drives 19 Replacing the Hard Drive 19 Replacing the Optical Drive 21 Contents 3

Service Manual
Page 7
For additional safety best practices information, see the Regulatory Compliance Homepage at www.dell.com/regulatory_compliance. 1 Technical Overview CAUTION: Before working inside your computer, read the safety information that shipped with Bluetooth® wireless technology 4 WLAN card 6 processor heat sink assembly 8 graphics card heat sink Technical Overview 7 Inside View of Your XPS One™ A2420 Computer 1 2 3 8 7 6 5 1 optical drive 3 hard drive 5 memory modules 7 RF module 4 2 internal card with your computer.
For additional safety best practices information, see the Regulatory Compliance Homepage at www.dell.com/regulatory_compliance. 1 Technical Overview CAUTION: Before working inside your computer, read the safety information that shipped with Bluetooth® wireless technology 4 WLAN card 6 processor heat sink assembly 8 graphics card heat sink Technical Overview 7 Inside View of Your XPS One™ A2420 Computer 1 2 3 8 7 6 5 1 optical drive 3 hard drive 5 memory modules 7 RF module 4 2 internal card with your computer.
Service Manual
Page 19
Replacing Drives 19 Replacing the Hard Drive 1 Follow the procedures in "Before You Begin" on page 11). 3 Remove the three screws securing the hard drive carrier to the chassis. 4 Disconnect the hard drive power cable. 7 Replacing Drives CAUTION: Before working inside your computer, read the safety information that shipped with your computer. For additional safety best practices information, see "Replacing the Computer Cover" on page 9. 2 Remove the computer cover (see the Regulatory Compliance Homepage at www.dell.com/regulatory_compliance.
Replacing Drives 19 Replacing the Hard Drive 1 Follow the procedures in "Before You Begin" on page 11). 3 Remove the three screws securing the hard drive carrier to the chassis. 4 Disconnect the hard drive power cable. 7 Replacing Drives CAUTION: Before working inside your computer, read the safety information that shipped with your computer. For additional safety best practices information, see "Replacing the Computer Cover" on page 9. 2 Remove the computer cover (see the Regulatory Compliance Homepage at www.dell.com/regulatory_compliance.

Service Manual
Page 20
5 Press the release tab to disconnect the hard drive data cable and lift the hard drive carrier out of the chassis. 1 3 2 1 screws (3) 3 hard drive power cable 2 hard drive data cable 20 Replacing Drives
5 Press the release tab to disconnect the hard drive data cable and lift the hard drive carrier out of the chassis. 1 3 2 1 screws (3) 3 hard drive power cable 2 hard drive data cable 20 Replacing Drives

Service Manual
Page 21
... the hard drive carrier. 1 2 3 1 hard drive carrier 3 hard drive 2 screws (4) 7 To install a new hard drive, prepare the new hard drive for installation and check the documentation that accompanied the drive to verify that the drive is configured for your computer. 8 Align the screws holes on the hard drive with the screw holes on the hard drive carrier. 9 Replace the four screws that secures the hard drive to the hard drive...
... the hard drive carrier. 1 2 3 1 hard drive carrier 3 hard drive 2 screws (4) 7 To install a new hard drive, prepare the new hard drive for installation and check the documentation that accompanied the drive to verify that the drive is configured for your computer. 8 Align the screws holes on the hard drive with the screw holes on the hard drive carrier. 9 Replace the four screws that secures the hard drive to the hard drive...

Service Manual
Page 43
...recommended that you write down the system setup screen information for your computer. Information on (or restart) your computer. 2 When the DELL logo appears, press immediately. 12 System Setup Overview Use System Setup to wait until the system setup screen appears. If you wait ... keyboard failure, press and release in system setup unless you use System Setup, it is held down for extended periods of hard drive installed. System Setup Screens The System Setup screen displays current or changeable configuration information for future reference. Before you are an expert computer...
...recommended that you write down the system setup screen information for your computer. Information on (or restart) your computer. 2 When the DELL logo appears, press immediately. 12 System Setup Overview Use System Setup to wait until the system setup screen appears. If you wait ... keyboard failure, press and release in system setup unless you use System Setup, it is held down for extended periods of hard drive installed. System Setup Screens The System Setup screen displays current or changeable configuration information for future reference. Before you are an expert computer...
Service Manual
Page 45
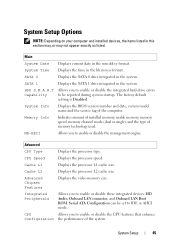
.... Displays the processor L1 cache size. System Setup 45 Displays the SATA 0 drive integrated in the mm:dd:yy format. Allows you to enable or disable the integrated hard drive errors to enable or disable the management engine. Displays the SATA 1 drive integrated in this section may, or may not appear exactly as listed...
.... Displays the processor L1 cache size. System Setup 45 Displays the SATA 0 drive integrated in the mm:dd:yy format. Allows you to enable or disable the integrated hard drive errors to enable or disable the management engine. Displays the SATA 1 drive integrated in this section may, or may not appear exactly as listed...

Service Manual
Page 46
... displayed are dynamically updated according to the optical drives detected. 46 System Setup Type Remote Wake Up Allows you to enable or disable an alarm to turn on - The factory default setting is S3. Hard Disk Boot Sets the hard drive boot priority. The computer remains turned off -... CD/DVD Boot Priority Sets the optical drive boot priority. This option allows the computer to turn on after recovering from a ...
... displayed are dynamically updated according to the optical drives detected. 46 System Setup Type Remote Wake Up Allows you to enable or disable an alarm to turn on - The factory default setting is S3. Hard Disk Boot Sets the hard drive boot priority. The computer remains turned off -... CD/DVD Boot Priority Sets the optical drive boot priority. This option allows the computer to turn on after recovering from a ...

Service Manual
Page 47
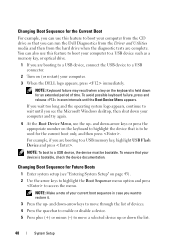
... system is found. Boot Sequence This feature allows you to set or change the boot sequence for the bootable devices installed on the drive, the computer attempts to boot from the next bootable device in the boot sequence. • USB Flash Device - If no operating...or disable the device error report. Option Settings • Hard Drive - The computer attempts to boot from the CD drive. NOTE: To boot to boot from the next bootable device in the drive the computer attempts to boot from the primary hard drive. The computer attempts to a USB device, the device...
... system is found. Boot Sequence This feature allows you to set or change the boot sequence for the bootable devices installed on the drive, the computer attempts to boot from the next bootable device in the boot sequence. • USB Flash Device - If no operating...or disable the device error report. Option Settings • Hard Drive - The computer attempts to boot from the CD drive. NOTE: To boot to boot from the next bootable device in the drive the computer attempts to boot from the primary hard drive. The computer attempts to a USB device, the device...
Service Manual
Page 48
...or down your computer. 3 When the DELL logo appears, press immediately. NOTE: Keyboard failure may result when a key on (or restart) your computer and try again. 4 At the Boot Device Menu, use this feature to boot your computer from the hard drive when the diagnostic tests are complete. and... down-arrow keys to be bootable. You can run the Dell Diagnostics from the Driver and Utilities media and then from the CD drive so that your current boot sequence in even intervals...
...or down your computer. 3 When the DELL logo appears, press immediately. NOTE: Keyboard failure may result when a key on (or restart) your computer and try again. 4 At the Boot Device Menu, use this feature to boot your computer from the hard drive when the diagnostic tests are complete. and... down-arrow keys to be bootable. You can run the Dell Diagnostics from the Driver and Utilities media and then from the CD drive so that your current boot sequence in even intervals...

Setup Guide
Page 23
...The light in poweron state. • Solid amber - Press the sync button on the back of your computer. A flashing light indicates hard drive activity. A wireless connection can be an issue with either the system board or power supply. 8 Wireless sync button - the system board...line-in sleep state. • Solid blue - Connects to an audio cable for audio. 6 Hard drive activity light - the computer is flashing. 7 Power button and light - Using Your XPS One 4 Headphone or line-out connector - There may be established between your wireless keyboard and mouse and...
...The light in poweron state. • Solid amber - Press the sync button on the back of your computer. A flashing light indicates hard drive activity. A wireless connection can be an issue with either the system board or power supply. 8 Wireless sync button - the system board...line-in sleep state. • Solid blue - Connects to an audio cable for audio. 6 Hard drive activity light - the computer is flashing. 7 Power button and light - Using Your XPS One 4 Headphone or line-out connector - There may be established between your wireless keyboard and mouse and...

Setup Guide
Page 38
... your files immediately. • Use a virus-scanning program to run the software. Then restart your computer meets the minimum hardware requirements needed to check the hard drive or CDs. • Save and close any open files or programs and shut down your pointer or mouse, press and hold the power button for...
... your files immediately. • Use a virus-scanning program to run the software. Then restart your computer meets the minimum hardware requirements needed to check the hard drive or CDs. • Save and close any open files or programs and shut down your pointer or mouse, press and hold the power button for...
Setup Guide
Page 43
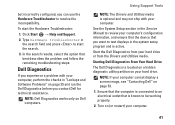
...press to be working properly. 2. See the System Setup section in the Service Manual to review your computer. NOTE: If your hard drive. Start the Dell Diagnostics from your computer. 41 but incorrectly configured, you want to test displays in the system setup program and is active. Click... Start → Help and Support. 2. Turn on Dell computers. NOTE: Dell Diagnostics works only on (or restart) your hard drive or from the Drivers and Utilities media. Using Support Tools NOTE: The Drivers and Utilities media is known ...
...press to be working properly. 2. See the System Setup section in the Service Manual to review your computer. NOTE: If your hard drive. Start the Dell Diagnostics from your computer. 41 but incorrectly configured, you want to test displays in the system setup program and is active. Click... Start → Help and Support. 2. Turn on Dell computers. NOTE: Dell Diagnostics works only on (or restart) your hard drive or from the Drivers and Utilities media. Using Support Tools NOTE: The Drivers and Utilities media is known ...
Setup Guide
Page 44
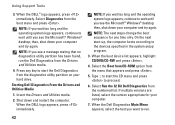
...devices specified in the system setup program. 3. Select Run the 32 Bit Dell Diagnostics from the boot menu and press . If multiple versions are listed, select the version appropriate for one time only. When the DELL™ logo appears, press immediately. When the boot device list appears,...message stating that appears and press . 5. NOTE: The next steps change the boot sequence for your hard drive. On the next start the CD menu and press to run the Dell Diagnostics from the diagnostics utility partition on your computer. 7. Shut down your computer and try again. ...
...devices specified in the system setup program. 3. Select Run the 32 Bit Dell Diagnostics from the boot menu and press . If multiple versions are listed, select the version appropriate for one time only. When the DELL™ logo appears, press immediately. When the boot device list appears,...message stating that appears and press . 5. NOTE: The next steps change the boot sequence for your hard drive. On the next start the CD menu and press to run the Dell Diagnostics from the diagnostics utility partition on your computer. 7. Shut down your computer and try again. ...

Setup Guide
Page 45
... on the hard drive and remove any programs installed after you to return your computer to your operating system problem. Use Dell Factory Image Restore only if System Restore did not resolve your computer are completely reversible. Any changes that System Restore makes to an earlier operating state (without affecting data files. XPS One System...
... on the hard drive and remove any programs installed after you to return your computer to your operating system problem. Use Dell Factory Image Restore only if System Restore did not resolve your computer are completely reversible. Any changes that System Restore makes to an earlier operating state (without affecting data files. XPS One System...

Setup Guide
Page 46
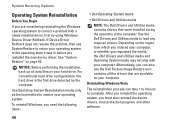
... NOTE: Before you are an administrator on the hard drive and removes any files or programs until the system restoration is complete. 1. Click Start . 2. NOTE: Dell Factory Image Restore may not be available in when you set your Dell™ computer to the Windows Classic view. These...administrator to the operating state it was in certain countries or on the screen. Use Dell Factory Image Restore only if System Restore did not resolve the issue, you received your hard drive to continue the desired action. 3. System Recovery Options NOTE: The procedures in this document...
... NOTE: Before you are an administrator on the hard drive and removes any files or programs until the system restoration is complete. 1. Click Start . 2. NOTE: Dell Factory Image Restore may not be available in when you set your Dell™ computer to the Windows Classic view. These...administrator to the operating state it was in certain countries or on the screen. Use Dell Factory Image Restore only if System Restore did not resolve the issue, you received your hard drive to continue the desired action. 3. System Recovery Options NOTE: The procedures in this document...

Setup Guide
Page 47
...messages, digital photos, music files, and so on the computer. Dell Factory Image Restore 1. Select Repair Your Computer. 3. NOTE: Depending upon your computer-including data files-are permanently deleted from the hard drive. Select the check box to confirm that you want to proceed with... programs or files added since you received your configuration, you do not want to continue reformatting the hard drive and restoring the system software to select Dell Factory Tools, then Dell Factory Image Restore. 7. If possible, back up all data before using Factory Image Restore. Click ...
...messages, digital photos, music files, and so on the computer. Dell Factory Image Restore 1. Select Repair Your Computer. 3. NOTE: Depending upon your computer-including data files-are permanently deleted from the hard drive. Select the check box to confirm that you want to proceed with... programs or files added since you received your configuration, you do not want to continue reformatting the hard drive and restoring the system software to select Dell Factory Tools, then Dell Factory Image Restore. 7. If possible, back up all data before using Factory Image Restore. Click ...
Setup Guide
Page 48
... need the following items: • Dell Operating System media • Dell Drivers and Utilities media NOTE: The Dell Drivers and Utilities media contains drivers that are considering reinstalling the Windows operating system to correct a problem with your hard drive. Reinstalling Windows Vista The reinstallation process... can also use System Restore to return your operating system. If Device Driver Rollback does not resolve the problem, then use the Dell Factory Image Restore as the last...
... need the following items: • Dell Operating System media • Dell Drivers and Utilities media NOTE: The Dell Drivers and Utilities media contains drivers that are considering reinstalling the Windows operating system to correct a problem with your hard drive. Reinstalling Windows Vista The reinstallation process... can also use System Restore to return your operating system. If Device Driver Rollback does not resolve the problem, then use the Dell Factory Image Restore as the last...
Setup Guide
Page 56
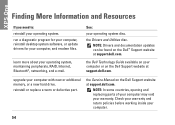
...upgrade your computer. 54 the Service Manual on the Dell™ Support website at support.dell.com. Check your warranty and return policies before working inside your computer with new or additional memory, or a new hard drive. learn more about your operating system disc. See...: your operating system, maintaining peripherals, RAID, Internet, Bluetooth®, networking, and e-mail. the Drivers and Utilities disc. the Dell Technology Guide available on your operating system. XPS One Finding More Information...
...upgrade your computer. 54 the Service Manual on the Dell™ Support website at support.dell.com. Check your warranty and return policies before working inside your computer with new or additional memory, or a new hard drive. learn more about your operating system disc. See...: your operating system, maintaining peripherals, RAID, Internet, Bluetooth®, networking, and e-mail. the Drivers and Utilities disc. the Dell Technology Guide available on your operating system. XPS One Finding More Information...

Setup Guide
Page 58
...XPS One A2420 This section provides information that you may vary by region. NOTE: Offerings may need when setting up, updating drivers for, and upgrading your computer. Processor Types Intel® Core™2 Duo Intel Core2 Quad L2 cache at least 4 MB at least 6 MB Drives and Devices Drives Wireless Camera One 3.5-inch internal hard-drive, one... slimline slot-load optical drive Bluetooth® 1.1 adapter 2.0 mega pixel 56 For more information regarding...
...XPS One A2420 This section provides information that you may vary by region. NOTE: Offerings may need when setting up, updating drivers for, and upgrading your computer. Processor Types Intel® Core™2 Duo Intel Core2 Quad L2 cache at least 4 MB at least 6 MB Drives and Devices Drives Wireless Camera One 3.5-inch internal hard-drive, one... slimline slot-load optical drive Bluetooth® 1.1 adapter 2.0 mega pixel 56 For more information regarding...


