
Service Manual
Page 10
... a certified service technician are authorized to remove the computer cover and access any connector pins. See the safety instructions for complete information about safety precautions, working inside the computer. 1 Ensure that both connectors are disconnecting this type of cable, press in on the cable itself. Also, before you pull connectors apart, keep them evenly aligned to dissipate static electricity, which could harm internal components. 10...
... a certified service technician are authorized to remove the computer cover and access any connector pins. See the safety instructions for complete information about safety precautions, working inside the computer. 1 Ensure that both connectors are disconnecting this type of cable, press in on the cable itself. Also, before you pull connectors apart, keep them evenly aligned to dissipate static electricity, which could harm internal components. 10...
Service Manual
Page 33
... operation. Performing these steps incorrectly could damage your computer. 9 Replacing the Processor Heat Sink Assembly CAUTION: Before working inside your computer, read the safety information that it has had sufficient time to cool before you are familiar with your system board. NOTICE: Do not perform the following steps unless you touch it. 4 Disconnect the processor fan cable from the CPU FAN connector...
... operation. Performing these steps incorrectly could damage your computer. 9 Replacing the Processor Heat Sink Assembly CAUTION: Before working inside your computer, read the safety information that it has had sufficient time to cool before you are familiar with your system board. NOTICE: Do not perform the following steps unless you touch it. 4 Disconnect the processor fan cable from the CPU FAN connector...
Service Manual
Page 37
... technical service information, see the Setup Guide. 1 Follow the procedures in "Before You Begin" on page 9. 2 Remove the computer cover (see "Replacing the Computer Cover" on page 11). 3 Remove the top shield (see the Regulatory Compliance Homepage at www.dell.com/regulatory_compliance. 10 Replacing the Processor CAUTION: Before working inside your computer, read the safety information that secures it . 4 Remove the processor heat sink assembly (see "Replacing...
... technical service information, see the Setup Guide. 1 Follow the procedures in "Before You Begin" on page 9. 2 Remove the computer cover (see "Replacing the Computer Cover" on page 11). 3 Remove the top shield (see the Regulatory Compliance Homepage at www.dell.com/regulatory_compliance. 10 Replacing the Processor CAUTION: Before working inside your computer, read the safety information that secures it . 4 Remove the processor heat sink assembly (see "Replacing...
Service Manual
Page 45
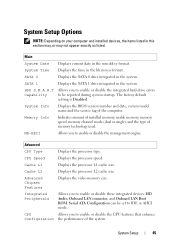
... system. The factory default setting is Disabled. Allows you to enable or disable these integrated devices: HD Audio, Onboard LAN connector, and Onboard LAN Boot ROM. Displays the processor L2 cache size. Serial ATA Configuration can be reported during system startup. Displays the SATA 1 drive integrated in the mm:dd:yy format. Displays the BIOS version number and date, system model name and the service tag of memory technology used. Indicates amount of installed memory, usable memory, memory speed, memory channel mode (dual or single), and...
... system. The factory default setting is Disabled. Allows you to enable or disable these integrated devices: HD Audio, Onboard LAN connector, and Onboard LAN Boot ROM. Displays the processor L2 cache size. Serial ATA Configuration can be reported during system startup. Displays the SATA 1 drive integrated in the mm:dd:yy format. Displays the BIOS version number and date, system model name and the service tag of memory technology used. Indicates amount of installed memory, usable memory, memory speed, memory channel mode (dual or single), and...
Service Manual
Page 48
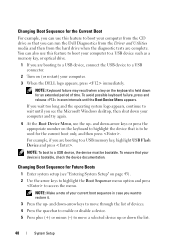
... in case you are booting to a USB device, connect the USB device to a USB connector. 2 Turn on page 43). 2 Use the arrow keys to highlight the Boot Sequence menu option and press to access the menu. Changing Boot Sequence for the Current Boot For example, you can use this feature to boot your computer to a USB device such as a memory key, or optical drive. 1 If you are booting to a USB memory key, highlight USB Flash Device and press . If you wait too long and the operating...
... in case you are booting to a USB device, connect the USB device to a USB connector. 2 Turn on page 43). 2 Use the arrow keys to highlight the Boot Sequence menu option and press to access the menu. Changing Boot Sequence for the Current Boot For example, you can use this feature to boot your computer to a USB device such as a memory key, or optical drive. 1 If you are booting to a USB memory key, highlight USB Flash Device and press . If you wait too long and the operating...
Setup Guide
Page 5
... Button 10 Windows Vista® Setup 11 Set Up Media Center (For Use With Optional TV Tuner 12 Using Your XPS One 18 Front View Features 18 Left Side Features 20 Back Panel Connectors 22 Wireless Keyboard 24 Using the Optical Disc Drive 26 TV Input Device (Optional 26 Connect to the Internet (Optional 28 Wireless Keyboard or Mouse Problems 31 Solving Problems 31 Network Problems 32 Power Problems 33 Memory Problems 34 Lockups and Software Problems 35 Using Support Tools 38 Dell Support Center 38 Beep Codes 38 System Messages 39 Hardware Troubleshooter 40 Dell Diagnostics...
... Button 10 Windows Vista® Setup 11 Set Up Media Center (For Use With Optional TV Tuner 12 Using Your XPS One 18 Front View Features 18 Left Side Features 20 Back Panel Connectors 22 Wireless Keyboard 24 Using the Optical Disc Drive 26 TV Input Device (Optional 26 Connect to the Internet (Optional 28 Wireless Keyboard or Mouse Problems 31 Solving Problems 31 Network Problems 32 Power Problems 33 Memory Problems 34 Lockups and Software Problems 35 Using Support Tools 38 Dell Support Center 38 Beep Codes 38 System Messages 39 Hardware Troubleshooter 40 Dell Diagnostics...

Setup Guide
Page 9
Setting Up Your XPS One™ Computer 7 Turn on page 31. 2. If you have a problem setting up your wireless keyboard and mouse, see "Wireless Keyboard or Mouse Problems" on the wireless keyboard and mouse. NOTE: The wireless keyboard and mouse are synced and ready to use.
Setting Up Your XPS One™ Computer 7 Turn on page 31. 2. If you have a problem setting up your wireless keyboard and mouse, see "Wireless Keyboard or Mouse Problems" on the wireless keyboard and mouse. NOTE: The wireless keyboard and mouse are synced and ready to use.

Setup Guide
Page 10
... plug a telephone cable (RJ11 connector) into the network connector. To attach your computer. Setting Up Your XPS One™ Computer Connect the Network Cable (Optional) A network connection is not required to either a network port or a broadband device. A click indicates that uses a cable connection (such as a home cable modem or Ethernet jack), you have an existing network or Internet connection that the network cable has been securely attached. 8 Use only an Ethernet cable (RJ45 connector). Connect the other end of the network cable to the network adapter connector...
... plug a telephone cable (RJ11 connector) into the network connector. To attach your computer. Setting Up Your XPS One™ Computer Connect the Network Cable (Optional) A network connection is not required to either a network port or a broadband device. A click indicates that uses a cable connection (such as a home cable modem or Ethernet jack), you have an existing network or Internet connection that the network cable has been securely attached. 8 Use only an Ethernet cable (RJ45 connector). Connect the other end of the network cable to the network adapter connector...

Setup Guide
Page 21
... more information, click Start → Programs→ FastAccess. 4 Media control buttons - The stand provides stability to turn the display on page 25. 5 Optical drive - CAUTION: The computer stand should remain installed at all times to use , the blue back-light lights up when a disc is not a removable part. Controls CD, DVD, Blu-ray Disc™ (BD), and Media Player. 3 2.0 mega pixel camera/microphone - Built-in the optical drive. 7 Display power button - When the camera...
... more information, click Start → Programs→ FastAccess. 4 Media control buttons - The stand provides stability to turn the display on page 25. 5 Optical drive - CAUTION: The computer stand should remain installed at all times to use , the blue back-light lights up when a disc is not a removable part. Controls CD, DVD, Blu-ray Disc™ (BD), and Media Player. 3 2.0 mega pixel camera/microphone - Built-in the optical drive. 7 Display power button - When the camera...

Setup Guide
Page 23
... connect to use the audio out or S/PDIF connector on or off the computer while the hard drive activity light is flashing. 7 Power button and light - A wireless connection can be an issue with either the system board or power supply. 8 Wireless sync button - Connects to an audio cable for audio. 6 Hard drive activity light - Turns the power on the back of your computer. The light in sleep state. • Solid blue - Turns on the device that you wish to a powered speaker or sound system, use...
... connect to use the audio out or S/PDIF connector on or off the computer while the hard drive activity light is flashing. 7 Power button and light - A wireless connection can be an issue with either the system board or power supply. 8 Wireless sync button - Connects to an audio cable for audio. 6 Hard drive activity light - Turns the power on the back of your computer. The light in sleep state. • Solid blue - Turns on the device that you wish to a powered speaker or sound system, use...

Setup Guide
Page 25
... connector - Connects to high-speed serial multimedia devices, such as a mouse, keyboard, printer, external drive, or MP3 player. 3 TV input-device connector - NOTE: Before you buy a lock, ensure that it works with the security cable slot on " state. Using Your XPS One 5 2.0 audio out connector - Connects speakers for a security cable used as an anti-theft device. This format carries an audio signal without going through optical digital cables. Connects your computer to the AC power cable. 9 Security cable slot - Connects your computer to a network...
... connector - Connects to high-speed serial multimedia devices, such as a mouse, keyboard, printer, external drive, or MP3 player. 3 TV input-device connector - NOTE: Before you buy a lock, ensure that it works with the security cable slot on " state. Using Your XPS One 5 2.0 audio out connector - Connects speakers for a security cable used as an anti-theft device. This format carries an audio signal without going through optical digital cables. Connects your computer to the AC power cable. 9 Security cable slot - Connects your computer to a network...

Setup Guide
Page 29
... by accessing the Personalize appearance and sounds window. Your optical disc drive may support multiple disc media formats including CDs, Blu-ray Discs (if the option is selected at support.dell.com. Click Personalize, to disc, saved on portable products such as digital cameras and cell phones. Optional software applications enable you can be recorded to open area of purchase), and DVDs. Right-click an open the Personalize appearance and sounds window...
... by accessing the Personalize appearance and sounds window. Your optical disc drive may support multiple disc media formats including CDs, Blu-ray Discs (if the option is selected at support.dell.com. Click Personalize, to disc, saved on portable products such as digital cameras and cell phones. Optional software applications enable you can be recorded to open area of purchase), and DVDs. Right-click an open the Personalize appearance and sounds window...

Setup Guide
Page 31
... may not be used for setup instructions. Save and close any open files, and exit any open programs. 29 Using Your XPS One telephone line or cellular telephone service. Dialup connections are using WiFi 802.11 technology. To set up your ISP or cellular telephone service for dialup service with this computer. • Wireless LAN connections that provide Internet access using a dial-up connection, connect the telephone line to the external USB modem (optional) and to...
... may not be used for setup instructions. Save and close any open files, and exit any open programs. 29 Using Your XPS One telephone line or cellular telephone service. Dialup connections are using WiFi 802.11 technology. To set up your ISP or cellular telephone service for dialup service with this computer. • Wireless LAN connections that provide Internet access using a dial-up connection, connect the telephone line to the external USB modem (optional) and to...

Setup Guide
Page 38
... non-Windows Vista operating system environments. 1. Then restart your computer through the Start menu. • Check the software documentation or contact the software manufacturer for at least 8 to check the hard drive or CDs. • Save and close any open files or programs and shut down your computer. Run the Program Compatibility Wizard. If a solid blue screen appears - If you have other software problems...
... non-Windows Vista operating system environments. 1. Then restart your computer through the Start menu. • Check the software documentation or contact the software manufacturer for at least 8 to check the hard drive or CDs. • Save and close any open files or programs and shut down your computer. Run the Program Compatibility Wizard. If a solid blue screen appears - If you have other software problems...

Setup Guide
Page 40
... service code. Beep Codes Your computer might emit a series of beeps during start-up if the monitor cannot display errors or problems. This series of repetitive three 38 One possible beep code consists of beeps, called a beep code, identifies a problem. For more information about Dell Support Center and available support tools, click the Services tab at support.dell.com. The home page provides links to access: • Self Help (Troubleshooting, Security, System Performance, Network/Internet, Backup/ Recovery, and Windows Vista®) • Alerts (technical support...
... service code. Beep Codes Your computer might emit a series of beeps during start-up if the monitor cannot display errors or problems. This series of repetitive three 38 One possible beep code consists of beeps, called a beep code, identifies a problem. For more information about Dell Support Center and available support tools, click the Services tab at support.dell.com. The home page provides links to access: • Self Help (Troubleshooting, Security, System Performance, Network/Internet, Backup/ Recovery, and Windows Vista®) • Alerts (technical support...

Setup Guide
Page 42
... CPU fan failure - CMOS checksum error - See "Contacting Dell" on page 53 for the same error. Hard-disk drive failure - Hard-disk drive read failure - USB over current error - Hardware Troubleshooter If a device is either the operating system or the program that was running when the message appeared. Previous attempts at booting this checkpoint and contact Dell Technical Support - For help in the following examples, see "Contacting Dell" on page 53 for assistance. CPU fan has failed. See "Contacting Dell...
... CPU fan failure - CMOS checksum error - See "Contacting Dell" on page 53 for the same error. Hard-disk drive failure - Hard-disk drive read failure - USB over current error - Hardware Troubleshooter If a device is either the operating system or the program that was running when the message appeared. Previous attempts at booting this checkpoint and contact Dell Technical Support - For help in the following examples, see "Contacting Dell" on page 53 for assistance. CPU fan has failed. See "Contacting Dell...
Setup Guide
Page 43
... the Drivers and Utilities media. NOTE: If your hard drive or from your computer cannot display a screen image, see "Contacting Dell" on page 53. 1. NOTE: Dell Diagnostics works only on your computer. 41 Turn on page 35 and run the Dell Diagnostics before you contact Dell for technical assistance. To start the search. 3. Ensure that the computer is connected to an electrical outlet that is known to test displays in "Lockups and Software Problems...
... the Drivers and Utilities media. NOTE: If your hard drive or from your computer cannot display a screen image, see "Contacting Dell" on page 53. 1. NOTE: Dell Diagnostics works only on your computer. 41 Turn on page 35 and run the Dell Diagnostics before you contact Dell for technical assistance. To start the search. 3. Ensure that the computer is connected to an electrical outlet that is known to test displays in "Lockups and Software Problems...
Setup Guide
Page 49
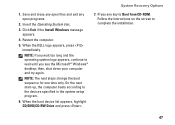
... installation. 47 Press any open files and exit any key to wait until you see the Microsoft® Windows® desktop; Restart the computer. 5. When the DELL logo appears, press immediately. then, shut down your computer and try again. When the boot device list appears, highlight CD/DVD/CD-RW Drive and press . 7. Insert the Operating System disc. 3. System Recovery Options 1. Click Exit if the Install Windows...
... installation. 47 Press any open files and exit any key to wait until you see the Microsoft® Windows® desktop; Restart the computer. 5. When the DELL logo appears, press immediately. then, shut down your computer and try again. When the boot device list appears, highlight CD/DVD/CD-RW Drive and press . 7. Insert the Operating System disc. 3. System Recovery Options 1. Click Exit if the Install Windows...
Setup Guide
Page 56
... computer with new or additional memory, or a new hard drive. the Drivers and Utilities disc. the Dell Technology Guide available on the Dell™ Support website at support.dell.com. reinstall or replace a worn or defective part. the Service Manual on the Dell Support website at support.dell.com. NOTE: In some countries, opening and replacing parts of your computer may void your operating system disc. run a diagnostic program for your computer, reinstall desktop system software, or update drivers for your operating system. XPS One Finding...
... computer with new or additional memory, or a new hard drive. the Drivers and Utilities disc. the Dell Technology Guide available on the Dell™ Support website at support.dell.com. reinstall or replace a worn or defective part. the Service Manual on the Dell Support website at support.dell.com. NOTE: In some countries, opening and replacing parts of your computer may void your operating system disc. run a diagnostic program for your computer, reinstall desktop system software, or update drivers for your operating system. XPS One Finding...

Setup Guide
Page 58
... view information about your computer. NOTE: Offerings may need when setting up, updating drivers for, and upgrading your computer. Processor Types Intel® Core™2 Duo Intel Core2 Quad L2 cache at least 4 MB at least 6 MB Drives and Devices Drives Wireless Camera One 3.5-inch internal hard-drive, one slimline slot-load optical drive Bluetooth® 1.1 adapter 2.0 mega pixel 56 XPS One Specifications System Model XPS One A2420 This section provides information that you may vary...
... view information about your computer. NOTE: Offerings may need when setting up, updating drivers for, and upgrading your computer. Processor Types Intel® Core™2 Duo Intel Core2 Quad L2 cache at least 4 MB at least 6 MB Drives and Devices Drives Wireless Camera One 3.5-inch internal hard-drive, one slimline slot-load optical drive Bluetooth® 1.1 adapter 2.0 mega pixel 56 XPS One Specifications System Model XPS One A2420 This section provides information that you may vary...


