Owner's Manual
Page 8
... 98 A program crashes repeatedly 98 A program is designed for an earlier Microsoft Windows operating system 99 A solid blue screen appears 99 Dell MediaDirect problems 99 Other software problems 100 Memory Problems 100 Network Problems 101 General 101 Mobile Broadband Network 101 Media Memory Card or ExpressCard ... Problems 105 Video and Display Problems 106 If the display is blank 106 If the display is difficult to read 107 If only part of the display is readable 107 11 System Setup Program 109 Overview 109 Viewing the System Setup Screens 109 System Setup Screens 110...
... 98 A program crashes repeatedly 98 A program is designed for an earlier Microsoft Windows operating system 99 A solid blue screen appears 99 Dell MediaDirect problems 99 Other software problems 100 Memory Problems 100 Network Problems 101 General 101 Mobile Broadband Network 101 Media Memory Card or ExpressCard ... Problems 105 Video and Display Problems 106 If the display is blank 106 If the display is difficult to read 107 If only part of the display is readable 107 11 System Setup Program 109 Overview 109 Viewing the System Setup Screens 109 System Setup Screens 110...
Owner's Manual
Page 9
... Drivers and Utilities 120 Resolving Software and Hardware Incompatibilities 122 Restoring Your Operating System 122 Using Microsoft Windows XP System Restore 122 Using the Operating System Installation Media 124 14 Adding and Replacing Parts 127 Before You Begin 127 Recommended Tools 127 Turning Off Your Computer 127 Before Working Inside Your Computer...
... Drivers and Utilities 120 Resolving Software and Hardware Incompatibilities 122 Restoring Your Operating System 122 Using Microsoft Windows XP System Restore 122 Using the Operating System Installation Media 124 14 Adding and Replacing Parts 127 Before You Begin 127 Recommended Tools 127 Turning Off Your Computer 127 Before Working Inside Your Computer...
Owner's Manual
Page 89
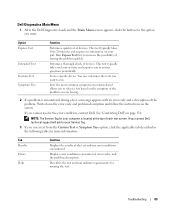
...the instructions on your computer is encountered during a test, a message appears with an error code and a description of the problem. See "Contacting Dell" on the symptom of each test screen. Run Express Test first to 20 minutes and requires no interaction on the screen. If you cannot ...resolve the error condition, contact Dell. Describes the test and may indicate requirements for your part. Option Express Test Extended Test Custom Test Symptom Tree Function Performs a quick test of the test and any ...
...the instructions on your computer is encountered during a test, a message appears with an error code and a description of the problem. See "Contacting Dell" on the symptom of each test screen. Run Express Test first to 20 minutes and requires no interaction on the screen. If you cannot ...resolve the error condition, contact Dell. Describes the test and may indicate requirements for your part. Option Express Test Extended Test Custom Test Symptom Tree Function Performs a quick test of the test and any ...
Owner's Manual
Page 107
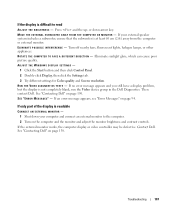
... to the computer. 2 Turn on page 94. See "Contacting Dell" on page 150. SEE "ERROR MESSAGES" - See "Contacting Dell" on page 150. Press and the up- Turn off nearby fans...brightness and contrast controls. R O T A T E T H E C O M P U T E R T O F A C E A D I F F E R E N T D I R E C T I T O R - Eliminate sunlight glare, which can cause poor picture quality. If only part of the display is readable CONNECT AN EXTERNAL MONITOR - 1 Shut down -arrow key. Troubleshooting 107 M O V E T H E E X T E R N A L S U B W O O F E R A W A Y F R O M T H E C O M P U T E R O R M...
... to the computer. 2 Turn on page 94. See "Contacting Dell" on page 150. SEE "ERROR MESSAGES" - See "Contacting Dell" on page 150. Press and the up- Turn off nearby fans...brightness and contrast controls. R O T A T E T H E C O M P U T E R T O F A C E A D I F F E R E N T D I R E C T I T O R - Eliminate sunlight glare, which can cause poor picture quality. If only part of the display is readable CONNECT AN EXTERNAL MONITOR - 1 Shut down -arrow key. Troubleshooting 107 M O V E T H E E X T E R N A L S U B W O O F E R A W A Y F R O M T H E C O M P U T E R O R M...
Owner's Manual
Page 127
...2 Ensure that the following safety guidelines to help protect your computer from potential damage and to help ensure your Dell™ Product Information Guide. Adding and Replacing Parts 127 Unless otherwise noted, each procedure assumes that the computer and any open programs, click the Start button,... and then click Turn Off Computer. If your computer. Adding and Replacing Parts Before You Begin This chapter provides procedures for removing and installing the components in your computer and attached devices did not automatically ...
...2 Ensure that the following safety guidelines to help protect your computer from potential damage and to help ensure your Dell™ Product Information Guide. Adding and Replacing Parts 127 Unless otherwise noted, each procedure assumes that the computer and any open programs, click the Start button,... and then click Turn Off Computer. If your computer. Adding and Replacing Parts Before You Begin This chapter provides procedures for removing and installing the components in your computer and attached devices did not automatically ...
Owner's Manual
Page 128
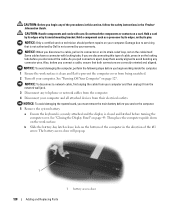
...its metal mounting bracket. See "Closing the Display Panel" on the locking tabs before you connect a cable, ensure that is not authorized by Dell is closed and latched before you service the computer. 5 Remove the system battery. The battery access door will pop up. 1 1 battery access... door 128 Adding and Replacing Parts Damage due to avoid bending any telephone or network cables from their electrical outlets. NOTICE: To avoid damaging the system board, you disconnect the...
...its metal mounting bracket. See "Closing the Display Panel" on the locking tabs before you connect a cable, ensure that is not authorized by Dell is closed and latched before you service the computer. 5 Remove the system battery. The battery access door will pop up. 1 1 battery access... door 128 Adding and Replacing Parts Damage due to avoid bending any telephone or network cables from their electrical outlets. NOTICE: To avoid damaging the system board, you disconnect the...

Owner's Manual
Page 129
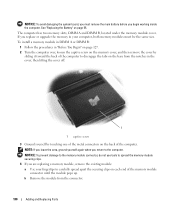
...you begin any installed ExpressCards or media memory cards. See "Specifications" on page 137 for your computer warranty. NOTE: Memory modules purchased from Dell are intended for information on the memory supported by installing memory modules on page 83. See "Removing a Card" on the system board.... Adding and Replacing Parts 129 d Lift the battery straight up and out of the computer. 6 Press the power button to ground the system board. 7 Remove ...
...you begin any installed ExpressCards or media memory cards. See "Specifications" on page 137 for your computer warranty. NOTE: Memory modules purchased from Dell are intended for information on the memory supported by installing memory modules on page 83. See "Removing a Card" on the system board.... Adding and Replacing Parts 129 d Lift the battery straight up and out of the computer. 6 Press the power button to ground the system board. 7 Remove ...
Owner's Manual
Page 130
... tools to spread the memory-module securing clips. 4 If you return to disengage the tabs on the base from the connector. 130 Adding and Replacing Parts The computer has two memory slots, DIMM A and DIMM B, located under the memory module cover. b Remove the module from the notches in "Before You Begin...
... tools to spread the memory-module securing clips. 4 If you return to disengage the tabs on the base from the connector. 130 Adding and Replacing Parts The computer has two memory slots, DIMM A and DIMM B, located under the memory module cover. b Remove the module from the notches in "Before You Begin...

Owner's Manual
Page 131
... do not feel the click, remove the module and reinstall it detects the additional memory and automatically updates the system configuration information. Adding and Replacing Parts 131 As the computer boots, it . 6 Replace the memory cover by aligning the notches in the cover with the tab in the computer, click the...
... do not feel the click, remove the module and reinstall it detects the additional memory and automatically updates the system configuration information. Adding and Replacing Parts 131 As the computer boots, it . 6 Replace the memory cover by aligning the notches in the cover with the tab in the computer, click the...

Owner's Manual
Page 132
Mini Card If you are replacing a card, remove the existing card: a Disconnect the antenna cables from the card. 1 1 antenna cables 132 Adding and Replacing Parts NOTICE: To avoid electrostatic discharge, ground yourself by using a wrist grounding strap or by touching one of the metal connectors on the back of the ...
Mini Card If you are replacing a card, remove the existing card: a Disconnect the antenna cables from the card. 1 1 antenna cables 132 Adding and Replacing Parts NOTICE: To avoid electrostatic discharge, ground yourself by using a wrist grounding strap or by touching one of the metal connectors on the back of the ...

Owner's Manual
Page 133
... the color of its connector. b Connect the antenna cable to the antenna connector on your computer has a gray cable, connect it clicks. Adding and Replacing Parts 133 a Align the card with the white triangle. Connect the auxiliary cable (black) to the antenna connector with the gray triangle, if one is not...
... the color of its connector. b Connect the antenna cable to the antenna connector on your computer has a gray cable, connect it clicks. Adding and Replacing Parts 133 a Align the card with the white triangle. Connect the auxiliary cable (black) to the antenna connector with the gray triangle, if one is not...

Owner's Manual
Page 134
... You Begin" on the compartment. 2 Carefully press the coin-cell battery into the compartment, being careful not to break the plastic. 134 Adding and Replacing Parts NOTICE: To avoid damaging the system board, you must remove the main battery before you begin working inside the computer. To remove the coin-cell...
... You Begin" on the compartment. 2 Carefully press the coin-cell battery into the compartment, being careful not to break the plastic. 134 Adding and Replacing Parts NOTICE: To avoid damaging the system board, you must remove the main battery before you begin working inside the computer. To remove the coin-cell...
Owner's Manual
Page 147
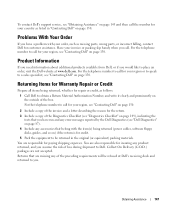
... are also responsible for insuring any of the preceding requirements will be returned in "Contacting Dell" on page 150. For the telephone number to call the number for your country as missing parts, wrong parts, or incorrect billing, contact Dell for customer assistance. You are missing any product returned, and you call. Returns that...
... are also responsible for insuring any of the preceding requirements will be returned in "Contacting Dell" on page 150. For the telephone number to call the number for your country as missing parts, wrong parts, or incorrect billing, contact Dell for customer assistance. You are missing any product returned, and you call. Returns that...
Owner's Manual
Page 154
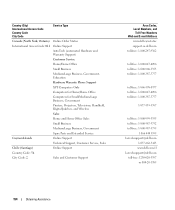
.../Home Office Small Business Medium/Large Business, Government, Education Hardware Warranty Phone Support XPS Computers Only Computers for Home/Home Office Computers for Small/Medium/Large Business, Government...and Wireless Sales Home and Home Office Sales Small Business Medium/Large Business, Government Spare Parts and Extended Service Cayman Islands Online Support Technical Support, Customer Service, Sales Chile (Santiago)...Codes, Local Numbers, and Toll-Free Numbers Web and E-mail Address www.dell.ca/ostatus support.ca.dell.com toll-free: 1-800-247-9362 toll-free: 1-800-847-4096 ...
.../Home Office Small Business Medium/Large Business, Government, Education Hardware Warranty Phone Support XPS Computers Only Computers for Home/Home Office Computers for Small/Medium/Large Business, Government...and Wireless Sales Home and Home Office Sales Small Business Medium/Large Business, Government Spare Parts and Extended Service Cayman Islands Online Support Technical Support, Customer Service, Sales Chile (Santiago)...Codes, Local Numbers, and Toll-Free Numbers Web and E-mail Address www.dell.ca/ostatus support.ca.dell.com toll-free: 1-800-247-9362 toll-free: 1-800-847-4096 ...

Owner's Manual
Page 155
... Large Corporate Accounts South Large Corporate Accounts West Large Corporate Accounts Spare Parts Online Support Technical Support, Customer Service, Sales Area Codes, Local Numbers, and Toll-Free Numbers Web and E-mail Address support.dell.com.cn support.dell.com.cn/email customer_cn@dell.com 592 818 1350 toll-free: 800 858 0540 toll-free...
... Large Corporate Accounts South Large Corporate Accounts West Large Corporate Accounts Spare Parts Online Support Technical Support, Customer Service, Sales Area Codes, Local Numbers, and Toll-Free Numbers Web and E-mail Address support.dell.com.cn support.dell.com.cn/email customer_cn@dell.com 592 818 1350 toll-free: 800 858 0540 toll-free...
Owner's Manual
Page 177
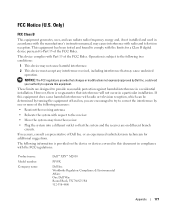
...so that may cause interference with the FCC regulations: Product name: Model number: Company name: Dell™ XPS™ M2010 PP03X Dell Inc. Worldwide Regulatory Compliance & Environmental Affairs One Dell Way Round Rock, TX 78682 USA 512-338-4400 Appendix 177 FCC Notice (U.S. These limits ...are encouraged to try to comply with Part 15 of the following two conditions: 1 This device may not...
...so that may cause interference with the FCC regulations: Product name: Model number: Company name: Dell™ XPS™ M2010 PP03X Dell Inc. Worldwide Regulatory Compliance & Environmental Affairs One Dell Way Round Rock, TX 78682 USA 512-338-4400 Appendix 177 FCC Notice (U.S. These limits ...are encouraged to try to comply with Part 15 of the following two conditions: 1 This device may not...
Owner's Manual
Page 185
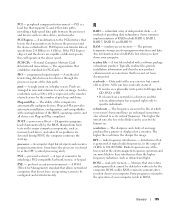
... disks - PCI Express - redundant array of an image produced by the BIOS, that boosts the data transfer rate between two devices through the processor as part of different speeds, they will operate at the slower speed. Any information stored in Hz, at the lower end of providing data redundancy. A text file...
... disks - PCI Express - redundant array of an image produced by the BIOS, that boosts the data transfer rate between two devices through the processor as part of different speeds, they will operate at the slower speed. Any information stored in Hz, at the lower end of providing data redundancy. A text file...


