
Setup Guide
Page 5
Contents Setting Up Your XPS Laptop 7 Before Setting Up Your Computer 7 Connect the AC Adapter 8 Connect the Network ... Display (Optional 18 Set Up the TV Tuner (Optional 19 Connect to the Internet (Optional 20 Using Your XPS Laptop 22 Right View Features 22 Left View Features 26 Back View Features 28 Computer Base and Keyboard... Features 30 Status Lights and Indicators 34 Disabling Battery Charging 35 Touch Pad Gestures 36 Multimedia Control Keys 38 Control Strip Features 40 Using the Optical Drive 42...
Contents Setting Up Your XPS Laptop 7 Before Setting Up Your Computer 7 Connect the AC Adapter 8 Connect the Network ... Display (Optional 18 Set Up the TV Tuner (Optional 19 Connect to the Internet (Optional 20 Using Your XPS Laptop 22 Right View Features 22 Left View Features 26 Back View Features 28 Computer Base and Keyboard... Features 30 Status Lights and Indicators 34 Disabling Battery Charging 35 Touch Pad Gestures 36 Multimedia Control Keys 38 Control Strip Features 40 Using the Optical Drive 42...

Setup Guide
Page 16
NOTE: Installing a mini B-CAS card into the SIM card slot. 4. To install the SIM card: 1. In the battery bay, slide the SIM card into the SIM card slot is not required if you are using an EVDO card to set up and view ... computer. 2. To remove the SIM card, press and eject the SIM card. 14 Replace the battery (see "Removing and Replacing the Battery" on page 48). 5. Remove the battery (see "Removing and Replacing the Battery" on page 48). 3. Setting Up Your XPS Laptop Install the SIM Card (Optional) NOTE: Installing a SIM card is required to access...
NOTE: Installing a mini B-CAS card into the SIM card slot. 4. To install the SIM card: 1. In the battery bay, slide the SIM card into the SIM card slot is not required if you are using an EVDO card to set up and view ... computer. 2. To remove the SIM card, press and eject the SIM card. 14 Replace the battery (see "Removing and Replacing the Battery" on page 48). 5. Remove the battery (see "Removing and Replacing the Battery" on page 48). 3. Setting Up Your XPS Laptop Install the SIM Card (Optional) NOTE: Installing a SIM card is required to access...
Setup Guide
Page 27
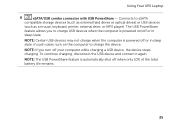
The USB PowerShare feature allows you turn on /off when only 10% of the total battery life remains. 25 NOTE: The USB PowerShare feature is powered off your computer while charging a USB device, the device stops charging. In such cases, turn ... storage devices (such as external hard drives or optical drives) or USB devices (such as a mouse, keyboard, printer, external drive, or MP3 player). Using Your XPS Laptop 8 eSATA/USB combo connector with USB PowerShare -
The USB PowerShare feature allows you turn on /off when only 10% of the total battery life remains. 25 NOTE: The USB PowerShare feature is powered off your computer while charging a USB device, the device stops charging. In such cases, turn ... storage devices (such as external hard drives or optical drives) or USB devices (such as a mouse, keyboard, printer, external drive, or MP3 player). Using Your XPS Laptop 8 eSATA/USB combo connector with USB PowerShare -
Setup Guide
Page 31
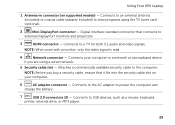
... Connects your computer. 6 AC adapter connector - Connects to the AC adapter to a TV for both 5.1 audio and video signals. Using Your XPS Laptop 1 Antenna-in connector (on your computer to a network or a broadband device if you buy a security cable, ensure that connects to ... slot - NOTE: When used with a monitor, only the video signal is read. 4 Network connector - Connects to power the computer and charge the battery. 7 USB 3.0 connectors (2) - Digital interface standard connector that it fits into the security cable slot on supported models) - NOTE: Before you are ...
... Connects your computer. 6 AC adapter connector - Connects to the AC adapter to a TV for both 5.1 audio and video signals. Using Your XPS Laptop 1 Antenna-in connector (on your computer to a network or a broadband device if you buy a security cable, ensure that connects to ... slot - NOTE: When used with a monitor, only the video signal is read. 4 Network connector - Connects to power the computer and charge the battery. 7 USB 3.0 connectors (2) - Digital interface standard connector that it fits into the security cable slot on supported models) - NOTE: Before you are ...
Setup Guide
Page 33
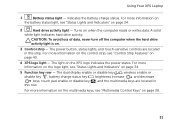
...- CAUTION: To avoid loss of data, never turn off the computer when the hard drive activity light is on page 40. 4 XPS logo light - For more information on the battery status light, see "Control Strip Features" on . 3 Control strip - A solid white light indicates hard drive activity. For more ...page 38. 31 For more information on the logo light, see "Multimedia Control Keys" on page 34. 5 Function key row - Indicates the battery charge status. The light on the XPS logo indicates the power states. The dual display enable or disable key , wireless enable or disable key...
...- CAUTION: To avoid loss of data, never turn off the computer when the hard drive activity light is on page 40. 4 XPS logo light - For more information on the battery status light, see "Control Strip Features" on . 3 Control strip - A solid white light indicates hard drive activity. For more ...page 38. 31 For more information on the logo light, see "Multimedia Control Keys" on page 34. 5 Function key row - Indicates the battery charge status. The light on the XPS logo indicates the power states. The dual display enable or disable key , wireless enable or disable key...

Setup Guide
Page 36
Using Your XPS Laptop Status Lights and Indicators Battery Status Light AC adapter Battery Indicator light status solid white off solid amber off Computer state(s) on/standby/off/ hibernate on/standby/off/ hibernate on/standby on/standby/off/ hibernate off/hibernate Battery charge status charging fully charged low battery (
Using Your XPS Laptop Status Lights and Indicators Battery Status Light AC adapter Battery Indicator light status solid white off solid amber off Computer state(s) on/standby/off/ hibernate on/standby/off/ hibernate on/standby on/standby/off/ hibernate off/hibernate Battery charge status charging fully charged low battery (
Setup Guide
Page 37
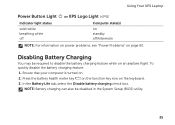
... may be disabled in the System Setup (BIOS) utility. 35 NOTE: Battery charging can also be required to disable the battery charging feature while on page 60. To quickly disable the battery charging feature: 1. Using Your XPS Laptop Power Button Light or XPS Logo Light Indicator light status solid white breathing white off Computer state...
... may be disabled in the System Setup (BIOS) utility. 35 NOTE: Battery charging can also be required to disable the battery charging feature while on page 60. To quickly disable the battery charging feature: 1. Using Your XPS Laptop Power Button Light or XPS Logo Light Indicator light status solid white breathing white off Computer state...
Setup Guide
Page 43
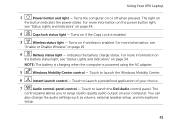
Using Your XPS Laptop 1 Power button and light - Turns on page 34. 2 Caps lock status light - NOTE: The battery is charging when the computer is enabled. Touch to setup studio-quality audio output on or off when pressed. You can also change the ...information, see "Status Lights and Indicators" on if wireless is powered using the AC adapter. 5 Windows Mobility Center control - Touch to launch the Dell Audio control panel. For more information on the battery status light, see "Enable or Disable Wireless" on the button indicates the power states. The light on page 16...
Using Your XPS Laptop 1 Power button and light - Turns on page 34. 2 Caps lock status light - NOTE: The battery is charging when the computer is enabled. Touch to setup studio-quality audio output on or off when pressed. You can also change the ...information, see "Status Lights and Indicators" on if wireless is powered using the AC adapter. 5 Windows Mobility Center control - Touch to launch the Dell Audio control panel. For more information on the battery status light, see "Enable or Disable Wireless" on the button indicates the power states. The light on page 16...
Setup Guide
Page 50
... latch to the unlock position. 3. Lift the battery up at an angle and remove it over. 2. Using Your XPS Laptop Removing and Replacing the Battery WARNING: Before you begin any of fire or explosion. Turn off the computer and turn it from Dell. Press the battery down the computer, and remove external cables (including the...
... latch to the unlock position. 3. Lift the battery up at an angle and remove it over. 2. Using Your XPS Laptop Removing and Replacing the Battery WARNING: Before you begin any of fire or explosion. Turn off the computer and turn it from Dell. Press the battery down the computer, and remove external cables (including the...

Setup Guide
Page 54
...® graphic processing unit (GPU) with NVIDIA's Optimus technology. This may be required for preset applications and thus extends the battery life. The Optimus technology is designed to combine the graphic processing capability of application profiles is updated frequently by NVIDIA and is ... XPS laptop is equipped with the discrete NVIDIA GPU while running graphicintensive applications such as 3D games. It enables you are connected to see if the application has an associated application profile. • If an application profile exists, the NVIDIA GPU is turned on battery ...
...® graphic processing unit (GPU) with NVIDIA's Optimus technology. This may be required for preset applications and thus extends the battery life. The Optimus technology is designed to combine the graphic processing capability of application profiles is updated frequently by NVIDIA and is ... XPS laptop is equipped with the discrete NVIDIA GPU while running graphicintensive applications such as 3D games. It enables you are connected to see if the application has an associated application profile. • If an application profile exists, the NVIDIA GPU is turned on battery ...

Setup Guide
Page 68
.... • If the hard drive is your data regularly. Replace the battery (see the Service Manual at support.dell.com/ manuals). Possible hard-disk drive failure during HDD boot test. Contact Dell (see "Contacting Dell" on page 87) for assistance. 66 S.M.A.R.T error, possible hard drive ...the drive is correct (see the Service Manual at support.dell.com/manuals) or Contact Dell (see "Contacting Dell" on page 87) for assistance. Using Support Tools CMOS checksum error - Possible system board failure or RTC battery low. Hard Drive SELF MONITORING SYSTEM has reported that ...
.... • If the hard drive is your data regularly. Replace the battery (see the Service Manual at support.dell.com/ manuals). Possible hard-disk drive failure during HDD boot test. Contact Dell (see "Contacting Dell" on page 87) for assistance. 66 S.M.A.R.T error, possible hard drive ...the drive is correct (see the Service Manual at support.dell.com/manuals) or Contact Dell (see "Contacting Dell" on page 87) for assistance. Using Support Tools CMOS checksum error - Possible system board failure or RTC battery low. Hard Drive SELF MONITORING SYSTEM has reported that ...

Setup Guide
Page 96
...maximum) 1.8 A/2.1 A Input frequency 50-60 Hz Output power 130 W/150 W 94 See the safety information that shipped with your computer. Specifications Battery 9-cell "smart" lithium ion: Height 221.07 mm (8.70 inches) Width 54.35 mm (2.14 inches) Depth 42.53 mm (1.67 inches...33 kg (0.73 lb) Voltage 13.3 V (6-/9-cell) Charge time 4 hours (when the (approximate) computer is turned off) Battery Operating time battery operating time varies depending on operating conditions Coin-cell battery CR-2032 AC Adapter NOTE: Use only AC adapters specified for use with your computer.
...maximum) 1.8 A/2.1 A Input frequency 50-60 Hz Output power 130 W/150 W 94 See the safety information that shipped with your computer. Specifications Battery 9-cell "smart" lithium ion: Height 221.07 mm (8.70 inches) Width 54.35 mm (2.14 inches) Depth 42.53 mm (1.67 inches...33 kg (0.73 lb) Voltage 13.3 V (6-/9-cell) Charge time 4 hours (when the (approximate) computer is turned off) Battery Operating time battery operating time varies depending on operating conditions Coin-cell battery CR-2032 AC Adapter NOTE: Use only AC adapters specified for use with your computer.

Setup Guide
Page 97
... Pad X/Y position resolution (graphics table mode) Size: 240 cpi Width 100 mm (3.94 inches) Height 56 mm (2.2 inches) Physical Height Width Depth Weight (with 6-cell battery) 32.9 mm to 38.5 mm (1.29 inches to 1.51 inches) 414.9 mm (16.33 inches) 287.3 mm (11.31 inches) configurable to 158°F) Keyboard...
... Pad X/Y position resolution (graphics table mode) Size: 240 cpi Width 100 mm (3.94 inches) Height 56 mm (2.2 inches) Physical Height Width Depth Weight (with 6-cell battery) 32.9 mm to 38.5 mm (1.29 inches to 1.51 inches) 414.9 mm (16.33 inches) 287.3 mm (11.31 inches) configurable to 158°F) Keyboard...

Setup Guide
Page 101
Index A airflow, allowing 7 Audio control panel 41 B backup and recovery 51 battery status light 31 B-CAS card 14 C calling Dell 85 Camera 45 CDs, playing and creating 51 computer capabilities 50 computer, setting up 7 connect(ing) to the Internet 20 Contacting Dell online 87 Control strip 31 customer service 80 D DataSafe Local Backup 74 DellConnect 80 Dell Diagnostics 67 Dell Factory Image Restore 77 Dell Stage 55 Dell Support Center 64 Diagnostic Checklist 86 drivers and downloads 89 DVDs, playing and creating 51 99
Index A airflow, allowing 7 Audio control panel 41 B backup and recovery 51 battery status light 31 B-CAS card 14 C calling Dell 85 Camera 45 CDs, playing and creating 51 computer capabilities 50 computer, setting up 7 connect(ing) to the Internet 20 Contacting Dell online 87 Control strip 31 customer service 80 D DataSafe Local Backup 74 DellConnect 80 Dell Diagnostics 67 Dell Factory Image Restore 77 Dell Stage 55 Dell Support Center 64 Diagnostic Checklist 86 drivers and downloads 89 DVDs, playing and creating 51 99


