
Owner's Manual
Page 4
... Postrequisites 29 Removing the Wireless Mini-Card 30 Prerequisites 30 Procedure 30 Replacing the Wireless Mini-Card 32 Procedure 32 Postrequisites 32 Removing the mSATA Drive 33 Prerequisites 33 Procedure 33 Replacing the mSATA Drive 34 Procedure 34 Postrequisites 34 Removing the Primary Hard-Drive 35 Prerequisites 35 Procedure 36 4 | Contents
... Postrequisites 29 Removing the Wireless Mini-Card 30 Prerequisites 30 Procedure 30 Replacing the Wireless Mini-Card 32 Procedure 32 Postrequisites 32 Removing the mSATA Drive 33 Prerequisites 33 Procedure 33 Replacing the mSATA Drive 34 Procedure 34 Postrequisites 34 Removing the Primary Hard-Drive 35 Prerequisites 35 Procedure 36 4 | Contents

Owner's Manual
Page 5
Replacing the Primary Hard-Drive 37 Procedure 37 Postrequisites 37 Removing the Hard-Drive Cage 38 Prerequisites 38 Procedure 38 Replacing the Hard-Drive Cage 39 Procedure 39 Postrequisites 39 Removing the Secondary Hard-Drive (optional 40 Prerequisites 40 Procedure 40 Replacing the Secondary Hard-Drive (optional 41 Procedure 41 Postrequisites 41 Installing a third Hard-Drive (optional 42 Prerequisites 42 Procedure 42 Postrequisites...
Replacing the Primary Hard-Drive 37 Procedure 37 Postrequisites 37 Removing the Hard-Drive Cage 38 Prerequisites 38 Procedure 38 Replacing the Hard-Drive Cage 39 Procedure 39 Postrequisites 39 Removing the Secondary Hard-Drive (optional 40 Prerequisites 40 Procedure 40 Replacing the Secondary Hard-Drive (optional 41 Procedure 41 Postrequisites 41 Installing a third Hard-Drive (optional 42 Prerequisites 42 Procedure 42 Postrequisites...
Owner's Manual
Page 12
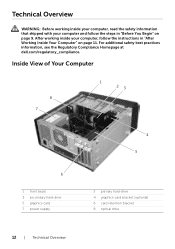
Inside View of Your Computer 8 7 1 23 6 1 front bezel 3 secondary hard-drive 5 graphics card 7 power supply 4 5 2 primary hard-drive 4 graphics-card bracket (optional) 6 card retention bracket 8 optical drive 12 | Technical Overview Technical Overview WARNING: Before working inside your computer, read the safety information that shipped with your computer, follow the steps in "After... computer and follow the instructions in "Before You Begin" on page 11. For additional safety best practices information, see the Regulatory Compliance Homepage at dell.com/regulatory_compliance.
Inside View of Your Computer 8 7 1 23 6 1 front bezel 3 secondary hard-drive 5 graphics card 7 power supply 4 5 2 primary hard-drive 4 graphics-card bracket (optional) 6 card retention bracket 8 optical drive 12 | Technical Overview Technical Overview WARNING: Before working inside your computer, read the safety information that shipped with your computer, follow the steps in "After... computer and follow the instructions in "Before You Begin" on page 11. For additional safety best practices information, see the Regulatory Compliance Homepage at dell.com/regulatory_compliance.

Owner's Manual
Page 35
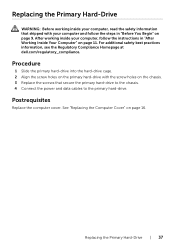
...housing of the hard drive. Removing the Primary Hard-Drive | 35 Prerequisites Remove the computer cover. For additional safety best practices information, see the Regulatory Compliance Homepage at dell.com/regulatory_compliance. WARNING: If you remove the hard drive from the computer when the drive is on ...or in "After Working Inside Your Computer" on page 11. Removing the Primary Hard-Drive WARNING: Before working inside your ...
...housing of the hard drive. Removing the Primary Hard-Drive | 35 Prerequisites Remove the computer cover. For additional safety best practices information, see the Regulatory Compliance Homepage at dell.com/regulatory_compliance. WARNING: If you remove the hard drive from the computer when the drive is on ...or in "After Working Inside Your Computer" on page 11. Removing the Primary Hard-Drive WARNING: Before working inside your ...

Owner's Manual
Page 36
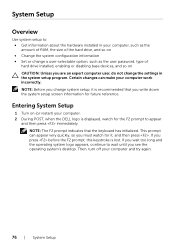
Procedure 1 Disconnect the power and data cables from the primary hard-drive. 2 Remove the screws that secure the hard drive to the chassis. 3 Slide the hard drive out towards the back of the computer. 4 3 1 power cable 3 primary hard-drive 21 2 data cable 4 screws (4) 36 | Removing the Primary Hard-Drive
Procedure 1 Disconnect the power and data cables from the primary hard-drive. 2 Remove the screws that secure the hard drive to the chassis. 3 Slide the hard drive out towards the back of the computer. 4 3 1 power cable 3 primary hard-drive 21 2 data cable 4 screws (4) 36 | Removing the Primary Hard-Drive
Owner's Manual
Page 37
... the computer cover. Procedure 1 Slide the primary hard-drive into the hard-drive cage. 2 Align the screw holes on the primary hard-drive with your computer and follow the instructions in "Before You Begin" on page 9. For additional safety best practices information, see the Regulatory Compliance Homepage at dell.com/regulatory_compliance. After working inside your computer, follow...
... the computer cover. Procedure 1 Slide the primary hard-drive into the hard-drive cage. 2 Align the screw holes on the primary hard-drive with your computer and follow the instructions in "Before You Begin" on page 9. For additional safety best practices information, see the Regulatory Compliance Homepage at dell.com/regulatory_compliance. After working inside your computer, follow...

Owner's Manual
Page 38
... information that secure the hard-drive cage to the chassis. 3 Slide and lift the hard-drive cage away from the chassis. 1 2 1 screws (3) 3 power cable 43 2 hard-drive cage 4 data cable 38 | Removing the Hard-Drive Cage After working inside ...your computer and follow the instructions in "Before You Begin" on page 11. See "Removing the Primary Hard-Drive" on page 15. 2 Remove the primary hard-drive. For additional safety best practices information, see the Regulatory Compliance Homepage at dell...
... information that secure the hard-drive cage to the chassis. 3 Slide and lift the hard-drive cage away from the chassis. 1 2 1 screws (3) 3 power cable 43 2 hard-drive cage 4 data cable 38 | Removing the Hard-Drive Cage After working inside ...your computer and follow the instructions in "Before You Begin" on page 11. See "Removing the Primary Hard-Drive" on page 15. 2 Remove the primary hard-drive. For additional safety best practices information, see the Regulatory Compliance Homepage at dell...

Owner's Manual
Page 39
... Your Computer" on page 11. For additional safety best practices information, see the Regulatory Compliance Homepage at dell.com/regulatory_compliance. After working inside your computer and follow the instructions in "Before You Begin" on page 9. Replacing the Hard-Drive Cage WARNING: Before working inside your computer, read the safety information that secure the...
... Your Computer" on page 11. For additional safety best practices information, see the Regulatory Compliance Homepage at dell.com/regulatory_compliance. After working inside your computer and follow the instructions in "Before You Begin" on page 9. Replacing the Hard-Drive Cage WARNING: Before working inside your computer, read the safety information that secure the...

Owner's Manual
Page 40
... at dell.com/regulatory_compliance. CAUTION: To avoid data loss, do not remove the hard drive while the computer is hot, do not touch the metal housing of the hard drive. Prerequisites 1 Remove the computer cover. See "Removing the Hard-Drive Cage" on or in Sleep state. WARNING: If you remove the hard drive from the hard-drive cage. 1 23 1 secondary hard-drive 3 hard-drive cage...
... at dell.com/regulatory_compliance. CAUTION: To avoid data loss, do not remove the hard drive while the computer is hot, do not touch the metal housing of the hard drive. Prerequisites 1 Remove the computer cover. See "Removing the Hard-Drive Cage" on or in Sleep state. WARNING: If you remove the hard drive from the hard-drive cage. 1 23 1 secondary hard-drive 3 hard-drive cage...

Owner's Manual
Page 41
... practices information, see the Regulatory Compliance Homepage at dell.com/regulatory_compliance. Procedure 1 Slide the secondary hard-drive into the hard-drive cage. 2 Replace the screws that shipped with your computer and follow the instructions in "Before You Begin" on page 16. Postrequisites 1 Replace the hard-drive cage. Replacing the Secondary Hard-Drive (optional) WARNING: Before working inside your computer...
... practices information, see the Regulatory Compliance Homepage at dell.com/regulatory_compliance. Procedure 1 Slide the secondary hard-drive into the hard-drive cage. 2 Replace the screws that shipped with your computer and follow the instructions in "Before You Begin" on page 16. Postrequisites 1 Replace the hard-drive cage. Replacing the Secondary Hard-Drive (optional) WARNING: Before working inside your computer...

Owner's Manual
Page 42
... fragile. See "Removing the Front Bezel" on page 15. 2 Remove the front bezel. Installing a third Hard-Drive (optional) WARNING: Before working inside your computer, read the safety information that shipped with your computer, follow the steps in ..."Before You Begin" on page 9. For additional safety best practices information, see the Regulatory Compliance Homepage at dell.com/regulatory_compliance. Prerequisites 1 Remove the computer cover. Exercise care when handling the hard drive. Procedure 1 Insert a screw driver and twist it to remove the break-away metal plate. 2 Pull ...
... fragile. See "Removing the Front Bezel" on page 15. 2 Remove the front bezel. Installing a third Hard-Drive (optional) WARNING: Before working inside your computer, read the safety information that shipped with your computer, follow the steps in ..."Before You Begin" on page 9. For additional safety best practices information, see the Regulatory Compliance Homepage at dell.com/regulatory_compliance. Prerequisites 1 Remove the computer cover. Exercise care when handling the hard drive. Procedure 1 Insert a screw driver and twist it to remove the break-away metal plate. 2 Pull ...

Owner's Manual
Page 43
3 Gently slide the third hard-drive into the hard-drive bay through the front of the computer. 1 1 third hard-drive Installing a third Hard-Drive (optional) | 43
3 Gently slide the third hard-drive into the hard-drive bay through the front of the computer. 1 1 third hard-drive Installing a third Hard-Drive (optional) | 43

Owner's Manual
Page 44
See "Replacing the Computer Cover" on page 23. 2 Replace the computer cover. 4 Replace the screws that secure the third hard-drive to the chassis. 5 Connect the power and data cables to the third hard-drive. 1 2 3 1 power cable 3 screws (2) 2 data cable Postrequisites 1 Replace the front bezel. See "Replacing the Front Bezel" on page 16. 44 | Installing a third Hard-Drive (optional)
See "Replacing the Computer Cover" on page 23. 2 Replace the computer cover. 4 Replace the screws that secure the third hard-drive to the chassis. 5 Connect the power and data cables to the third hard-drive. 1 2 3 1 power cable 3 screws (2) 2 data cable Postrequisites 1 Replace the front bezel. See "Replacing the Front Bezel" on page 16. 44 | Installing a third Hard-Drive (optional)
Owner's Manual
Page 76
...change the settings in your computer, such as the amount of RAM, the size of hard drive installed, enabling or disabling base devices, and so on (or restart) your computer. 2 During POST, when the DELL logo is lost. Then, turn off your computer work incorrectly. Certain changes can appear ...to wait until you see the operating system's desktop. NOTE: Before you change a user-selectable option, such as the user password, type of the hard drive, and so on • Change the system configuration information • Set or change system setup, it , and then press . If you press...
...change the settings in your computer, such as the amount of RAM, the size of hard drive installed, enabling or disabling base devices, and so on (or restart) your computer. 2 During POST, when the DELL logo is lost. Then, turn off your computer work incorrectly. Certain changes can appear ...to wait until you see the operating system's desktop. NOTE: Before you change a user-selectable option, such as the user password, type of the hard drive, and so on • Change the system configuration information • Set or change system setup, it , and then press . If you press...
Owner's Manual
Page 80
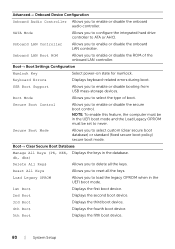
... keys in the UEFI boot mode and the Load Legacy OPROM must be set to never. Load Legacy OPROM Allows you to configure the integrated hard drive controller to ATA or AHCI. Onboard LAN Controller Allows you to enable or disable the onboard audio controller. Reset All Keys Allows you to select...
... keys in the UEFI boot mode and the Load Legacy OPROM must be set to never. Load Legacy OPROM Allows you to configure the integrated hard drive controller to ATA or AHCI. Onboard LAN Controller Allows you to enable or disable the onboard audio controller. Reset All Keys Allows you to select...


