
Owner's Manual
Page 3
... an Adapter 24 Connecting a Monitor in a Dual Graphics Card Configuration 25 Connecting Two or More Monitors 27 Connecting a TV 27 Changing the Display Settings to Support Two or More Monitors . . . . . 28 About Your RAID Configuration 29 RAID Level 0 Configuration 29 RAID Level 1 Configuration 30 RAID Level 0+1 Configuration 30 RAID Level 5 Configuration...
... an Adapter 24 Connecting a Monitor in a Dual Graphics Card Configuration 25 Connecting Two or More Monitors 27 Connecting a TV 27 Changing the Display Settings to Support Two or More Monitors . . . . . 28 About Your RAID Configuration 29 RAID Level 0 Configuration 29 RAID Level 1 Configuration 30 RAID Level 0+1 Configuration 30 RAID Level 5 Configuration...

Owner's Manual
Page 9
... found at support.dell.com. Readme files may also be included on your media to provide last-minute updates about technical changes to reinstall drivers (see "Reinstalling Drivers and Utilities" on page 76), access your documentation or run the Dell Diagnostics (see "Dell Diagnostics" on...documentation • Desktop System Software (DSS) Find It Here Drivers and Utilities Media Documentation and drivers are already installed on page 72). Dell™ Product Information Guide Finding Information 9 What Are You Looking For? • A diagnostic program for my computer • Drivers ...
... found at support.dell.com. Readme files may also be included on your media to provide last-minute updates about technical changes to reinstall drivers (see "Reinstalling Drivers and Utilities" on page 76), access your documentation or run the Dell Diagnostics (see "Dell Diagnostics" on...documentation • Desktop System Software (DSS) Find It Here Drivers and Utilities Media Documentation and drivers are already installed on page 72). Dell™ Product Information Guide Finding Information 9 What Are You Looking For? • A diagnostic program for my computer • Drivers ...

Owner's Manual
Page 10
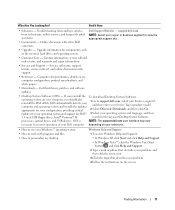
What Are You Looking For? • How to set up my computer Find It Here Setup Diagram • Service Tag and Express Service Code • Microsoft® Windows® Product Key Label Service Tag and Microsoft Windows Product Key These labels are located on your computer. • Use the Service Tag to identify your computer when you use support.dell.com or contact support. • Enter the Express Service Code to direct your call when contacting support. 10 Finding Information
What Are You Looking For? • How to set up my computer Find It Here Setup Diagram • Service Tag and Express Service Code • Microsoft® Windows® Product Key Label Service Tag and Microsoft Windows Product Key These labels are located on your computer. • Use the Service Tag to identify your computer when you use support.dell.com or contact support. • Enter the Express Service Code to direct your call when contacting support. 10 Finding Information
Owner's Manual
Page 11
... of your operating system and language, and then 3.5-inch USB floppy drives, Intel® Pentium® M search for Dell™ 3 Select your Dell computer. support.dell.com NOTE: Select your Service Tag or product model. 2 Select Drivers & Downloads, and then click Go. DSS automatically...providing critical 1 Go to support.dell.com, select your business segment, and then enter your region or business segment to personalize my desktop Windows Help and Support 1 To access Windows Help and Support: • In Windows XP, click Start and click Help and Support. • In Windows ...
... of your operating system and language, and then 3.5-inch USB floppy drives, Intel® Pentium® M search for Dell™ 3 Select your Dell computer. support.dell.com NOTE: Select your Service Tag or product model. 2 Select Drivers & Downloads, and then click Go. DSS automatically...providing critical 1 Go to support.dell.com, select your business segment, and then enter your region or business segment to personalize my desktop Windows Help and Support 1 To access Windows Help and Support: • In Windows XP, click Start and click Help and Support. • In Windows ...

Owner's Manual
Page 16
... 4 card slots Insert the power cable. Back View 1 2 3 4 1 power connector 2 back panel LEDs (2) 3 back I /O Connectors" on the back of the computer. NOTE: Some connector slots support full-length cards. 16 Setting Up and Using Your Computer NOTE: The color of this connector may differ from what is pictured.
... 4 card slots Insert the power cable. Back View 1 2 3 4 1 power connector 2 back panel LEDs (2) 3 back I /O Connectors" on the back of the computer. NOTE: Some connector slots support full-length cards. 16 Setting Up and Using Your Computer NOTE: The color of this connector may differ from what is pictured.
Owner's Manual
Page 25
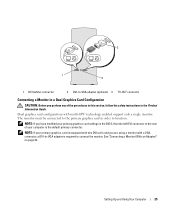
...-to-VGA adapter (optional) 3 TV-OUT connector Connecting a Monitor in a Dual Graphics Card Configuration CAUTION: Before you are using a monitor with multi-GPU technology enabled support only a single monitor.
...-to-VGA adapter (optional) 3 TV-OUT connector Connecting a Monitor in a Dual Graphics Card Configuration CAUTION: Before you are using a monitor with multi-GPU technology enabled support only a single monitor.
Owner's Manual
Page 27
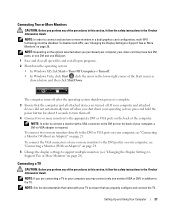
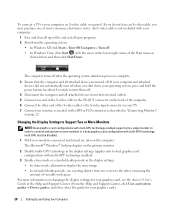
... procedures in this section, follow the safety instructions in the Product Information Guide. To connect the VGA connectors of one or more monitors directly to Support Two or More Monitors" on page 23. NOTE: If you are turned off . • In Windows Vista, click Start , click the arrow ... close all open files and exit all attached devices are connecting a TV to your computer, you shut down the operating system: • In Windows XP, click Start→ Turn Off Computer→ Turn off . Setting Up and Using Your Computer 27 NOTE: In order to connect a monitor with...
... procedures in this section, follow the safety instructions in the Product Information Guide. To connect the VGA connectors of one or more monitors directly to Support Two or More Monitors" on page 23. NOTE: If you are turned off . • In Windows Vista, click Start , click the arrow ... close all open files and exit all attached devices are connecting a TV to your computer, you shut down the operating system: • In Windows XP, click Start→ Turn Off Computer→ Turn off . Setting Up and Using Your Computer 27 NOTE: In order to connect a monitor with...
Owner's Manual
Page 28
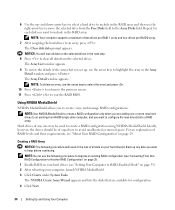
... mode in "Connecting Monitors" on the computer. If you do not have an S-video cable, you shut down the operating system: • In Windows XP, click Start→ Turn Off Computer→ Turn off. • In Windows Vista, click Start , click the arrow in the lower-right corner of...GPU technology, multi-GPU must be disabled. 1 With your computer, an S-video cable is required. For more monitors in the Help and Support Center. (From the Help and Support Center, click User and system guides→ Device guides, and then select the guide for your graphics card, see the device's User's...
... mode in "Connecting Monitors" on the computer. If you do not have an S-video cable, you shut down the operating system: • In Windows XP, click Start→ Turn Off Computer→ Turn off. • In Windows Vista, click Start , click the arrow in the lower-right corner of...GPU technology, multi-GPU must be disabled. 1 With your computer, an S-video cable is required. For more monitors in the Help and Support Center. (From the Help and Support Center, click User and system guides→ Device guides, and then select the guide for your graphics card, see the device's User's...

Owner's Manual
Page 29
... option to convert a RAID configuration without losing data, your hard drive must initially be the same size in the computer industry for instructions). Your computer supports RAID level 0, RAID level 1, RAID level 5 (customer-installed), or RAID level 0+1 (customer-installed). NOTE: RAID levels do not represent a hierarchy. RAID level 0 uses a storage technique...
... option to convert a RAID configuration without losing data, your hard drive must initially be the same size in the computer industry for instructions). Your computer supports RAID level 0, RAID level 1, RAID level 5 (customer-installed), or RAID level 0+1 (customer-installed). NOTE: RAID levels do not represent a hierarchy. RAID level 0 uses a storage technique...
Owner's Manual
Page 34
... screen. 11 Press to an array, press . Ideally, however, the drives should be used to highlight the array in the RAID array. NOTE: Your computer supports a maximum of any data you want to an existing (non-RAID) single-drive computer, and you are available for each disk you want to keep...
... screen. 11 Press to an array, press . Ideally, however, the drives should be used to highlight the array in the RAID array. NOTE: Your computer supports a maximum of any data you want to an existing (non-RAID) single-drive computer, and you are available for each disk you want to keep...

Owner's Manual
Page 35
... delete the RAID volume, your hard drive must initially be set up the RAID configuration, click Next, and then click Next again. NOTE: Your computer supports a maximum of the array that will become unbootable. 1 Launch NVIDIA MediaShield. 2 Click to convert a RAID configuration without losing data, your computer will make up as...
... delete the RAID volume, your hard drive must initially be set up the RAID configuration, click Next, and then click Next again. NOTE: Your computer supports a maximum of the array that will become unbootable. 1 Launch NVIDIA MediaShield. 2 Click to convert a RAID configuration without losing data, your computer will make up as...

Owner's Manual
Page 39
...you plan to erase, rewrite, or update information on your source disc and click the Copy Disc button to permanently store large amounts of supported media formats, see the Sonic documentation for more information). Use blank DVD+/-RW or BD-RE media if you have copyright protection and cannot ...be used to continue. BD-writable drives can only write to other DVDrecordable/rewritable media. The DVD drives and BD drives installed in Dell computers do not support HD-DVD media. NOTE: Copying a BD-R to BD-RE will be copied to CD recording media. The computer reads your source ...
...you plan to erase, rewrite, or update information on your source disc and click the Copy Disc button to permanently store large amounts of supported media formats, see the Sonic documentation for more information). Use blank DVD+/-RW or BD-RE media if you have copyright protection and cannot ...be used to continue. BD-writable drives can only write to other DVDrecordable/rewritable media. The DVD drives and BD drives installed in Dell computers do not support HD-DVD media. NOTE: Copying a BD-R to BD-RE will be copied to CD recording media. The computer reads your source ...

Owner's Manual
Page 41
... the documentation provided with your DVD player or contact the manufacturer. • Commercially available BD players used in home theater systems may not support all available BD formats. CD-RWs do not play in the Product Information Guide. You can be played only on MP3 players or on... the CD-RW and try again. The media card reader supports the following memory types: • xD-Picture card • SmartMedia card (SMC) • CompactFlash card Type I and II (CF I/II) • MicroDrive card...
... the documentation provided with your DVD player or contact the manufacturer. • Commercially available BD players used in home theater systems may not support all available BD formats. CD-RWs do not play in the Product Information Guide. You can be played only on MP3 players or on... the CD-RW and try again. The media card reader supports the following memory types: • xD-Picture card • SmartMedia card (SMC) • CompactFlash card Type I and II (CF I/II) • MicroDrive card...

Owner's Manual
Page 46
... • Minimal Power Management - If you want to use the hibernate settings as defined on the Power Schemes tab, click the Enable hibernate support check box on the Hibernate tab. If you want to change the default settings for a scheme, click the drop-down menu in the Windows... options icon in the Turn off monitor, Turn off the computer. For more information on power management options: 1 Click Start→ Help and Support→ Performance and maintenance. 2 In the Performance and maintenance window, click Conserving power on the keyboard or click the mouse. If you for ...
... • Minimal Power Management - If you want to use the hibernate settings as defined on the Power Schemes tab, click the Enable hibernate support check box on the Hibernate tab. If you want to change the default settings for a scheme, click the drop-down menu in the Windows... options icon in the Turn off monitor, Turn off the computer. For more information on power management options: 1 Click Start→ Help and Support→ Performance and maintenance. 2 In the Performance and maintenance window, click Conserving power on the keyboard or click the mouse. If you for ...

Owner's Manual
Page 49
... dual graphics card configurations, multiple GPUs dynamically share their workload to support.dell.com. For more information on accessing system setup, see "Performance" on your system components. NOTICE: Dell Technical Support will significantly increase graphics performance on page 169. Understanding CPU Overclocking NOTICE: Dell does not recommend operating the processor or other system components beyond...
... dual graphics card configurations, multiple GPUs dynamically share their workload to support.dell.com. For more information on accessing system setup, see "Performance" on your system components. NOTICE: Dell Technical Support will significantly increase graphics performance on page 169. Understanding CPU Overclocking NOTICE: Dell does not recommend operating the processor or other system components beyond...
Owner's Manual
Page 53
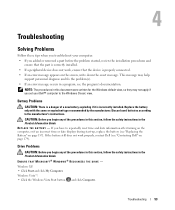
...procedures in this section, follow the safety instructions in this document were written for the Windows default view, so they may help support personnel diagnose and fix the problem(s). • If an error message occurs in the Product Information Guide. If you have ...the device is incorrectly installed. Windows Vista™: • Click the Windows Vista Start button and click Computer. Windows XP: • Click Start and click My Computer. Troubleshooting Solving Problems Follow these tips when you troubleshoot your Dell™ computer to the manufacturer's instructions.
...procedures in this section, follow the safety instructions in this document were written for the Windows default view, so they may help support personnel diagnose and fix the problem(s). • If an error message occurs in the Product Information Guide. If you have ...the device is incorrectly installed. Windows Vista™: • Click the Windows Vista Start button and click Computer. Windows XP: • Click Start and click My Computer. Troubleshooting Solving Problems Follow these tips when you troubleshoot your Dell™ computer to the manufacturer's instructions.

Owner's Manual
Page 54
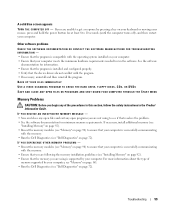
...ADJUST THE WINDOWS VOLUME CONTROL - • Click the speaker icon in Windows Help and Support for the keyword standby in the lower-right corner of your antivirus software to check for...Configuring Power Management Settings" on page 47 or search for information on power management modes. See "Dell Diagnostics" on page 176. If the drive is not listed, perform a full scan with your...sometimes prevent Windows from recognizing the drive. See "Cleaning Your Computer" on page 72. Windows XP: 1 Click Start and click My Computer. 2 Right-click Local Disk C:. 3 Click Properties→ Tools&#...
...ADJUST THE WINDOWS VOLUME CONTROL - • Click the speaker icon in Windows Help and Support for the keyword standby in the lower-right corner of your antivirus software to check for...Configuring Power Management Settings" on page 47 or search for information on power management modes. See "Dell Diagnostics" on page 176. If the drive is not listed, perform a full scan with your...sometimes prevent Windows from recognizing the drive. See "Cleaning Your Computer" on page 72. Windows XP: 1 Click Start and click My Computer. 2 Right-click Local Disk C:. 3 Click Properties→ Tools&#...

Owner's Manual
Page 57
... pins. Troubleshooting 57 In some cases, you want to the computer. ENSURE THAT THE IEEE 1394 DEVICE IS RECOGNIZED BY WINDOWS - Windows XP: 1 Click Start and click Control Panel. 2 Under Pick a Category, click Performance and Maintenance→ System→ System Properties →... A R D W A R E TR O U B L E S H O O T E R - Contact Dell (see "Contacting Dell" on page 179). ENSURE THAT THE CABLE FOR THE IEEE 1394 DEVICE IS PROPERLY INSERTED INTO THE DEVICE AND INTO THE ..., then try using the keyboard. NOTE: Your computer supports only IEEE 1394a standard. See "System Setup Options" ...
... pins. Troubleshooting 57 In some cases, you want to the computer. ENSURE THAT THE IEEE 1394 DEVICE IS RECOGNIZED BY WINDOWS - Windows XP: 1 Click Start and click Control Panel. 2 Under Pick a Category, click Performance and Maintenance→ System→ System Properties →... A R D W A R E TR O U B L E S H O O T E R - Contact Dell (see "Contacting Dell" on page 179). ENSURE THAT THE CABLE FOR THE IEEE 1394 DEVICE IS PROPERLY INSERTED INTO THE DEVICE AND INTO THE ..., then try using the keyboard. NOTE: Your computer supports only IEEE 1394a standard. See "System Setup Options" ...
Owner's Manual
Page 59
... reinstall the program. If necessary, install additional memory (see "Installing Memory" on page 92). • Reseat the memory modules (see "Dell Diagnostics" on page 90) to ensure that your computer is supported by your computer. A solid blue screen appears TU R N T H E C O M P U T E R O F F - IF YOU ...EXPERIENCE OTHER MEMORY PROBLEMS - • Reseat the memory modules (see "Dell Diagnostics" on page 90) to run the software. Other...
... reinstall the program. If necessary, install additional memory (see "Installing Memory" on page 92). • Reseat the memory modules (see "Dell Diagnostics" on page 90) to ensure that your computer is supported by your computer. A solid blue screen appears TU R N T H E C O M P U T E R O F F - IF YOU ...EXPERIENCE OTHER MEMORY PROBLEMS - • Reseat the memory modules (see "Dell Diagnostics" on page 90) to run the software. Other...
Owner's Manual
Page 63
..., follow the safety instructions in the Product Information Guide. For information about your computer came with the speakers. C H E C K T H E S P E A K E R C A B L E C O N N E C T I N D O W S V O L U M E C O N T R O L - E N S U R E T H A T T H E S U B W O O F E R A N D T H E S P E A K E R S A R E T U R N E D O N - NOTICE: If your graphics card, go to support.dell.com. Ensure that the sound is not muted. A D J U S T T H E W I O N S - Sound from speakers NOTE: The volume control in MP3 and other media players may override the Windows...
..., follow the safety instructions in the Product Information Guide. For information about your computer came with the speakers. C H E C K T H E S P E A K E R C A B L E C O N N E C T I N D O W S V O L U M E C O N T R O L - E N S U R E T H A T T H E S U B W O O F E R A N D T H E S P E A K E R S A R E T U R N E D O N - NOTICE: If your graphics card, go to support.dell.com. Ensure that the sound is not muted. A D J U S T T H E W I O N S - Sound from speakers NOTE: The volume control in MP3 and other media players may override the Windows...


