Owner's Manual
Page 18
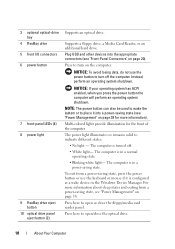
... light illuminates or remains solid to turn off . • White light- The computer is configured as a wake device in the Windows Device Manager. Multi-colored lights provide illumination for more information about sleep states and exiting from a power-saving state, press the power...optional optical-drive bay 4 FlexBay drive 5 front I/O connectors 6 power button 7 front-panel LEDs (4) 8 power light 9 FlexBay drive eject button 10 optical drive panel eject button (2) Supports an optical drive. Plug USB and other devices into a power-saving state (see "Power Management" on page 38....
... light illuminates or remains solid to turn off . • White light- The computer is configured as a wake device in the Windows Device Manager. Multi-colored lights provide illumination for more information about sleep states and exiting from a power-saving state, press the power...optional optical-drive bay 4 FlexBay drive 5 front I/O connectors 6 power button 7 front-panel LEDs (4) 8 power light 9 FlexBay drive eject button 10 optical drive panel eject button (2) Supports an optical drive. Plug USB and other devices into a power-saving state (see "Power Management" on page 38....
Owner's Manual
Page 71
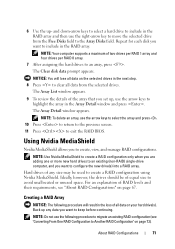
...appears. Using Nvidia MediaShield Nvidia MediaShield allows you set up - NOTE: Do not use the arrow keys to select the array and press . 10 Press to return to the previous screen. 11 Press to exit the RAID BIOS. Ideally, however, the drives should be used to avoid unallocated... RAID configuration (see "About RAID Configurations" on your hard drive(s). and down-arrow keys to select a hard drive to include in the Array Detail window and press . Hard drives of two drives per RAID 1 array and four drives per RAID 0 array. 7 After assigning the hard drives to configure...
...appears. Using Nvidia MediaShield Nvidia MediaShield allows you set up - NOTE: Do not use the arrow keys to select the array and press . 10 Press to return to the previous screen. 11 Press to exit the RAID BIOS. Ideally, however, the drives should be used to avoid unallocated... RAID configuration (see "About RAID Configurations" on your hard drive(s). and down-arrow keys to select a hard drive to include in the Array Detail window and press . Hard drives of two drives per RAID 1 array and four drives per RAID 0 array. 7 After assigning the hard drives to configure...
Owner's Manual
Page 72
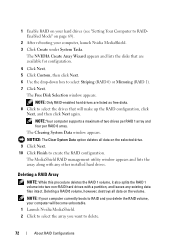
.... NOTICE: The Clear System Data option deletes all data on the volume. The Free Disk Selection window appears. The MediaShield RAID management utility window appears and lists the array along with a partition, and leaves any other installed hard drives. Deleting a RAID 0 ...volume, however, destroys all data on the selected drive. 9 Click Next. 10 Click Finish to RAIDEnabled Mode" on page 69). 2 After rebooting ...
.... NOTICE: The Clear System Data option deletes all data on the volume. The Free Disk Selection window appears. The MediaShield RAID management utility window appears and lists the array along with a partition, and leaves any other installed hard drives. Deleting a RAID 0 ...volume, however, destroys all data on the selected drive. 9 Click Next. 10 Click Finish to RAIDEnabled Mode" on page 69). 2 After rebooting ...
Owner's Manual
Page 86
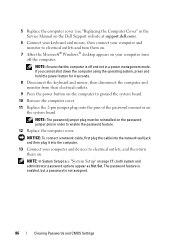
... it into the computer. 13 Connect your computer, turn them on. 7 After the Microsoft® Windows® desktop appears on your computer and devices to electrical outlets, and then turn off and not ...their electrical outlets. 9 Press the power button on the computer to ground the system board. 10 Remove the computer cover. 11 Replace the 2-pin jumper plug onto the pins of the password ...connector on the password jumper pins in the Service Manual on the Dell Support website at support.dell.com). 6 Connect your keyboard and mouse, then connect your computer and monitor to ...
... it into the computer. 13 Connect your computer, turn them on. 7 After the Microsoft® Windows® desktop appears on your computer and devices to electrical outlets, and then turn off and not ...their electrical outlets. 9 Press the power button on the computer to ground the system board. 10 Remove the computer cover. 11 Replace the 2-pin jumper plug onto the pins of the password ...connector on the password jumper pins in the Service Manual on the Dell Support website at support.dell.com). 6 Connect your keyboard and mouse, then connect your computer and monitor to ...

Owner's Manual
Page 106
... to select the program that it runs in the Product Information Guide. Windows XP: The Program Compatibility Wizard configures a program so that is designed for at least 8 to 10 seconds (until the computer turns off), and then restart your mouse, ...press and hold the power button for an earlier Windows operating system RUN THE PROGRAM COMPATIBILITY WIZARD - If necessary, uninstall and then reinstall the program. TU R N ...
... to select the program that it runs in the Product Information Guide. Windows XP: The Program Compatibility Wizard configures a program so that is designed for at least 8 to 10 seconds (until the computer turns off), and then restart your mouse, ...press and hold the power button for an earlier Windows operating system RUN THE PROGRAM COMPATIBILITY WIZARD - If necessary, uninstall and then reinstall the program. TU R N ...
Owner's Manual
Page 107
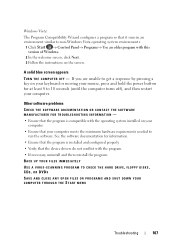
...8226; Verify that your computer. A solid blue screen appears TURN THE COMPUTER OFF - See the software documentation for at least 8 to 10 seconds (until the computer turns off), and then restart your computer meets the minimum hardware requirements needed to run the software. BACK UP ...→ Control Panel→ Programs→ Use an older program with the program. • If necessary, uninstall and then reinstall the program. Windows Vista: The Program Compatibility Wizard configures a program so that it runs in an environment similar to get a response by pressing a key on your ...
...8226; Verify that your computer. A solid blue screen appears TURN THE COMPUTER OFF - See the software documentation for at least 8 to 10 seconds (until the computer turns off), and then restart your computer meets the minimum hardware requirements needed to run the software. BACK UP ...→ Control Panel→ Programs→ Use an older program with the program. • If necessary, uninstall and then reinstall the program. Windows Vista: The Program Compatibility Wizard configures a program so that it runs in an environment similar to get a response by pressing a key on your ...

Owner's Manual
Page 125
... ones that you do not press in when you purchased your computer operating system to return your computer. Dell PC Restore enables you do not want to its original state. Windows XP: Dell PC Restore Using PC Restore: 1 Turn on . 6 Click Next. NOTE: Do not manually shut down... restarts, click OK. Reinstalling Software 125 The restore process takes approximately 6 to 10 minutes to complete. 4 When prompted, click Finish to gain additional hard-drive space. It is restored to proceed with www.dell.com appears at the top of the screen. 2 Immediately upon seeing the blue...
... ones that you do not press in when you purchased your computer operating system to return your computer. Dell PC Restore enables you do not want to its original state. Windows XP: Dell PC Restore Using PC Restore: 1 Turn on . 6 Click Next. NOTE: Do not manually shut down... restarts, click OK. Reinstalling Software 125 The restore process takes approximately 6 to 10 minutes to complete. 4 When prompted, click Finish to gain additional hard-drive space. It is restored to proceed with www.dell.com appears at the top of the screen. 2 Immediately upon seeing the blue...
Owner's Manual
Page 132
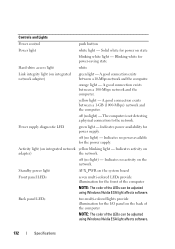
...Indicates no light) - off (no power available for the front of the computer NOTE: The color of the LEDs can be adjusted using Windows Nvidia ESA light affects software. off (no light) - off (no light) - Indicates no activity on integrated network yellow blinking light - ... for the power supply. Controls and Lights Power control push button Power light white light - A good connection exists between a 10-Mbps network and the computer. Back panel LEDs two multi-colored lights provide illumination for power supply. Solid white for power-saving...
...Indicates no light) - off (no power available for the front of the computer NOTE: The color of the LEDs can be adjusted using Windows Nvidia ESA light affects software. off (no light) - off (no light) - Indicates no activity on integrated network yellow blinking light - ... for the power supply. Controls and Lights Power control push button Power light white light - A good connection exists between a 10-Mbps network and the computer. Back panel LEDs two multi-colored lights provide illumination for power supply. Solid white for power-saving...
Service Manual
Page 9
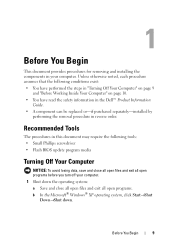
...; You have performed the steps in "Turning Off Your Computer" on page 9 and "Before Working Inside Your Computer" on page 10. • You have read the safety information in the Dell™ Product Information Guide. • A component can be replaced or-if purchased separately-installed by performing the removal procedure in your... media Turning Off Your Computer NOTICE: To avoid losing data, save and close all open files and exit all open programs. b In the Microsoft® Windows® XP operating system, click Start→Shut Down→Shut down. Before You Begin 9
...; You have performed the steps in "Turning Off Your Computer" on page 9 and "Before Working Inside Your Computer" on page 10. • You have read the safety information in the Dell™ Product Information Guide. • A component can be replaced or-if purchased separately-installed by performing the removal procedure in your... media Turning Off Your Computer NOTICE: To avoid losing data, save and close all open files and exit all open programs. b In the Microsoft® Windows® XP operating system, click Start→Shut Down→Shut down. Before You Begin 9

Service Manual
Page 10
...metal mounting bracket. NOTICE: Handle components and cards with locking tabs; Hold a card by its edges or by its pull-tab, not on page 9). 10 Before You Begin NOTICE: To avoid damaging the computer, perform the following safety guidelines to help to ensure your warranty. In the Microsoft...® operating system, click the Windows Vista Start button , click the arrow in the lower-right corner of cable, press in on the locking tabs before you begin working inside the computer. 1 Ensure that the work surface is not covered by Dell is flat and clean to prevent the computer ...
...metal mounting bracket. NOTICE: Handle components and cards with locking tabs; Hold a card by its edges or by its pull-tab, not on page 9). 10 Before You Begin NOTICE: To avoid damaging the computer, perform the following safety guidelines to help to ensure your warranty. In the Microsoft...® operating system, click the Windows Vista Start button , click the arrow in the lower-right corner of cable, press in on the locking tabs before you begin working inside the computer. 1 Ensure that the work surface is not covered by Dell is flat and clean to prevent the computer ...
Service Manual
Page 29
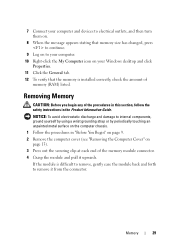
... turn them on. 8 When the message appears stating that memory size has changed, press to continue. 9 Log on to your computer. 10 Right-click the My Computer icon on your Windows desktop and click Properties. 11 Click the General tab. 12 To verify that the memory is difficult to remove, gently ease...
... turn them on. 8 When the message appears stating that memory size has changed, press to continue. 9 Log on to your computer. 10 Right-click the My Computer icon on your Windows desktop and click Properties. 11 Click the General tab. 12 To verify that the memory is difficult to remove, gently ease...


