Owner's Manual
Page 5
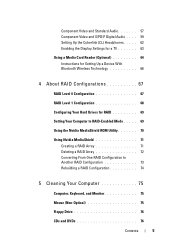
... Audio 57 Component Video and S/PDIF Digital Audio . . . . 59 Setting Up the Cyberlink (CL) Headphones. . . . . 62 Enabling the Display Settings for a TV 63 Using a Media Card Reader (Optional 64 Instructions for Setting Up a Device With Bluetooth Wireless Technology 66 4 About RAID Configurations 67 RAID Level 0 Configuration 67 RAID Level 1 Configuration 68 Configuring...
... Audio 57 Component Video and S/PDIF Digital Audio . . . . 59 Setting Up the Cyberlink (CL) Headphones. . . . . 62 Enabling the Display Settings for a TV 63 Using a Media Card Reader (Optional 64 Instructions for Setting Up a Device With Bluetooth Wireless Technology 66 4 About RAID Configurations 67 RAID Level 0 Configuration 67 RAID Level 1 Configuration 68 Configuring...
Owner's Manual
Page 18
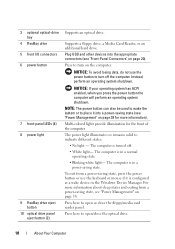
... of the computer. To exit from a power-saving state, see "Power Management" on page 20). Supports a floppy drive, a Media Card Reader, or an additional hard drive. Multi-colored lights provide illumination for more information about sleep states and exiting from a power-saving state, press... the power button or use the power button to open /close the floppy/media card reader panel. The computer is configured as a wake device in a power-saving state. 3 optional optical-drive bay 4 FlexBay drive 5 front I/O ...
... of the computer. To exit from a power-saving state, see "Power Management" on page 20). Supports a floppy drive, a Media Card Reader, or an additional hard drive. Multi-colored lights provide illumination for more information about sleep states and exiting from a power-saving state, press... the power button or use the power button to open /close the floppy/media card reader panel. The computer is configured as a wake device in a power-saving state. 3 optional optical-drive bay 4 FlexBay drive 5 front I/O ...
Owner's Manual
Page 64
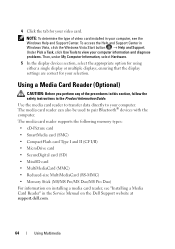
...Manual on the Dell Support website at support.dell.com. 64 Using Multimedia The media card reader supports the following memory types: • xD-Picture card • SmartMedia card (SMC) • CompactFlash card Type I and II (CF I/II) • MicroDrive card • SecureDigital card (SD) • MiniSD card • MultiMediaCard... MultiMediaCard (RS-MMC) • Memory Stick (MS/MS Pro/MS Duo/MS Pro Duo) For information on installing a media card reader, see the Windows Help and Support Center. Under Pick a Task, click Use Tools to view your computer information and diagnose problems...
...Manual on the Dell Support website at support.dell.com. 64 Using Multimedia The media card reader supports the following memory types: • xD-Picture card • SmartMedia card (SMC) • CompactFlash card Type I and II (CF I/II) • MicroDrive card • SecureDigital card (SD) • MiniSD card • MultiMediaCard... MultiMediaCard (RS-MMC) • Memory Stick (MS/MS Pro/MS Duo/MS Pro Duo) For information on installing a media card reader, see the Windows Help and Support Center. Under Pick a Task, click Use Tools to view your computer information and diagnose problems...
Owner's Manual
Page 66
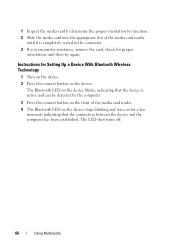
...has been established. Instructions for proper orientation, and then try again. 1 Inspect the media card to determine the proper orientation for insertion. 2 Slide the media card into the appropriate slot of the media card reader. 4 The Bluetooth LED on the device stops blinking and stays on for a few ... can be detected by the computer. 3 Press the connect button on the front of the media card reader until it is completely seated in the connector. 3 If you encounter resistance, remove the card, check for Setting Up a Device With Bluetooth Wireless Technology 1 Turn on the device. 2 Press...
...has been established. Instructions for proper orientation, and then try again. 1 Inspect the media card to determine the proper orientation for insertion. 2 Slide the media card into the appropriate slot of the media card reader. 4 The Bluetooth LED on the device stops blinking and stays on for a few ... can be detected by the computer. 3 Press the connect button on the front of the media card reader until it is completely seated in the connector. 3 If you encounter resistance, remove the card, check for Setting Up a Device With Bluetooth Wireless Technology 1 Turn on the device. 2 Press...

Owner's Manual
Page 164
diagnostics beep codes, 90 Dell, 95 documentation End User License Agreement, 12 ergonomics, 12 online, 14 Product Information Guide, 12 regulatory, 12 safety, 12 warranty, 12 Dolby headphones, setting up, ... codes, 90 problems, 103 F Factory Image Restore, 124, 126 Files and Settings Transfer Wizard, 29 Flex Bay drive Media Card Reader, 18 H hard drive problems, 103 hardware beep codes, 90 conflicts, 95, 121 Dell Diagnostics, 95 drives, RAID configuration, 67 Hardware Troubleshooter, 95, 121 hibernate mode, 39, 41-42 I IEEE 1394 problems, 104...
diagnostics beep codes, 90 Dell, 95 documentation End User License Agreement, 12 ergonomics, 12 online, 14 Product Information Guide, 12 regulatory, 12 safety, 12 warranty, 12 Dolby headphones, setting up, ... codes, 90 problems, 103 F Factory Image Restore, 124, 126 Files and Settings Transfer Wizard, 29 Flex Bay drive Media Card Reader, 18 H hard drive problems, 103 hardware beep codes, 90 conflicts, 95, 121 Dell Diagnostics, 95 drives, RAID configuration, 67 Hardware Troubleshooter, 95, 121 hibernate mode, 39, 41-42 I IEEE 1394 problems, 104...
Owner's Manual
Page 165
L labels Microsoft Windows, 13 Service Tag, 13 M media card reader using, 64 memory problems, 108 messages error, 103 monitor blank, 113 clone mode, 37 connect DVI, 35-36 connect TV, 35, 37 connect two, 35-...
L labels Microsoft Windows, 13 Service Tag, 13 M media card reader using, 64 memory problems, 108 messages error, 103 monitor blank, 113 clone mode, 37 connect DVI, 35-36 connect TV, 35, 37 connect two, 35-...
Service Manual
Page 5
Drive Panel 53 Removing the Drive Panel 53 Installing the Drive Panel 54 Floppy Drive 55 Removing a Floppy Drive 55 Installing a Floppy Drive 56 Media Card Reader 59 Removing a Media Card Reader 59 Installing a Media Card Reader 60 CD/DVD Drive 63 Removing a CD/DVD Drive 63 Installing a CD/DVD Drive 64 7 Fans 69 Removing the Card Fan 69 Installing the Card Fan 71 Removing the Hard Drive Fan 74 Installing the Hard Drive Fan 76 8 Processor Heatsink 79 Removing the Processor Heatsink 79 Installing the Processor Heatsink 80 Contents 5
Drive Panel 53 Removing the Drive Panel 53 Installing the Drive Panel 54 Floppy Drive 55 Removing a Floppy Drive 55 Installing a Floppy Drive 56 Media Card Reader 59 Removing a Media Card Reader 59 Installing a Media Card Reader 60 CD/DVD Drive 63 Removing a CD/DVD Drive 63 Installing a CD/DVD Drive 64 7 Fans 69 Removing the Card Fan 69 Installing the Card Fan 71 Removing the Hard Drive Fan 74 Installing the Hard Drive Fan 76 8 Processor Heatsink 79 Removing the Processor Heatsink 79 Installing the Processor Heatsink 80 Contents 5
Service Manual
Page 15
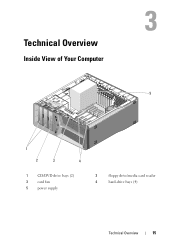
Technical Overview Inside View of Your Computer 5 1 2 3 4 1 CD/DVD drive bays (2) 3 card fan 5 power supply 2 floppy drive/media card reader 4 hard-drive bays (4) Technical Overview 15
Technical Overview Inside View of Your Computer 5 1 2 3 4 1 CD/DVD drive bays (2) 3 card fan 5 power supply 2 floppy drive/media card reader 4 hard-drive bays (4) Technical Overview 15

Service Manual
Page 45
Drives Your computer supports: • Four SATA devices (hard drives or optical drives) • One IDE device (one hard drive or one optical drive) • One floppy drive or one media card reader NOTICE: When removing and replacing drives, be sure to leave the drive data and power cables connected to the system board. NOTE: The 3.5-inch media card reader/floppy drive carrier is not interchangeable with the hard drive carrier. 1 2 1 CD/DVD drive bays (2) 3 hard-drive bays (4) 3 2 floppy drive/media card reader Drives 45
Drives Your computer supports: • Four SATA devices (hard drives or optical drives) • One IDE device (one hard drive or one optical drive) • One floppy drive or one media card reader NOTICE: When removing and replacing drives, be sure to leave the drive data and power cables connected to the system board. NOTE: The 3.5-inch media card reader/floppy drive carrier is not interchangeable with the hard drive carrier. 1 2 1 CD/DVD drive bays (2) 3 hard-drive bays (4) 3 2 floppy drive/media card reader Drives 45

Service Manual
Page 59
Media Card Reader CAUTION: Before you begin any of the media card reader. 1 1 media card reader cable Drives 59 Removing a Media Card Reader 1 Follow the procedures in "Before You Begin" on page 9. 2 Remove the computer cover (see "Removing the Computer Cover" on page 13). 3 Remove the drive panel (see "Removing the Drive Panel" on page 53). 4 Disconnect the media card reader cable from the back of the procedures in this section, follow the safety instructions in the Product Information Guide.
Media Card Reader CAUTION: Before you begin any of the media card reader. 1 1 media card reader cable Drives 59 Removing a Media Card Reader 1 Follow the procedures in "Before You Begin" on page 9. 2 Remove the computer cover (see "Removing the Computer Cover" on page 13). 3 Remove the drive panel (see "Removing the Drive Panel" on page 53). 4 Disconnect the media card reader cable from the back of the procedures in this section, follow the safety instructions in the Product Information Guide.

Service Manual
Page 60
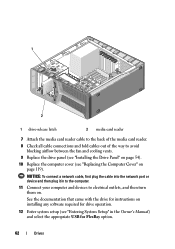
5 Slide the drive-release latch towards the base of the computer to electrical outlets, and then turn them on. Installing a Media Card Reader 1 Follow the procedures in "Before You Begin" on page 9. 2 Remove the computer cover (see "Replacing the Computer Cover" on page 13). 60... plug it into the computer. 8 Connect your computer and devices to release the shoulder screw, and then slide the media card reader out of the drive bay. 1 2 1 drive-release latch 2 media card reader 6 Replace the drive panel (see "Installing the Drive Panel" on page 54). 7 Replace the computer cover (see "...
5 Slide the drive-release latch towards the base of the computer to electrical outlets, and then turn them on. Installing a Media Card Reader 1 Follow the procedures in "Before You Begin" on page 9. 2 Remove the computer cover (see "Replacing the Computer Cover" on page 13). 60... plug it into the computer. 8 Connect your computer and devices to release the shoulder screw, and then slide the media card reader out of the drive bay. 1 2 1 drive-release latch 2 media card reader 6 Replace the drive panel (see "Installing the Drive Panel" on page 54). 7 Replace the computer cover (see "...

Service Manual
Page 61
Drives 61 3 Remove the drive panel (see "Removing the Drive Panel" on page 53). 4 Remove the existing media card reader, if applicable (see "Removing a Media Card Reader" on page 59). 5 If no screws are present, attach the screws to the media card reader, check the inside of the drive panel for shoulder screws. If screws are attached to the new card reader. 1 2 1 media card reader 2 shoulder screws (4) 6 Slide the media card reader into the drive bay until it clicks into place.
Drives 61 3 Remove the drive panel (see "Removing the Drive Panel" on page 53). 4 Remove the existing media card reader, if applicable (see "Removing a Media Card Reader" on page 59). 5 If no screws are present, attach the screws to the media card reader, check the inside of the drive panel for shoulder screws. If screws are attached to the new card reader. 1 2 1 media card reader 2 shoulder screws (4) 6 Slide the media card reader into the drive bay until it clicks into place.
Service Manual
Page 62
... came with the drive for instructions on installing any software required for FlexBay option. 62 Drives 1 2 1 drive-release latch 2 media card reader 7 Attach the media card reader cable to the back of the media card reader. 8 Check all cable connections and fold cables out of the way to avoid blocking airflow between the fan and cooling...
... came with the drive for instructions on installing any software required for FlexBay option. 62 Drives 1 2 1 drive-release latch 2 media card reader 7 Attach the media card reader cable to the back of the media card reader. 8 Check all cable connections and fold cables out of the way to avoid blocking airflow between the fan and cooling...
Service Manual
Page 102
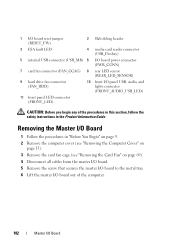
1 I/O board reset jumper (RESET_FW) 2 Slab debug header 3 ESA fault LED 4 media card reader connector (USB_Flexbay) 5 internal USB connector (USB_MB) 6 I/O board power connector (PWR_CONN) 7 card fan connector (FAN_CCAG) 8 rear LED sensor (REAR_LED_SENSOR) 9 hard drive fan connector (FAN_HDD) 10 front I/O panel USB, audio, ... You Begin" on page 9. 2 Remove the computer cover (see "Removing the Computer Cover" on page 13). 3 Remove the card fan cage (see "Removing the Card Fan" on page 69). 4 Disconnect all cables from the master I/O board. 5 Remove the screw that secures the master I/O ...
1 I/O board reset jumper (RESET_FW) 2 Slab debug header 3 ESA fault LED 4 media card reader connector (USB_Flexbay) 5 internal USB connector (USB_MB) 6 I/O board power connector (PWR_CONN) 7 card fan connector (FAN_CCAG) 8 rear LED sensor (REAR_LED_SENSOR) 9 hard drive fan connector (FAN_HDD) 10 front I/O panel USB, audio, ... You Begin" on page 9. 2 Remove the computer cover (see "Removing the Computer Cover" on page 13). 3 Remove the card fan cage (see "Removing the Card Fan" on page 69). 4 Disconnect all cables from the master I/O board. 5 Remove the screw that secures the master I/O ...


