Owners Manual
Page 6
... Disconnecting Drive Cables 76 Hard Drive 76 Removing a Hard Drive 76 Installing a Hard Drive 78 CD/DVD Drive 81 Removing a CD/DVD Drive 81 Installing a CD/DVD Drive 83 Media Card Reader 85 Removing a Media Card Reader 85 Installing a Media Card Reader 87 Floppy Drive (Optional 89 Removing a Floppy Drive 89 Installing a Floppy Drive 91 Modem 93 Replacing the Modem 93 Battery 94 Replacing the...
... Disconnecting Drive Cables 76 Hard Drive 76 Removing a Hard Drive 76 Installing a Hard Drive 78 CD/DVD Drive 81 Removing a CD/DVD Drive 81 Installing a CD/DVD Drive 83 Media Card Reader 85 Removing a Media Card Reader 85 Installing a Media Card Reader 87 Floppy Drive (Optional 89 Removing a Floppy Drive 89 Installing a Floppy Drive 91 Modem 93 Replacing the Modem 93 Battery 94 Replacing the...

Owners Manual
Page 74
... brackets also keep dust and dirt out of its top corners, and then ease it out of your computer. 5 Replace the computer cover (see "Replacing the Computer Cover" on page 96), reconnect the computer and devices to electrical outlets, and then turn them on. ... devices: • One SATA (serial ATA) drive • One FlexBay drive (optional floppy drive or Media Card Reader) • One CD or DVD drive 2 3 1 1 FlexBay for optional floppy drive or Media Card Reader (under CD/DVD drive) 2 CD/DVD drive 3 hard drive Connect a SATA optical drive to the connector labeled "SATA0 (blue connector)" ...
... brackets also keep dust and dirt out of its top corners, and then ease it out of your computer. 5 Replace the computer cover (see "Replacing the Computer Cover" on page 96), reconnect the computer and devices to electrical outlets, and then turn them on. ... devices: • One SATA (serial ATA) drive • One FlexBay drive (optional floppy drive or Media Card Reader) • One CD or DVD drive 2 3 1 1 FlexBay for optional floppy drive or Media Card Reader (under CD/DVD drive) 2 CD/DVD drive 3 hard drive Connect a SATA optical drive to the connector labeled "SATA0 (blue connector)" ...

Owners Manual
Page 84
4 Gently position the drive until it clicks into place. 2 1 1 CD/DVD drive 2 CD/DVD drive bracket 5 Check all cable connections, and fold cables out of the way to provide airflow for the fan and cooling vents. 6 Replace the computer cover (see "Replacing the Computer Cover" on page 96). 7 ...that came with the drive for instructions on installing any software required for drive operation. 9 Enter system setup (see "System Setup" on page 101) and select the appropriate Drive option. 10 Verify that your computer works correctly by running the Dell Diagnostics (see "Dell Diagnostics" on page ...
4 Gently position the drive until it clicks into place. 2 1 1 CD/DVD drive 2 CD/DVD drive bracket 5 Check all cable connections, and fold cables out of the way to provide airflow for the fan and cooling vents. 6 Replace the computer cover (see "Replacing the Computer Cover" on page 96). 7 ...that came with the drive for instructions on installing any software required for drive operation. 9 Enter system setup (see "System Setup" on page 101) and select the appropriate Drive option. 10 Verify that your computer works correctly by running the Dell Diagnostics (see "Dell Diagnostics" on page ...
Owners Manual
Page 88
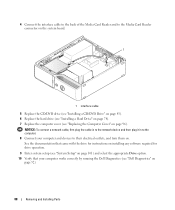
... computer and devices to the Media Card Reader connector on the system board. 1 1 interface cable 5 Replace the CD/DVD drive (see "Installing a CD/DVD Drive" on page 83). 6 Replace the hard drive (see "Installing a Hard Drive" on page 78). 7 Replace the computer cover (see "Dell Diagnostics" on page 52). 88 Removing and Installing Parts 4 Connect the interface cable to the...
... computer and devices to the Media Card Reader connector on the system board. 1 1 interface cable 5 Replace the CD/DVD drive (see "Installing a CD/DVD Drive" on page 83). 6 Replace the hard drive (see "Installing a Hard Drive" on page 78). 7 Replace the computer cover (see "Dell Diagnostics" on page 52). 88 Removing and Installing Parts 4 Connect the interface cable to the...

Owners Manual
Page 92
...Dell Diagnostics (see "Dell Diagnostics" on page 52). 92 Removing and Installing Parts NOTICE: To connect a network cable, first plug the cable in to the network device and then plug it in to the computer. 7 Connect your computer and devices to provide airflow for drive ...101) and select the appropriate Diskette Drive option. 9 Verify that came with the drive for instructions on installing any software required for the fan and cooling vents. 5 Replace the CD/DVD drive (see "Installing a CD/DVD Drive" on page 83). 6 Replace the computer cover (see "Replacing the Computer Cover" on page 96)....
...Dell Diagnostics (see "Dell Diagnostics" on page 52). 92 Removing and Installing Parts NOTICE: To connect a network cable, first plug the cable in to the network device and then plug it in to the computer. 7 Connect your computer and devices to provide airflow for drive ...101) and select the appropriate Diskette Drive option. 9 Verify that came with the drive for instructions on installing any software required for the fan and cooling vents. 5 Replace the CD/DVD drive (see "Installing a CD/DVD Drive" on page 83). 6 Replace the computer cover (see "Replacing the Computer Cover" on page 96)....

Owners Manual
Page 110
... edge. • To clean your monitor screen, lightly dampen a soft, clean cloth with the compressed air. Never touch the lens in the CD/DVD drive, and follow the instructions that come with water. You can also touch the inside edge of water and mild soap. Only) Technician-assisted technical... if they are safe to clean the lens in the drive. You can also purchase commercial products that fluff from Dell, as well as shipped from the swab is available at support.dell.com. If possible, use on the rollers. 6 Replace the ball and retainer ring, and then turn the retainer...
... edge. • To clean your monitor screen, lightly dampen a soft, clean cloth with the compressed air. Never touch the lens in the CD/DVD drive, and follow the instructions that come with water. You can also touch the inside edge of water and mild soap. Only) Technician-assisted technical... if they are safe to clean the lens in the drive. You can also purchase commercial products that fluff from Dell, as well as shipped from the swab is available at support.dell.com. If possible, use on the rollers. 6 Replace the ball and retainer ring, and then turn the retainer...

Owners Manual
Page 133
... opening, 62 D Dell contacting, 111-112 Dell Diagnostics, 52 support policy, 110 Dell support site, 11 diagnostic lights, 49 diagnostics Dell, 52 lights, 49 display. Index A audio. See monitor documentation End User License Agreement, 9 ergonomics, 9 online, 11 Product Information Guide, 9 regulatory, 9 safety, 9 warranty, 9 drivers about, 54 identifying, 54 Drivers and Utilities CD, 9 drives hard drive, 76 installing...
... opening, 62 D Dell contacting, 111-112 Dell Diagnostics, 52 support policy, 110 Dell support site, 11 diagnostic lights, 49 diagnostics Dell, 52 lights, 49 display. Index A audio. See monitor documentation End User License Agreement, 9 ergonomics, 9 online, 11 Product Information Guide, 9 regulatory, 9 safety, 9 warranty, 9 drivers about, 54 identifying, 54 Drivers and Utilities CD, 9 drives hard drive, 76 installing...


