Owners Manual
Page 11
... order status, and warranty and repair information • Service and support - updates for your operating system and support for components, such as the memory, hard drive, and operating system • Customer Care - Upgrade information for Dell™ 2 Select Drivers & Downloads, then click Go. 3.5-inch USB floppy drives, Intel® processors, optical 3 Select your selections. • How to use Windows XP • How to work with programs and files • How to view...
... order status, and warranty and repair information • Service and support - updates for your operating system and support for components, such as the memory, hard drive, and operating system • Customer Care - Upgrade information for Dell™ 2 Select Drivers & Downloads, then click Go. 3.5-inch USB floppy drives, Intel® processors, optical 3 Select your selections. • How to use Windows XP • How to work with programs and files • How to view...
Owners Manual
Page 14
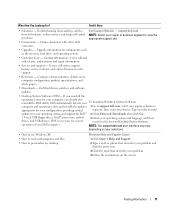
... to access the front-panel connectors. The computer is operating. Press this button to turn off . • Steady green - The hard drive activity light is on page 43. See "Power Problems" on the card. The light might also be on when a device such as joysticks or cameras (see "Diagnostic Lights" on when the computer reads data from the drive. This panel covers the CD/DVD drive, the Media Card Reader, and the optional floppy drive. 14 Setting...
... to access the front-panel connectors. The computer is operating. Press this button to turn off . • Steady green - The hard drive activity light is on page 43. See "Power Problems" on the card. The light might also be on when a device such as joysticks or cameras (see "Diagnostic Lights" on when the computer reads data from the drive. This panel covers the CD/DVD drive, the Media Card Reader, and the optional floppy drive. 14 Setting...
Owners Manual
Page 16
... device, connect one end of your network. Connect the other end of the network cable to the network adapter connector on the back panel of a network cable to either a network jack or your computer to ensure reliable operation. On computers with a sound card, use Category 3 wiring, force the network speed to 10 Mbps to the Internet. It is recommended that the network cable has been securely attached. A high volume of network traffic may make this light...
... device, connect one end of your network. Connect the other end of the network cable to the network adapter connector on the back panel of a network cable to either a network jack or your computer to ensure reliable operation. On computers with a sound card, use Category 3 wiring, force the network speed to 10 Mbps to the Internet. It is recommended that the network cable has been securely attached. A high volume of network traffic may make this light...

Owners Manual
Page 17
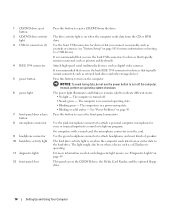
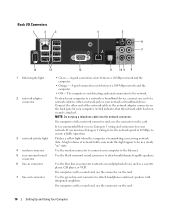
.... The LFE channel drives a subwoofer to attach multichannel-capable speakers. Setting Up a Printer NOTICE: Complete the operating system setup before you use the front USB connectors for technical assistance. Setting Up and Using Your Computer 17 8 microphone 9 side surround sound connector 10 center/LFE connector 11 S/PDIF connector 12 VGA connector 13 USB 2.0 connectors (6) 14 IEEE 1394 connector Use the pink connector to attach a personal computer microphone for devices that typically remain connected, such as...
.... The LFE channel drives a subwoofer to attach multichannel-capable speakers. Setting Up a Printer NOTICE: Complete the operating system setup before you use the front USB connectors for technical assistance. Setting Up and Using Your Computer 17 8 microphone 9 side surround sound connector 10 center/LFE connector 11 S/PDIF connector 12 VGA connector 13 USB 2.0 connectors (6) 14 IEEE 1394 connector Use the pink connector to attach a personal computer microphone for devices that typically remain connected, such as...
Owners Manual
Page 18
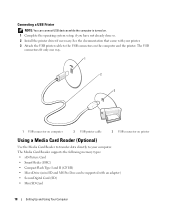
.... 3 Attach the USB printer cable to the USB connectors on . 1 Complete the operating system setup, if you have not already done so. 2 Install the printer driver if necessary. The Media Card Reader supports the following memory types: • xD-Picture Card • SmartMedia (SMC) • CompactFlash Type I and II (CF I/II) • MicroDrive (mini SD and MS Pro Duo can connect USB devices while the computer is turned on the...
.... 3 Attach the USB printer cable to the USB connectors on . 1 Complete the operating system setup, if you have not already done so. 2 Install the printer driver if necessary. The Media Card Reader supports the following memory types: • xD-Picture Card • SmartMedia (SMC) • CompactFlash Type I and II (CF I/II) • MicroDrive (mini SD and MS Pro Duo can connect USB devices while the computer is turned on the...
Owners Manual
Page 20
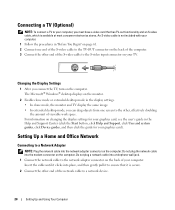
... Support Center (click the Start button, click Help and Support, click User and system guides, click Device guides, and then click the guide for your graphics card, see the user's guide in "Before You Begin" on page 61. 2 Connect one screen to the other, effectively doubling the amount of viewable work space. Do not plug a network cable into a telephone wall jack. 1 Connect the network cable to the network adapter connector on changing the display settings for your graphics card). Insert the cable...
... Support Center (click the Start button, click Help and Support, click User and system guides, click Device guides, and then click the guide for your graphics card, see the user's guide in "Before You Begin" on page 61. 2 Connect one screen to the other, effectively doubling the amount of viewable work space. Do not plug a network cable into a telephone wall jack. 1 Connect the network cable to the network adapter connector on changing the display settings for your graphics card). Insert the cable...
Owners Manual
Page 25
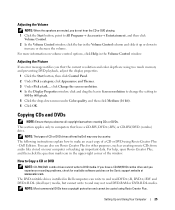
... DVD-RAM or DVD-R DL media. For help, open Roxio Creator Plus, and then click the question mark icon in the upper-right corner of a CD or DVD using too much memory and preventing DVD playback, adjust the display properties. 1 Click the Start button, then click Control Panel. 2 Under Pick a category, click Appearance and Themes. 3 Under Pick a task..., click Change the screen resolution. 4 In the Display Properties window...
... DVD-RAM or DVD-R DL media. For help, open Roxio Creator Plus, and then click the question mark icon in the upper-right corner of a CD or DVD using too much memory and preventing DVD playback, adjust the display properties. 1 Click the Start button, then click Control Panel. 2 Under Pick a category, click Appearance and Themes. 3 Under Pick a task..., click Change the screen resolution. 4 In the Display Properties window...
Owners Manual
Page 42
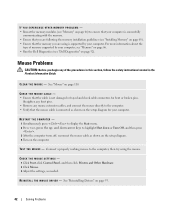
... keys to display the Start menu. 2 Press , press the up- TE S T T H E M O U S E - R E I N S T A L L T H E M O U S E D R I V E R - Straighten any bent pins. • Remove any of memory supported by your computer, see "Memory" on page 66. • Run the Dell Diagnostics (see "Installing Memory" on the setup diagram for bent or broken pins. Connect a properly working mouse to the computer, then try using is supported by your computer. CHECK THE MOUSE SETTINGS - 1 Click Start, click Control Panel, and then click Printers and Other Hardware. 2 Click Mouse...
... keys to display the Start menu. 2 Press , press the up- TE S T T H E M O U S E - R E I N S T A L L T H E M O U S E D R I V E R - Straighten any bent pins. • Remove any of memory supported by your computer, see "Memory" on page 66. • Run the Dell Diagnostics (see "Installing Memory" on the setup diagram for bent or broken pins. Connect a properly working mouse to the computer, then try using is supported by your computer. CHECK THE MOUSE SETTINGS - 1 Click Start, click Control Panel, and then click Printers and Other Hardware. 2 Click Mouse...

Owners Manual
Page 54
... further installation or configuration is a program that use the device. Identifying Drivers If you : • Upgrade your operating system. • Reinstall your problem and, if necessary, update the driver. If an exclamation point appears next to the device name, you may need to the device name. Drivers What Is a Driver? Many drivers, such as a printer, mouse, or keyboard. Windows XP 1 Click the Start button, then click Control Panel. 2 Under Pick a Category, click Performance and Maintenance...
... further installation or configuration is a program that use the device. Identifying Drivers If you : • Upgrade your operating system. • Reinstall your problem and, if necessary, update the driver. If an exclamation point appears next to the device name, you may need to the device name. Drivers What Is a Driver? Many drivers, such as a printer, mouse, or keyboard. Windows XP 1 Click the Start button, then click Control Panel. 2 Under Pick a Category, click Performance and Maintenance...
Owners Manual
Page 55
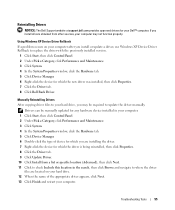
... install or update a driver, use Windows XP Device Driver Rollback to replace the driver with the previously installed version. 1 Click Start, then click Control Panel. 2 Under Pick a Category, click Performance and Maintenance. 3 Click System. 4 In the System Properties window, click the Hardware tab. 5 Click Device Manager. 6 Right-click the device for which the new driver was installed, then click Properties. 7 Click the Driver tab. 8 Click Roll Back Driver. Troubleshooting Tools 55 Using Windows XP Device Driver Rollback If a problem occurs on your hard drive...
... install or update a driver, use Windows XP Device Driver Rollback to replace the driver with the previously installed version. 1 Click Start, then click Control Panel. 2 Under Pick a Category, click Performance and Maintenance. 3 Click System. 4 In the System Properties window, click the Hardware tab. 5 Click Device Manager. 6 Right-click the device for which the new driver was installed, then click Properties. 7 Click the Driver tab. 8 Click Roll Back Driver. Troubleshooting Tools 55 Using Windows XP Device Driver Rollback If a problem occurs on your hard drive...
Owners Manual
Page 56
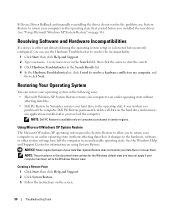
... the Hardware Troubleshooter list, click I need to resolve a hardware conflict on computers purchased in an undesirable operating state. Resolving Software and Hardware Incompatibilities If a device is either not detected during the operating system setup or is available only on my computer, and then click Next. NOTE: Dell PC Restore is detected but incorrectly configured, you installed the new driver (see "Using Microsoft Windows XP System Restore" on the screen. 56 Troubleshooting Tools System Restore...
... the Hardware Troubleshooter list, click I need to resolve a hardware conflict on computers purchased in an undesirable operating state. Resolving Software and Hardware Incompatibilities If a device is either not detected during the operating system setup or is available only on my computer, and then click Next. NOTE: Dell PC Restore is detected but incorrectly configured, you installed the new driver (see "Using Microsoft Windows XP System Restore" on the screen. 56 Troubleshooting Tools System Restore...

Owners Manual
Page 62
..., and then press the power button to servicing that is not authorized by Dell is not covered by your computer from the computer. 62 Removing and Installing Parts Before you begin working inside your computer from potential damage and to avoid bending any of cable, press in the Product Information Guide. 1 Shut down the computer through the Start menu (see "Turning Off Your Computer" on...
..., and then press the power button to servicing that is not authorized by Dell is not covered by your computer from the computer. 62 Removing and Installing Parts Before you begin working inside your computer from potential damage and to avoid bending any of cable, press in the Product Information Guide. 1 Shut down the computer through the Start menu (see "Turning Off Your Computer" on...

Owners Manual
Page 92
... the drive for instructions on installing any software required for the fan and cooling vents. 5 Replace the CD/DVD drive (see "Installing a CD/DVD Drive" on page 83). 6 Replace the computer cover (see "Dell Diagnostics" on page 96). See the documentation that your computer and devices to the computer. 7 Connect your computer works correctly by running the Dell Diagnostics (see "Replacing the Computer Cover" on page 52). 92 Removing and Installing Parts NOTICE: To connect a network cable, first plug the cable...
... the drive for instructions on installing any software required for the fan and cooling vents. 5 Replace the CD/DVD drive (see "Installing a CD/DVD Drive" on page 83). 6 Replace the computer cover (see "Dell Diagnostics" on page 96). See the documentation that your computer and devices to the computer. 7 Connect your computer works correctly by running the Dell Diagnostics (see "Replacing the Computer Cover" on page 52). 92 Removing and Installing Parts NOTICE: To connect a network cable, first plug the cable...

Owners Manual
Page 95
... up at a slight angle. a Press the battery release lever to electrical outlets, and turn them on. 9 Enter system setup (see "System Board Components" on page 65). 3 Remove the computer cover (see "Removing the Computer Cover" on page 62). 4 Locate the battery socket (see "System Setup" on page 101) and restore the settings you recorded in step 1. 10 Properly dispose of the old battery. Removing and Installing Parts 95
... up at a slight angle. a Press the battery release lever to electrical outlets, and turn them on. 9 Enter system setup (see "System Board Components" on page 65). 3 Remove the computer cover (see "Removing the Computer Cover" on page 62). 4 Locate the battery socket (see "System Setup" on page 101) and restore the settings you recorded in step 1. 10 Properly dispose of the old battery. Removing and Installing Parts 95
Owners Manual
Page 99
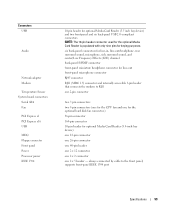
... connected by cable to RJ11 one 2-pin connector two 7-pin connectors two 5-pin connectors (one for the CPU fan and one 2 x 5 header - supports front-panel IEEE 1394 port Specifications 99 Connectors USB Audio Network adapter Modem Temperature Sensor System board connectors: Serial ATA Fan PCI Express x1 PCI Express x16 USB MDC Floppy connector Front panel Power Processor power IEEE 1394 10-pin header for optional Media Card Reader (3.5 inch bay device) and two front-panel and six back-panel USB 2.0-compliant connectors NOTE: The 10-pin header connector used for the optional Media Card...
... connected by cable to RJ11 one 2-pin connector two 7-pin connectors two 5-pin connectors (one for the CPU fan and one 2 x 5 header - supports front-panel IEEE 1394 port Specifications 99 Connectors USB Audio Network adapter Modem Temperature Sensor System board connectors: Serial ATA Fan PCI Express x1 PCI Express x16 USB MDC Floppy connector Front panel Power Processor power IEEE 1394 10-pin header for optional Media Card Reader (3.5 inch bay device) and two front-panel and six back-panel USB 2.0-compliant connectors NOTE: The 10-pin header connector used for the optional Media Card...

Owners Manual
Page 104
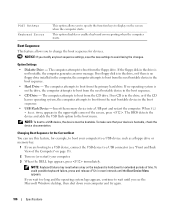
... setup options. This setting specifies which video controller is enabled for specific applications in the set of system memory for any supported processor in the computer. • Bypass - Your computer does not test or change the current acoustics mode setting. • Quiet (default) - The hard drive operates at its maximum speed. NOTE: Switching to performance mode may enable DEP protection through creating an application compatibility shim and installing that USB devices will be enabled for an integrated video controller...
... setup options. This setting specifies which video controller is enabled for specific applications in the set of system memory for any supported processor in the computer. • Bypass - Your computer does not test or change the current acoustics mode setting. • Quiet (default) - The hard drive operates at its maximum speed. NOTE: Switching to performance mode may enable DEP protection through creating an application compatibility shim and installing that USB devices will be enabled for an integrated video controller...
Owners Manual
Page 106
... drive or memory key. 1 If you are booting to a USB device, connect the USB device to a USB connector (see the Microsoft Windows desktop, then shut down for extended periods of time. If the floppy disk in the boot sequence. • USB Flash Device - The BIOS detects the device and adds the USB flash option to a USB device, the device must be bootable. Changing Boot Sequence for the Current Boot You can use this feature, for devices. This option disables or enables keyboard error reporting when the computer starts...
... drive or memory key. 1 If you are booting to a USB device, connect the USB device to a USB connector (see the Microsoft Windows desktop, then shut down for extended periods of time. If the floppy disk in the boot sequence. • USB Flash Device - The BIOS detects the device and adds the USB flash option to a USB device, the device must be bootable. Changing Boot Sequence for the Current Boot You can use this feature, for devices. This option disables or enables keyboard error reporting when the computer starts...

Owners Manual
Page 108
...). 7 Turn off the monitor and disconnect it from the electrical outlet. 8 Disconnect the computer power cable from the electrical outlet, and press the power button to ground the system board. 9 Remove the computer cover (see "Replacing the Computer Cover" on page 96). 10 Locate the 2-pin password jumper (CLRPSWD) on the system board (see "Replacing the Computer Cover" on . 108 Specifications The real-time clock is being reset (jumpered temporarily). Jumper CLRPSWD Setting...
...). 7 Turn off the monitor and disconnect it from the electrical outlet. 8 Disconnect the computer power cable from the electrical outlet, and press the power button to ground the system board. 9 Remove the computer cover (see "Replacing the Computer Cover" on page 96). 10 Locate the 2-pin password jumper (CLRPSWD) on the system board (see "Replacing the Computer Cover" on . 108 Specifications The real-time clock is being reset (jumpered temporarily). Jumper CLRPSWD Setting...

Owners Manual
Page 134
...47 motherboard. End User License Agreement, 9 ergonomics information, 9 error messages diagnostic lights, 49 F floppy drive installing, 91 removing, 89 H hard drive installing, 78 problems, 35 removing, 76 hardware Dell Diagnostics, 52 Hardware Troubleshooter, 56 Help and Support Center, 11 help file Windows Help and Support Center, 11 hibernate mode, 28, 30 Hyper-Threading, 31 I IEEE 1394 problems, 38 installing parts before you begin, 61 recommended tools, 61 turning off your computer, 61 Internet connection, about, 22 connection, options, 22 connection, setting up , 20 Network Setup Wizard...
...47 motherboard. End User License Agreement, 9 ergonomics information, 9 error messages diagnostic lights, 49 F floppy drive installing, 91 removing, 89 H hard drive installing, 78 problems, 35 removing, 76 hardware Dell Diagnostics, 52 Hardware Troubleshooter, 56 Help and Support Center, 11 help file Windows Help and Support Center, 11 hibernate mode, 28, 30 Hyper-Threading, 31 I IEEE 1394 problems, 38 installing parts before you begin, 61 recommended tools, 61 turning off your computer, 61 Internet connection, about, 22 connection, options, 22 connection, setting up , 20 Network Setup Wizard...
Owners Manual
Page 135
...) setting up, 17 USB, 18 problems battery, 33 blue screen, 40 CD drive, 34 CD/DVD-RW drive, 35 computer crashes, 39-40 computer stops responding, 39 Dell Diagnostics, 52 diagnostic lights, 49 drives, 34 DVD drive, 34 e-mail, 35 error messages, 37 general, 39 hard drive, 35 IEEE 1394, 38 Internet, 35 keyboard, 39 media card reader, 38 memory, 41 modem, 35 monitor is blank, 47 monitor is hard to read, 48 mouse, 42 network, 43 power, 43 power light conditions...
...) setting up, 17 USB, 18 problems battery, 33 blue screen, 40 CD drive, 34 CD/DVD-RW drive, 35 computer crashes, 39-40 computer stops responding, 39 Dell Diagnostics, 52 diagnostic lights, 49 drives, 34 DVD drive, 34 e-mail, 35 error messages, 37 general, 39 hard drive, 35 IEEE 1394, 38 Internet, 35 keyboard, 39 media card reader, 38 memory, 41 modem, 35 monitor is blank, 47 monitor is hard to read, 48 mouse, 42 network, 43 power, 43 power light conditions...


