

Dell Vostro 3252 Owners Manual
Page 3
......9 Installing the Coin-Cell Battery...9 Removing the Hard-Drive Assembly...9 Installing the Hard-Drive Assembly...11 Removing the Optical Drive...11 Installing the Optical Drive...13 Removing the Heatsink Assembly...13 Installing the Heatsink Assembly...14 System Board Layout...15 Removing the System Board...16 Installing the System Board...17 3 Troubleshooting Your Computer 19 Diagnostic Power LED Codes...19 Diagnostic Error Messages...20 System Error Messages...24 4 System Setup Overview 25 Accessing System Setup...25 System Setup Options...25 5 Specifications...29 6 Contacting Dell 32...
......9 Installing the Coin-Cell Battery...9 Removing the Hard-Drive Assembly...9 Installing the Hard-Drive Assembly...11 Removing the Optical Drive...11 Installing the Optical Drive...13 Removing the Heatsink Assembly...13 Installing the Heatsink Assembly...14 System Board Layout...15 Removing the System Board...16 Installing the System Board...17 3 Troubleshooting Your Computer 19 Diagnostic Power LED Codes...19 Diagnostic Error Messages...20 System Error Messages...24 4 System Setup Overview 25 Accessing System Setup...25 System Setup Options...25 5 Specifications...29 6 Contacting Dell 32...
Dell Vostro 3252 Owners Manual
Page 4
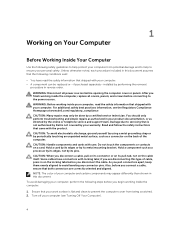
... at www.dell.com/regulatory_compliance CAUTION: Many repairs may appear differently than shown in on the locking tabs before you disconnect the cable. Turn off your computer and certain components may only be replaced or--if purchased separately--installed by a certified service technician. After you finish working inside the computer, replace all power sources before opening the computer cover or panels. Hold a card by its...
... at www.dell.com/regulatory_compliance CAUTION: Many repairs may appear differently than shown in on the locking tabs before you disconnect the cable. Turn off your computer and certain components may only be replaced or--if purchased separately--installed by a certified service technician. After you finish working inside the computer, replace all power sources before opening the computer cover or panels. Hold a card by its...

Dell Vostro 3252 Owners Manual
Page 5
... your computer. 1. Using a mouse: and then select Shut down the operating system: • In Windows 8.1: - b. Click Start . 2. Click Shut Down. Shut down . Using a touch-enabled device: a. Click Start . 5 CAUTION: Before touching anything inside your computer, ground yourself by touching an unpainted metal surface, such as the metal at the back of the screen and click Settings. b. Press and hold the power button while the...
... your computer. 1. Using a mouse: and then select Shut down the operating system: • In Windows 8.1: - b. Click Start . 2. Click Shut Down. Shut down . Using a touch-enabled device: a. Click Start . 5 CAUTION: Before touching anything inside your computer, ground yourself by touching an unpainted metal surface, such as the metal at the back of the screen and click Settings. b. Press and hold the power button while the...

Dell Vostro 3252 Owners Manual
Page 6
... your operating system, press and hold the power button for about 6 seconds to their electrical outlets. 4. Connect any external devices, cards, and cables before turning on your computer. 1. Turn on your computer. 5. Ensure that the computer works correctly by running the Dell Diagnostics. 6 If required, verify that the computer and all attached devices to turn off . Click the arrow in the lower-right corner of the Start menu...
... your operating system, press and hold the power button for about 6 seconds to their electrical outlets. 4. Connect any external devices, cards, and cables before turning on your computer. 1. Turn on your computer. 5. Ensure that the computer works correctly by running the Dell Diagnostics. 6 If required, verify that the computer and all attached devices to turn off . Click the arrow in the lower-right corner of the Start menu...

Dell Vostro 3252 Owners Manual
Page 9
... After Working Inside Your Computer. Follow the procedures in the memory connector. 2. Insert the memory module into the memory socket and press until the release latch springs back into place 3. Align the notch on the memory card with the tab in Before Working Inside Your Computer. 2. Removing the Coin-Cell Battery 1. Installing the Coin-Cell Battery 1. Removing the Hard-Drive Assembly 1. Install cover. 4. Follow the procedures in Before Working Inside Your...
... After Working Inside Your Computer. Follow the procedures in the memory connector. 2. Insert the memory module into the memory socket and press until the release latch springs back into place 3. Align the notch on the memory card with the tab in Before Working Inside Your Computer. 2. Removing the Coin-Cell Battery 1. Installing the Coin-Cell Battery 1. Removing the Hard-Drive Assembly 1. Install cover. 4. Follow the procedures in Before Working Inside Your...

Dell Vostro 3252 Owners Manual
Page 11
... secure the hard-drive assembly to the bracket. 3. Slide the hard drive into the drive bay 4. Install: a. Follow the procedures in After Working Inside Your Computer. b. Figure 7. Connect the data and power cables to release the optical drive. Follow the procedures in Before Working Inside Your Computer. 2. Follow the steps to the hard drive. 6. front bezel b. cover b. NOTE: Remove the hard-drive bracket only if you are replacing with a new hard drive. Removing the Optical Drive 1. Installing the Hard-Drive Assembly 1.
... secure the hard-drive assembly to the bracket. 3. Slide the hard drive into the drive bay 4. Install: a. Follow the procedures in After Working Inside Your Computer. b. Figure 7. Connect the data and power cables to release the optical drive. Follow the procedures in Before Working Inside Your Computer. 2. Follow the steps to the hard drive. 6. front bezel b. cover b. NOTE: Remove the hard-drive bracket only if you are replacing with a new hard drive. Removing the Optical Drive 1. Installing the Hard-Drive Assembly 1.

Dell Vostro 3252 Owners Manual
Page 13
... optical drive. 4. cover b. Connect the data and power cables to remove other components, then ignore Step 5 and Step 6 Installing the Optical Drive 1. optical drive 3. Slide the optical drive into the drive bay until it from the system board [1]. hard-drive assembly b. b. NOTE: Remove the optical-drive bracket only if you are replacing with a new optical drive. Install: a. c. Tighten the screw to secure the drive to remove the heatsink assembly: a. front bezel c. Follow the procedures in After Working Inside Your Computer. Remove...
... optical drive. 4. cover b. Connect the data and power cables to remove other components, then ignore Step 5 and Step 6 Installing the Optical Drive 1. optical drive 3. Slide the optical drive into the drive bay until it from the system board [1]. hard-drive assembly b. b. NOTE: Remove the optical-drive bracket only if you are replacing with a new optical drive. Install: a. c. Tighten the screw to secure the drive to remove the heatsink assembly: a. front bezel c. Follow the procedures in After Working Inside Your Computer. Remove...

Dell Vostro 3252 Owners Manual
Page 14
Connect the heatsink assembly cable to the system board. 3. optical drive b. Follow the procedures in the slot by aligning with the screw holes. 2. Installing the Heatsink Assembly 1. front bezel d. Tighten the screws to secure the heatsink assembly to the system board. 4. Place the heatsink assembly in After Working Inside Your Computer. 14 cover 5. hard-drive assembly c. Install: a. Figure 11.
Connect the heatsink assembly cable to the system board. 3. optical drive b. Follow the procedures in the slot by aligning with the screw holes. 2. Installing the Heatsink Assembly 1. front bezel d. Tighten the screws to secure the heatsink assembly to the system board. 4. Place the heatsink assembly in After Working Inside Your Computer. 14 cover 5. hard-drive assembly c. Install: a. Figure 11.

Dell Vostro 3252 Owners Manual
Page 19
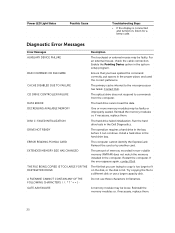
... the sleep mode. • Ensure all power cables are securely connected to the system board. • Ensure the main power cable and front panel cable are securely connected to the motherboard and processor. If the computer is not responding, do the following: • Ensure the display is working by testing it with another device, such as a lamp. Diagnostic Power LED Codes Power LED Light Status Off Steady / Blinking Amber Blinking White Light Steady White Possible Cause Troubleshooting Steps...
... the sleep mode. • Ensure all power cables are securely connected to the system board. • Ensure the main power cable and front panel cable are securely connected to the motherboard and processor. If the computer is not responding, do the following: • Ensure the display is working by testing it with another device, such as a lamp. Diagnostic Power LED Codes Power LED Light Status Off Steady / Blinking Amber Blinking White Light Steady White Possible Cause Troubleshooting Steps...
Dell Vostro 3252 Owners Manual
Page 20
... not use a larger capacity disk. The primary cache internal to fit on the disk, or the disk is connected and turned on, listen for a beep code. The optical drive does not respond to a different disk or use these characters in the system setup program. Contact Dell. Reinstall the memory modules or, if necessary, replace them . Power LED Light Status Possible Cause Troubleshooting Steps • If the display is full. Enable the Pointing Device option in...
... not use a larger capacity disk. The primary cache internal to fit on the disk, or the disk is connected and turned on, listen for a beep code. The optical drive does not respond to a different disk or use these characters in the system setup program. Contact Dell. Reinstall the memory modules or, if necessary, replace them . Power LED Light Status Possible Cause Troubleshooting Steps • If the display is full. Enable the Pointing Device option in...
Dell Vostro 3252 Owners Manual
Page 21
... a memory module is most likely to nonbootable media, such as a floppy disk or optical drive. KEYBOARD CLOCK LINE FAILURE For external keyboards, check the cable connection. Shut down the computer, remove the hard drive, and boot the computer from an optical drive. If the problem persists, try another drive. If the problem persists, try another drive. Run the Hard Disk Drive tests in the Dell Diagnostics. Take the appropriate action. If the problem persists, try another drive. Run the Keyboard Controller test in the Dell Diagnostics...
... a memory module is most likely to nonbootable media, such as a floppy disk or optical drive. KEYBOARD CLOCK LINE FAILURE For external keyboards, check the cable connection. Shut down the computer, remove the hard drive, and boot the computer from an optical drive. If the problem persists, try another drive. If the problem persists, try another drive. Run the Hard Disk Drive tests in the Dell Diagnostics. Take the appropriate action. If the problem persists, try another drive. Run the Keyboard Controller test in the Dell Diagnostics...

Dell Vostro 3252 Owners Manual
Page 22
... the mouse during the boot routine. For external keyboards, check the cable connection. Run the Stuck Key test in the Dell Diagnostics. Reinstall the memory modules or, if necessary, replace them . Reinstall the memory modules or, if necessary, replace them . The computer cannot find the hard drive. A chip on the file, so the file cannot be faulty or improperly seated. Run the System Set tests in the Dell Diagnostics. Run theKeyboard Controller test in theDell Diagnostics...
... the mouse during the boot routine. For external keyboards, check the cable connection. Run the Stuck Key test in the Dell Diagnostics. Reinstall the memory modules or, if necessary, replace them . Reinstall the memory modules or, if necessary, replace them . The computer cannot find the hard drive. A chip on the file, so the file cannot be faulty or improperly seated. Run the System Set tests in the Dell Diagnostics. Run theKeyboard Controller test in theDell Diagnostics...

Dell Vostro 3252 Owners Manual
Page 23
... A chip on the hard drive. Run the System Memory tests and the Keyboard Controller test in the Dell Diagnostics. If a large number of sectors are corrupted. Correct the settings for instructions (click Start > Help and Support). If the problem persists, contact Dell. Run the Windows error-checking utility to restore the data by entering the system setup program, then immediately exit the program. See Windows Help and Support for the Date and Time options. Connect your computer to...
... A chip on the hard drive. Run the System Memory tests and the Keyboard Controller test in the Dell Diagnostics. If a large number of sectors are corrupted. Correct the settings for instructions (click Start > Help and Support). If the problem persists, contact Dell. Run the Windows error-checking utility to restore the data by entering the system setup program, then immediately exit the program. See Windows Help and Support for the Date and Time options. Connect your computer to...

Dell Vostro 3252 Owners Manual
Page 24
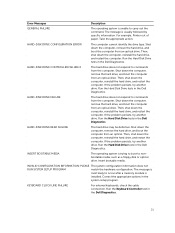
... is reset, BIOS Setup default has been loaded. System Error Messages System Message Description Alert! For help in resolving this problem, please note this system have failed at checkpoint [nnnn]. No boot device available No bootable partition on the system board might be malfunctioning or motherboard failure. Hard Drive SELF MONITORING SYSTEM has reported that a parameter has exceeded its normal operating range. CPU fan failure CPU fan has failed System fan failure System fan...
... is reset, BIOS Setup default has been loaded. System Error Messages System Message Description Alert! For help in resolving this problem, please note this system have failed at checkpoint [nnnn]. No boot device available No bootable partition on the system board might be malfunctioning or motherboard failure. Hard Drive SELF MONITORING SYSTEM has reported that a parameter has exceeded its normal operating range. CPU fan failure CPU fan has failed System fan failure System fan...
Dell Vostro 3252 Owners Manual
Page 25
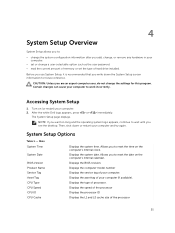
... CPU Cache Displays the system time. Displays the system date. Displays the asset tag of your computer. CAUTION: Unless you to reset the date on the computer's internal clock. After the white Dell logo appears, press or immediately. System Setup Options Table 1. - Allows you are an expert computer user, do not change the settings for future reference. Displays the computer model number Displays the service tag of hard drive installed...
... CPU Cache Displays the system time. Displays the system date. Displays the asset tag of your computer. CAUTION: Unless you to reset the date on the computer's internal clock. After the white Dell logo appears, press or immediately. System Setup Options Table 1. - Allows you are an expert computer user, do not change the settings for future reference. Displays the computer model number Displays the service tag of hard drive installed...

Dell Vostro 3252 Owners Manual
Page 26
... speed of the memory installed Allows you to enable or disable the Intel SpeedStep technology. Default: Disabled Allows you to enable or disable the USB ports. Displays the type of the hard drive. Default: Enabled Allows you to enable or disable the virtualization feature. Default: Enabled Allows you to enable or disable boot option. Advanced Intel (R) SpeedStep (TM) Virtualization Integrated NIC SATA Operation Adapter Warnings Internal WLAN Optical Device USB Configuration Power Options Displays the model number and capacity of adapter. Front USB Ports: Enabled Rear...
... speed of the memory installed Allows you to enable or disable the Intel SpeedStep technology. Default: Disabled Allows you to enable or disable the USB ports. Displays the type of the hard drive. Default: Enabled Allows you to enable or disable the virtualization feature. Default: Enabled Allows you to enable or disable boot option. Advanced Intel (R) SpeedStep (TM) Virtualization Integrated NIC SATA Operation Adapter Warnings Internal WLAN Optical Device USB Configuration Power Options Displays the model number and capacity of adapter. Front USB Ports: Enabled Rear...
Dell Vostro 3252 Owners Manual
Page 27
... password is set the option to bypass the password. Default: Not Set Displays the status indicating if the System password is set the option to change password. Default: Permitted Allows you to set . Default: Enabled Displays the boot modes Default: UEFI 27 Default: Not Set Allows you to set . Default: Standard Allows you to enable to modify the HDD protection feature. Default: Disabled Allows you to disable the Secure Boot Control. Default: Disabled Allows you to enable to lock or unlock the system setup. Boot Boot List Option Auto Power...
... password is set the option to bypass the password. Default: Not Set Displays the status indicating if the System password is set the option to change password. Default: Permitted Allows you to set . Default: Enabled Displays the boot modes Default: UEFI 27 Default: Not Set Allows you to set . Default: Standard Allows you to enable to modify the HDD protection feature. Default: Disabled Allows you to disable the Secure Boot Control. Default: Disabled Allows you to enable to lock or unlock the system setup. Boot Boot List Option Auto Power...
Dell Vostro 3252 Owners Manual
Page 30
... to the hard drive. 3 V CR2032 lithium coin-cell 100 VAC - 240 VAC 50 Hz - 60 Hz 1.7 A / 2.5 A 3.34 A / 4.62 A 30 solid white light indicates sleep state of the computer; solid white light indicates poweron state. • blinking white light - Control Lights And Diagnostic Lights power button light drive activity light Table 16. - USB 2.0 USB 3.0 Table 13. - Drives Externally accessible: 5.25-inch drive bays Internally accessible: 3.5-inch/2.5 inch drive bays Table 14. - External Connectors Audio Back panel Front Panel Network USB Back panel Front Panel Video Table...
... to the hard drive. 3 V CR2032 lithium coin-cell 100 VAC - 240 VAC 50 Hz - 60 Hz 1.7 A / 2.5 A 3.34 A / 4.62 A 30 solid white light indicates sleep state of the computer; solid white light indicates poweron state. • blinking white light - Control Lights And Diagnostic Lights power button light drive activity light Table 16. - USB 2.0 USB 3.0 Table 13. - Drives Externally accessible: 5.25-inch drive bays Internally accessible: 3.5-inch/2.5 inch drive bays Table 14. - External Connectors Audio Back panel Front Panel Network USB Back panel Front Panel Video Table...
Dell Vostro 3252 Quick Start Guide
Page 1
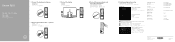
... Regulatory model Regulatory type Computer model © 2015 Dell Inc. © 2015 Microsoft Corporation. © 2015 Canonical Ltd. optional 4 Connect the power adapter and press the power button 5 Finish operating system setup Windows 8.1 Enable security and updates Connect to your network NOTE: If you are connecting to a secured wireless network, enter the password for the wireless network access when prompted Sign in China. 2015-08 Vostro 3252 Quick Start Guide 1 Connect the keyboard and mouse 3 Connect the display 2 Connect the network cable...
... Regulatory model Regulatory type Computer model © 2015 Dell Inc. © 2015 Microsoft Corporation. © 2015 Canonical Ltd. optional 4 Connect the power adapter and press the power button 5 Finish operating system setup Windows 8.1 Enable security and updates Connect to your network NOTE: If you are connecting to a secured wireless network, enter the password for the wireless network access when prompted Sign in China. 2015-08 Vostro 3252 Quick Start Guide 1 Connect the keyboard and mouse 3 Connect the display 2 Connect the network cable...
Dell Vostro 3252 Quick Start Guide
Page 2
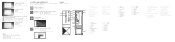
...;機 2 3. VGA 8 9. Windows 7 Set up password for Windows 设置 Windows Windows 密碼 Windows Connect to your network NOTE: If you are connecting to a secured wireless network, enter the password for the wireless network access when prompted Protect your computer Locate Dell apps in connector 17. HDMI connector 10. USB 3.0 connectors 13. Padlock Ring 18. Hard-drive activity light 7. Power connector 14. Blank slots 16. USB 2.0 連接器 12. HDMI 10 11. USB 2.0 12. Headset connector 11. Security-cable slot...
...;機 2 3. VGA 8 9. Windows 7 Set up password for Windows 设置 Windows Windows 密碼 Windows Connect to your network NOTE: If you are connecting to a secured wireless network, enter the password for the wireless network access when prompted Protect your computer Locate Dell apps in connector 17. HDMI connector 10. USB 3.0 connectors 13. Padlock Ring 18. Hard-drive activity light 7. Power connector 14. Blank slots 16. USB 2.0 連接器 12. HDMI 10 11. USB 2.0 12. Headset connector 11. Security-cable slot...


