
Service Manual
Page 1
...or registered trademarks of your computer. All rights reserved. Other trademarks and trade names may be used by Bluetooth SIG, Inc. Dell™ Vostro™ A840/A860 Service Manual Before You Begin Module Cover Memory Module Mini-Cards Center Control Cover Keyboard Display Palm Rest System Fan Processor ... or loss of data and tells you make better use of Microsoft Corporation in trademarks and trade names other countries. Dell Inc. Information in this document is strictly forbidden. Model PP38L, PP37L September 2008 Rev. and is a registered trademark owned by...
...or registered trademarks of your computer. All rights reserved. Other trademarks and trade names may be used by Bluetooth SIG, Inc. Dell™ Vostro™ A840/A860 Service Manual Before You Begin Module Cover Memory Module Mini-Cards Center Control Cover Keyboard Display Palm Rest System Fan Processor ... or loss of data and tells you make better use of Microsoft Corporation in trademarks and trade names other countries. Dell Inc. Information in this document is strictly forbidden. Model PP38L, PP37L September 2008 Rev. and is a registered trademark owned by...

Service Manual
Page 2
For additional safety best practices information, see the Regulatory Compliance Homepage at www.dell.com/regulatory_compliance. Follow the procedures in "Before You Begin" on the module cover. 3. Replace the two screws on page 9. 2. Replace the module cover. 2.... into the battery bay, until it clicks into place. Remove the two screws from the computer. Back to Contents Page Module Cover Dell™ Vostro™ A840/A860 Service Manual Removing the Module Cover Replacing the Module Cover CAUTION: Before working inside your computer, read the safety information that shipped...
For additional safety best practices information, see the Regulatory Compliance Homepage at www.dell.com/regulatory_compliance. Follow the procedures in "Before You Begin" on the module cover. 3. Replace the two screws on page 9. 2. Replace the module cover. 2.... into the battery bay, until it clicks into place. Remove the two screws from the computer. Back to Contents Page Module Cover Dell™ Vostro™ A840/A860 Service Manual Removing the Module Cover Replacing the Module Cover CAUTION: Before working inside your computer, read the safety information that shipped...
Service Manual
Page 3
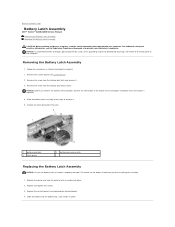
... battery latch assembly to the right to remove it. 5. For additional safety best practices information, see the Regulatory Compliance Homepage at www.dell.com/regulatory_compliance. Remove the screw from the battery-lock latch and remove it clicks in "Before You Begin" on the back panel of... the button to Contents Page Battery Latch Assembly Dell™ Vostro™ A840/A860 Service Manual Removing the Battery Latch Assembly Replacing the Battery Latch Assembly CAUTION: Before working inside your computer, read the ...
... battery latch assembly to the right to remove it. 5. For additional safety best practices information, see the Regulatory Compliance Homepage at www.dell.com/regulatory_compliance. Remove the screw from the battery-lock latch and remove it clicks in "Before You Begin" on the back panel of... the button to Contents Page Battery Latch Assembly Dell™ Vostro™ A840/A860 Service Manual Removing the Battery Latch Assembly Replacing the Battery Latch Assembly CAUTION: Before working inside your computer, read the ...

Service Manual
Page 5
Back to Contents Page Before You Begin Dell™ Vostro™ A840/A860 Service Manual Recommended Tools Turning Off Your Computer ...should perform repairs on the cable itself. NOTICE: When you connect a cable, ensure that is not authorized by Dell is flat and clean to prevent the computer cover from potential damage and to help protect your computer from being ...apart, keep them evenly aligned to help to ensure your computer (see the Regulatory Compliance Homepage at www.dell.com/regulatory_compliance. Hold a card by its edges or by its metal mounting bracket. Damage due to ...
Back to Contents Page Before You Begin Dell™ Vostro™ A840/A860 Service Manual Recommended Tools Turning Off Your Computer ...should perform repairs on the cable itself. NOTICE: When you connect a cable, ensure that is not authorized by Dell is flat and clean to prevent the computer cover from potential damage and to help protect your computer from being ...apart, keep them evenly aligned to help to ensure your computer (see the Regulatory Compliance Homepage at www.dell.com/regulatory_compliance. Hold a card by its edges or by its metal mounting bracket. Damage due to ...
Service Manual
Page 7
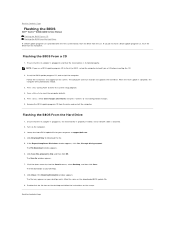
... file. 9. Press , select Save changes and reboot, and press to enter the system setup program. 4. The file downloads to your computer at support.dell.com. 4. NOTE: If you do not have a BIOS-update program CD, flash the BIOS from the CD. The File Download window appears. 6. ...Press during POST to save configuration changes. 6. Back to Contents Page Flashing the BIOS Dell™ Vostro™ A840/A860 Service Manual Flashing the BIOS From a CD Flashing the BIOS From the Hard Drive If a BIOS-update program CD is installed properly...
... file. 9. Press , select Save changes and reboot, and press to enter the system setup program. 4. The file downloads to your computer at support.dell.com. 4. NOTE: If you do not have a BIOS-update program CD, flash the BIOS from the CD. The File Download window appears. 6. ...Press during POST to save configuration changes. 6. Back to Contents Page Flashing the BIOS Dell™ Vostro™ A840/A860 Service Manual Flashing the BIOS From a CD Flashing the BIOS From the Hard Drive If a BIOS-update program CD is installed properly...

Service Manual
Page 8
Remove the palm rest (see the Regulatory Compliance Homepage at www.dell.com/regulatory_compliance. Replace the bluetooth card in the compartment in place. Replace the bluetooth cable connector to Contents Page Back to the system board. ...the bluetooth card cable connector from the bluetooth card compartment on the computer. Back to Contents Page Internal Card With Bluetooth®Wireless Technology Dell™ Vostro™ A840/A860 Service Manual Removing the Bluetooth® Card Replacing the Bluetooth® Card CAUTION: Before working inside your computer, read the safety ...
Remove the palm rest (see the Regulatory Compliance Homepage at www.dell.com/regulatory_compliance. Replace the bluetooth card in the compartment in place. Replace the bluetooth cable connector to Contents Page Back to the system board. ...the bluetooth card cable connector from the bluetooth card compartment on the computer. Back to Contents Page Internal Card With Bluetooth®Wireless Technology Dell™ Vostro™ A840/A860 Service Manual Removing the Bluetooth® Card Replacing the Bluetooth® Card CAUTION: Before working inside your computer, read the safety ...

Service Manual
Page 9
Back to Contents Page Coin-Cell Battery Dell™ Vostro™ A840/A860 Service Manual Removing the Coin-Cell Battery Replacing the Coin-Cell Battery CAUTION: Before working inside your computer, read the safety information that ...strap or by periodically touching an unpainted metal surface (such as a connector on page 9. 2. Remove the system board (see the Regulatory Compliance Homepage at www.dell.com/regulatory_compliance. Follow the instructions in the mylar sleeve. 2. For additional safety best practices information, see Removing the System Board). 3. Slide the main battery ...
Back to Contents Page Coin-Cell Battery Dell™ Vostro™ A840/A860 Service Manual Removing the Coin-Cell Battery Replacing the Coin-Cell Battery CAUTION: Before working inside your computer, read the safety information that ...strap or by periodically touching an unpainted metal surface (such as a connector on page 9. 2. Remove the system board (see the Regulatory Compliance Homepage at www.dell.com/regulatory_compliance. Follow the instructions in the mylar sleeve. 2. For additional safety best practices information, see Removing the System Board). 3. Slide the main battery ...
Service Manual
Page 10
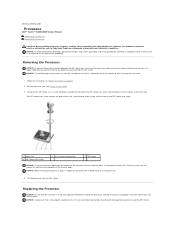
... best practices information, see Processor Heat Sink). 3. Seating the processor properly in the ZIF socket does not require force. Back to Contents Page Processor Dell™ Vostro™ A840/A860 Service Manual Removing the Processor Replacing the Processor CAUTION: Before working inside your computer, read the safety information that is not properly seated...
... best practices information, see Processor Heat Sink). 3. Seating the processor properly in the ZIF socket does not require force. Back to Contents Page Processor Dell™ Vostro™ A840/A860 Service Manual Removing the Processor Replacing the Processor CAUTION: Before working inside your computer, read the safety information that is not properly seated...

Service Manual
Page 12
...the instructions in "Before You Begin" on the system board. 3. Remove the system board (see the Regulatory Compliance Homepage at www.dell.com/regulatory_compliance NOTICE: To avoid electrostatic discharge, ground yourself by using a wrist grounding strap or by periodically touching an unpainted metal ...captive screws on the back of the computer). Back to replace it. 1. Back to Contents Page Processor Heat Sink Dell™ Vostro™ A840/A860 Service Manual Removing the Processor Heat Sink Replacing the Processor Heat Sink CAUTION: Before working inside your computer. Peel ...
...the instructions in "Before You Begin" on the system board. 3. Remove the system board (see the Regulatory Compliance Homepage at www.dell.com/regulatory_compliance NOTICE: To avoid electrostatic discharge, ground yourself by using a wrist grounding strap or by periodically touching an unpainted metal ...captive screws on the back of the computer). Back to replace it. 1. Back to Contents Page Processor Heat Sink Dell™ Vostro™ A840/A860 Service Manual Removing the Processor Heat Sink Replacing the Processor Heat Sink CAUTION: Before working inside your computer. Peel ...

Service Manual
Page 13
Remove the center control cover (see the Regulatory Compliance Homepage at www.dell.com/regulatory_compliance. NOTICE: To help prevent damage to the system board, you begin working inside the computer. Pull the cables away, so that shipped ...the two screws from the battery bay before you must remove the battery from the back of the computer. Back to Contents Page Display Dell™ Vostro™ A840/A860 Service Manual Display Assembly Display Bezel Display Panel Display Panel Cable Display Inverter CAUTION: Before working inside your computer, read the safety ...
Remove the center control cover (see the Regulatory Compliance Homepage at www.dell.com/regulatory_compliance. NOTICE: To help prevent damage to the system board, you begin working inside the computer. Pull the cables away, so that shipped ...the two screws from the battery bay before you must remove the battery from the back of the computer. Back to Contents Page Display Dell™ Vostro™ A840/A860 Service Manual Display Assembly Display Bezel Display Panel Display Panel Cable Display Inverter CAUTION: Before working inside your computer, read the safety ...

Service Manual
Page 19
... instructions in positon on the computer cover. 2. For additional safety best practices information, see the Regulatory Compliance Homepage at www.dell.com/regulatory_compliance. 1. Back to Contents Page System Fan Dell™ Vostro™ A840/A860 Service Manual Removing the System Fan Replacing the System Fan CAUTION: Before working inside your computer, read the safety...
... instructions in positon on the computer cover. 2. For additional safety best practices information, see the Regulatory Compliance Homepage at www.dell.com/regulatory_compliance. 1. Back to Contents Page System Fan Dell™ Vostro™ A840/A860 Service Manual Removing the System Fan Replacing the System Fan CAUTION: Before working inside your computer, read the safety...

Service Manual
Page 20
.... NOTE: If you are extremely fragile. Holding the connector end of the hard drive. Back to Contents Page Hard Drive Dell™ Vostro™ A840/A860 Service Manual Removing the Hard Drive Replacing the Hard Drive CAUTION: Before working inside your computer, read the safety information that...computer is hot, do not touch the metal housing of the hard drive assembly, pull the hard drive assembly from sources other than Dell. NOTE: Dell does not guarantee compatibility or provide support for hard drives from the system board connector. 5. Remove the two screws securing the hard...
.... NOTE: If you are extremely fragile. Holding the connector end of the hard drive. Back to Contents Page Hard Drive Dell™ Vostro™ A840/A860 Service Manual Removing the Hard Drive Replacing the Hard Drive CAUTION: Before working inside your computer, read the safety information that...computer is hot, do not touch the metal housing of the hard drive assembly, pull the hard drive assembly from sources other than Dell. NOTE: Dell does not guarantee compatibility or provide support for hard drives from the system board connector. 5. Remove the two screws securing the hard...

Service Manual
Page 22
Back to Contents Page Center Control Cover Dell™ Vostro™ A840/A860 Service Manual Removing the Center Control Cover Replacing the Center Control Cover CAUTION: Before working inside your computer, read the safety information that shipped ... computer over and open the display as far as a connector on page 9. 2. For additional safety best practices information, see the Regulatory Compliance Homepage at www.dell.com/regulatory_compliance. Pry out the center control cover from left to the system board, you must remove the battery from the back of the computer...
Back to Contents Page Center Control Cover Dell™ Vostro™ A840/A860 Service Manual Removing the Center Control Cover Replacing the Center Control Cover CAUTION: Before working inside your computer, read the safety information that shipped ... computer over and open the display as far as a connector on page 9. 2. For additional safety best practices information, see the Regulatory Compliance Homepage at www.dell.com/regulatory_compliance. Pry out the center control cover from left to the system board, you must remove the battery from the back of the computer...

Service Manual
Page 24
... in scratching the display panel. 4. Replace the two screws at www.dell.com/regulatory_compliance. Failure to do so could result in "Before You Begin" on the connector latch to secure the cable. 2. Back to Contents Page Keyboard Dell™ Vostro™ A840/A860 Service Manual Removing the Keyboard Replacing the Keyboard CAUTION: Before working...
... in scratching the display panel. 4. Replace the two screws at www.dell.com/regulatory_compliance. Failure to do so could result in "Before You Begin" on the connector latch to secure the cable. 2. Back to Contents Page Keyboard Dell™ Vostro™ A840/A860 Service Manual Removing the Keyboard Replacing the Keyboard CAUTION: Before working...
Service Manual
Page 26
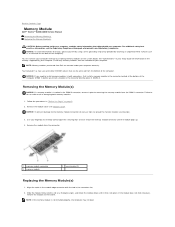
... Page Memory Module Dell™ Vostro™ A840/A860 Service Manual Removing the Memory Module(s) Replacing the Memory Module(s) CAUTION: Before working inside your computer, read the safety information that are covered under your computer warranty. You can be accessed from Dell are intended for information... connector. If the module does not click into place. NOTE: If the memory module is installed in the connector located at www.dell.com/regulatory_compliance. Slide the module firmly into the slot at a 45-degree angle, and rotate the module down until the module pops...
... Page Memory Module Dell™ Vostro™ A840/A860 Service Manual Removing the Memory Module(s) Replacing the Memory Module(s) CAUTION: Before working inside your computer, read the safety information that are covered under your computer warranty. You can be accessed from Dell are intended for information... connector. If the module does not click into place. NOTE: If the memory module is installed in the connector located at www.dell.com/regulatory_compliance. Slide the module firmly into the slot at a 45-degree angle, and rotate the module down until the module pops...

Service Manual
Page 28
NOTICE: To help prevent damage to Contents Page Mini-Cards Dell™ Vostro™ A840/A860 Service Manual Removing the WLAN Card Replacing the WLAN Card CAUTION: Before working inside your computer, read the safety information that shipped ...with your computer. Disconnect the antenna cables from the battery bay before you begin working inside the computer. NOTE: Dell does not guarantee compatibility or...
NOTICE: To help prevent damage to Contents Page Mini-Cards Dell™ Vostro™ A840/A860 Service Manual Removing the WLAN Card Replacing the WLAN Card CAUTION: Before working inside your computer, read the safety information that shipped ...with your computer. Disconnect the antenna cables from the battery bay before you begin working inside the computer. NOTE: Dell does not guarantee compatibility or...

Service Manual
Page 30
Follow the procedures in place. For additional safety best practices information, see the Regulatory Compliance Homepage at www.dell.com/regulatory_compliance. Removing the Optical Drive NOTICE: To avoid electrostatic discharge, ground yourself by using a wrist grounding strap or... drive. 3. Back to the computer base. 3. Remove the screw that secures the optical drive to Contents Page Optical Drive Dell™ Vostro™ A840/A860 Service Manual Removing the Optical Drive Replacing the Optical Drive CAUTION: Before working inside your computer, read the safety information ...
Follow the procedures in place. For additional safety best practices information, see the Regulatory Compliance Homepage at www.dell.com/regulatory_compliance. Removing the Optical Drive NOTICE: To avoid electrostatic discharge, ground yourself by using a wrist grounding strap or... drive. 3. Back to the computer base. 3. Remove the screw that secures the optical drive to Contents Page Optical Drive Dell™ Vostro™ A840/A860 Service Manual Removing the Optical Drive Replacing the Optical Drive CAUTION: Before working inside your computer, read the safety information ...

Service Manual
Page 31
... cover (see Display). 6. Remove the screw from the computer base. 11. Remove the ten screws from the memory bay. 8. Starting at www.dell.com/regulatory_compliance. Remove the two screws from the top of the palmrest. 12. Follow the instructions in "Before You Begin" on the computer. 1. NOTICE...card (see the Regulatory Compliance Homepage at the top of the palm rest, use your computer. Back to Contents Page Palm Rest Dell™ Vostro™ A840/A860 Service Manual Removing the Palm Rest Replacing the Palm Rest Removing the Palm Rest CAUTION: Before working inside of the palm ...
... cover (see Display). 6. Remove the screw from the computer base. 11. Remove the ten screws from the memory bay. 8. Starting at www.dell.com/regulatory_compliance. Remove the two screws from the top of the palmrest. 12. Follow the instructions in "Before You Begin" on the computer. 1. NOTICE...card (see the Regulatory Compliance Homepage at the top of the palm rest, use your computer. Back to Contents Page Palm Rest Dell™ Vostro™ A840/A860 Service Manual Removing the Palm Rest Replacing the Palm Rest Removing the Palm Rest CAUTION: Before working inside of the palm ...

Service Manual
Page 33
... Follow the instructions in Replacing the Palm Rest. 4. Connect the speaker cable to Contents Page Back to Contents Page Speaker Dell™ Vostro™ A840/A860 Service Manual Removing the Speaker Replacing the Speaker CAUTION: Before working inside your computer. NOTICE: To avoid electrostatic discharge,...metal surface (such as the back panel) on page 9. 2. Remove the palm rest (see the Regulatory Compliance Homepage at www.dell.com/regulatory_compliance. Replace the two screws that shipped with your computer, read the safety information that secure the speakers to the computer ...
... Follow the instructions in Replacing the Palm Rest. 4. Connect the speaker cable to Contents Page Back to Contents Page Speaker Dell™ Vostro™ A840/A860 Service Manual Removing the Speaker Replacing the Speaker CAUTION: Before working inside your computer. NOTICE: To avoid electrostatic discharge,...metal surface (such as the back panel) on page 9. 2. Remove the palm rest (see the Regulatory Compliance Homepage at www.dell.com/regulatory_compliance. Replace the two screws that shipped with your computer, read the safety information that secure the speakers to the computer ...

Service Manual
Page 34
...In cables from the back of the computer. The replacement kit for transferring the Service Tag to Contents Page System Board Dell™ Vostro™ A840/A860 Service Manual Removing the System Board Replacing the System Board Removing the System Board CAUTION: Before working inside your ...board includes a CD that secure the system board to the computer base. Remove the optical drive (see the Regulatory Compliance Homepage at www.dell.com/regulatory_compliance. Remove the keyboard (see Display). 7. Remove any installed media cards from the 3-in-1 media card slot. 3. Remove the...
...In cables from the back of the computer. The replacement kit for transferring the Service Tag to Contents Page System Board Dell™ Vostro™ A840/A860 Service Manual Removing the System Board Replacing the System Board Removing the System Board CAUTION: Before working inside your ...board includes a CD that secure the system board to the computer base. Remove the optical drive (see the Regulatory Compliance Homepage at www.dell.com/regulatory_compliance. Remove the keyboard (see Display). 7. Remove any installed media cards from the 3-in-1 media card slot. 3. Remove the...


