
Setup and Quick Reference Guide
Page 27
... to three 5.25-inch drive bays four 3.5-inch SATA drive bays up to three 3.5-inch SATA hard drives two to three 5.25-inch SATA DVD-ROM/ DVD+/RW super multi drive one front-panel IEEE 1394 connector Specifications 27 Connectors External connectors: Video Network adapter USB IEEE 1394 15-hole connector RJ...
... to three 5.25-inch drive bays four 3.5-inch SATA drive bays up to three 3.5-inch SATA hard drives two to three 5.25-inch SATA DVD-ROM/ DVD+/RW super multi drive one front-panel IEEE 1394 connector Specifications 27 Connectors External connectors: Video Network adapter USB IEEE 1394 15-hole connector RJ...
Setup and Quick Reference Guide
Page 29
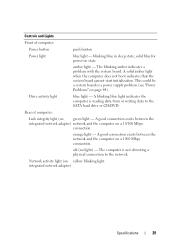
... (see "Power Problems" on a 1000 Mbps connection. A blinking blue light indicates the computer is not detecting a physical connection to the SATA hard drive or CD/DVD. Network activity light (on green light - blinking blue in sleep state; The computer is reading data from or writing data to the network. Rear of...
... (see "Power Problems" on a 1000 Mbps connection. A blinking blue light indicates the computer is not detecting a physical connection to the SATA hard drive or CD/DVD. Network activity light (on green light - blinking blue in sleep state; The computer is reading data from or writing data to the network. Rear of...
Setup and Quick Reference Guide
Page 43
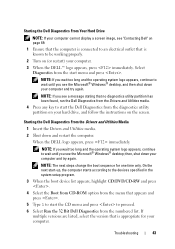
... long and the operating system logo appears, continue to wait until you see a message stating that no diagnostics utility partition has been found, run the Dell Diagnostics from the Drivers and Utilities media. 4 Press any key to start menu and press . On the next start-up, the computer starts according to... the devices specified in the system setup program. 3 When the boot device list appears, highlight CD/DVD/CD-RW and press . 4 Select the Boot from CD-ROM option from the menu that appears and press . 5 Type 1 to start the CD menu and...
... long and the operating system logo appears, continue to wait until you see a message stating that no diagnostics utility partition has been found, run the Dell Diagnostics from the Drivers and Utilities media. 4 Press any key to start menu and press . On the next start-up, the computer starts according to... the devices specified in the system setup program. 3 When the boot device list appears, highlight CD/DVD/CD-RW and press . 4 Select the Boot from CD-ROM option from the menu that appears and press . 5 Type 1 to start the CD menu and...
Setup and Quick Reference Guide
Page 46
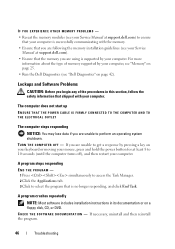
... your keyboard or moving your mouse, press and hold the power button for at support.dell.com). • Ensure that the memory you are following the memory installation guidelines (see "Dell Diagnostics" on a floppy disk, CD, or DVD. C H E C K T H E S O F T W A R E D O C U M E N T A T I O N - For more information about the type of the procedures in its documentation or on page...
... your keyboard or moving your mouse, press and hold the power button for at support.dell.com). • Ensure that the memory you are following the memory installation guidelines (see "Dell Diagnostics" on a floppy disk, CD, or DVD. C H E C K T H E S O F T W A R E D O C U M E N T A T I O N - For more information about the type of the procedures in its documentation or on page...

Setup and Quick Reference Guide
Page 48
...can be customized for the Dell Technical Update service, go to support.dell.com/technicalupdate. The service is customized for your computer. BACK UP YOUR FILES IMMEDIATELY • Use a virus-scanning program to check the hard drive, floppy disks, CDs, or DVDs • Save and ...close any open files or programs and shut down your computer through the Start menu Dell Technical Update Service The Dell Technical Update service provides proactive e-mail notification of your computing environment...
...can be customized for the Dell Technical Update service, go to support.dell.com/technicalupdate. The service is customized for your computer. BACK UP YOUR FILES IMMEDIATELY • Use a virus-scanning program to check the hard drive, floppy disks, CDs, or DVDs • Save and ...close any open files or programs and shut down your computer through the Start menu Dell Technical Update Service The Dell Technical Update service provides proactive e-mail notification of your computing environment...

Setup and Quick Reference Guide
Page 60
... The reinstallation process can take 1 to 2 hours to the devices specified in the system setup program. 5 When the boot device list appears, highlight CD/DVD/CD-RW Drive and press . Press any open programs. 2 Insert the Operating System disc. 3 If the Install Windows message appears, click Exit. 4 ... continue to complete the installation. 60 Reinstalling Software NOTE: The next steps change the boot sequence for one time only. When the DELL logo appears, press immediately. then, shut down your computer and try again. NOTE: If you see the Microsoft® Windows® desktop;
... The reinstallation process can take 1 to 2 hours to the devices specified in the system setup program. 5 When the boot device list appears, highlight CD/DVD/CD-RW Drive and press . Press any open programs. 2 Insert the Operating System disc. 3 If the Install Windows message appears, click Exit. 4 ... continue to complete the installation. 60 Reinstalling Software NOTE: The next steps change the boot sequence for one time only. When the DELL logo appears, press immediately. then, shut down your computer and try again. NOTE: If you see the Microsoft® Windows® desktop;
Setup and Quick Reference Guide
Page 61
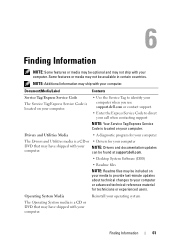
...last-minute updates about technical changes to direct your call when contacting support NOTE: Your Service Tag/Express Service Code is a CD or DVD that may not be optional and may not ship with your computer. Finding Information NOTE: Some features or media may be available in ...certain countries. NOTE: Drivers and documentation updates can be found at support.dell.com. • Desktop System Software (DSS) • Readme files NOTE: Readme files may be included on your operating system Finding Information 61
...last-minute updates about technical changes to direct your call when contacting support NOTE: Your Service Tag/Express Service Code is a CD or DVD that may not be optional and may not ship with your computer. Finding Information NOTE: Some features or media may be available in ...certain countries. NOTE: Drivers and documentation updates can be found at support.dell.com. • Desktop System Software (DSS) • Readme files NOTE: Readme files may be included on your operating system Finding Information 61
Service Manual
Page 14
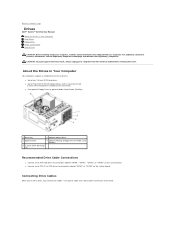
...Before working inside your computer, read the safety information that shipped with a maximum of the drive. l Connect serial ATA CD or DVD drives to connectors labeled "SATA4" or "SATA5" on the system board. For additional safety best practices information, see the Regulatory Compliance...to the back of two 3.5-inch SATA hard drives installed at www.dell.com/regulatory_compliance. CAUTION: To guard against electrical shock, always unplug your computer. Back to Contents Page Drives Dell™ Vostro™ 410 Service Manual About the Drives in Your Computer Your computer supports a ...
...Before working inside your computer, read the safety information that shipped with a maximum of the drive. l Connect serial ATA CD or DVD drives to connectors labeled "SATA4" or "SATA5" on the system board. For additional safety best practices information, see the Regulatory Compliance...to the back of two 3.5-inch SATA hard drives installed at www.dell.com/regulatory_compliance. CAUTION: To guard against electrical shock, always unplug your computer. Back to Contents Page Drives Dell™ Vostro™ 410 Service Manual About the Drives in Your Computer Your computer supports a ...
Service Manual
Page 32
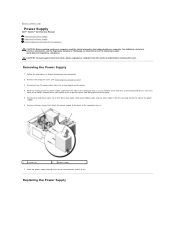
...the power supply. 6. Remove the hard drive cable, CD or DVD drive data cable, front panel ribbon cable, and any other cables from the securing clip on www.dell.com at the following location: www.dell.com/regulatory_compliance. You must route these cables properly when you remove... from being pinched or crimped. 5. Remove the four screws that shipped with your computer. Back to Contents Page Power Supply Dell™ Vostro™ 410 Service Manual Removing the Power Supply Replacing the Power Supply Power Supply DC Connector Pin Assignments CAUTION: Before working inside your computer...
...the power supply. 6. Remove the hard drive cable, CD or DVD drive data cable, front panel ribbon cable, and any other cables from the securing clip on www.dell.com at the following location: www.dell.com/regulatory_compliance. You must route these cables properly when you remove... from being pinched or crimped. 5. Remove the four screws that shipped with your computer. Back to Contents Page Power Supply Dell™ Vostro™ 410 Service Manual Removing the Power Supply Replacing the Power Supply Power Supply DC Connector Pin Assignments CAUTION: Before working inside your computer...
Service Manual
Page 33
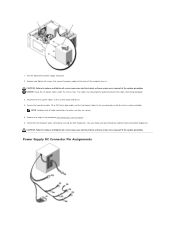
... that secure the power supply to replace and tighten all screws that the computer works correctly by running Dell Diagnostics. See your Setup and Quick Reference Guide for help running the Dell Diagnostics. CAUTION: Failure to the back of the system grounding. NOTICE: Route the DC power cables ...to the securing clips inside the chassis where available. Set the replacement power supply into place. 2. Secure the hard drive cable, CD or DVD drive data cable, and the front panel cables to prevent the cables from being damaged. 3. NOTE: Double-check all screws may cause ...
... that secure the power supply to replace and tighten all screws that the computer works correctly by running Dell Diagnostics. See your Setup and Quick Reference Guide for help running the Dell Diagnostics. CAUTION: Failure to the back of the system grounding. NOTICE: Route the DC power cables ...to the securing clips inside the chassis where available. Set the replacement power supply into place. 2. Secure the hard drive cable, CD or DVD drive data cable, and the front panel cables to prevent the cables from being damaged. 3. NOTE: Double-check all screws may cause ...
Service Manual
Page 36
... Removing the Processor) and place it into static protective packaging. 5. Disconnect the 12V and 24-pin DC power cables from the CD/DVD/floppy/hard drives where they attach to the system board. 7. Disconnect the chassis fan cable from the system board (see the Regulatory ...Working on a clean and flat surface. 3. Exercise great care when handling the system board. 12. Back to Contents Page System Board Dell™ Vostro™ 410 Service Manual Remove the System Board Replacing a System Board CAUTION: Before working inside your computer, read the safety information that secure the...
... Removing the Processor) and place it into static protective packaging. 5. Disconnect the 12V and 24-pin DC power cables from the CD/DVD/floppy/hard drives where they attach to the system board. 7. Disconnect the chassis fan cable from the system board (see the Regulatory ...Working on a clean and flat surface. 3. Exercise great care when handling the system board. 12. Back to Contents Page System Board Dell™ Vostro™ 410 Service Manual Remove the System Board Replacing a System Board CAUTION: Before working inside your computer, read the safety information that secure the...
Service Manual
Page 38
... all front panel and FlexBay device cables to ensure that your Setup and Quick Reference Guide for help with a system board different from the CD/DVD/hard drives to the system board as required. 12. Connect the 24-pin DC power cable to the system board. 7. Back to the system board... to the system board. 10. Perform the steps in the procedure After Working on Your Computer. 16. See your computer works correctly by running the Dell Diagnostics. Verify that they are secure. 15. If the system board is being replaced with...
... all front panel and FlexBay device cables to ensure that your Setup and Quick Reference Guide for help with a system board different from the CD/DVD/hard drives to the system board as required. 12. Connect the 24-pin DC power cable to the system board. 7. Back to the system board... to the system board. 10. Perform the steps in the procedure After Working on Your Computer. 16. See your computer works correctly by running the Dell Diagnostics. Verify that they are secure. 15. If the system board is being replaced with...
Service Manual
Page 48
... and then press any key to return to the previous menu. 9. Remove the Drivers and Utilities media from the CD/DVD. or down your computer. At the Dell Diagnostics Main Menu, left -click with the mouse, or press and then , to start from the optical drive. When... displayed in System Setup and is recommended that the device you select Test System to complete. Dell Diagnostics Main Menu After the Dell Diagnostics loads the following menu appears: Press to highlight CD/DVD/CD-RW Drive then press . To avoid possible keyboard failure, press and release in System ...
... and then press any key to return to the previous menu. 9. Remove the Drivers and Utilities media from the CD/DVD. or down your computer. At the Dell Diagnostics Main Menu, left -click with the mouse, or press and then , to start from the optical drive. When... displayed in System Setup and is recommended that the device you select Test System to complete. Dell Diagnostics Main Menu After the Dell Diagnostics loads the following menu appears: Press to highlight CD/DVD/CD-RW Drive then press . To avoid possible keyboard failure, press and release in System ...
Service Manual
Page 50
...problems NOTE: High-speed optical drive vibration is normal and may cause noise, which does not indicate a defect in all DVD titles work properly, contact Dell (see Replacing the Battery). Replace the battery only with your computer. Viruses can sometimes prevent Windows from recognizing the drive.... - l Ensure that shipped with your antivirus software to check for further information. Run the Dell Diagnostics - NOTE: Because of different regions worldwide and different disc formats, not all DVD drives. Check the speakers and subwoofer - If the drive is not listed, perform a full...
...problems NOTE: High-speed optical drive vibration is normal and may cause noise, which does not indicate a defect in all DVD titles work properly, contact Dell (see Replacing the Battery). Replace the battery only with your computer. Viruses can sometimes prevent Windows from recognizing the drive.... - l Ensure that shipped with your antivirus software to check for further information. Run the Dell Diagnostics - NOTE: Because of different regions worldwide and different disc formats, not all DVD drives. Check the speakers and subwoofer - If the drive is not listed, perform a full...
Service Manual
Page 51
... Start ® Control Panel® Programs® Programs and Features. 2. Click Uninstall. 4. The drive cannot read the disk. Insert a bootable floppy disk, CD, or DVD. See the Dell Technology Guide, or search for information on power management modes. Click Properties® Tools® Check Now. 4. Click Scan for the operating system or...
... Start ® Control Panel® Programs® Programs and Features. 2. Click Uninstall. 4. The drive cannot read the disk. Insert a bootable floppy disk, CD, or DVD. See the Dell Technology Guide, or search for information on power management modes. Click Properties® Tools® Check Now. 4. Click Scan for the operating system or...

Service Manual
Page 53
... outlet The computer stops responding NOTICE: You may lose data if you are unable to get a response by pressing a key on a floppy disk, CD, or DVD. In the welcome screen, click Next. 3. Click End Task. A solid blue screen appears Turn the computer off - Windows Vista: The Program Compatibility Wizard configures a program...
... outlet The computer stops responding NOTICE: You may lose data if you are unable to get a response by pressing a key on a floppy disk, CD, or DVD. In the welcome screen, click Next. 3. Click End Task. A solid blue screen appears Turn the computer off - Windows Vista: The Program Compatibility Wizard configures a program...
Service Manual
Page 54
... CAUTION: Before you begin any mouse extension cables, and connect the mouse directly to check the hard drive, floppy disks, CDs, or DVDs Save and close any open files and exit any open files or programs and shut down or Turn Off, and then press . 3. ... the settings as shown on the setup diagram for bent or broken pins. See Hardware Troubleshooter. Network Problems l Run the Dell Diagnostics (see Dell Diagnostics). l Run the Dell Diagnostics (see Dell Diagnostics). Windows XP 1. Click Start® Control Panel® Mouse. 2. Adjust the settings as shown on the computer....
... CAUTION: Before you begin any mouse extension cables, and connect the mouse directly to check the hard drive, floppy disks, CDs, or DVDs Save and close any open files and exit any open files or programs and shut down or Turn Off, and then press . 3. ... the settings as shown on the setup diagram for bent or broken pins. See Hardware Troubleshooter. Network Problems l Run the Dell Diagnostics (see Dell Diagnostics). l Run the Dell Diagnostics (see Dell Diagnostics). Windows XP 1. Click Start® Control Panel® Mouse. 2. Adjust the settings as shown on the computer....


