Setup and Features Information Tech Sheet
Page 1
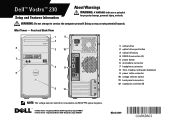
Dell™ Vostro™ 230 Setup and Features Information About Warnings WARNING: A WARNING indicates a potential for property damage, personal injury, or death. For Mini Tower - Front and Back View 1 9 2 8 3 10 7 4 11 6 5 12 1 optical drive 2 optical drive eject button 3 optical drive bay 4 USB 2.0 connectors (2) 5 power button 6 microphone connector 7 headphone connector 8 19-in-1 media-card reader (optional) 9 power cable connector...
Dell™ Vostro™ 230 Setup and Features Information About Warnings WARNING: A WARNING indicates a potential for property damage, personal injury, or death. For Mini Tower - Front and Back View 1 9 2 8 3 10 7 4 11 6 5 12 1 optical drive 2 optical drive eject button 3 optical drive bay 4 USB 2.0 connectors (2) 5 power button 6 microphone connector 7 headphone connector 8 19-in-1 media-card reader (optional) 9 power cable connector...
Setup and Features Information Tech Sheet
Page 2
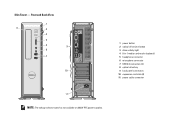
Slim Tower - Front and Back View 1 8 2 3 4 5 9 6 7 10 11 NOTE: The voltage selector switch is not available on 250 W PFC power supplies. 1 power button 2 optical drive eject button 3 drive activity light 4 8-in-1 media-card reader (optional) 5 headphone connector 6 microphone connector 7 USB 2.0 connectors (2) 8 optical drive bay 9 back panel connectors 10 expansion card slots (4) 11 power cable connector
Slim Tower - Front and Back View 1 8 2 3 4 5 9 6 7 10 11 NOTE: The voltage selector switch is not available on 250 W PFC power supplies. 1 power button 2 optical drive eject button 3 drive activity light 4 8-in-1 media-card reader (optional) 5 headphone connector 6 microphone connector 7 USB 2.0 connectors (2) 8 optical drive bay 9 back panel connectors 10 expansion card slots (4) 11 power cable connector
Setup and Features Information Tech Sheet
Page 4
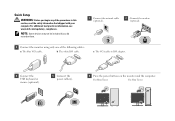
... the safety information that shipped with your computer. For additional best practices information, see www.dell.com/regulatory_compliance. c The VGA cable to DVI adapter. 4 Connect the USB keyboard or mouse (optional). 5 Connect the power cable(s). 6 Press the power buttons on the monitor and the computer. b The white DVI cable. For Mini Tower For Slim...
... the safety information that shipped with your computer. For additional best practices information, see www.dell.com/regulatory_compliance. c The VGA cable to DVI adapter. 4 Connect the USB keyboard or mouse (optional). 5 Connect the power cable(s). 6 Press the power buttons on the monitor and the computer. b The white DVI cable. For Mini Tower For Slim...
Setup and Features Information Tech Sheet
Page 6
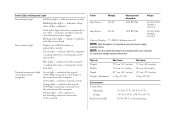
...activity light: Displays the SATA hard drive or optical drive activity. Power Wattage Maximum heat dissipation Voltage Mini Tower 300 W 1338 BTU/hr 115/230 VAC 50/60 Hz 9.0/4.5 A Slim Tower 250 W 1233 BTU/hr 115/230 VAC 50/60 Hz 8.0/4.0 A Coin-cell battery 3 V ... the computer. indicates that the computer is not detecting a physical connection to 80 % (noncondensing) Control Lights and Diagnostic Lights Power button light Solid blue light - indicates a problem with the system board. indicates that shipped with your computer for important voltage-setting information...
...activity light: Displays the SATA hard drive or optical drive activity. Power Wattage Maximum heat dissipation Voltage Mini Tower 300 W 1338 BTU/hr 115/230 VAC 50/60 Hz 9.0/4.5 A Slim Tower 250 W 1233 BTU/hr 115/230 VAC 50/60 Hz 8.0/4.0 A Coin-cell battery 3 V ... the computer. indicates that the computer is not detecting a physical connection to 80 % (noncondensing) Control Lights and Diagnostic Lights Power button light Solid blue light - indicates a problem with the system board. indicates that shipped with your computer for important voltage-setting information...


