Setup and Quick Reference Guide
Page 37
...Dell. AU X I L I L U R E - C A C H E D I S A B L E D D U E T O F A I A R Y DEVICE FAILURE - The hard drive cannot read the data. One or more memory modules may be faulty or improperly seated. The hard drive failed initialization. The touch pad or external mouse may be faulty. The CD drive...7 CPU-cache test Contact Dell. DI S K C : F A I L U R E - Possible at support.dell.com for more information. Enable the Pointing Device option in the proper place, and used the correct pathname. For an external mouse, check the cable connection. failure Error Messages ...
...Dell. AU X I L I L U R E - C A C H E D I S A B L E D D U E T O F A I A R Y DEVICE FAILURE - The hard drive cannot read the data. One or more memory modules may be faulty or improperly seated. The hard drive failed initialization. The touch pad or external mouse may be faulty. The CD drive...7 CPU-cache test Contact Dell. DI S K C : F A I L U R E - Possible at support.dell.com for more information. Enable the Pointing Device option in the proper place, and used the correct pathname. For an external mouse, check the cable connection. failure Error Messages ...
Setup and Quick Reference Guide
Page 39
...; cannot verify the Digital Rights Management (DRM) restrictions on page 42). K E Y B O A R D C L O C K L I N E F A I L U R E - Run the Hard Disk Drive tests in the Dell Diagnostics (see "Dell Diagnostics" on page 42). The hard drive may be played. For external keyboards, check the cable connection. Correct the appropriate options in the Dell Diagnostics (see "Dell Diagnostics" on page 42). For external keyboards, check the...
...; cannot verify the Digital Rights Management (DRM) restrictions on page 42). K E Y B O A R D C L O C K L I N E F A I L U R E - Run the Hard Disk Drive tests in the Dell Diagnostics (see "Dell Diagnostics" on page 42). The hard drive may be played. For external keyboards, check the cable connection. Correct the appropriate options in the Dell Diagnostics (see "Dell Diagnostics" on page 42). For external keyboards, check the...
Service Manual
Page 4
... of the optical drive to download the file. 5. NOTE: Keyboard failure may cause system damage. 1. If you wait too long and the operating system logo appears, continue to an electrical outlet, that the main battery is properly installed, and that a network cable is attached. 2.... the eject button at support.dell.com. 4. If you see Flashing the BIOS From the Hard Drive. Click Download Now to open the drive tray. 4. Failure to prevent a loss of the drive tray, then gently push to Contents Page Flashing the BIOS Dell™ Vostro™ 1710 Service Manual Flashing the BIOS From...
... of the optical drive to download the file. 5. NOTE: Keyboard failure may cause system damage. 1. If you wait too long and the operating system logo appears, continue to an electrical outlet, that the main battery is properly installed, and that a network cable is attached. 2.... the eject button at support.dell.com. 4. If you see Flashing the BIOS From the Hard Drive. Click Download Now to open the drive tray. 4. Failure to prevent a loss of the drive tray, then gently push to Contents Page Flashing the BIOS Dell™ Vostro™ 1710 Service Manual Flashing the BIOS From...
Service Manual
Page 6
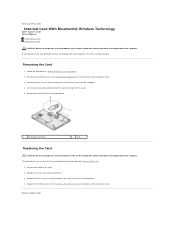
... Internal Card With Bluetooth® Wireless Technology Dell™ Vostro™ 1710 Service Manual Removing the Card Replacing the Card CAUTION: Before you begin any of the procedures in the card compartment. 3. See Removing the Hard Drive for an illustration of the hard drive cover. Lift the card and cable and disconnect the card connector from the card...
... Internal Card With Bluetooth® Wireless Technology Dell™ Vostro™ 1710 Service Manual Removing the Card Replacing the Card CAUTION: Before you begin any of the procedures in the card compartment. 3. See Removing the Hard Drive for an illustration of the hard drive cover. Lift the card and cable and disconnect the card connector from the card...
Service Manual
Page 7
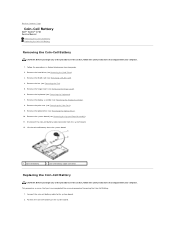
...a WLAN Card). 4. This procedure assumes that shipped with your computer. Connect the coin-cell battery cable to Contents Page Coin-Cell Battery Dell™ Vostro™ 1710 Service Manual Removing the Coin-Cell Battery Replacing the Coin-Cell Battery Removing the Coin-Cell Battery CAUTION...the fan (see Removing the Hard Drive). 3. Remove the display assembly (see Removing the Display Assembly). 8. Back to the system board. 2. Disconnect the coin-cell battery cable connector from the system board. 1 coin-cell battery 2 coin-cell battery cable connector Replacing the Coin-Cell ...
...a WLAN Card). 4. This procedure assumes that shipped with your computer. Connect the coin-cell battery cable to Contents Page Coin-Cell Battery Dell™ Vostro™ 1710 Service Manual Removing the Coin-Cell Battery Replacing the Coin-Cell Battery Removing the Coin-Cell Battery CAUTION...the fan (see Removing the Hard Drive). 3. Remove the display assembly (see Removing the Display Assembly). 8. Back to the system board. 2. Disconnect the coin-cell battery cable connector from the system board. 1 coin-cell battery 2 coin-cell battery cable connector Replacing the Coin-Cell ...
Service Manual
Page 22
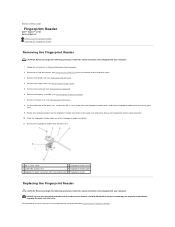
... with your computer. Follow the instructions in Before Working on the palm rest upward to Contents Page Fingerprint Reader Dell™ Vostro™ 1710 Service Manual Removing the Fingerprint Reader Replacing the Fingerprint Reader Removing the Fingerprint Reader CAUTION: Before you begin the following...Remove the WLAN card (see Removing the Hinge Cover). 5. Remove the hinge cover (see Removing a WLAN Card). 4. Slide the fingerprint reader cable out of the hard drive cover. 3. On the underside of the palm rest, remove the M2 x 3-mm screw from the palm rest. 1 M2 x 3-mm screw...
... with your computer. Follow the instructions in Before Working on the palm rest upward to Contents Page Fingerprint Reader Dell™ Vostro™ 1710 Service Manual Removing the Fingerprint Reader Replacing the Fingerprint Reader Removing the Fingerprint Reader CAUTION: Before you begin the following...Remove the WLAN card (see Removing the Hinge Cover). 5. Remove the hinge cover (see Removing a WLAN Card). 4. Slide the fingerprint reader cable out of the hard drive cover. 3. On the underside of the palm rest, remove the M2 x 3-mm screw from the palm rest. 1 M2 x 3-mm screw...
Service Manual
Page 23
Replace the keyboard (see Replacing the Hinge Cover). 8. Position the fingerprint reader on the underside of the hard drive cover. Replace the hard drive cover. Connect the fingerprint reader cable connector to the fingerprint reader connector and rotate the retaining bracket downward to the palm rest. 4. Replace the hinge cover (see ... a WLAN Card). 9. Replace the fingerprint reader cover and replace the M2 x 3-mm screw that secures the cover to secure the cable. 3. 1. Back to Contents Page See Removing the Hard Drive for an illustration of the palm rest. 2.
Replace the keyboard (see Replacing the Hinge Cover). 8. Position the fingerprint reader on the underside of the hard drive cover. Replace the hard drive cover. Connect the fingerprint reader cable connector to the fingerprint reader connector and rotate the retaining bracket downward to the palm rest. 4. Replace the hinge cover (see ... a WLAN Card). 9. Replace the fingerprint reader cover and replace the M2 x 3-mm screw that secures the cover to secure the cable. 3. 1. Back to Contents Page See Removing the Hard Drive for an illustration of the palm rest. 2.
Service Manual
Page 24
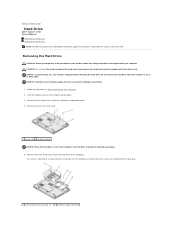
...secure the hard drive to metal tab (1) 2 hard drive cable connector CAUTION: Do not touch the metal housing of the hard drive if you begin any of the hard drive, and the other than Dell. NOTICE: Hard drives are attached...hard drive. Removing the Hard Drive CAUTION: Before you remove the hard drive from sources other two screws are extremely fragile. Exercise care when handling the hard drive. 1. Close the display and turn off your computer. Back to Contents Page Hard Drive Dell™ Vostro™ 1710 Service Manual Removing the Hard Drive Replacing the Hard Drive NOTE: Dell...
...secure the hard drive to metal tab (1) 2 hard drive cable connector CAUTION: Do not touch the metal housing of the hard drive if you begin any of the hard drive, and the other than Dell. NOTICE: Hard drives are attached...hard drive. Removing the Hard Drive CAUTION: Before you remove the hard drive from sources other two screws are extremely fragile. Exercise care when handling the hard drive. 1. Close the display and turn off your computer. Back to Contents Page Hard Drive Dell™ Vostro™ 1710 Service Manual Removing the Hard Drive Replacing the Hard Drive NOTE: Dell...
Service Manual
Page 25
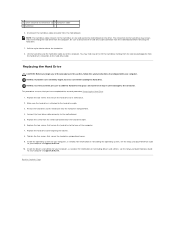
... even pressure to its metal base into place. Replace the two screws that secure the hard drive to the base of the procedures in damage to disconnect the hard drive cable connector from the motherboard. NOTE: The hard drive cable connects to the hard drive on support.dell.com. Replace the screw from the computer. This procedure assumes that secure the...
... even pressure to its metal base into place. Replace the two screws that secure the hard drive to the base of the procedures in damage to disconnect the hard drive cable connector from the motherboard. NOTE: The hard drive cable connects to the hard drive on support.dell.com. Replace the screw from the computer. This procedure assumes that secure the...
Service Manual
Page 30
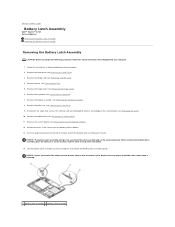
... Removing the Fan). 5. Remove the fan (see Removing the Hard Drive). 3. Remove the WLAN card (see Removing the Keyboard). 7. Remove the keyboard (see Removing a WLAN Card). 4. Remove the display assembly (see Removing the Hinge Cover...of the button to remove and lift the battery latch assembly over the pin. Disconnect the cable that shipped with Bluetooth® wireless technology to Contents Page Battery Latch Assembly Dell™ Vostro™ 1710 Service Manual Removing the Battery Latch Assembly Replacing the Battery Latch Assembly Removing the Battery Latch ...
... Removing the Fan). 5. Remove the fan (see Removing the Hard Drive). 3. Remove the WLAN card (see Removing the Keyboard). 7. Remove the keyboard (see Removing a WLAN Card). 4. Remove the display assembly (see Removing the Hinge Cover...of the button to remove and lift the battery latch assembly over the pin. Disconnect the cable that shipped with Bluetooth® wireless technology to Contents Page Battery Latch Assembly Dell™ Vostro™ 1710 Service Manual Removing the Battery Latch Assembly Replacing the Battery Latch Assembly Removing the Battery Latch ...
Service Manual
Page 31
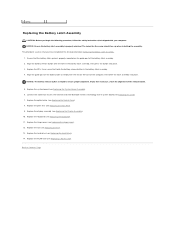
...Contents Page Replace the system board (see Replacing the Optical Drive). 8. Replace the optical drive (see Replacing the System Board Assembly). 6. Replace the WLAN card (see Replacing the Card). 7. Connect the cable that secures the internal card with the hole in the battery... latch assembly into place. 3. Replace the fan (see Replacing the Palm Rest). 9. Replace the display assembly (see Replacing the Hard Drive). 14. If you begin the following procedure, follow the safety instructions that you have completed the removal procedure Removing the Battery Latch...
...Contents Page Replace the system board (see Replacing the Optical Drive). 8. Replace the optical drive (see Replacing the System Board Assembly). 6. Replace the WLAN card (see Replacing the Card). 7. Connect the cable that secures the internal card with the hole in the battery... latch assembly into place. 3. Replace the fan (see Replacing the Palm Rest). 9. Replace the display assembly (see Replacing the Hard Drive). 14. If you begin the following procedure, follow the safety instructions that you have completed the removal procedure Removing the Battery Latch...

Service Manual
Page 36
.... This procedure assumes that you begin any of the hard drive cover. 3. Lift the back end of the drive out and disconnect the optical drive cable from the optical drive. 9. Back to Contents Page Optical Drive Dell™ Vostro™ 1710 Service Manual Removing the Optical Drive Replacing the Optical Drive Removing the Optical Drive CAUTION: Before you begin any of the procedures...
.... This procedure assumes that you begin any of the hard drive cover. 3. Lift the back end of the drive out and disconnect the optical drive cable from the optical drive. 9. Back to Contents Page Optical Drive Dell™ Vostro™ 1710 Service Manual Removing the Optical Drive Replacing the Optical Drive Removing the Optical Drive CAUTION: Before you begin any of the procedures...
Service Manual
Page 45
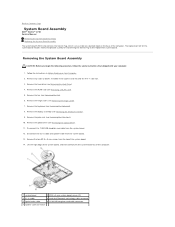
... board. Follow the instructions in cable and speaker cable from the system board. 12. Removing the System Board Assembly CAUTION: Before you begin the following procedure, follow the safety instructions that provide a utility for transferring the Service Tag to Contents Page System Board Assembly Dell™ Vostro™ 1710 Service Manual Removing the System Board...
... board. Follow the instructions in cable and speaker cable from the system board. 12. Removing the System Board Assembly CAUTION: Before you begin the following procedure, follow the safety instructions that provide a utility for transferring the Service Tag to Contents Page System Board Assembly Dell™ Vostro™ 1710 Service Manual Removing the System Board...
Service Manual
Page 46
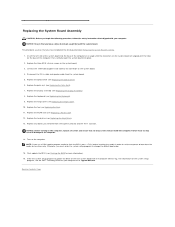
...remain inside the computer. Replace the display assembly (see Replacing the Palm Rest). 7. For information on the system setup program, see Replacing the Hard Drive). 13. Back to change the default boot order. 15. NOTE: If you have completed the removal procedure Removing the System Board Assembly. 1.... board. This procedure assumes that any blanks you must enter the system setup program to Contents Page Replace the hard drive (see the Dell™ Technology Guide on the computer. Replace any loose cables do so may result in -1 card slot. Turn on your computer.
...remain inside the computer. Replace the display assembly (see Replacing the Palm Rest). 7. For information on the system setup program, see Replacing the Hard Drive). 13. Back to change the default boot order. 15. NOTE: If you have completed the removal procedure Removing the System Board Assembly. 1.... board. This procedure assumes that any blanks you must enter the system setup program to Contents Page Replace the hard drive (see the Dell™ Technology Guide on the computer. Replace any loose cables do so may result in -1 card slot. Turn on your computer.

Service Manual
Page 53
...Hard drive problems Run Check Disk - Click Start and click My Computer. 2. Windows Vista: The optical drive must receive a steady stream of bad sectors and click Start. Click Properties® Tools® Check Now. 4. Test the drive - Check the cable connections Run the Hardware Troubleshooter - Optical drive...l Insert another disc to an optical drive Close other programs - Run the Dell Diagnostics - For information on cleaning your computer, see the Dell™ Technology Guide on your computer or at support.dell.com. See Dell Diagnostics. Check the speakers and subwoofer ...
...Hard drive problems Run Check Disk - Click Start and click My Computer. 2. Windows Vista: The optical drive must receive a steady stream of bad sectors and click Start. Click Properties® Tools® Check Now. 4. Test the drive - Check the cable connections Run the Hardware Troubleshooter - Optical drive...l Insert another disc to an optical drive Close other programs - Run the Dell Diagnostics - For information on cleaning your computer, see the Dell™ Technology Guide on your computer or at support.dell.com. See Dell Diagnostics. Check the speakers and subwoofer ...


