User Manual
Page 2
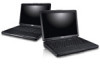
microphone 10. touchpad buttons (2) 13. keyboard 15. HDMI connector 8. The computer turns on the fan when the computer gets hot. device status lights 14. Do not store your Dell computer in the air vents. touchpad 11. 7. memory card reader 12. power button Figure 2. USB 2.0 connector WARNING: Do not block, push objects into, or...
microphone 10. touchpad buttons (2) 13. keyboard 15. HDMI connector 8. The computer turns on the fan when the computer gets hot. device status lights 14. Do not store your Dell computer in the air vents. touchpad 11. 7. memory card reader 12. power button Figure 2. USB 2.0 connector WARNING: Do not block, push objects into, or...
User Manual
Page 3
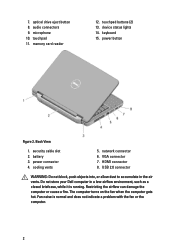
Front And Back - speakers (2) 5. keyboard 14. USB 2.0 connectors (2) 8. touchpad buttons (2) 10. microphone 11. Vostro 1540/1550 Figure 3. display 4. optical drive eject button 7. memory card reader 12. camera status light 2. Front View 1. camera 3. optical drive 6. touchpad 9. device status lights 13. power button 3
Front And Back - speakers (2) 5. keyboard 14. USB 2.0 connectors (2) 8. touchpad buttons (2) 10. microphone 11. Vostro 1540/1550 Figure 3. display 4. optical drive eject button 7. memory card reader 12. camera status light 2. Front View 1. camera 3. optical drive 6. touchpad 9. device status lights 13. power button 3
User Manual
Page 5
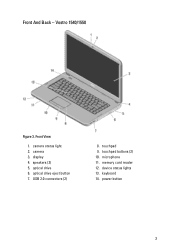
Connect the AC adapter to the electrical outlet. AC Adapter 2. Connect USB devices, such as a mouse or keyboard (optional). NOTE: Some devices may not be included if you did not order them. 1. Connect the network cable (optional). USB Connector 4. Figure 6. Network Connector 3. Open ...
Connect the AC adapter to the electrical outlet. AC Adapter 2. Connect USB devices, such as a mouse or keyboard (optional). NOTE: Some devices may not be included if you did not order them. 1. Connect the network cable (optional). USB Connector 4. Figure 6. Network Connector 3. Open ...
Owners Manual
Page 3
... Digital (SD) Card 13 Installing The Secure Digital (SD) Card 14 4 Removing The Hinge Cover 15 Installing The Hinge Cover 16 5 Removing The Keyboard 17 Installing The Keyboard 18 6 Removing The Optical Disc Drive 19 Installing The Optical Disc Drive 20 7 Removing The Memory Module 21 Installing The Memory Module 22 8 Removing...
... Digital (SD) Card 13 Installing The Secure Digital (SD) Card 14 4 Removing The Hinge Cover 15 Installing The Hinge Cover 16 5 Removing The Keyboard 17 Installing The Keyboard 18 6 Removing The Optical Disc Drive 19 Installing The Optical Disc Drive 20 7 Removing The Memory Module 21 Installing The Memory Module 22 8 Removing...
Owners Manual
Page 17
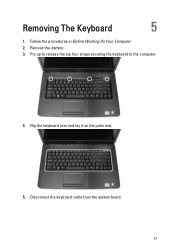
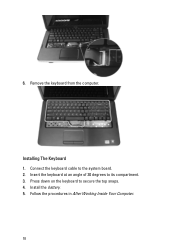
Pry up to release the top four snaps securing the keyboard to the computer. 4. Flip the keyboard over and lay it on the palm rest. 5. Follow the procedures in Before Working On Your Computer. 2. Disconnect the keyboard cable from the system board. 17 Removing The Keyboard 5 1. Remove the battery. 3.
Pry up to release the top four snaps securing the keyboard to the computer. 4. Flip the keyboard over and lay it on the palm rest. 5. Follow the procedures in Before Working On Your Computer. 2. Disconnect the keyboard cable from the system board. 17 Removing The Keyboard 5 1. Remove the battery. 3.
Owners Manual
Page 18
Connect the keyboard cable to secure the top snaps. 4. Remove the keyboard from the computer. Press down on the keyboard to the system board. 2. 6. Install the battery. 5. Follow the procedures in After Working Inside Your Computer. 18 Installing The Keyboard 1. Insert the keyboard at an angle of 30 degrees to its compartment. 3.
Connect the keyboard cable to secure the top snaps. 4. Remove the keyboard from the computer. Press down on the keyboard to the system board. 2. 6. Install the battery. 5. Follow the procedures in After Working Inside Your Computer. 18 Installing The Keyboard 1. Insert the keyboard at an angle of 30 degrees to its compartment. 3.
Owners Manual
Page 19
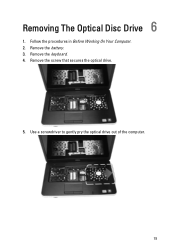
Remove the keyboard. 4. Removing The Optical Disc Drive 6 1. Remove the screw that secures the optical drive. 5. Follow the procedures in Before Working On Your Computer. 2. Use a screwdriver to gently pry the optical drive out of the computer. 19 Remove the battery. 3.
Remove the keyboard. 4. Removing The Optical Disc Drive 6 1. Remove the screw that secures the optical drive. 5. Follow the procedures in Before Working On Your Computer. 2. Use a screwdriver to gently pry the optical drive out of the computer. 19 Remove the battery. 3.

Owners Manual
Page 20
Install the keyboard. 4. Install the battery. 5. Slide the optical drive into the compartment on the left side of the chassis. 2. Tighten the screw to secure the optical drive to the computer. 3. Follow the procedures in After Working Inside Your Computer. 20 Installing The Optical Disc Drive 1.
Install the keyboard. 4. Install the battery. 5. Slide the optical drive into the compartment on the left side of the chassis. 2. Tighten the screw to secure the optical drive to the computer. 3. Follow the procedures in After Working Inside Your Computer. 20 Installing The Optical Disc Drive 1.
Owners Manual
Page 21
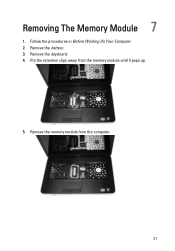
Remove the battery. 3. Remove the keyboard. 4. Remove the memory module from the memory module until it pops up. 5. Follow the procedures in Before Working On Your Computer. 2. Pry the retention clips away from the computer. 21 Removing The Memory Module 7 1.
Remove the battery. 3. Remove the keyboard. 4. Remove the memory module from the memory module until it pops up. 5. Follow the procedures in Before Working On Your Computer. 2. Pry the retention clips away from the computer. 21 Removing The Memory Module 7 1.
Owners Manual
Page 22
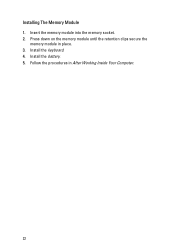
Insert the memory module into the memory socket. 2. Install the keyboard. 4. Install the battery. 5. Follow the procedures in place. 3. Press down on the memory module until the retention clips secure the memory module in After Working Inside Your Computer. 22 Installing The Memory Module 1.
Insert the memory module into the memory socket. 2. Install the keyboard. 4. Install the battery. 5. Follow the procedures in place. 3. Press down on the memory module until the retention clips secure the memory module in After Working Inside Your Computer. 22 Installing The Memory Module 1.
Owners Manual
Page 23
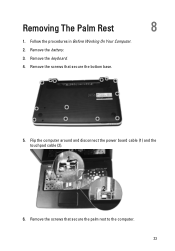
Remove the screws that secure the palm rest to the computer. 23 Flip the computer around and disconnect the power board cable (1) and the touchpad cable (2). 6. Remove the battery. 3. Remove the screws that secure the bottom base. 5. Remove the keyboard. 4. Removing The Palm Rest 8 1. Follow the procedures in Before Working On Your Computer. 2.
Remove the screws that secure the palm rest to the computer. 23 Flip the computer around and disconnect the power board cable (1) and the touchpad cable (2). 6. Remove the battery. 3. Remove the screws that secure the bottom base. 5. Remove the keyboard. 4. Removing The Palm Rest 8 1. Follow the procedures in Before Working On Your Computer. 2.
Owners Manual
Page 25
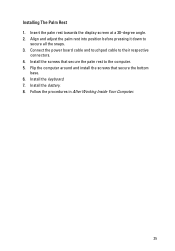
Install the screws that secure the bottom base. 6. Insert the palm rest towards the display screen at a 30-degree angle. 2. Align and adjust the palm rest into position before pressing it down to their respective connectors. 4. Install the keyboard. 7. Flip the computer around and install the screws that secure the palm rest to the computer. 5. Connect the power board cable and touchpad cable to secure all the snaps. 3. Follow the procedures in After Working Inside Your Computer. 25 Installing The Palm Rest 1. Install the battery. 8.
Install the screws that secure the bottom base. 6. Insert the palm rest towards the display screen at a 30-degree angle. 2. Align and adjust the palm rest into position before pressing it down to their respective connectors. 4. Install the keyboard. 7. Flip the computer around and install the screws that secure the palm rest to the computer. 5. Connect the power board cable and touchpad cable to secure all the snaps. 3. Follow the procedures in After Working Inside Your Computer. 25 Installing The Palm Rest 1. Install the battery. 8.
Owners Manual
Page 27
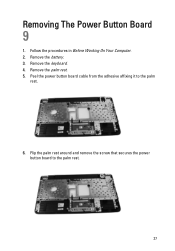
Removing The Power Button Board 9 1. Peel the power button board cable from the adhesive affixing it to the palm rest. 27 Remove the keyboard. 4. Flip the palm rest around and remove the screw that secures the power button board to the palm rest. 6. Remove the battery. 3. Follow the procedures in Before Working On Your Computer. 2. Remove the palm rest. 5.
Removing The Power Button Board 9 1. Peel the power button board cable from the adhesive affixing it to the palm rest. 27 Remove the keyboard. 4. Flip the palm rest around and remove the screw that secures the power button board to the palm rest. 6. Remove the battery. 3. Follow the procedures in Before Working On Your Computer. 2. Remove the palm rest. 5.
Owners Manual
Page 28
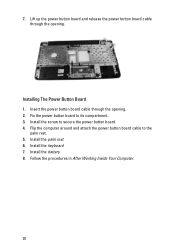
Flip the computer around and attach the power button board cable to secure the power button board. 4. Install the battery. 8. Install the screw to the palm rest. 5. Fix the power button board to its compartment. 3. Install the palm rest. 6. Follow the procedures in After Working Inside Your Computer. 28 Installing The Power Button Board 1. Install the keyboard. 7. Insert the power button board cable through the opening . 2. 7. Lift up the power button board and release the power button board cable through the opening .
Flip the computer around and attach the power button board cable to secure the power button board. 4. Install the battery. 8. Install the screw to the palm rest. 5. Fix the power button board to its compartment. 3. Install the palm rest. 6. Follow the procedures in After Working Inside Your Computer. 28 Installing The Power Button Board 1. Install the keyboard. 7. Insert the power button board cable through the opening . 2. 7. Lift up the power button board and release the power button board cable through the opening .

Owners Manual
Page 29
Remove the keyboard. 4. Remove the screws that secure the hard drive bracket and detach it out of the computer. 10 6. Slide the hard drive and lift it from the hard drive. 29 Removing The Hard Drive 1. Remove the battery. 3. Follow the procedures in Before Working On Your Computer. 2. Remove the palm rest. 5.
Remove the keyboard. 4. Remove the screws that secure the hard drive bracket and detach it out of the computer. 10 6. Slide the hard drive and lift it from the hard drive. 29 Removing The Hard Drive 1. Remove the battery. 3. Follow the procedures in Before Working On Your Computer. 2. Remove the palm rest. 5.
Owners Manual
Page 30
Install the palm rest. 5. Install the hard drive bracket to the system board. 4. Place the hard drive in After Working Inside Your Computer. 30 Install the keyboard. 6. Follow the procedures in its compartment and slide it towards the SATA connector to secure it to the hard drive. 2. Installing The Hard Drive 1. Tighten the screws that secure the hard drive bracket. 3. Install the battery. 7.
Install the palm rest. 5. Install the hard drive bracket to the system board. 4. Place the hard drive in After Working Inside Your Computer. 30 Install the keyboard. 6. Follow the procedures in its compartment and slide it towards the SATA connector to secure it to the hard drive. 2. Installing The Hard Drive 1. Tighten the screws that secure the hard drive bracket. 3. Install the battery. 7.

Owners Manual
Page 31
Remove the WLAN card from its compartment. 7. Pry the latch to the WLAN card. 6. Remove the keyboard. 4. Remove the palm rest. 5. Remove the battery. 3. Follow the procedures in Before Working On Your Computer. 2. Disconnect any antennae connected to release the WLAN card from the computer. 31 Removing The Wireless Local Area Network (WLAN) Card 11 1.
Remove the WLAN card from its compartment. 7. Pry the latch to the WLAN card. 6. Remove the keyboard. 4. Remove the palm rest. 5. Remove the battery. 3. Follow the procedures in Before Working On Your Computer. 2. Disconnect any antennae connected to release the WLAN card from the computer. 31 Removing The Wireless Local Area Network (WLAN) Card 11 1.
Owners Manual
Page 32
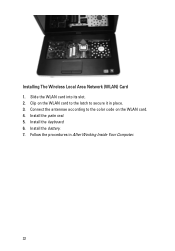
Installing The Wireless Local Area Network (WLAN) Card 1. Connect the antennae according to the color code on the WLAN card to the latch to secure it in After Working Inside Your Computer. 32 Install the keyboard. 6. Install the battery. 7. Install the palm rest. 5. Slide the WLAN card into its slot. 2. Clip on the WLAN card. 4. Follow the procedures in place. 3.
Installing The Wireless Local Area Network (WLAN) Card 1. Connect the antennae according to the color code on the WLAN card to the latch to secure it in After Working Inside Your Computer. 32 Install the keyboard. 6. Install the battery. 7. Install the palm rest. 5. Slide the WLAN card into its slot. 2. Clip on the WLAN card. 4. Follow the procedures in place. 3.
Owners Manual
Page 33
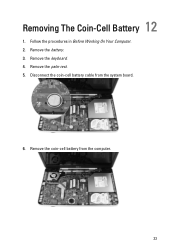
Removing The Coin-Cell Battery 12 1. Remove the keyboard. 4. Remove the palm rest. 5. Remove the coin-cell battery from the system board. 6. Disconnect the coin-cell battery cable from the computer. 33 Follow the procedures in Before Working On Your Computer. 2. Remove the battery. 3.
Removing The Coin-Cell Battery 12 1. Remove the keyboard. 4. Remove the palm rest. 5. Remove the coin-cell battery from the system board. 6. Disconnect the coin-cell battery cable from the computer. 33 Follow the procedures in Before Working On Your Computer. 2. Remove the battery. 3.
Owners Manual
Page 34
Installing The Coin-Cell Battery 1. Install the coin-cell battery to the system board. 3. Install the palm rest. 4. Install the battery. 6. Connect the coin-cell battery cable to the coin-cell battery compartment. 2. Follow the procedures in After Working Inside Your Computer. 34 Install the keyboard. 5.
Installing The Coin-Cell Battery 1. Install the coin-cell battery to the system board. 3. Install the palm rest. 4. Install the battery. 6. Connect the coin-cell battery cable to the coin-cell battery compartment. 2. Follow the procedures in After Working Inside Your Computer. 34 Install the keyboard. 5.


