Owner's Manual
Page 4
Surge Protectors 45 Line Conditioners 46 Uninterruptible Power Supplies 46 4 Using the Display 47 Adjusting Brightness 47 Switching the Video Image From Your Computer Display To a Projector 47 Setting Display Resolution and Refresh Rate 47 Microsoft® Windows® XP ...50 System Functions 50 Display Functions 50 Battery 50 Power Management 50 Microsoft® Windows® Logo Key Functions . . . . 50 Dell™ QuickSet Key Combinations 51 Adjusting Keyboard Settings 51 Touch Pad 52 Customizing the Touch Pad 53 6 Using a Battery 55 Battery Performance 55 4 Contents
Surge Protectors 45 Line Conditioners 46 Uninterruptible Power Supplies 46 4 Using the Display 47 Adjusting Brightness 47 Switching the Video Image From Your Computer Display To a Projector 47 Setting Display Resolution and Refresh Rate 47 Microsoft® Windows® XP ...50 System Functions 50 Display Functions 50 Battery 50 Power Management 50 Microsoft® Windows® Logo Key Functions . . . . 50 Dell™ QuickSet Key Combinations 51 Adjusting Keyboard Settings 51 Touch Pad 52 Customizing the Touch Pad 53 6 Using a Battery 55 Battery Performance 55 4 Contents

Owner's Manual
Page 5
Checking the Battery Charge 56 Dell QuickSet Battery Meter 56 Charge Gauge 57 Low-Battery Warning 58 Microsoft® Windows® XP Battery Meter . . . . . 58 Microsoft® Windows® Vista Battery ... Battery 61 Storing a Battery 62 7 Using the Optional Camera 63 Accessing the Camera's Help File 63 Manually Adjusting the Camera Settings 64 Creating a Picture or a Video 64 8 Using Multimedia 67 Playing Media 67 Playing Media Using Dell Express Card Remote Control 69 Copying CD and DVD Media 71 Contents 5
Checking the Battery Charge 56 Dell QuickSet Battery Meter 56 Charge Gauge 57 Low-Battery Warning 58 Microsoft® Windows® XP Battery Meter . . . . . 58 Microsoft® Windows® Vista Battery ... Battery 61 Storing a Battery 62 7 Using the Optional Camera 63 Accessing the Camera's Help File 63 Manually Adjusting the Camera Settings 64 Creating a Picture or a Video 64 8 Using Multimedia 67 Playing Media 67 Playing Media Using Dell Express Card Remote Control 69 Copying CD and DVD Media 71 Contents 5

Owner's Manual
Page 6
...DVD 71 Using Blank CD and DVD Media 72 Helpful Tips 72 Adjusting the Volume 73 Adjusting the Picture 74 Using Dell Media Experience™ and Dell MediaDirect™ 74 If the computer is turned on or in standby or sleep mode 75 If the computer is turned... mode 75 Dell MediaDirect and Dell Media Experience Help 76 Connecting Your Computer to a TV or Audio Device . . 76 S-Video and Standard Audio 78 S-Video and S/PDIF Digital Audio 80 Composite Video and Standard Audio 82 Composite Video and S/PDIF Digital Audio . . . . 84 Component Video and Standard Audio 86 Component Video and S/PDIF...
...DVD 71 Using Blank CD and DVD Media 72 Helpful Tips 72 Adjusting the Volume 73 Adjusting the Picture 74 Using Dell Media Experience™ and Dell MediaDirect™ 74 If the computer is turned on or in standby or sleep mode 75 If the computer is turned... mode 75 Dell MediaDirect and Dell Media Experience Help 76 Connecting Your Computer to a TV or Audio Device . . 76 S-Video and Standard Audio 78 S-Video and S/PDIF Digital Audio 80 Composite Video and Standard Audio 82 Composite Video and S/PDIF Digital Audio . . . . 84 Component Video and Standard Audio 86 Component Video and S/PDIF...

Owner's Manual
Page 9
... from integrated speakers 143 No sound from external speakers 143 No sound from headphones 144 Remote Control Problems 144 Touch Pad or Mouse Problems 145 Video and Display Problems 146 If the display is blank 146 If the display is difficult to read 146 If only part of the display is...
... from integrated speakers 143 No sound from external speakers 143 No sound from headphones 144 Remote Control Problems 144 Touch Pad or Mouse Problems 145 Video and Display Problems 146 If the display is blank 146 If the display is difficult to read 146 If only part of the display is...

Owner's Manual
Page 23
Hardware screen, you made when purchasing your computer, your computer has one of video controller installed in your computer, as well as the other hardware components. To determine your computer's video controller configuration: 1 Click Start , and then click Help and Support. 2 Under Pick a Task, click Use Tools to view your computer information and... 23 From the My Computer Information - About Your Computer Determining Your Computer's Configuration Based on selections that you can view the type of several different video controller configurations.
Hardware screen, you made when purchasing your computer, your computer has one of video controller installed in your computer, as well as the other hardware components. To determine your computer's video controller configuration: 1 Click Start , and then click Help and Support. 2 Under Pick a Task, click Use Tools to view your computer information and... 23 From the My Computer Information - About Your Computer Determining Your Computer's Configuration Based on selections that you can view the type of several different video controller configurations.

Owner's Manual
Page 25
... your computer, your display, see "Using the Display" on page 47. Mute the sound. Turn the volume up. Stop. Built-in -1 memory card reader 14 Dell™ MediaDirect™ button 16 power button C A M E R A I N D I S P L A Y - About Your Computer 25 11 device status lights 13 keyboard 15 keyboard status lights 12 8-...computer may not include a camera. Control CD, DVD, and Media Player playback. Play the next track. Play or pause. Digital directional microphones for video capture, conferencing, and chat. D I C A T O R - C A M E R A - Turn the volume down.
... your computer, your display, see "Using the Display" on page 47. Mute the sound. Turn the volume up. Stop. Built-in -1 memory card reader 14 Dell™ MediaDirect™ button 16 power button C A M E R A I N D I S P L A Y - About Your Computer 25 11 device status lights 13 keyboard 15 keyboard status lights 12 8-...computer may not include a camera. Control CD, DVD, and Media Player playback. Play the next track. Play or pause. Digital directional microphones for video capture, conferencing, and chat. D I C A T O R - C A M E R A - Turn the volume down.

Owner's Manual
Page 28
... enabled. The keyboard includes a numeric keypad as well as follows: - Turns on when wireless networking is connected to view and share digital photos, music, and videos stored on a battery, the light operates as the Microsoft® Windows® logo key. 28 About Your Computer Turns on only if you ordered the...
... enabled. The keyboard includes a numeric keypad as well as follows: - Turns on when wireless networking is connected to view and share digital photos, music, and videos stored on a battery, the light operates as the Microsoft® Windows® logo key. 28 About Your Computer Turns on only if you ordered the...

Owner's Manual
Page 30
... 3 air vents 5 USB connectors (2) 2 AC adapter connector 4 IEEE 1394a connector 6 ExpressCard slot S E C U R I E E E 1 3 9 4 A C O N N E C T O R - A I R V E N T S - Connects devices supporting IEEE 1394a high-speed transfer rates, such as some digital video cameras. 30 About Your Computer Fan noise is normal and does not indicate a problem with your computer turned on when the computer gets hot. CAUTION...
... 3 air vents 5 USB connectors (2) 2 AC adapter connector 4 IEEE 1394a connector 6 ExpressCard slot S E C U R I E E E 1 3 9 4 A C O N N E C T O R - A I R V E N T S - Connects devices supporting IEEE 1394a high-speed transfer rates, such as some digital video cameras. 30 About Your Computer Fan noise is normal and does not indicate a problem with your computer turned on when the computer gets hot. CAUTION...
Owner's Manual
Page 31
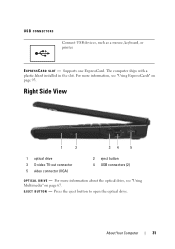
... Connect USB devices, such as a mouse, keyboard, or printer. E J E C T B U T T O N - For more information, see "Using Multimedia" on page 93. Right Side View 1 2 34 5 1 optical drive 3 S-video TV-out connector 5 video connector (VGA) 2 eject button 4 USB connectors (2) O P T I C A L D R I V E - About Your Computer 31 The computer ships with a plastic blank installed in the slot. Supports one ExpressCard...
... Connect USB devices, such as a mouse, keyboard, or printer. E J E C T B U T T O N - For more information, see "Using Multimedia" on page 93. Right Side View 1 2 34 5 1 optical drive 3 S-video TV-out connector 5 video connector (VGA) 2 eject button 4 USB connectors (2) O P T I C A L D R I V E - About Your Computer 31 The computer ships with a plastic blank installed in the slot. Supports one ExpressCard...

Owner's Manual
Page 32
USB CONNECTORS Connect USB devices, such as a monitor. Back View 1 1 modem connector (RJ-11) 2 2 network connector (RJ-45) 32 About Your Computer S-VIDEO TV-OUT CONNECTOR Connects your computer to a TV. Also connects digital audio-capable devices using the TV/digital audio adapter cable. VIDEO CONNECTOR Connects video devices, such as a mouse, keyboard, or printer.
USB CONNECTORS Connect USB devices, such as a monitor. Back View 1 1 modem connector (RJ-11) 2 2 network connector (RJ-45) 32 About Your Computer S-VIDEO TV-OUT CONNECTOR Connects your computer to a TV. Also connects digital audio-capable devices using the TV/digital audio adapter cable. VIDEO CONNECTOR Connects video devices, such as a mouse, keyboard, or printer.

Owner's Manual
Page 47
... the current settings so you can conserve power by your portable computer. Using the Display Adjusting Brightness When a Dell™ computer is connected to an external monitor and you try to switch the video image between the display only, the external device only, or the display and the external device simultaneously. NOTE... and the up-arrow key to increase brightness on the integrated display only (not on either the computer display or the external device. Switching the Video Image From Your Computer Display To a Projector When you can change .
... the current settings so you can conserve power by your portable computer. Using the Display Adjusting Brightness When a Dell™ computer is connected to an external monitor and you try to switch the video image between the display only, the external device only, or the display and the external device simultaneously. NOTE... and the up-arrow key to increase brightness on the integrated display only (not on either the computer display or the external device. Switching the Video Image From Your Computer Display To a Projector When you can change .

Owner's Manual
Page 48
...perform the steps in the following section that is using. To display a program at a specific resolution, both the video card and the display must support the program, and the necessary video drivers must be installed. Microsoft® Windows® XP 1 Click Start→ Settings→ Control Panel. 2...change , or under Resolution, slide the slide bar to the left/right to the closest supported values. NOTE: Use only the Dell-installed video drivers, which are designed to offer the best performance with vision impairments. NOTE: As the resolution increases, icons and text appear ...
...perform the steps in the following section that is using. To display a program at a specific resolution, both the video card and the display must support the program, and the necessary video drivers must be installed. Microsoft® Windows® XP 1 Click Start→ Settings→ Control Panel. 2...change , or under Resolution, slide the slide bar to the left/right to the closest supported values. NOTE: Use only the Dell-installed video drivers, which are designed to offer the best performance with vision impairments. NOTE: As the resolution increases, icons and text appear ...

Owner's Manual
Page 63
... camera features, see "Specifications" on . Using the Optional Camera 63 Using the Optional Camera If you ordered a camera when you to take photos and videos and to the touch when the computer is running and when the camera is turned on page 201. The camera and its integrated digital microphones... camera light appears when the camera is in use. 12 3 1 digital microphones (2) 3 camera 2 camera indicator Accessing the Camera's Help File To access the camera's Video Software Help file, right-click the icon in the computer display. Click Help from the menu and select Contents.
... camera features, see "Specifications" on . Using the Optional Camera 63 Using the Optional Camera If you ordered a camera when you to take photos and videos and to the touch when the computer is running and when the camera is turned on page 201. The camera and its integrated digital microphones... camera light appears when the camera is in use. 12 3 1 digital microphones (2) 3 camera 2 camera indicator Accessing the Camera's Help File To access the camera's Video Software Help file, right-click the icon in the computer display. Click Help from the menu and select Contents.
Owner's Manual
Page 64
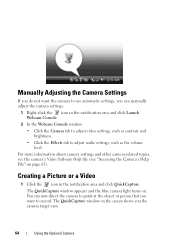
...now direct the camera to point at the object or person that you the camera target view. 64 Using the Optional Camera Creating a Picture or a Video 1 Click the icon in the notification area and click Launch Webcam Console. 2 In the Webcam Console window: • Click the Camera tab to adjust... video settings, such as contrast and brightness. • Click the Effects tab to adjust audio settings, such as the volume level. The QuickCapture window appears ...
...now direct the camera to point at the object or person that you the camera target view. 64 Using the Optional Camera Creating a Picture or a Video 1 Click the icon in the notification area and click Launch Webcam Console. 2 In the Webcam Console window: • Click the Camera tab to adjust... video settings, such as contrast and brightness. • Click the Effects tab to adjust audio settings, such as the volume level. The QuickCapture window appears ...

Owner's Manual
Page 65
To record a video, click Record a Video. Using the Optional Camera 65 Unless you designate a different location, the picture or video is automatically saved to the My Pictures folder on page 63). 2 To take a picture, click Take a Picture. For more information about creating pictures or videos, see the camera's Video Software Help file (see "Accessing the Camera's Help File" on your hard drive.
To record a video, click Record a Video. Using the Optional Camera 65 Unless you designate a different location, the picture or video is automatically saved to the My Pictures folder on page 63). 2 To take a picture, click Take a Picture. For more information about creating pictures or videos, see the camera's Video Software Help file (see "Accessing the Camera's Help File" on your hard drive.

Owner's Manual
Page 74
...Resolution. Changing or disabling the QuickSet default settings can limit Dell MediaDirect functionality. NOTE: Dell QuickSet is an instant-on page 189. 74 Using Multimedia... click Medium (16 bit). 5 Click OK. Using Dell Media Experience™ and Dell MediaDirect™ Based on configuration settings and selections you ... bar to function. For more information about Dell QuickSet, see "Dell™ QuickSet Features" on multimedia playback mode for Dell MediaDirect to reduce the resolution setting. 4... for: • Dell Media Experience, which is a multimedia user interface for accessing and ...
...Resolution. Changing or disabling the QuickSet default settings can limit Dell MediaDirect functionality. NOTE: Dell QuickSet is an instant-on page 189. 74 Using Multimedia... click Medium (16 bit). 5 Click OK. Using Dell Media Experience™ and Dell MediaDirect™ Based on configuration settings and selections you ... bar to function. For more information about Dell QuickSet, see "Dell™ QuickSet Features" on multimedia playback mode for Dell MediaDirect to reduce the resolution setting. 4... for: • Dell Media Experience, which is a multimedia user interface for accessing and ...

Owner's Manual
Page 76
... device may not be included with a standard S-video cable, a composite video adapter cable, or a component video adapter cable (available from Dell), enable you launch the media application, click on the desktop icon for purchase from Dell. Cables and TV/digital audio adapter cables are ...type of connector is available on your computer provides help . Dell MediaDirect and Dell Media Experience Help The Dell media application on your TV, you can use a commercially available S-video cable, composite video cable, or component video cable to connect your computer to a TV. When you...
... device may not be included with a standard S-video cable, a composite video adapter cable, or a component video adapter cable (available from Dell), enable you launch the media application, click on the desktop icon for purchase from Dell. Cables and TV/digital audio adapter cables are ...type of connector is available on your computer provides help . Dell MediaDirect and Dell Media Experience Help The Dell media application on your TV, you can use a commercially available S-video cable, composite video cable, or component video cable to connect your computer to a TV. When you...

Owner's Manual
Page 77
...-out connector 3 S/PDIF digital audio connector 5 S-video connector 2 composite video adapter 4 composite video-output connector 1 2 3 4 5 6 1 S-video TV-out connector 3 S/PDIF digital audio connector 5 Pb (blue) component video-output connector 2 component video adapter 4 Pr (red) component video-output connector 6 Y (green) component video-output connector If you want to connect your computer to a TV or audio device, it is recommended...
...-out connector 3 S/PDIF digital audio connector 5 S-video connector 2 composite video adapter 4 composite video-output connector 1 2 3 4 5 6 1 S-video TV-out connector 3 S/PDIF digital audio connector 5 Pb (blue) component video-output connector 2 component video adapter 4 Pr (red) component video-output connector 6 Y (green) component video-output connector If you want to connect your computer to a TV or audio device, it is recommended...

Owner's Manual
Page 78
See "Enabling the Display Settings for a TV" on page 91. S-Video and Standard Audio 1 2 1 audio connector 2 S-video TV-out connector 1 2 1 standard S-video cable 2 standard audio cable 78 Using Multimedia When you finish connecting the video and audio cables between your computer and your computer to ensure that the computer recognizes and works properly with the TV. Additionally, if you must enable your TV, you are using S/PDIF digital audio, see "Enabling S/PDIF Digital Audio" on page 91 to work with the TV.
See "Enabling the Display Settings for a TV" on page 91. S-Video and Standard Audio 1 2 1 audio connector 2 S-video TV-out connector 1 2 1 standard S-video cable 2 standard audio cable 78 Using Multimedia When you finish connecting the video and audio cables between your computer and your computer to ensure that the computer recognizes and works properly with the TV. Additionally, if you must enable your TV, you are using S/PDIF digital audio, see "Enabling S/PDIF Digital Audio" on page 91 to work with the TV.

Owner's Manual
Page 79
NOTE: If your TV or audio device supports S-video but not S/PDIF digital audio, you connected (if applicable), and then turn on the computer. 7...TV and/or audio device that you want to ensure that you can connect an S-video cable directly to the S-video TV-out connector on the computer (without the TV/digital audio adapter cable). 2 Plug one end of ...the S-video cable into the S-video output connector on the computer. 3 Plug the other end of the S-video cable into the S-video input connector on your TV. 4 Plug the single-connector end of...
NOTE: If your TV or audio device supports S-video but not S/PDIF digital audio, you connected (if applicable), and then turn on the computer. 7...TV and/or audio device that you want to ensure that you can connect an S-video cable directly to the S-video TV-out connector on the computer (without the TV/digital audio adapter cable). 2 Plug one end of ...the S-video cable into the S-video output connector on the computer. 3 Plug the other end of the S-video cable into the S-video input connector on your TV. 4 Plug the single-connector end of...


