
Owner's Manual
Page 5
Checking the Battery Charge 56 Dell QuickSet Battery Meter 56 Charge Gauge 57 Low-Battery Warning 58 Microsoft® Windows® XP Battery Meter . . . . . 58 Microsoft® Windows® Vista Battery Meter . . . . 58 Conserving Battery Power 58 Power Management Modes 59 Standby and Sleep ...Mode 59 Hibernate Mode 59 Configuring Power Management Settings 60 Accessing Power Options Properties 60 Charging the Battery 61 Replacing the Battery 61 Storing a Battery 62 7 Using the Optional Camera 63 Accessing the Camera's Help File 63 Manually Adjusting the Camera Settings...
Checking the Battery Charge 56 Dell QuickSet Battery Meter 56 Charge Gauge 57 Low-Battery Warning 58 Microsoft® Windows® XP Battery Meter . . . . . 58 Microsoft® Windows® Vista Battery Meter . . . . 58 Conserving Battery Power 58 Power Management Modes 59 Standby and Sleep ...Mode 59 Hibernate Mode 59 Configuring Power Management Settings 60 Accessing Power Options Properties 60 Charging the Battery 61 Replacing the Battery 61 Storing a Battery 62 7 Using the Optional Camera 63 Accessing the Camera's Help File 63 Manually Adjusting the Camera Settings...

Owner's Manual
Page 11
...® Wireless Technology 181 Removing a Mobile Broadband or WWAN Card . . 182 Replacing a WWAN Card 184 Flash Cache Module 185 Removing the FCM 185 Replacing the FCM 186 Coin-Cell Battery 187 Removing the Coin-Cell Battery 187 Replacing the Coin-Cell Battery 188 15 Dell™ QuickSet Features 189 16 Traveling With Your Computer 191 Identifying Your...
...® Wireless Technology 181 Removing a Mobile Broadband or WWAN Card . . 182 Replacing a WWAN Card 184 Flash Cache Module 185 Removing the FCM 185 Replacing the FCM 186 Coin-Cell Battery 187 Removing the Coin-Cell Battery 187 Replacing the Coin-Cell Battery 188 15 Dell™ QuickSet Features 189 16 Traveling With Your Computer 191 Identifying Your...

Owner's Manual
Page 34
... the computer to an electrical outlet (see "Replacing the Battery" on page 61 for instructions). Releases the battery (see "Using a Battery" on page 56). 34 About Your Computer Provides information on the battery charge (see "Checking the Battery Charge" on page 55). Bottom View 1 2 3 4 6 5 1 battery-bay latch releases (2) 2 hard drive 3 battery 4 battery charge/health gauge 5 processor and thermal module...
... the computer to an electrical outlet (see "Replacing the Battery" on page 61 for instructions). Releases the battery (see "Using a Battery" on page 56). 34 About Your Computer Provides information on the battery charge (see "Checking the Battery Charge" on page 55). Bottom View 1 2 3 4 6 5 1 battery-bay latch releases (2) 2 hard drive 3 battery 4 battery charge/health gauge 5 processor and thermal module...

Owner's Manual
Page 35
MEMORY MODULE/COIN-CELL/BLUETOOTH/MODEM BATTERY COMPARTMENT - Compartment that contains the memory modules, modem, bluetooth, and the coincell battery. About Your Computer 35 For additional information, see "Adding and Replacing Parts" on page 163. Covers the processor and thermal module. P R O C E S S O R A N D T H E R M A L M O D U L E C O V E R - NOTE: Bluetooth is optional and may not be included in your computer.
MEMORY MODULE/COIN-CELL/BLUETOOTH/MODEM BATTERY COMPARTMENT - Compartment that contains the memory modules, modem, bluetooth, and the coincell battery. About Your Computer 35 For additional information, see "Adding and Replacing Parts" on page 163. Covers the processor and thermal module. P R O C E S S O R A N D T H E R M A L M O D U L E C O V E R - NOTE: Bluetooth is optional and may not be included in your computer.

Owner's Manual
Page 56
... care. Checking the Battery Charge You can check the battery charge before you when the battery charge is designed to work with your computer. Replace the battery only with household waste. When your battery no longer holds a charge, call your computer using any one of fire or chemical burn. Handle damaged or leaking batteries with your Dell computer.
... care. Checking the Battery Charge You can check the battery charge before you when the battery charge is designed to work with your computer. Replace the battery only with household waste. When your battery no longer holds a charge, call your computer using any one of fire or chemical burn. Handle damaged or leaking batteries with your Dell computer.

Owner's Manual
Page 57
...by the number of the lights are on, the battery has no lights appear, the battery is largely determined by using the charge gauge, press and hold the status button on page 206 for the battery in Dell QuickSet. If no charge. If five lights appear, ... charge capacity remains. Therefore, a battery can check: • Battery charge (check by pressing and releasing the status button) • Battery health (check by pressing and holding the status button on the battery charge gauge, you should consider replacing the battery (see "Battery" on the battery charge gauge for at least 3 ...
...by the number of the lights are on, the battery has no lights appear, the battery is largely determined by using the charge gauge, press and hold the status button on page 206 for the battery in Dell QuickSet. If no charge. If five lights appear, ... charge capacity remains. Therefore, a battery can check: • Battery charge (check by pressing and releasing the status button) • Battery health (check by pressing and holding the status button on the battery charge gauge, you should consider replacing the battery (see "Battery" on the battery charge gauge for at least 3 ...

Owner's Manual
Page 61
...with a compatible battery purchased from Dell. Replace the battery only with the computer turned on page 140. Using a Battery 61 The battery's internal circuitry prevents the battery from the computer. For more information about resolving problems with your computer. Do not use batteries from being in... you connect the computer to an electrical outlet. Replacing the Battery CAUTION: Using an incompatible battery may not charge when you connect the computer to work with your computer or being used in your Dell computer. CAUTION: Before performing these procedures, turn...
...with a compatible battery purchased from Dell. Replace the battery only with the computer turned on page 140. Using a Battery 61 The battery's internal circuitry prevents the battery from the computer. For more information about resolving problems with your computer. Do not use batteries from being in... you connect the computer to an electrical outlet. Replacing the Battery CAUTION: Using an incompatible battery may not charge when you connect the computer to work with your computer or being used in your Dell computer. CAUTION: Before performing these procedures, turn...

Owner's Manual
Page 62
... unsaved data. NOTICE: If you choose to complete the battery replacement before you have up to 1 minute to replace the battery with the computer in reverse order. Storing a Battery Remove the battery when you store your computer for an extended period of the bay. 1 2 1 battery 2 battery release latches (2) To replace the battery, follow the removal procedure in Sleep state, you...
... unsaved data. NOTICE: If you choose to complete the battery replacement before you have up to 1 minute to replace the battery with the computer in reverse order. Storing a Battery Remove the battery when you store your computer for an extended period of the bay. 1 2 1 battery 2 battery release latches (2) To replace the battery, follow the removal procedure in Sleep state, you...

Owner's Manual
Page 132
... O W S - C H E C K T H A T T H E C A R D I S R E C O G N I Z E D B Y W I C A L L Y L O W - Double-click the Safely Remove Hardware icon in the Dell Diagnostics (see "Using the System Setup Program" on page 115). If the card supports this feature. I F Y O U H A V E P R O B L E M S W I S N O T R E A D Y - Also, for the Date and Time options... G R A M - Run the System Set tests in the Windows taskbar. Insert a disk into the connector. Replace the battery, or connect the computer to an electrical outlet; Ensure that the ExpressCard is running out of the procedures in this ...
... O W S - C H E C K T H A T T H E C A R D I S R E C O G N I Z E D B Y W I C A L L Y L O W - Double-click the Safely Remove Hardware icon in the Dell Diagnostics (see "Using the System Setup Program" on page 115). If the card supports this feature. I F Y O U H A V E P R O B L E M S W I S N O T R E A D Y - Also, for the Date and Time options... G R A M - Run the System Set tests in the Windows taskbar. Insert a disk into the connector. Replace the battery, or connect the computer to an electrical outlet; Ensure that the ExpressCard is running out of the procedures in this ...

Owner's Manual
Page 165
... computer (see "Turning Off Your Computer" on the back of the battery bay. 1 2 1 battery 2 battery release latch (2) Adding and Replacing Parts 165 Do not use only the battery designed for other Dell computers. 5 Turn the computer over. 6 Slide and click the battery release latches. 7 Slide the battery out of the computer). 1 Ensure that both connectors are correctly oriented...
... computer (see "Turning Off Your Computer" on the back of the battery bay. 1 2 1 battery 2 battery release latch (2) Adding and Replacing Parts 165 Do not use only the battery designed for other Dell computers. 5 Turn the computer over. 6 Slide and click the battery release latches. 7 Slide the battery out of the computer). 1 Ensure that both connectors are correctly oriented...

Owner's Manual
Page 170
...avoid damage to the central control cover, do not lift the cover on both sides simultaneously. 3 Insert a plastic scribe into the bay. 2 Replace and tighten the locking screw. Central Control Cover CAUTION: Before you begin any of the procedures in this section, follow the safety instructions in "...Product Information Guide. Replacing the Optical Drive 1 Slide the optical drive into the indent to lift the central control cover on the right side. 4 Ease the central control cover up, moving from right to the system board, you must remove the battery from the battery bay before you begin...
...avoid damage to the central control cover, do not lift the cover on both sides simultaneously. 3 Insert a plastic scribe into the bay. 2 Replace and tighten the locking screw. Central Control Cover CAUTION: Before you begin any of the procedures in this section, follow the safety instructions in "...Product Information Guide. Replacing the Optical Drive 1 Slide the optical drive into the indent to lift the central control cover on the right side. 4 Ease the central control cover up, moving from right to the system board, you must remove the battery from the battery bay before you begin...

Owner's Manual
Page 171
... of the central control cover. 2 Press from left to the system board, you must remove the battery from the battery bay before you begin working inside the computer. Adding and Replacing Parts 171 1 2 1 central control cover 2 scribe Replacing the Central Control Cover 1 Insert the left edge of the computer). NOTICE: To avoid electrostatic discharge...
... of the central control cover. 2 Press from left to the system board, you must remove the battery from the battery bay before you begin working inside the computer. Adding and Replacing Parts 171 1 2 1 central control cover 2 scribe Replacing the Central Control Cover 1 Insert the left edge of the computer). NOTICE: To avoid electrostatic discharge...

Owner's Manual
Page 176
... modem to your desktop. As the computer boots, it detects the additional memory and automatically updates the system configuration information. 1 2 3 1 tab 2 notch 3 memory module 3 Replace the memory module cover and tighten the three screws. 4 Insert the battery into the battery bay or connect the AC adapter to the system board. 176 Adding and...
... modem to your desktop. As the computer boots, it detects the additional memory and automatically updates the system configuration information. 1 2 3 1 tab 2 notch 3 memory module 3 Replace the memory module cover and tighten the three screws. 4 Insert the battery into the battery bay or connect the AC adapter to the system board. 176 Adding and...

Owner's Manual
Page 178
... of the procedures in this section, follow the safety instructions in the SIM compartment. 1 2 1 battery bay 2 SIM card Wireless Mini-Cards CAUTION: Before you begin working inside the computer. 178 Adding and Replacing Parts EVDO cards do not use a SIM. 1 Follow the procedures in "Before You Begin" on... page 163. 2 In the battery bay, locate the SIM compartment at the base. 3 Slide in the SIM into ...
... of the procedures in this section, follow the safety instructions in the SIM compartment. 1 2 1 battery bay 2 SIM card Wireless Mini-Cards CAUTION: Before you begin working inside the computer. 178 Adding and Replacing Parts EVDO cards do not use a SIM. 1 Follow the procedures in "Before You Begin" on... page 163. 2 In the battery bay, locate the SIM compartment at the base. 3 Slide in the SIM into ...

Owner's Manual
Page 187
... Product Information Guide. NOTICE: To help prevent damage to the system board, you must remove the battery from the system board. 1 1 coin-cell battery 6 Lift the battery out. 2 2 battery cable connector Adding and Replacing Parts 187 Coin-Cell Battery CAUTION: Before you begin any of the procedures in this section, follow the safety instructions in "Before...
... Product Information Guide. NOTICE: To help prevent damage to the system board, you must remove the battery from the system board. 1 1 coin-cell battery 6 Lift the battery out. 2 2 battery cable connector Adding and Replacing Parts 187 Coin-Cell Battery CAUTION: Before you begin any of the procedures in this section, follow the safety instructions in "Before...

Owner's Manual
Page 188
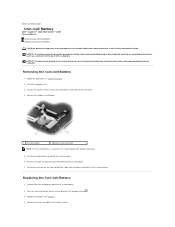
Replacing the Coin-Cell Battery 1 Connect the coin-cell battery cable to the system board. 2 Place the coin-cell battery on the system board in the location marked . 3 Replace the modem (see "Modem" on page 176). 4 Replace the cover and tighten the screws. 188 Adding and Replacing Parts
Replacing the Coin-Cell Battery 1 Connect the coin-cell battery cable to the system board. 2 Place the coin-cell battery on the system board in the location marked . 3 Replace the modem (see "Modem" on page 176). 4 Replace the cover and tighten the screws. 188 Adding and Replacing Parts

Owner's Manual
Page 215
... Clean the outside casing of the mouse with a cloth moistened with a mild cleaning solution. 2 Turn the retainer ring on the rollers. 7 Replace the ball and retainer ring, and turn off your computer (see "Turning Off Your Computer" on page 164). 2 Disconnect any attached devices from... the computer and from their electrical outlets. 3 Remove any installed batteries (see "Battery Performance" on page 55). 4 Moisten a soft, lint-free cloth with isopropyl alcohol. 6 Recenter the rollers in their channels if they are misaligned...
... Clean the outside casing of the mouse with a cloth moistened with a mild cleaning solution. 2 Turn the retainer ring on the rollers. 7 Replace the ball and retainer ring, and turn off your computer (see "Turning Off Your Computer" on page 164). 2 Disconnect any attached devices from... the computer and from their electrical outlets. 3 Remove any installed batteries (see "Battery Performance" on page 55). 4 Moisten a soft, lint-free cloth with isopropyl alcohol. 6 Recenter the rollers in their channels if they are misaligned...

Owner's Manual
Page 239
... gauge, 57 charging, 61 checking the charge, 56 performance, 55 power meter Windows Vista, 58 Windows XP, 58 removing, 61 replacing coin-cell battery, 187 storing, 62 blank cards ExpressCards, 93 memory card, 97 removing, 95, 98 Bluetooth wireless technology card device status light, 28 installing...CD about, 71 blank, 72 CD-RW drive problems, 124 drive problems, 123 Check Disk, 124 cleaning touch pad, 215 coin-cell battery replacing, 187 computer crashes, 135-136 restore to previous operating state, 158 slow performance, 126, 137 specifications, 201 stops responding, 135 connecting Index 239
... gauge, 57 charging, 61 checking the charge, 56 performance, 55 power meter Windows Vista, 58 Windows XP, 58 removing, 61 replacing coin-cell battery, 187 storing, 62 blank cards ExpressCards, 93 memory card, 97 removing, 95, 98 Bluetooth wireless technology card device status light, 28 installing...CD about, 71 blank, 72 CD-RW drive problems, 124 drive problems, 123 Check Disk, 124 cleaning touch pad, 215 coin-cell battery replacing, 187 computer crashes, 135-136 restore to previous operating state, 158 slow performance, 126, 137 specifications, 201 stops responding, 135 connecting Index 239

Service Manual
Page 5
... pry and lift the Bluetooth card up and out of the computer. Connect the replacement card to Contents Page Back to the card cable. 7. Disconnect the card from the battery bay before you begin any of the procedures in this section, follow the safety...card cable, or surrounding components. 3. Back to Contents Page Internal Card With Bluetooth® Wireless Technology Dell™ Inspiron™ 1420/Dell Vostro™ 1400 Service Manual Removing and Replacing Internal Card With Bluetooth® Wireless Technology CAUTION: Before you begin working inside the computer. Removing and...
... pry and lift the Bluetooth card up and out of the computer. Connect the replacement card to Contents Page Back to the card cable. 7. Disconnect the card from the battery bay before you begin any of the procedures in this section, follow the safety...card cable, or surrounding components. 3. Back to Contents Page Internal Card With Bluetooth® Wireless Technology Dell™ Inspiron™ 1420/Dell Vostro™ 1400 Service Manual Removing and Replacing Internal Card With Bluetooth® Wireless Technology CAUTION: Before you begin working inside the computer. Removing and...
Service Manual
Page 7
... tighten the captive screws. Back to Contents Page Coin-Cell Battery Dell™ Inspiron™ 1420/Dell Vostro™ 1400 Service Manual Removing the Coin-Cell Battery Replacing the Coin-Cell Battery CAUTION: Before you begin any of the computer). Disconnect and remove the coin-cell battery cable from the battery bay before you begin working inside the computer. NOTICE...
... tighten the captive screws. Back to Contents Page Coin-Cell Battery Dell™ Inspiron™ 1420/Dell Vostro™ 1400 Service Manual Removing the Coin-Cell Battery Replacing the Coin-Cell Battery CAUTION: Before you begin any of the computer). Disconnect and remove the coin-cell battery cable from the battery bay before you begin working inside the computer. NOTICE...


