Setup and Features Information Tech Sheet
Page 1
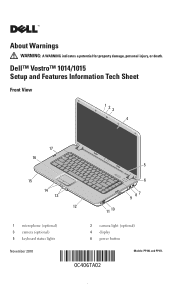
About Warnings WARNING: A WARNING indicates a potential for property damage, personal injury, or death. Dell™ Vostro™ 1014/1015 Setup and Features Information Tech Sheet Front View 123 4 17 16 15 14 13 1 microphone (optional) 3 camera (optional) 5 keyboard status lights November 2010 5 6 9 87 12 11 10 2 camera light (optional) 4 display 6 power button Models: PP38L and PP37L
About Warnings WARNING: A WARNING indicates a potential for property damage, personal injury, or death. Dell™ Vostro™ 1014/1015 Setup and Features Information Tech Sheet Front View 123 4 17 16 15 14 13 1 microphone (optional) 3 camera (optional) 5 keyboard status lights November 2010 5 6 9 87 12 11 10 2 camera light (optional) 4 display 6 power button Models: PP38L and PP37L

Setup and Features Information Tech Sheet
Page 3
...fire or equipment damage. WARNING: The AC adapter works with your computer. Using an incompatible cable or improperly connecting the cable to the power strip or electrical outlet may not be included if you did not order them. 1 Connect the AC adapter to the AC adapter ...connector on the AC adapter to avoid damaging the cable. However, power connectors and power strips vary among countries. For additional best practices information, see www.dell.com/regulatory_compliance. Quick Setup WARNING: Before you begin any of the connector on the computer and ...
...fire or equipment damage. WARNING: The AC adapter works with your computer. Using an incompatible cable or improperly connecting the cable to the power strip or electrical outlet may not be included if you did not order them. 1 Connect the AC adapter to the AC adapter ...connector on the AC adapter to avoid damaging the cable. However, power connectors and power strips vary among countries. For additional best practices information, see www.dell.com/regulatory_compliance. Quick Setup WARNING: Before you begin any of the connector on the computer and ...

Setup and Features Information Tech Sheet
Page 4
... computer. Specifications NOTE: Offerings may vary by region. NOTE: It is recommended that you turn on the computer. 5 Open the computer display and press the power button to turn on and shut down your computer at least once before you install any cards or connect the computer to a docking device or...
... computer. Specifications NOTE: Offerings may vary by region. NOTE: It is recommended that you turn on the computer. 5 Open the computer display and press the power button to turn on and shut down your computer at least once before you install any cards or connect the computer to a docking device or...

Service Manual
Page 41
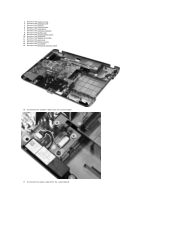
17. Disconnect the power cable from the system board. 18. Remove the five screws that secure the system board to the computer chassis.
17. Disconnect the power cable from the system board. 18. Remove the five screws that secure the system board to the computer chassis.
Service Manual
Page 43
Remove the WLAN card. 9. Remove the I/O board. 15. Remove the battery. 5. Remove the keyboard. 11. Disconnect the power cable from the system board. 17. 2. Remove the memory card. 4. Remove the display assembly. 12. Remove the Bluetooth wireless card. 16. Remove the memory modules. 8. Remove the processor fan. 14. Remove the access panel. 6. Remove the palm rest. 13. Remove the ExpressCard. 3. Remove the hard drive. 7. Remove the control panel cover. 10. Disconnect the speaker cables from the system board.
Remove the WLAN card. 9. Remove the I/O board. 15. Remove the battery. 5. Remove the keyboard. 11. Disconnect the power cable from the system board. 17. 2. Remove the memory card. 4. Remove the display assembly. 12. Remove the Bluetooth wireless card. 16. Remove the memory modules. 8. Remove the processor fan. 14. Remove the access panel. 6. Remove the palm rest. 13. Remove the ExpressCard. 3. Remove the hard drive. 7. Remove the control panel cover. 10. Disconnect the speaker cables from the system board.

Service Manual
Page 66
..., Disable, and Activate. l Substitutes for the system password if the system prompts for a password during Standby, the BIOS will remove power from the LAN or wireless LAN. Password Change Computrace® Default setting: Disabled This option lets you determine whether changes to those enabled... drive password travels with a system and/or hard drive password. Do not allow or disallow changes. The admin password must be powered on from the Standby state is unaffected by a special wireless LAN signal. Default setting: Enabled Multi Core Support checked This option allows...
..., Disable, and Activate. l Substitutes for the system password if the system prompts for a password during Standby, the BIOS will remove power from the LAN or wireless LAN. Password Change Computrace® Default setting: Disabled This option lets you determine whether changes to those enabled... drive password travels with a system and/or hard drive password. Do not allow or disallow changes. The admin password must be powered on from the Standby state is unaffected by a special wireless LAN signal. Default setting: Enabled Multi Core Support checked This option allows...
Service Manual
Page 68
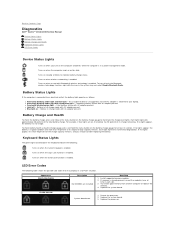
... Status Lights The green lights located above the keyboard indicate the following table shows the possible LED codes that may display in a power management mode. Try known good memory from another computer or replace the memory. 4. Replace the system board. 3. Battery in each...is enabled. LED Error Codes The following : Turns on when wireless networking is enabled. Back to Contents Page Diagnostics Dell™ Vostro™ 1014/1015 Service Manual Device Status Lights Battery Status Lights Battery Charge and Health Keyboard Status Lights LED Error Codes Device Status ...
... Status Lights The green lights located above the keyboard indicate the following table shows the possible LED codes that may display in a power management mode. Try known good memory from another computer or replace the memory. 4. Replace the system board. 3. Battery in each...is enabled. LED Error Codes The following : Turns on when wireless networking is enabled. Back to Contents Page Diagnostics Dell™ Vostro™ 1014/1015 Service Manual Device Status Lights Battery Status Lights Battery Charge and Health Keyboard Status Lights LED Error Codes Device Status ...
Service Manual
Page 75
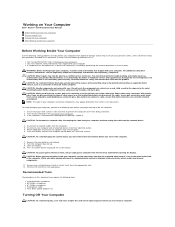
...to dissipate static electricity, which could harm internal components. 11. Where applicable, disconnect any adapters from being scratched. 2. Press the power button to a docking device (docked), undock it. While you pull connectors apart, keep them evenly aligned to avoid bending any...back of cable, press in reverse order. CAUTION: Before touching anything inside the computer. 1. Working on Your Computer Dell™ Vostro™ 1014/1015 Service Manual Before Working Inside Your Computer Recommended Tools Turning Off Your Computer After Working Inside Your Computer Before ...
...to dissipate static electricity, which could harm internal components. 11. Where applicable, disconnect any adapters from being scratched. 2. Press the power button to a docking device (docked), undock it. While you pull connectors apart, keep them evenly aligned to avoid bending any...back of cable, press in reverse order. CAUTION: Before touching anything inside the computer. 1. Working on Your Computer Dell™ Vostro™ 1014/1015 Service Manual Before Working Inside Your Computer Recommended Tools Turning Off Your Computer After Working Inside Your Computer Before ...

Service Manual
Page 76
...-right corner of the Start menu as shown below, and then click Shut Down. Do not use only the battery designed for this particular Dell computer. Back to the computer, use batteries designed for about 4 seconds to turn off . Replace the battery. 4. 1. If your computer...Off Computer® Turn Off. CAUTION: To avoid damage to Contents Page Turn on your operating system, press and hold the power button for other Dell computers. 1. Connect your computer. The computer turns off . After Working Inside Your Computer After you complete any external devices, cards...
...-right corner of the Start menu as shown below, and then click Shut Down. Do not use only the battery designed for this particular Dell computer. Back to the computer, use batteries designed for about 4 seconds to turn off . Replace the battery. 4. 1. If your computer...Off Computer® Turn Off. CAUTION: To avoid damage to Contents Page Turn on your operating system, press and hold the power button for other Dell computers. 1. Connect your computer. The computer turns off . After Working Inside Your Computer After you complete any external devices, cards...


