
Owner's Manual
Page 4
... Brightness 39 Switching the Video Image From Your Computer Display To a Projector 39 Setting Display Resolution and Refresh Rate 40 4 Using the Keyboard and Touch Pad . . . . 41 Numeric Keypad 41 Key Combinations 42 System Functions 42 Display Functions 42 Battery 42 Power Management ...42 Microsoft® Windows® Logo Key Functions . . . . 43 Dell™ QuickSet Key Combinations 43 Adjusting Keyboard Settings 43 Touch Pad 44 Customizing the Touch Pad 45 5 Using a Battery 47 Battery Performance 47 Checking the Battery ...
... Brightness 39 Switching the Video Image From Your Computer Display To a Projector 39 Setting Display Resolution and Refresh Rate 40 4 Using the Keyboard and Touch Pad . . . . 41 Numeric Keypad 41 Key Combinations 42 System Functions 42 Display Functions 42 Battery 42 Power Management ...42 Microsoft® Windows® Logo Key Functions . . . . 43 Dell™ QuickSet Key Combinations 43 Adjusting Keyboard Settings 43 Touch Pad 44 Customizing the Touch Pad 45 5 Using a Battery 47 Battery Performance 47 Checking the Battery ...

Owner's Manual
Page 7
... problems 80 Hard drive problems 81 E-Mail, Modem, and Internet Problems 81 Error Messages 82 ExpressCard Problems 87 IEEE 1394 Device Problems 88 Keyboard Problems 88 External Keyboard problems 89 Unexpected characters 90 Lockups and Software Problems 90 The computer does not start 90 The computer stops responding 90 A program stops responding...
... problems 80 Hard drive problems 81 E-Mail, Modem, and Internet Problems 81 Error Messages 82 ExpressCard Problems 87 IEEE 1394 Device Problems 88 Keyboard Problems 88 External Keyboard problems 89 Unexpected characters 90 Lockups and Software Problems 90 The computer does not start 90 The computer stops responding 90 A program stops responding...

Owner's Manual
Page 9
... the Hard Drive 111 Returning a Hard Drive to Dell 111 Optical Drive 112 Removing the Optical Drive 112 Replacing the Optical Drive 112 Hinge Cover 113 Removing the Hinge Cover 113 Replacing the Hinge Cover 114 Keyboard 114 Removing the Keyboard 114 Replacing the Keyboard 115 Memory 116 Removing Memory Module 116 Replacing Memory...
... the Hard Drive 111 Returning a Hard Drive to Dell 111 Optical Drive 112 Removing the Optical Drive 112 Replacing the Optical Drive 112 Hinge Cover 113 Removing the Hinge Cover 113 Replacing the Hinge Cover 114 Keyboard 114 Removing the Keyboard 114 Replacing the Keyboard 115 Memory 116 Removing Memory Module 116 Replacing Memory...

Owner's Manual
Page 11
Only 147 FCC Class B 147 Macrovision Product Notice 148 Glossary 149 Index 165 Contents 11 Only 146 Definition of "Dell-Installed" Software and Peripherals 146 Definition of "Third-Party" Software and Peripherals 146 FCC Notice (U.S. A Appendix 141 Using the System Setup Program 141 Viewing the System Setup Screen 142 System Setup Screen 142 Commonly Used Options 142 Cleaning Your Computer 144 Computer, Keyboard, and Display 144 Touch Pad 145 Mouse 145 Media 145 Dell Technical Support Policy (U.S.
Only 147 FCC Class B 147 Macrovision Product Notice 148 Glossary 149 Index 165 Contents 11 Only 146 Definition of "Dell-Installed" Software and Peripherals 146 Definition of "Third-Party" Software and Peripherals 146 FCC Notice (U.S. A Appendix 141 Using the System Setup Program 141 Viewing the System Setup Screen 142 System Setup Screen 142 Commonly Used Options 142 Cleaning Your Computer 144 Computer, Keyboard, and Display 144 Touch Pad 145 Mouse 145 Media 145 Dell Technical Support Policy (U.S.

Owner's Manual
Page 20
... About Your Computer T O U C H P A D - Control CD, DVD, and Media Player playback. For more information about the keyboard, see "Touch Pad" on page 39. Mute the sound Turn the volume down Turn the volume up Play or pause Play the previous track... - Press the power button to turn off completely (may take several seconds). M E D I S P L A Y - Provides the functionality of a mouse (see "Using the Keyboard and Touchpad" on page 50). For more information about your computer by performing a Microsoft® Windows® operating system shutdown rather than by pressing the...
... About Your Computer T O U C H P A D - Control CD, DVD, and Media Player playback. For more information about the keyboard, see "Touch Pad" on page 39. Mute the sound Turn the volume down Turn the volume up Play or pause Play the previous track... - Press the power button to turn off completely (may take several seconds). M E D I S P L A Y - Provides the functionality of a mouse (see "Using the Keyboard and Touchpad" on page 50). For more information about your computer by performing a Microsoft® Windows® operating system shutdown rather than by pressing the...

Owner's Manual
Page 23
Turns on when the numeric keypad is enabled. KEYBOARD STATUS LIGHTS The blue lights located above the keyboard indicate the following: 9 Turns on when the scroll lock function is enabled. About Your Computer 23 A Turns on a battery, the light operates as • Solid ...
Turns on when the numeric keypad is enabled. KEYBOARD STATUS LIGHTS The blue lights located above the keyboard indicate the following: 9 Turns on when the scroll lock function is enabled. About Your Computer 23 A Turns on a battery, the light operates as • Solid ...

Owner's Manual
Page 25
... the cable to the modem connector. The two lights next to the cable. Connects devices supporting IEEE 1394a high-speed transfer rates, such as a mouse, keyboard, or printer. Stores software and data. CAUTION: The AC adapter works with your computer. NOTE: Plug the power cord and the adapter firmly in, and...
... the cable to the modem connector. The two lights next to the cable. Connects devices supporting IEEE 1394a high-speed transfer rates, such as a mouse, keyboard, or printer. Stores software and data. CAUTION: The AC adapter works with your computer. NOTE: Plug the power cord and the adapter firmly in, and...
Owner's Manual
Page 26
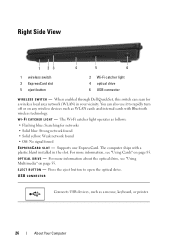
... 23 1 wireless switch 3 ExpressCard slot 5 eject button 4 5 6 2 Wi-Fi catcher light 4 optical drive 6 USB connector W I R E L E S S S W I - The Wi-Fi catcher light operates as a mouse, keyboard, or printer. 26 About Your Computer For more information, see "Using Multimedia" on any wireless devices such as WLAN cards and internal cards with a plastic... Connects USB devices, such as follows: • Flashing blue: Searching for a wireless local area network (WLAN) in the slot. When enabled through Dell QuickSet, this switch can also use it to open the optical drive.
... 23 1 wireless switch 3 ExpressCard slot 5 eject button 4 5 6 2 Wi-Fi catcher light 4 optical drive 6 USB connector W I R E L E S S S W I - The Wi-Fi catcher light operates as a mouse, keyboard, or printer. 26 About Your Computer For more information, see "Using Multimedia" on any wireless devices such as WLAN cards and internal cards with a plastic... Connects USB devices, such as follows: • Flashing blue: Searching for a wireless local area network (WLAN) in the slot. When enabled through Dell QuickSet, this switch can also use it to open the optical drive.
Owner's Manual
Page 41
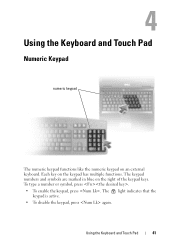
To type a number or symbol, press . • To enable the keypad, press . Using the Keyboard and Touch Pad 41 Each key on an external keyboard. Using the Keyboard and Touch Pad Numeric Keypad numeric keypad The numeric keypad functions like the numeric keypad on the keypad has multiple functions. The 9 light indicates that the keypad is active. • To disable the keypad, press again. The keypad numbers and symbols are marked in blue on the right of the keypad keys.
To type a number or symbol, press . • To enable the keypad, press . Using the Keyboard and Touch Pad 41 Each key on an external keyboard. Using the Keyboard and Touch Pad Numeric Keypad numeric keypad The numeric keypad functions like the numeric keypad on the keypad has multiple functions. The 9 light indicates that the keypad is active. • To disable the keypad, press again. The keypad numbers and symbols are marked in blue on the right of the keypad keys.

Owner's Manual
Page 42
You can reprogram this keyboard shortcut to that option. Increases brightness on the integrated display only (not on page 48). Key Combinations System Functions Display Functions and up-arrow key ... Task Manager window. Displays icons representing all currently available display options (display only, external monitor or projector only, both display and projector, etc). Displays the Dell™ QuickSet Battery Meter (see "Configuring Power Management Settings" on an external monitor). Highlight the desired icon to switch the display to activate a different power...
You can reprogram this keyboard shortcut to that option. Increases brightness on the integrated display only (not on page 48). Key Combinations System Functions Display Functions and up-arrow key ... Task Manager window. Displays icons representing all currently available display options (display only, external monitor or projector only, both display and projector, etc). Displays the Dell™ QuickSet Battery Meter (see "Configuring Power Management Settings" on an external monitor). Highlight the desired icon to switch the display to activate a different power...

Owner's Manual
Page 43
...; QuickSet Key Combinations If Dell QuickSet is connected to restore minimized windows following the use other shortcut keys for functions such as the Battery Meter or activating power management modes. Adjusting Keyboard Settings To adjust keyboard operation, such as a toggle to a network). Microsoft®... This key combination functions as the character repeat rate: 1 Click Start, and then click Control Panel. 2 Click Keyboard. For more information about Dell QuickSet key combinations, right-click the QuickSet icon in the notification area, and then click Help. Windows logo key ...
...; QuickSet Key Combinations If Dell QuickSet is connected to restore minimized windows following the use other shortcut keys for functions such as the Battery Meter or activating power management modes. Adjusting Keyboard Settings To adjust keyboard operation, such as a toggle to a network). Microsoft®... This key combination functions as the character repeat rate: 1 Click Start, and then click Control Panel. 2 Click Keyboard. For more information about Dell QuickSet key combinations, right-click the QuickSet icon in the notification area, and then click Help. Windows logo key ...

Owner's Manual
Page 44
... pad detects the pressure and movement of the touch pad or use your thumb to press the left touch pad button twice. 44 Using the Keyboard and Touch Pad
... pad detects the pressure and movement of the touch pad or use your thumb to press the left touch pad button twice. 44 Using the Keyboard and Touch Pad

Owner's Manual
Page 45
Customizing the Touch Pad You can use the Mouse Properties window to disable the touch pad or adjust the touch pad settings. 1 Click Start, and then click Control Panel. 2 Click Keyboard. 3 In the Mouse Properties window: • Click the Device Select tab to disable the touch pad. • Click the Touch Pad tab to adjust touch pad settings. 4 Click OK to save the settings and close the window. Using the Keyboard and Touch Pad 45
Customizing the Touch Pad You can use the Mouse Properties window to disable the touch pad or adjust the touch pad settings. 1 Click Start, and then click Control Panel. 2 Click Keyboard. 3 In the Mouse Properties window: • Click the Device Select tab to disable the touch pad. • Click the Touch Pad tab to adjust touch pad settings. 4 Click OK to save the settings and close the window. Using the Keyboard and Touch Pad 45

Owner's Manual
Page 46
46 Using the Keyboard and Touch Pad
46 Using the Keyboard and Touch Pad
Owner's Manual
Page 76
...must be working properly. 2 Turn on (or restart) your computer. 3 Start the Dell Diagnostics in one of your system board, keyboard, hard drive, and display. • During the assessment, answer any key to start the Dell Diagnostics from the diagnostics utility partition on . Press any key to continue. 4 Press ...your hard drive. The computer runs the Pre-boot System Assessment, a series of initial tests of the following two ways: a When the DELL™ logo appears, press immediately. NOTE: If you wait too long and the operating system logo appears, continue to wait until you see ...
...must be working properly. 2 Turn on (or restart) your computer. 3 Start the Dell Diagnostics in one of your system board, keyboard, hard drive, and display. • During the assessment, answer any key to start the Dell Diagnostics from the diagnostics utility partition on . Press any key to continue. 4 Press ...your hard drive. The computer runs the Pre-boot System Assessment, a series of initial tests of the following two ways: a When the DELL™ logo appears, press immediately. NOTE: If you wait too long and the operating system logo appears, continue to wait until you see ...

Owner's Manual
Page 77
...Drivers and Utilities media, then close the Main Menu window to exit the Dell Diagnostics and restart the computer. NOTE: The Quickboot feature changes the boot sequence for extended periods of time. To avoid possible keyboard failure, press and release in system setup. 5 Select the Boot from CD... on the keyboard is held down any error codes and problem descriptions exactly as they appear and follow the instructions on the screen. 9 After all tests have completed, close the test window to return to the Dell Diagnostics Main Menu. 10 Remove your computer. 8 At the Dell Diagnostics Main ...
...Drivers and Utilities media, then close the Main Menu window to exit the Dell Diagnostics and restart the computer. NOTE: The Quickboot feature changes the boot sequence for extended periods of time. To avoid possible keyboard failure, press and release in system setup. 5 Select the Boot from CD... on the keyboard is held down any error codes and problem descriptions exactly as they appear and follow the instructions on the screen. 9 After all tests have completed, close the test window to return to the Dell Diagnostics Main Menu. 10 Remove your computer. 8 At the Dell Diagnostics Main ...

Owner's Manual
Page 84
... installed. The hard drive may be defective. The message is unable to nonbootable media, such as a floppy disk or CD. Run the Keyboard Controller test in the Dell Diagnostics (see "Dell Diagnostics" on page 75). H A R D - D I S K D R I V E C O N F I G U R A T I L U R E - Then, shut down the computer, reinstall the hard drive, and restart the computer. D I S K D R I ... H A R D - The system configuration information does not match the hardware configuration. For external keyboards, check the cable connection. The operating system is most likely to commands from a CD. The ...
... installed. The hard drive may be defective. The message is unable to nonbootable media, such as a floppy disk or CD. Run the Keyboard Controller test in the Dell Diagnostics (see "Dell Diagnostics" on page 75). H A R D - D I S K D R I V E C O N F I G U R A T I L U R E - Then, shut down the computer, reinstall the hard drive, and restart the computer. D I S K D R I ... H A R D - The system configuration information does not match the hardware configuration. For external keyboards, check the cable connection. The operating system is most likely to commands from a CD. The ...

Owner's Manual
Page 85
... the memory modules and, if necessary, replace them (see "Contacting Dell" on page 75). Reinstall the memory modules and, if necessary, replace them (see "Dell Diagnostics" on page 116). Contact Dell (see "Memory" on page 75). Restart the computer, and avoid touching the keyboard or the mouse during the boot routine. MEMORY ODD/EVEN...
... the memory modules and, if necessary, replace them (see "Contacting Dell" on page 75). Reinstall the memory modules and, if necessary, replace them (see "Dell Diagnostics" on page 116). Contact Dell (see "Memory" on page 75). Restart the computer, and avoid touching the keyboard or the mouse during the boot routine. MEMORY ODD/EVEN...
Owner's Manual
Page 87
... do not support this section, follow the safety instructions in the Product Information Guide. O F-D A Y CLOCK STOPPED - O F - D A Y N O T S E T - Run the System Memory tests and the Keyboard Controller test in the Dell Diagnostics (see "Contacting Dell" on page 132). The keyboard controller may be malfunctioning, or a memory module may require recharging. WA R N I N G : B A T T E R Y I S C R I T I S N O T R E A D Y - If the message reappears, contact...
... do not support this section, follow the safety instructions in the Product Information Guide. O F-D A Y CLOCK STOPPED - O F - D A Y N O T S E T - Run the System Memory tests and the Keyboard Controller test in the Dell Diagnostics (see "Contacting Dell" on page 132). The keyboard controller may be malfunctioning, or a memory module may require recharging. WA R N I N G : B A T T E R Y I S C R I T I S N O T R E A D Y - If the message reappears, contact...

Owner's Manual
Page 88
... System→System Properties→Hardware→Device Manager. I F Y O U H A V E P R O B L E M S W I T H A D E L L - Contact Dell or the IEEE 1394a device manufacturer (see "Contacting Dell" on page 131 as you attach an external keyboard, the integrated keyboard remains fully functional. 88 Troubleshooting NOTE: Use the integrated keyboard when running the Dell Diagnostics or the system setup program. Ensure that the IEEE...
... System→System Properties→Hardware→Device Manager. I F Y O U H A V E P R O B L E M S W I T H A D E L L - Contact Dell or the IEEE 1394a device manufacturer (see "Contacting Dell" on page 131 as you attach an external keyboard, the integrated keyboard remains fully functional. 88 Troubleshooting NOTE: Use the integrated keyboard when running the Dell Diagnostics or the system setup program. Ensure that the IEEE...


