User Manual
Page 11
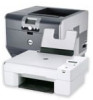
...the port. 18 Power supply with port Connect the printer to a power source using a USB cable. Note: The carrier moves to the printhead access area when no printhead is supported in your printer to a computer, a local network, an external DSL, or a cable modem. 15 USB port Connect the ... using the power cord. 19 Duplex unit • Print on both sides of a sheet of paper. • Remove paper jams. 20 Printhead access area Install the printhead. About your printer 11 Use the To 12 Scanner unit Access the ink cartridges. 13 Ink cartridge access area Install, replace, or remove...
...the port. 18 Power supply with port Connect the printer to a power source using a USB cable. Note: The carrier moves to the printhead access area when no printhead is supported in your printer to a computer, a local network, an external DSL, or a cable modem. 15 USB port Connect the ... using the power cord. 19 Duplex unit • Print on both sides of a sheet of paper. • Remove paper jams. 20 Printhead access area Install the printhead. About your printer 11 Use the To 12 Scanner unit Access the ink cartridges. 13 Ink cartridge access area Install, replace, or remove...
User Manual
Page 13
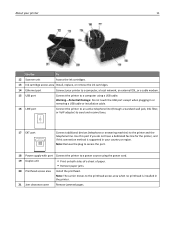
...Turn on your printer. 2 Open the printer. You must install new cartridges immediately after removing the old ones, or the ink remaining in the printhead nozzles may dry out. Ordering and replacing supplies 13 Replacing ink cartridges Make sure you have a new ink cartridge or cartridges before you begin. Installing... ink cartridges 1 Remove the ink cartridge from the pack, and then remove the protective cap from the ink cartridge. Note: The printhead moves to the cartridge installation position. 3 Press the release tab, and then remove the used ink cartridge or cartridges.
...Turn on your printer. 2 Open the printer. You must install new cartridges immediately after removing the old ones, or the ink remaining in the printhead nozzles may dry out. Ordering and replacing supplies 13 Replacing ink cartridges Make sure you have a new ink cartridge or cartridges before you begin. Installing... ink cartridges 1 Remove the ink cartridge from the pack, and then remove the protective cap from the ink cartridge. Note: The printhead moves to the cartridge installation position. 3 Press the release tab, and then remove the used ink cartridge or cartridges.
User Manual
Page 124
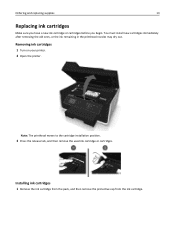
... briefly come out of Sleep mode or will temporarily turn on your printed image appear jagged or wavy, then you may need to align the printhead. 1 Load plain paper. 2 From the printer control panel, navigate to: > Setup > >Maintenance > > Align Printer > An alignment page prints. Maintaining the printer 124 ...Queue. 3 Click Supply Levels. Note: Do not remove the alignment page until printing is plugged into a properly grounded, working electrical outlet. Aligning the printhead If the characters or lines on if it is finished. If print quality has not improved, then clean the...
... briefly come out of Sleep mode or will temporarily turn on your printed image appear jagged or wavy, then you may need to align the printhead. 1 Load plain paper. 2 From the printer control panel, navigate to: > Setup > >Maintenance > > Align Printer > An alignment page prints. Maintaining the printer 124 ...Queue. 3 Click Supply Levels. Note: Do not remove the alignment page until printing is plugged into a properly grounded, working electrical outlet. Aligning the printhead If the characters or lines on if it is finished. If print quality has not improved, then clean the...
User Manual
Page 125
... risk of electric shock when cleaning the exterior of the printer 1 Make sure that has accumulated on the paper exit tray. Notes: • Cleaning the printhead nozzles uses ink, so clean them only when necessary. • Deep cleaning uses more ink, so try the Clean... to perform automatic maintenance cycles. Keep your prints. Warning-Potential Damage: Do not use household cleaners or detergents, as they may need to clean the printhead nozzles to improve the quality of the printer, making sure to remove any ink residue that the printer is dry before beginning a new print job...
... risk of electric shock when cleaning the exterior of the printer 1 Make sure that has accumulated on the paper exit tray. Notes: • Cleaning the printhead nozzles uses ink, so clean them only when necessary. • Deep cleaning uses more ink, so try the Clean... to perform automatic maintenance cycles. Keep your prints. Warning-Potential Damage: Do not use household cleaners or detergents, as they may need to clean the printhead nozzles to improve the quality of the printer, making sure to remove any ink residue that the printer is dry before beginning a new print job...

User Manual
Page 130
... and then reconnect the USB cable. • For a printer that is not in the Printer list, then choose Add Printer. From the list of the printhead. 3 Close the printer. REMOVE AND RECONNECT THE USB CABLE CONNECTED TO YOUR PRINTER The cartridges should click firmly into the matching color slot of printers...
... and then reconnect the USB cable. • For a printer that is not in the Printer list, then choose Add Printer. From the list of the printhead. 3 Close the printer. REMOVE AND RECONNECT THE USB CABLE CONNECTED TO YOUR PRINTER The cartridges should click firmly into the matching color slot of printers...
User Manual
Page 131
... turn on and off slowly, then the printer is busy or does not respond If the "Before you continue to have connected to Deep Clean Printhead, and then press . If the cartridges do not seem to Align Printer, and then press . Note: Do not remove the alignment page until printing is... paper. 3 From the printer control panel, navigate to: > Setup > > Maintenance > 4 Press the up or down arrow button to scroll to fit, then make sure the printhead is properly seated, and then try another USB port on page 13 for any obvious damage. Printer is in Sleep mode. The USB port is...
... turn on and off slowly, then the printer is busy or does not respond If the "Before you continue to have connected to Deep Clean Printhead, and then press . If the cartridges do not seem to Align Printer, and then press . Note: Do not remove the alignment page until printing is... paper. 3 From the printer control panel, navigate to: > Setup > > Maintenance > 4 Press the up or down arrow button to scroll to fit, then make sure the printhead is properly seated, and then try another USB port on page 13 for any obvious damage. Printer is in Sleep mode. The USB port is...
User Manual
Page 136
... 136 Network [x] Software Error [x] is the number of the media loaded. Out of Paper in the tray. • Press to cancel the current job. Printhead Cannot Move Try one or more of the following : • Load the specified paper in Tray [x] Try one or more of the following : •... to clear the message. Paper Tray [x] Detected Try one or more of the following : • Open the printer to remove any obstructions to the printhead, and then close the printer. • Press to clear the message. Printer Memory Full Try one or more of the following : • Press to...
... 136 Network [x] Software Error [x] is the number of the media loaded. Out of Paper in the tray. • Press to cancel the current job. Printhead Cannot Move Try one or more of the following : • Load the specified paper in Tray [x] Try one or more of the following : •... to clear the message. Paper Tray [x] Detected Try one or more of the following : • Open the printer to remove any obstructions to the printhead, and then close the printer. • Press to clear the message. Printer Memory Full Try one or more of the following : • Press to...

User Manual
Page 137
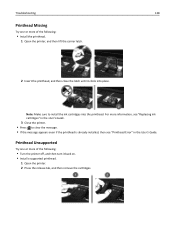
... hands to avoid damage and print quality problems. 1 Open the printer, and then lift the latch. 2 Remove the printhead. 3 Wipe the printhead contacts and the contacts inside the printhead carrier using a clean, lint‑free cloth. 4 Reinsert the printhead, and then close the latch until it back on. Note: If removing and reinserting the...
... hands to avoid damage and print quality problems. 1 Open the printer, and then lift the latch. 2 Remove the printhead. 3 Wipe the printhead contacts and the contacts inside the printhead carrier using a clean, lint‑free cloth. 4 Reinsert the printhead, and then close the latch until it back on. Note: If removing and reinserting the...
User Manual
Page 138
...printer, and then lift the carrier latch. 2 Insert the printhead, and then close the latch until it back on. • Install a supported printhead. 1 Open the printer. 2 Press the release tab, and then remove the cartridges. Troubleshooting 138 Printhead Missing Try one or more of the following : • ...Turn the printer off, and then turn it clicks into the printhead. Note: Make sure to clear the message. • If the message appears even if the printhead is already installed, then see "Replacing ink cartridges" in the User's Guide. 3 Close the printer...
...printer, and then lift the carrier latch. 2 Insert the printhead, and then close the latch until it back on. • Install a supported printhead. 1 Open the printer. 2 Press the release tab, and then remove the cartridges. Troubleshooting 138 Printhead Missing Try one or more of the following : • ...Turn the printer off, and then turn it clicks into the printhead. Note: Make sure to clear the message. • If the message appears even if the printhead is already installed, then see "Replacing ink cartridges" in the User's Guide. 3 Close the printer...
User Manual
Page 139
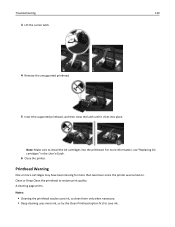
... 3 Lift the carrier latch. 4 Remove the unsupported printhead. 5 Insert the supported printhead, and then close the latch until it clicks into the printhead. For more than two hours since the printer was turned on. A cleaning page prints. Printhead Warning One or more cartridges may have been missing for...Close the printer. Notes: • Cleaning the printhead nozzles uses ink, so clean them only when necessary. • Deep cleaning uses more ink, so try the Clean Printhead option first to restore print quality. Clean or Deep Clean the printhead to save ink. Note: Make sure to ...
... 3 Lift the carrier latch. 4 Remove the unsupported printhead. 5 Insert the supported printhead, and then close the latch until it clicks into the printhead. For more than two hours since the printer was turned on. A cleaning page prints. Printhead Warning One or more cartridges may have been missing for...Close the printer. Notes: • Cleaning the printhead nozzles uses ink, so clean them only when necessary. • Deep cleaning uses more ink, so try the Clean Printhead option first to restore print quality. Clean or Deep Clean the printhead to save ink. Note: Make sure to ...
User Manual
Page 140
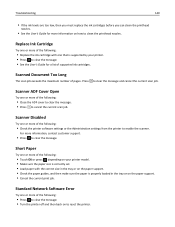
...• See the User's Guide for more of the following : • Close the ADF cover to clear the message. • Press to clean the printhead nozzles. Scanned Document Too Long The scan job exceeds the maximum number of the following : • Replace the ink cartridge with the correct size in... current print job. Troubleshooting 140 • If the ink levels are too low, then you must replace the ink cartridges before you can clean the printhead nozzles. • See the User's Guide for a list of supported ink cartridges. Short Paper Try one or more of the following : • ...
...• See the User's Guide for more of the following : • Close the ADF cover to clear the message. • Press to clean the printhead nozzles. Scanned Document Too Long The scan job exceeds the maximum number of the following : • Replace the ink cartridge with the correct size in... current print job. Troubleshooting 140 • If the ink levels are too low, then you must replace the ink cartridges before you can clean the printhead nozzles. • See the User's Guide for a list of supported ink cartridges. Short Paper Try one or more of the following : • ...
User Manual
Page 142
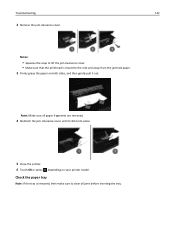
Note: Make sure all jams before inserting the tray. Notes: • Squeeze the snap to lift the jam clearance cover. • Make sure that the printhead is removed, then make sure to the side and away from the jammed paper. 3 Firmly grasp the paper on your printer model. Check the paper tray Note: If the tray is moved to clear all paper fragments are removed. 4 Reattach the jam clearance cover until it clicks into place. 5 Close the printer. 6 Touch OK or press , depending on both sides, and then gently pull it out. Troubleshooting 142 2 Remove the jam clearance cover.
Note: Make sure all jams before inserting the tray. Notes: • Squeeze the snap to lift the jam clearance cover. • Make sure that the printhead is removed, then make sure to the side and away from the jammed paper. 3 Firmly grasp the paper on your printer model. Check the paper tray Note: If the tray is moved to clear all paper fragments are removed. 4 Reattach the jam clearance cover until it clicks into place. 5 Close the printer. 6 Touch OK or press , depending on both sides, and then gently pull it out. Troubleshooting 142 2 Remove the jam clearance cover.
User Manual
Page 149
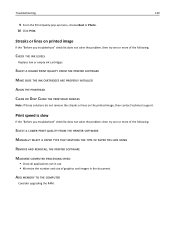
... and images in the document. SELECT A HIGHER PRINT QUALITY FROM THE PRINTER SOFTWARE MAKE SURE THE INK CARTRIDGES ARE PROPERLY INSTALLED ALIGN THE PRINTHEAD CLEAN OR DEEP CLEAN THE PRINTHEAD NOZZLES Note: If these solutions do not remove the streaks or lines on printed image If the "Before you troubleshoot" checklist does...
... and images in the document. SELECT A HIGHER PRINT QUALITY FROM THE PRINTER SOFTWARE MAKE SURE THE INK CARTRIDGES ARE PROPERLY INSTALLED ALIGN THE PRINTHEAD CLEAN OR DEEP CLEAN THE PRINTHEAD NOZZLES Note: If these solutions do not remove the streaks or lines on printed image If the "Before you troubleshoot" checklist does...
User Manual
Page 179
...ADF tray location 10 adjusting dialing and ringer volume 91 adjusting speaker volume 91 advanced wireless setup 97 AliceBox 100 aligning the printhead 124 Alignment Problem 133 answering machine best settings for fax 91 setting up 71 appliances wireless network 118 assigning IP address ...tone 90 checklist before you troubleshoot 128 fax troubleshooting 153 choosing a splitter, faxing 89 cleaning exterior of the printer 125 cleaning printhead nozzles 125 Close Printer 133 Club Internet 100 coated paper loading 35 collating copies 57 Communication Error 134 Communication not available message 164...
...ADF tray location 10 adjusting dialing and ringer volume 91 adjusting speaker volume 91 advanced wireless setup 97 AliceBox 100 aligning the printhead 124 Alignment Problem 133 answering machine best settings for fax 91 setting up 71 appliances wireless network 118 assigning IP address ...tone 90 checklist before you troubleshoot 128 fax troubleshooting 153 choosing a splitter, faxing 89 cleaning exterior of the printer 125 cleaning printhead nozzles 125 Close Printer 133 Club Internet 100 coated paper loading 35 collating copies 57 Communication Error 134 Communication not available message 164...
User Manual
Page 183
... uninstalling 27 printer status determining 99 printer, setting as default 52 printhead aligning 124 printhead access area location 11 Printhead Cannot Move 136 printhead error 137 Printhead Missing 138 printhead nozzles cleaning 125 Printhead Unsupported 138 Printhead Warning 139 printing collate 40 custom‑size paper 45 documents 40... R received history report 93 receiving faxes Auto Answer setting 87, 88 automatically 87 manually 88 tips 87, 88 recycling 7 Dell products 14 WEEE statement 170 redial attempts, fax setting 82 redial time, fax setting 82 reducing an image 56 registering fax ...
... uninstalling 27 printer status determining 99 printer, setting as default 52 printhead aligning 124 printhead access area location 11 Printhead Cannot Move 136 printhead error 137 Printhead Missing 138 printhead nozzles cleaning 125 Printhead Unsupported 138 Printhead Warning 139 printing collate 40 custom‑size paper 45 documents 40... R received history report 93 receiving faxes Auto Answer setting 87, 88 automatically 87 manually 88 tips 87, 88 recycling 7 Dell products 14 WEEE statement 170 redial attempts, fax setting 82 redial time, fax setting 82 reducing an image 56 registering fax ...
User Manual
Page 184
... on display 128 installation screen did not appear automatically 129 page does not print 130 printer does not respond 131 printer printing blank pages 131 printhead error 137 software did not install 129 shared printing 110 sharing printer in Windows 109 Short Paper 140 shortcut creating 22 deleting 23 modifying 23...
... on display 128 installation screen did not appear automatically 129 page does not print 130 printer does not respond 131 printer printing blank pages 131 printhead error 137 software did not install 129 shared printing 110 sharing printer in Windows 109 Short Paper 140 shortcut creating 22 deleting 23 modifying 23...
User Manual
Page 185
... screen did not appear automatically 129 page does not print 130 printer does not respond 131 printer printing blank pages 131 printhead error 137 software did not install 129 troubleshooting, wireless cannot print over wireless network 161 changing wireless settings after installation (... wireless setup instructions 100 uninstalling printer software 27 Universal Print Driver downloading 27 Unrecoverable Scan Error 141 Unsupported Cartridge 135 Unsupported printhead 138 USB 120 cable 115 Macintosh 107 USB cable 115 definition 115 USB connection with network connection 120 USB Device Not ...
... screen did not appear automatically 129 page does not print 130 printer does not respond 131 printer printing blank pages 131 printhead error 137 software did not install 129 troubleshooting, wireless cannot print over wireless network 161 changing wireless settings after installation (... wireless setup instructions 100 uninstalling printer software 27 Universal Print Driver downloading 27 Unrecoverable Scan Error 141 Unsupported Cartridge 135 Unsupported printhead 138 USB 120 cable 115 Macintosh 107 USB cable 115 definition 115 USB connection with network connection 120 USB Device Not ...


