
User Manual
Page 2
...your printer 7 Thank you for choosing this printer!...7 Minimizing your printer's environmental impact 7 Finding information about the printer...8 Understanding the parts of the printer 10 Ordering and replacing supplies 12 Ordering ink cartridges...12 Replacing ink cartridges...13 Recycling Dell products...14 Using the printer control ...panel buttons and menus 16 Replacing the language sheet...16 Using the printer control panel...17 Changing the Sleep timeout...19 Saving ...
...your printer 7 Thank you for choosing this printer!...7 Minimizing your printer's environmental impact 7 Finding information about the printer...8 Understanding the parts of the printer 10 Ordering and replacing supplies 12 Ordering ink cartridges...12 Replacing ink cartridges...13 Recycling Dell products...14 Using the printer control ...panel buttons and menus 16 Replacing the language sheet...16 Using the printer control panel...17 Changing the Sleep timeout...19 Saving ...
User Manual
Page 3
......55 Copying an ID card...56 Enlarging or reducing images...56 Adjusting copy quality...57 Making a copy lighter or darker...57 Collating copies using the printer control panel 57 Placing separator sheets between copies 58 Copying multiple pages on one sheet...58 Placing an overlay message on each page 58 Removing... Scanning to a flash drive or memory card 62 Scanning photos for editing...63 Scanning documents for editing...64 Scanning directly to e‑mail using the printer software 65 Scanning to a PDF...65
......55 Copying an ID card...56 Enlarging or reducing images...56 Adjusting copy quality...57 Making a copy lighter or darker...57 Collating copies using the printer control panel 57 Placing separator sheets between copies 58 Copying multiple pages on one sheet...58 Placing an overlay message on each page 58 Removing... Scanning to a flash drive or memory card 62 Scanning photos for editing...63 Scanning documents for editing...64 Scanning directly to e‑mail using the printer software 65 Scanning to a PDF...65
User Manual
Page 4
Contents 4 Scanning FAQ...66 Canceling scan jobs...67 E-mailing...68 Setting up the printer to e-mail...68 Sending e-mail...69 Canceling an e‑mail...70 Faxing...71 Setting up the printer to fax...71 Configuring the fax settings...82 Creating a contact list...84 Sending...network 104 Performing network management tasks 105 Networking FAQ...110 Maintaining the printer 124 Maintaining ink cartridges...124 Cleaning the exterior of the printer...125 Cleaning the scanner glass...126 Moving the printer to another location 126 Troubleshooting 128 Before you troubleshoot...128 If ...
Contents 4 Scanning FAQ...66 Canceling scan jobs...67 E-mailing...68 Setting up the printer to e-mail...68 Sending e-mail...69 Canceling an e‑mail...70 Faxing...71 Setting up the printer to fax...71 Configuring the fax settings...82 Creating a contact list...84 Sending...network 104 Performing network management tasks 105 Networking FAQ...110 Maintaining the printer 124 Maintaining ink cartridges...124 Cleaning the exterior of the printer...125 Cleaning the scanner glass...126 Moving the printer to another location 126 Troubleshooting 128 Before you troubleshoot...128 If ...

User Manual
Page 6
...safety standards with the use of fire, use the fax feature during a lightning storm. The manufacturer is not responsible for signs of the printer, unplug the power cord from the wall outlet and disconnect all external connections (such as Ethernet and telephone system connections) are properly installed .... CAUTION-SHOCK HAZARD: To avoid the risk of electric shock when cleaning the exterior of such problems. Remove the power cord from the printer before inspecting it. There is not intended to be obvious. Do not set up this product near the product and easily accessible. Inspect...
...safety standards with the use of fire, use the fax feature during a lightning storm. The manufacturer is not responsible for signs of the printer, unplug the power cord from the wall outlet and disconnect all external connections (such as Ethernet and telephone system connections) are properly installed .... CAUTION-SHOCK HAZARD: To avoid the risk of electric shock when cleaning the exterior of such problems. Remove the power cord from the printer before inspecting it. There is not intended to be obvious. Do not set up this product near the product and easily accessible. Inspect...
User Manual
Page 7
...We've worked hard to make sure you to protecting the environment and are the reason we do what we do it better. Wireless/network printers allow you 're satisfied. To get back on both sides of the paper. Duplexing lets you get the most out of our knowledgeable support ...representatives will meet your suggestions help you print on track fast. Use the preview features found in a minimum‑power standby mode after the printer is left idle for presentation. You can scan documents or photographs and save . And if you find something we want to make sure it ...
...We've worked hard to make sure you to protecting the environment and are the reason we do what we do it better. Wireless/network printers allow you 're satisfied. To get back on both sides of the paper. Duplexing lets you get the most out of our knowledgeable support ...representatives will meet your suggestions help you print on track fast. Use the preview features found in a minimum‑power standby mode after the printer is left idle for presentation. You can scan documents or photographs and save . And if you find something we want to make sure it ...
User Manual
Page 8
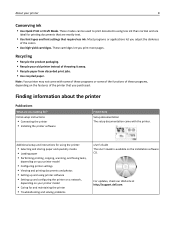
... looking for? For updates, check our Web site at http://support.dell.com. These modes can be used to print documents using printer software • Setting up and configuring the printer on a network, depending on your printer 8 Conserving ink • Use Quick Print or Draft Mode. Recycling... of these programs or some of these programs, depending on the installation software CD. Note: Your printer may not come with the printer. Finding information about the printer Publications What are mostly text. • Use font types and font settings that you print more pages...
... looking for? For updates, check our Web site at http://support.dell.com. These modes can be used to print documents using printer software • Setting up and configuring the printer on a network, depending on your printer 8 Conserving ink • Use Quick Print or Draft Mode. Recycling... of these programs or some of these programs, depending on the installation software CD. Note: Your printer may not come with the printer. Finding information about the printer Publications What are mostly text. • Use font types and font settings that you print more pages...
User Manual
Page 9
...Code Note: The Service Tag and Express Service Code appear on labels located on your printer. • Software and Drivers-Certified drivers for your printer and installers for Dell printer software • Readme files-Last‑minute technical changes, or advanced technical reference ...for experienced users or technicians Installation software CD Note: If you purchased your Dell computer and printer at the same time, then documentation and drivers for your printer • Replacement cartridges Dell Printer Supplies Web site- Notes: • The Help installs automatically with some...
...Code Note: The Service Tag and Express Service Code appear on labels located on your printer. • Software and Drivers-Certified drivers for your printer and installers for Dell printer software • Readme files-Last‑minute technical changes, or advanced technical reference ...for experienced users or technicians Installation software CD Note: If you purchased your Dell computer and printer at the same time, then documentation and drivers for your printer • Replacement cartridges Dell Printer Supplies Web site- Notes: • The Help installs automatically with some...
User Manual
Page 10
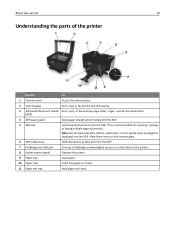
... Understanding the parts of the printer Use the To 1 Scanner cover Access the scanner glass. 2 Scanner glass Scan, copy or fax photos and documents. 3 Automatic Document Feeder Scan, copy, or fax ... Hold documents as they exit from the ADF. 7 PictBridge and USB port Connect a PictBridge‑enabled digital camera or a flash drive to the printer. 8 Printer control panel Operate the printer. 9 Paper tray Load paper. 10 Paper stop Catch the paper as it exits. 11 Paper exit tray Hold paper as magazine clippings) into...
... Understanding the parts of the printer Use the To 1 Scanner cover Access the scanner glass. 2 Scanner glass Scan, copy or fax photos and documents. 3 Automatic Document Feeder Scan, copy, or fax ... Hold documents as they exit from the ADF. 7 PictBridge and USB port Connect a PictBridge‑enabled digital camera or a flash drive to the printer. 8 Printer control panel Operate the printer. 9 Paper tray Load paper. 10 Paper stop Catch the paper as it exits. 11 Paper exit tray Hold paper as magazine clippings) into...
User Manual
Page 11
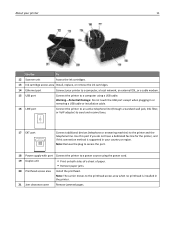
...Warning-Potential Damage: Do not touch the USB port except when plugging in or removing a USB cable or installation cable. 16 LINE port Connect the printer to an active telephone line (through a standard wall jack, DSL filter, or VoIP adapter) to send and receive faxes. 17 EXT port Connect ...additional devices (telephone or answering machine) to the printer and the telephone line. About your printer 11 Use the To 12 Scanner unit Access the ink cartridges. 13 Ink cartridge access area Install, replace, or remove the ...
...Warning-Potential Damage: Do not touch the USB port except when plugging in or removing a USB cable or installation cable. 16 LINE port Connect the printer to an active telephone line (through a standard wall jack, DSL filter, or VoIP adapter) to send and receive faxes. 17 EXT port Connect ...additional devices (telephone or answering machine) to the printer and the telephone line. About your printer 11 Use the To 12 Scanner unit Access the ink cartridges. 13 Ink cartridge access area Install, replace, or remove the ...
User Manual
Page 13
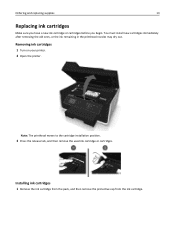
Removing ink cartridges 1 Turn on your printer. 2 Open the printer. Ordering and replacing supplies 13 Replacing ink cartridges Make sure you have a new ink cartridge or cartridges before you begin. You must install new cartridges ...
Removing ink cartridges 1 Turn on your printer. 2 Open the printer. Ordering and replacing supplies 13 Replacing ink cartridges Make sure you have a new ink cartridge or cartridges before you begin. You must install new cartridges ...

User Manual
Page 14
...removing the protective cap to avoid exposing the ink to Dell for recycling: 1 Click or Start. 2 Click All Programs or Programs, and then select the printer program folder from the list. 3 Select Printer Home. 4 Choose your printer from the printer drop‑down list. 5 Click Order supplies in the... and replacing supplies 14 If your finger along the ink cartridge until the cartridge clicks into place. Recycling Dell products To return Dell products to air. 3 Close the printer. Slide your ink cartridge comes with a twist cap, then remove the cap. 2 Insert each ink cartridge.
...removing the protective cap to avoid exposing the ink to Dell for recycling: 1 Click or Start. 2 Click All Programs or Programs, and then select the printer program folder from the list. 3 Select Printer Home. 4 Choose your printer from the printer drop‑down list. 5 Click Order supplies in the... and replacing supplies 14 If your finger along the ink cartridge until the cartridge clicks into place. Recycling Dell products To return Dell products to air. 3 Close the printer. Slide your ink cartridge comes with a twist cap, then remove the cap. 2 Insert each ink cartridge.
User Manual
Page 16
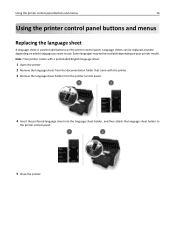
... that came with the printer. 3 Remove the language sheet holder from the printer control panel. 4 Insert the preferred language sheet into the language sheet holder, and then attach the language sheet holder to label buttons on the printer control panel. Using the printer control panel buttons and ...menus 16 Using the printer control panel buttons and menus Replacing the language sheet A language sheet is used to the...
... that came with the printer. 3 Remove the language sheet holder from the printer control panel. 4 Insert the preferred language sheet into the language sheet holder, and then attach the language sheet holder to label buttons on the printer control panel. Using the printer control panel buttons and ...menus 16 Using the printer control panel buttons and menus Replacing the language sheet A language sheet is used to the...
User Manual
Page 17
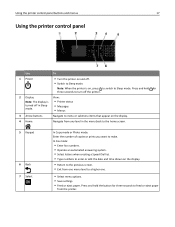
...date and time shown on , press to switch to Sleep mode. Press and hold for three seconds to feed or eject paper from the printer. Note: When the printer is turned off in the menu back to the home screen. 5 Keypad 6 Back 7 Select In Copy mode or Photo mode: Enter...number of copies or prints you want to make. Using the printer control panel buttons and menus 17 Using the printer control panel Use To 1 Power • Turn the printer on the display. 4 Home Navigate from any level in Sleep mode. • Printer status • Messages • Menus 3 Arrow buttons Navigate to...
...date and time shown on , press to switch to Sleep mode. Press and hold for three seconds to feed or eject paper from the printer. Note: When the printer is turned off in the menu back to the home screen. 5 Keypad 6 Back 7 Select In Copy mode or Photo mode: Enter...number of copies or prints you want to make. Using the printer control panel buttons and menus 17 Using the printer control panel Use To 1 Power • Turn the printer on the display. 4 Home Navigate from any level in Sleep mode. • Printer status • Messages • Menus 3 Arrow buttons Navigate to...

User Manual
Page 18
... the previous mode. • Clear current settings or error messages, and return to default settings. 16 Network indicator Check the network connection status of your printer. Insert a three-second pause in progress. • Exit from a menu level of the Copy, Scan, Fax, Photo, or File Print menu to ... 13 Black 14 Start Switch to black‑and‑white mode. Enter a pause only when you have already begun entering the number. Using the printer control panel buttons and menus 18 8 Redial 9 Pause 10 Dial tone Display the last number dialed. Start a job, depending on which mode is...
... the previous mode. • Clear current settings or error messages, and return to default settings. 16 Network indicator Check the network connection status of your printer. Insert a three-second pause in progress. • Exit from a menu level of the Copy, Scan, Fax, Photo, or File Print menu to ... 13 Black 14 Start Switch to black‑and‑white mode. Enter a pause only when you have already begun entering the number. Using the printer control panel buttons and menus 18 8 Redial 9 Pause 10 Dial tone Display the last number dialed. Start a job, depending on which mode is...
User Manual
Page 19
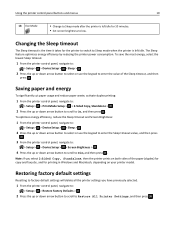
... up or down arrow button to scroll to On, and then press . To optimize energy efficiency, reduce the Sleep timeout and Screen Brightness: 1 From the printer control panel, navigate to: > Setup > > Device Setup > > Sleep > 2 Press the up or down arrow button to select or use the keypad to Dim, and then... Defaults > 2 Press the up or down arrow button to select or use the keypad to enter the Sleep timeout value, and then press . 3 From the printer control panel, navigate to: > Setup > > Device Setup > > Screen Brightness > 4 Press the up or down arrow button to scroll to Restore All...
... up or down arrow button to scroll to On, and then press . To optimize energy efficiency, reduce the Sleep timeout and Screen Brightness: 1 From the printer control panel, navigate to: > Setup > > Device Setup > > Sleep > 2 Press the up or down arrow button to select or use the keypad to Dim, and then... Defaults > 2 Press the up or down arrow button to select or use the keypad to enter the Sleep timeout value, and then press . 3 From the printer control panel, navigate to: > Setup > > Device Setup > > Screen Brightness > 4 Press the up or down arrow button to scroll to Restore All...

User Manual
Page 20
Using the printer control panel buttons and menus 20 3 Press the left or right arrow button to scroll to set the initial settings of your printer, make your selections using the printer control panel buttons. The printer restarts automatically after resetting to factory default settings. 4 When prompted to Yes, and then press . Initial Setup Complete appears on the display.
Using the printer control panel buttons and menus 20 3 Press the left or right arrow button to scroll to set the initial settings of your printer, make your selections using the printer control panel buttons. The printer restarts automatically after resetting to factory default settings. 4 When prompted to Yes, and then press . Initial Setup Complete appears on the display.
User Manual
Page 21
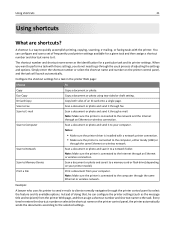
...he can configure and save a set of doing that, he enters the shortcut number or selects the shortcut name on the printer control panel, the printer automatically sends the documents according to your computer. The shortcut number and shortcut name serve as the message title and recipient)... shortcuts? A shortcut is connected to the computer, either locally (USB) or through the same Ethernet or wireless network. You can configure the printer settings (such as the identification for a particular task and its available options. When you want to perform a task with those settings, you ...
...he can configure and save a set of doing that, he enters the shortcut number or selects the shortcut name on the printer control panel, the printer automatically sends the documents according to your computer. The shortcut number and shortcut name serve as the message title and recipient)... shortcuts? A shortcut is connected to the computer, either locally (USB) or through the same Ethernet or wireless network. You can configure the printer settings (such as the identification for a particular task and its available options. When you want to perform a task with those settings, you ...
User Manual
Page 22
... click Launch. If you were not able to create your shortcuts during installation, then you begin, make sure: • Your printer and computer are each connected to the network through your printer > Settings > Configure Shortcuts For Macintosh users 1 From the Finder, navigate to : Add New Shortcut > select a task 2 ...the settings if necessary. 3 Click Add. For Windows users 1 Click or Start. 2 Click All Programs or Programs, and then select the printer program folder from 1 to 999. • If you configured the shortcut to show the settings before running, then the settings will be ...
... click Launch. If you were not able to create your shortcuts during installation, then you begin, make sure: • Your printer and computer are each connected to the network through your printer > Settings > Configure Shortcuts For Macintosh users 1 From the Finder, navigate to : Add New Shortcut > select a task 2 ...the settings if necessary. 3 Click Add. For Windows users 1 Click or Start. 2 Click All Programs or Programs, and then select the printer program folder from 1 to 999. • If you configured the shortcut to show the settings before running, then the settings will be ...
User Manual
Page 23
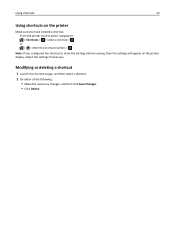
Using shortcuts 23 Using shortcuts on the printer Make sure you configured the shortcut to show the settings before running, then the settings will appear on the printer display. From the printer control panel, navigate to: > Shortcuts > > select a shortcut > or > > enter the shortcut number > Note: If you have created a shortcut. Modifying or deleting a shortcut 1 Launch the shortcuts page, and then select a shortcut. 2 Do either of the following: • Make the necessary changes, and then click Save Changes. • Click Delete. Adjust the settings if necessary.
Using shortcuts 23 Using shortcuts on the printer Make sure you configured the shortcut to show the settings before running, then the settings will appear on the printer display. From the printer control panel, navigate to: > Shortcuts > > select a shortcut > or > > enter the shortcut number > Note: If you have created a shortcut. Modifying or deleting a shortcut 1 Launch the shortcuts page, and then select a shortcut. 2 Do either of the following: • Make the necessary changes, and then click Save Changes. • Click Delete. Adjust the settings if necessary.

User Manual
Page 24
... 2010.12 and 2010.10* * The printer driver for this operating system is available only at http://support.dell.com. Using the Windows printer software Software installed during printer installation When you do. Using the printer software 24 Using the printer software Minimum system requirements The printer software requires up the printer using the installation software CD, all...
... 2010.12 and 2010.10* * The printer driver for this operating system is available only at http://support.dell.com. Using the Windows printer software Software installed during printer installation When you do. Using the printer software 24 Using the printer software Minimum system requirements The printer software requires up the printer using the installation software CD, all...


