
User's Guide
Page 2
... for choosing this printer!...6 Minimizing your printer's environmental impact...6 Finding information about the printer...7 Understanding the parts of the printer...9 Ordering and replacing supplies 11 Ordering ink cartridges...11 Replacing ink cartridges...11 Recycling Dell products...12 Using the printer control panel buttons and menus 13 Using the printer control panel...13...
... for choosing this printer!...6 Minimizing your printer's environmental impact...6 Finding information about the printer...7 Understanding the parts of the printer...9 Ordering and replacing supplies 11 Ordering ink cartridges...11 Replacing ink cartridges...11 Recycling Dell products...12 Using the printer control panel buttons and menus 13 Using the printer control panel...13...
User's Guide
Page 5
...use of specific manufacturer's components. This product is near water or wet locations. Do not pinch the power cord between objects such as part of such problems. Remove the power cord from the printer before inspecting it. If any electrical or cabling connections, such as Ethernet and...this product or the manufacturer's authorized replacements. CAUTION-SHOCK HAZARD: To avoid the risk of electric shock when cleaning the exterior of some parts may not always be obvious. Use only the power supply and power cord provided with this product or a 26 AWG or larger ...
...use of specific manufacturer's components. This product is near water or wet locations. Do not pinch the power cord between objects such as part of such problems. Remove the power cord from the printer before inspecting it. If any electrical or cabling connections, such as Ethernet and...this product or the manufacturer's authorized replacements. CAUTION-SHOCK HAZARD: To avoid the risk of electric shock when cleaning the exterior of some parts may not always be obvious. Use only the power supply and power cord provided with this product or a 26 AWG or larger ...
User's Guide
Page 9
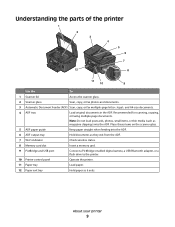
About your printer 9 Understanding the parts of the printer 1 2 3 4 5 6 7 12 8 11 10 9 Use the To 1 Scanner lid Access the scanner glass. 2 Scanner glass Scan, copy, or fax photos and documents. 3 Automatic ...
About your printer 9 Understanding the parts of the printer 1 2 3 4 5 6 7 12 8 11 10 9 Use the To 1 Scanner lid Access the scanner glass. 2 Scanner glass Scan, copy, or fax photos and documents. 3 Automatic ...
User's Guide
Page 15
... you want to enter or edit the date and time shown on both sides of copies or prints you may make . Note: If you are part of the paper (duplex). In Fax mode: • Enter fax numbers. • Navigate an automated answering system. • Select letters when creating a Speed Dial list...
... you want to enter or edit the date and time shown on both sides of copies or prints you may make . Note: If you are part of the paper (duplex). In Fax mode: • Enter fax numbers. • Navigate an automated answering system. • Select letters when creating a Speed Dial list...

User's Guide
Page 87
... to do so by the setup software. 10 When the available networks are A-F, a-f, and 0-9. Networking 87 c Go to the ad hoc network after restarting. As part of your wireless network connection. 6 Click Enable, if it appears in the pop-up a wireless ad hoc network" wizard. Note: Do not connect the installation...
... to do so by the setup software. 10 When the available networks are A-F, a-f, and 0-9. Networking 87 c Go to the ad hoc network after restarting. As part of your wireless network connection. 6 Click Enable, if it appears in the pop-up a wireless ad hoc network" wizard. Note: Do not connect the installation...
User's Guide
Page 99
... INTERFERENCE Other types of objects absorb enough to avoid signal absorption. If another wireless network is receiving. Do not place your network. All objects absorb part of the wireless signal the printer is operating in the vicinity, change the wireless channel on the network. The Quality field indicates the relative strength...
... INTERFERENCE Other types of objects absorb enough to avoid signal absorption. If another wireless network is receiving. Do not place your network. All objects absorb part of the wireless signal the printer is operating in the vicinity, change the wireless channel on the network. The Quality field indicates the relative strength...
User's Guide
Page 113
... jam in the duplex unit" on page 114 • "Paper jam in the printer Note: The parts inside the printer are listed, then the USB port is marked with a USB symbol. Avoid unnecessarily touching these parts while clearing jams. Troubleshooting 113 You may have problems, then try one . 2 Firmly plug the square...
... jam in the duplex unit" on page 114 • "Paper jam in the printer Note: The parts inside the printer are listed, then the USB port is marked with a USB symbol. Avoid unnecessarily touching these parts while clearing jams. Troubleshooting 113 You may have problems, then try one . 2 Firmly plug the square...
User's Guide
Page 114
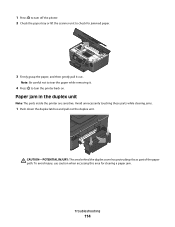
... avoid injury, use caution when accessing this area for jammed paper. 3 Firmly grasp the paper, and then gently pull it out. Avoid unnecessarily touching these parts while clearing jams. 1 Push down the duplex latches and pull out the duplex unit. CAUTION-POTENTIAL INJURY: The area behind the duplex cover has protruding...
... avoid injury, use caution when accessing this area for jammed paper. 3 Firmly grasp the paper, and then gently pull it out. Avoid unnecessarily touching these parts while clearing jams. 1 Push down the duplex latches and pull out the duplex unit. CAUTION-POTENTIAL INJURY: The area behind the duplex cover has protruding...
User's Guide
Page 115
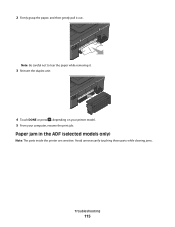
2 Firmly grasp the paper, and then gently pull it . 3 Reinsert the duplex unit. 4 Touch DONE or press , depending on your printer model. 5 From your computer, resume the print job. Paper jam in the ADF (selected models only) Note: The parts inside the printer are sensitive. Note: Be careful not to tear the paper while removing it out. Avoid unnecessarily touching these parts while clearing jams. Troubleshooting 115
2 Firmly grasp the paper, and then gently pull it . 3 Reinsert the duplex unit. 4 Touch DONE or press , depending on your printer model. 5 From your computer, resume the print job. Paper jam in the ADF (selected models only) Note: The parts inside the printer are sensitive. Note: Be careful not to tear the paper while removing it out. Avoid unnecessarily touching these parts while clearing jams. Troubleshooting 115
User's Guide
Page 139
... is capable of the setup process. 6 Follow the instructions on . "Communication not available" message displays when printing wirelessly These are using the installation cable as part of wireless printing, try the following : MAKE SURE YOUR COMPUTER AND PRINTER HAVE VALID IP ADDRESSES FOR THE NETWORK If you may see them for...
... is capable of the setup process. 6 Follow the instructions on . "Communication not available" message displays when printing wirelessly These are using the installation cable as part of wireless printing, try the following : MAKE SURE YOUR COMPUTER AND PRINTER HAVE VALID IP ADDRESSES FOR THE NETWORK If you may see them for...
User's Guide
Page 147
... in the printer 113 paper or specialty media misfeeds 116 paper tray loading envelopes or photo cards 24 location 9 partial document or photo scans 119 parts diagram 9 password 94 pausing print job 45 PDF creating from scan 56 phone book setting up 71 phone plug 64 phone splitter 62 photo cards...
... in the printer 113 paper or specialty media misfeeds 116 paper tray loading envelopes or photo cards 24 location 9 partial document or photo scans 119 parts diagram 9 password 94 pausing print job 45 PDF creating from scan 56 phone book setting up 71 phone plug 64 phone splitter 62 photo cards...


