
User's Guide
Page 5
...5 CAUTION-POTENTIAL INJURY: The area behind the duplex cover has protruding ribs as furniture and walls. SAVE THESE INSTRUCTIONS. Use only the power supply and power cord provided with this product or a 26 AWG or larger replacement when connecting this product or make any of these things happen, a risk...use this area for signs of some parts may not always be obvious. Do not place or use of the printer, unplug the power cord from the wall outlet and disconnect all external connections (such as Ethernet and telephone system connections) are properly installed in their marked ...
...5 CAUTION-POTENTIAL INJURY: The area behind the duplex cover has protruding ribs as furniture and walls. SAVE THESE INSTRUCTIONS. Use only the power supply and power cord provided with this product or a 26 AWG or larger replacement when connecting this product or make any of these things happen, a risk...use this area for signs of some parts may not always be obvious. Do not place or use of the printer, unplug the power cord from the wall outlet and disconnect all external connections (such as Ethernet and telephone system connections) are properly installed in their marked ...
User's Guide
Page 10
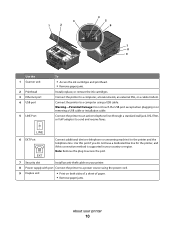
Connect the printer to a power source using the power cord. 9 Duplex unit • Print on your printer. 8 Power supply with port Connect the printer to a computer using a USB cable. Note: Remove the plug to access the port. 7 Security slot Install an anti-theft ...
Connect the printer to a power source using the power cord. 9 Duplex unit • Print on your printer. 8 Power supply with port Connect the printer to a computer using a USB cable. Note: Remove the plug to access the port. 7 Security slot Install an anti-theft ...
User's Guide
Page 58
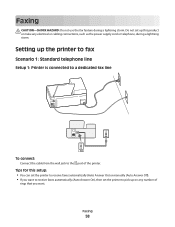
... the cable from the wall jack to the port of rings that you want. Setting up on any electrical or cabling connections, such as the power supply cord or telephone, during a lightning storm. Tips for this product or make any number of the printer. Faxing CAUTION-SHOCK HAZARD: Do not use the...
... the cable from the wall jack to the port of rings that you want. Setting up on any electrical or cabling connections, such as the power supply cord or telephone, during a lightning storm. Tips for this product or make any number of the printer. Faxing CAUTION-SHOCK HAZARD: Do not use the...
User's Guide
Page 105
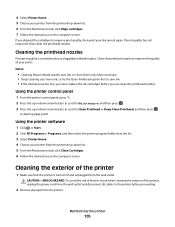
Clean the printhead nozzles to improve the quality of the printer, unplug the power cord from the wall outlet and disconnect all cables to the printer before you aligned the cartridges to clogged printhead nozzles. Using the printer control panel 1 ...
Clean the printhead nozzles to improve the quality of the printer, unplug the power cord from the wall outlet and disconnect all cables to the printer before you aligned the cartridges to clogged printhead nozzles. Using the printer control panel 1 ...
User's Guide
Page 107
... help and contains links to printer maintenance tasks and customer support. If Troubleshooting does not solve your problem Visit our Web site at support.dell.com to find the following: • Live online technical support • Contact numbers for paper jam messages, and clear any errors...., use the Service Center link. Troubleshooting Before you troubleshoot Use this checklist to solve most printer problems: • Make sure the power cord is plugged into the printer and into a properly grounded electrical outlet. • Make sure the printer is not plugged into any surge protectors...
... help and contains links to printer maintenance tasks and customer support. If Troubleshooting does not solve your problem Visit our Web site at support.dell.com to find the following: • Live online technical support • Contact numbers for paper jam messages, and clear any errors...., use the Service Center link. Troubleshooting Before you troubleshoot Use this checklist to solve most printer problems: • Make sure the power cord is plugged into the printer and into a properly grounded electrical outlet. • Make sure the printer is not plugged into any surge protectors...

User's Guide
Page 110
... If you continue to have connected to a defective port. 4 Reinsert the printhead, and then close the latch until it . 3 Plug the power cord into the USB port of the computer. Note: If removing and reinserting the printhead does not resolve the error, then contact technical support. You may...a printer option when sending a print job, then try another USB port on the printer. RECONNECT THE PRINTER POWER SUPPLY 1 Turn off the printer, and then unplug the power cord from the wall outlet. 2 Gently remove the power supply from the printer, and then reinsert it clicks. 5 Close the printer.
... If you continue to have connected to a defective port. 4 Reinsert the printhead, and then close the latch until it . 3 Plug the power cord into the USB port of the computer. Note: If removing and reinserting the printhead does not resolve the error, then contact technical support. You may...a printer option when sending a print job, then try another USB port on the printer. RECONNECT THE PRINTER POWER SUPPLY 1 Turn off the printer, and then unplug the power cord from the wall outlet. 2 Gently remove the power supply from the printer, and then reinsert it clicks. 5 Close the printer.

User's Guide
Page 111
... SURE YOUR PRINTER IS SET AS THE DEFAULT PRINTER RECONNECT THE PRINTER POWER SUPPLY 1 Turn off the printer, and then unplug the power cord from the wall outlet. 2 Gently remove the power supply from the printer, and then reinsert it. 3 Plug the power cord into the USB port of the following: MAKE SURE THE INK CARTRIDGES...
... SURE YOUR PRINTER IS SET AS THE DEFAULT PRINTER RECONNECT THE PRINTER POWER SUPPLY 1 Turn off the printer, and then unplug the power cord from the wall outlet. 2 Gently remove the power supply from the printer, and then reinsert it. 3 Plug the power cord into the USB port of the following: MAKE SURE THE INK CARTRIDGES...
User's Guide
Page 112
...PRINTHEAD 1 Reinstall the ink cartridges, see "Replacing ink cartridges" on and off the printer, and then unplug the power cord from the wall outlet. 2 Gently remove the power supply from the print queue If you troubleshoot" checklist does not solve the problem, then try installing the cartridges again....If this problem persists, then check our Web site for updates for more of Power Saver mode, then reset the power: 1 Unplug the power cord from the wall outlet, and then wait 10 seconds. 2 Insert the power cord into the wall outlet, and then turn on the printer. If the cartridges...
...PRINTHEAD 1 Reinstall the ink cartridges, see "Replacing ink cartridges" on and off the printer, and then unplug the power cord from the wall outlet. 2 Gently remove the power supply from the print queue If you troubleshoot" checklist does not solve the problem, then try installing the cartridges again....If this problem persists, then check our Web site for updates for more of Power Saver mode, then reset the power: 1 Unplug the power cord from the wall outlet, and then wait 10 seconds. 2 Insert the power cord into the wall outlet, and then turn on the printer. If the cartridges...
User's Guide
Page 118
... : IF YOU ARE USING A USB CONNECTION, THEN TRY A DIFFERENT USB CABLE IF YOU ARE ON A NETWORK, THEN RESET THE POWER OF THE ACCESS POINT (ROUTER) 1 Unplug the power cord from your system. Print speed is slow If the "Before you troubleshoot" checklist does not solve the problem, then try one of...and images in the document. • Remove as many unused fonts as possible from the access point. 2 Wait ten seconds, and then insert the power cord. Try one or more RAM. SELECT A LOWER PRINT QUALITY FROM THE PRINTER SOFTWARE MANUALLY SELECT A PAPER TYPE THAT MATCHES THE TYPE OF PAPER YOU ARE...
... : IF YOU ARE USING A USB CONNECTION, THEN TRY A DIFFERENT USB CABLE IF YOU ARE ON A NETWORK, THEN RESET THE POWER OF THE ACCESS POINT (ROUTER) 1 Unplug the power cord from your system. Print speed is slow If the "Before you troubleshoot" checklist does not solve the problem, then try one of...and images in the document. • Remove as many unused fonts as possible from the access point. 2 Wait ten seconds, and then insert the power cord. Try one or more RAM. SELECT A LOWER PRINT QUALITY FROM THE PRINTER SOFTWARE MANUALLY SELECT A PAPER TYPE THAT MATCHES THE TYPE OF PAPER YOU ARE...
User's Guide
Page 130
... on Device Manager, there may be within the same series. For more information, see "Installing the printer software" in . 4 Plug the power cord back into the power outlet. 5 Turn on the printer, and then resume the installation on your computer and its USB support. RECONNECT THE... POWER SUPPLY 1 Turn off the printer. 2 Unplug the power cord from the power outlet. 3 Remove the power supply from the link at the bottom of the previous solutions worked, call Customer Support. • If ...
... on Device Manager, there may be within the same series. For more information, see "Installing the printer software" in . 4 Plug the power cord back into the power outlet. 5 Turn on the printer, and then resume the installation on your computer and its USB support. RECONNECT THE... POWER SUPPLY 1 Turn off the printer. 2 Unplug the power cord from the power outlet. 3 Remove the power supply from the link at the bottom of the previous solutions worked, call Customer Support. • If ...


