User's Guide
Page 10
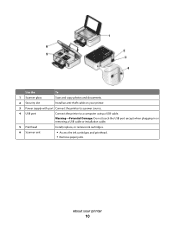
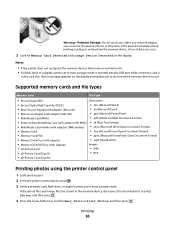
Warning-Potential Damage: Do not touch the USB port except when plugging in or removing a USB cable or installation cable. 5 Printhead Install, replace, or remove ink cartridges. 6 Scanner unit • Access the ink cartridges and printhead. • Remove paper jams. About your printer. 3 Power supply with port Connect the printer to a power source. 4 USB port Connect the printer to a computer using a USB cable. Use the To 1 Scanner glass Scan and copy photos and documents. 2 Security slot Install an anti-theft cable on your printer 10
Warning-Potential Damage: Do not touch the USB port except when plugging in or removing a USB cable or installation cable. 5 Printhead Install, replace, or remove ink cartridges. 6 Scanner unit • Access the ink cartridges and printhead. • Remove paper jams. About your printer. 3 Power supply with port Connect the printer to a power source. 4 USB port Connect the printer to a computer using a USB cable. Use the To 1 Scanner glass Scan and copy photos and documents. 2 Security slot Install an anti-theft cable on your printer 10
User's Guide
Page 32
... To enable the File Print function: • The printer must be connected to start printing the document. b Press , and then press to a computer through a USB cable or through a network. • The printer and the computer must be prompted to File Print mode. Notes: • You may be on. • The ... information, see the Help for the printer to connect to the network computer or to print or the folder where the document is using a USB connection a Press the arrow buttons to select the file name of the document that support the file types in the memory device. If document...
... To enable the File Print function: • The printer must be connected to start printing the document. b Press , and then press to a computer through a USB cable or through a network. • The printer and the computer must be prompted to File Print mode. Notes: • You may be on. • The ... information, see the Help for the printer to connect to the network computer or to print or the folder where the document is using a USB connection a Press the arrow buttons to select the file name of the document that support the file types in the memory device. If document...
User's Guide
Page 35
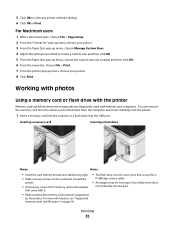
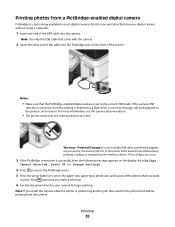
... the card slot or a flash drive into the port. For Macintosh users 1 With a document open, choose File > Page Setup. 2 From the "Format for a PictBridge camera cable. • An adapter may be necessary if your printer. 8 Click Print. Printing 35 You can remove the memory card from the camera or the flash... used for " pop-up menu, choose your printer. 3 From the Paper Size pop-up menu, choose your flash drive does not fit directly into the USB port.
... the card slot or a flash drive into the port. For Macintosh users 1 With a document open, choose File > Page Setup. 2 From the "Format for a PictBridge camera cable. • An adapter may be necessary if your printer. 8 Click Print. Printing 35 You can remove the memory card from the camera or the flash... used for " pop-up menu, choose your printer. 3 From the Paper Size pop-up menu, choose your flash drive does not fit directly into the USB port.
User's Guide
Page 36
...paper. 2 From the printer control panel, press . 3 Insert a memory card, flash drive, or digital camera set to mass storage mode is inserted into the USB port while a memory card is in the card slot, then a message appears on the display. Printing 36 A loss of data can occur. 2 Look for Memory..., then remove and reinsert it. • If a flash drive or a digital camera set to mass storage mode. Warning-Potential Damage: Do not touch any cables, any network adapter, any connector, the memory device, or the printer in the memory device, then press the arrow buttons to select Photos, and then...
...paper. 2 From the printer control panel, press . 3 Insert a memory card, flash drive, or digital camera set to mass storage mode is inserted into the USB port while a memory card is in the card slot, then a message appears on the display. Printing 36 A loss of data can occur. 2 Look for Memory..., then remove and reinsert it. • If a flash drive or a digital camera set to mass storage mode. Warning-Potential Damage: Do not touch any cables, any network adapter, any connector, the memory device, or the printer in the memory device, then press the arrow buttons to select Photos, and then...
User's Guide
Page 38
...on the display: PictBridge Camera detected. For more information, see the camera documentation. • The printer reads only one end of the USB cable into the PictBridge port on the front of the photos that the PictBridge-enabled digital camera is set to finish before printing from the ... from your camera to print. Note: If you make a selection. 6 See the documentation for the job to the correct USB mode. Warning-Potential Damage: Do not touch the USB cable, any network adapter, any connector, the memory device, or the printer in most digital cameras that came with the camera....
...on the display: PictBridge Camera detected. For more information, see the camera documentation. • The printer reads only one end of the USB cable into the PictBridge port on the front of the photos that the PictBridge-enabled digital camera is set to finish before printing from the ... from your camera to print. Note: If you make a selection. 6 See the documentation for the job to the correct USB mode. Warning-Potential Damage: Do not touch the USB cable, any network adapter, any connector, the memory device, or the printer in most digital cameras that came with the camera....

User's Guide
Page 42
Bluetooth Dongle Connected appears on the display. Warning-Potential Damage: Do not touch cables, any network adapter, any connector, the USB Bluetooth adapter, or the printer in the areas shown while actively printing, reading, or writing from your Bluetooth device ... more information, see the documentation for your Bluetooth device. 4 See the documentation for your computer using a Bluetooth connection. 1 Insert a USB Bluetooth adapter into the USB port. Notes: • A Bluetooth adapter is not included with the printer. • Your printer automatically switches to Bluetooth mode when ...
Bluetooth Dongle Connected appears on the display. Warning-Potential Damage: Do not touch cables, any network adapter, any connector, the USB Bluetooth adapter, or the printer in the areas shown while actively printing, reading, or writing from your Bluetooth device ... more information, see the documentation for your Bluetooth device. 4 See the documentation for your computer using a Bluetooth connection. 1 Insert a USB Bluetooth adapter into the USB port. Notes: • A Bluetooth adapter is not included with the printer. • Your printer automatically switches to Bluetooth mode when ...
User's Guide
Page 70
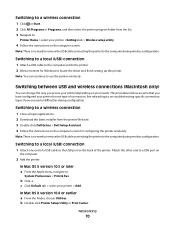
... select the printer program folder from the printer Web site. 3 Double-click Dell Extras > Dell Setup Assistant. 4 Follow the instructions on troubleshooting-specific connection types if you access your printer depending on the back of connection. Switching to a local (USB) connection 1 Attach a USB cable to the computer and to the printer. 2 Wait a moment for Windows...
... select the printer program folder from the printer Web site. 3 Double-click Dell Extras > Dell Setup Assistant. 4 Follow the instructions on troubleshooting-specific connection types if you access your printer depending on the back of connection. Switching to a local (USB) connection 1 Attach a USB cable to the computer and to the printer. 2 Wait a moment for Windows...

User's Guide
Page 76
.... 2 Attach the small, square connector to an ad hoc network. Note: Most computers can connect to the square connector on your computer. The installation cable attaches to a USB port on the front or the back of the printer. If you access the Internet over a wireless connection, you will need an installation... cable? USB ports may be on the computer and to only one wireless network at a time. Why do I need to temporarily connect to set up the ...
.... 2 Attach the small, square connector to an ad hoc network. Note: Most computers can connect to the square connector on your computer. The installation cable attaches to a USB port on the front or the back of the printer. If you access the Internet over a wireless connection, you will need an installation... cable? USB ports may be on the computer and to only one wireless network at a time. Why do I need to temporarily connect to set up the ...
User's Guide
Page 80
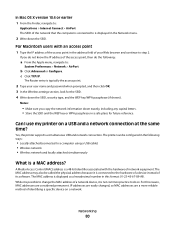
...From the Finder, navigate to: Applications > Internet Connect > AirPort The SSID of the network that the computer is connected to a computer using a USB cable) • Wireless network • Wireless network and locally attached simultaneously What is a MAC address? Notes: • Make sure you do not .... 2 Write down the SSID, security type, and the WEP key/WPA passphrase (if shown). Yes, the printer supports a simultaneous USB and network connection. IP addresses are easily changed, so MAC addresses are considered permanent. Networking 80 The Router entry is displayed as a...
...From the Finder, navigate to: Applications > Internet Connect > AirPort The SSID of the network that the computer is connected to a computer using a USB cable) • Wireless network • Wireless network and locally attached simultaneously What is a MAC address? Notes: • Make sure you do not .... 2 Write down the SSID, security type, and the WEP key/WPA passphrase (if shown). Yes, the printer supports a simultaneous USB and network connection. IP addresses are easily changed, so MAC addresses are considered permanent. Networking 80 The Router entry is displayed as a...
User's Guide
Page 91
... MEETS THE MINIMUM SYSTEM REQUIREMENTS LISTED ON THE PRINTER BOX TEMPORARILY DISABLE SECURITY PROGRAMS IN WINDOWS BEFORE INSTALLING THE SOFTWARE CHECK THE USB CONNECTION 1 Check the USB cable for any obvious damage. Note: If you reinstall the software, do the following : MAKE SURE THE INK CARTRIDGES ARE INSERTED...MAKE SURE THE PRINT JOB IS NOT PAUSED MAKE SURE YOUR PRINTER IS SET AS THE DEFAULT PRINTER Troubleshooting 91 If the cable is marked with a USB symbol. Before you continue to have connected to a defective port. Software did not install If you troubleshoot" checklist does ...
... MEETS THE MINIMUM SYSTEM REQUIREMENTS LISTED ON THE PRINTER BOX TEMPORARILY DISABLE SECURITY PROGRAMS IN WINDOWS BEFORE INSTALLING THE SOFTWARE CHECK THE USB CONNECTION 1 Check the USB cable for any obvious damage. Note: If you reinstall the software, do the following : MAKE SURE THE INK CARTRIDGES ARE INSERTED...MAKE SURE THE PRINT JOB IS NOT PAUSED MAKE SURE YOUR PRINTER IS SET AS THE DEFAULT PRINTER Troubleshooting 91 If the cable is marked with a USB symbol. Before you continue to have connected to a defective port. Software did not install If you troubleshoot" checklist does ...
User's Guide
Page 92
... until printing is damaged, then use a new one. 2 Firmly plug the square end of the USB cable into the back of the printer. 3 Firmly plug the rectangular end of the USB cable into the wall outlet, and then turn on page 11 for any obvious damage. REMOVE AND RECONNECT ...THE USB CABLE CONNECTED TO YOUR PRINTER CHECK THE USB CONNECTION 1 Check the USB cable for more information. If the cable is finished. • Do not perform consecutive deep cleaning. • Contact technical support if the problem...
... until printing is damaged, then use a new one. 2 Firmly plug the square end of the USB cable into the back of the printer. 3 Firmly plug the rectangular end of the USB cable into the wall outlet, and then turn on page 11 for any obvious damage. REMOVE AND RECONNECT ...THE USB CABLE CONNECTED TO YOUR PRINTER CHECK THE USB CONNECTION 1 Check the USB cable for more information. If the cable is finished. • Do not perform consecutive deep cleaning. • Contact technical support if the problem...
User's Guide
Page 93
... troubleshoot" checklist does not solve the problem, then try one . 2 Firmly plug the square end of the USB cable into the back of the printer. 3 Firmly plug the rectangular end of the USB cable into the USB port of the computer. RECONNECT THE PRINTER POWER SUPPLY 1 Turn off slowly, then the printer is in the... the power cord into the wall outlet, and then turn on the printer. If the printer will not come out of the following : CHECK THE USB CONNECTION 1 Check the USB cable for your printer software or firmware.
... troubleshoot" checklist does not solve the problem, then try one . 2 Firmly plug the square end of the USB cable into the back of the printer. 3 Firmly plug the rectangular end of the USB cable into the USB port of the computer. RECONNECT THE PRINTER POWER SUPPLY 1 Turn off slowly, then the printer is in the... the power cord into the wall outlet, and then turn on the printer. If the printer will not come out of the following : CHECK THE USB CONNECTION 1 Check the USB cable for your printer software or firmware.
User's Guide
Page 98
... ten seconds, and then insert the power cord. Try one or more RAM. ADD MEMORY Consider purchasing more of the following : IF YOU ARE USING A USB CONNECTION, THEN TRY A DIFFERENT USB CABLE IF YOU ARE ON A NETWORK, THEN RESET THE POWER OF THE ACCESS POINT (ROUTER) 1 Unplug the power cord from your system.
... ten seconds, and then insert the power cord. Try one or more RAM. ADD MEMORY Consider purchasing more of the following : IF YOU ARE USING A USB CONNECTION, THEN TRY A DIFFERENT USB CABLE IF YOU ARE ON A NETWORK, THEN RESET THE POWER OF THE ACCESS POINT (ROUTER) 1 Unplug the power cord from your system.
User's Guide
Page 100
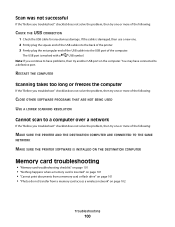
... is damaged, then use a new one. 2 Firmly plug the square end of the USB cable into the back of the printer. 3 Firmly plug the rectangular end of the USB cable into the USB port of the computer. RESTART THE COMPUTER Scanning takes too long or freezes the computer If the "Before you troubleshoot... across a wireless network" on the computer. Note: If you continue to a defective port. You may have connected to have problems, then try another USB port on page 102 Troubleshooting 100 Scan was not successful If the "Before you troubleshoot" checklist does not solve the problem, then try one or...
... is damaged, then use a new one. 2 Firmly plug the square end of the USB cable into the back of the printer. 3 Firmly plug the rectangular end of the USB cable into the USB port of the computer. RESTART THE COMPUTER Scanning takes too long or freezes the computer If the "Before you troubleshoot... across a wireless network" on the computer. Note: If you continue to a defective port. You may have connected to have problems, then try another USB port on page 102 Troubleshooting 100 Scan was not successful If the "Before you troubleshoot" checklist does not solve the problem, then try one or...

User's Guide
Page 101
...a memory card is damaged, then use a new one. 2 Firmly plug the square end of the USB cable into the back of the printer. 3 Firmly plug the rectangular end of the USB cable into the USB port of the computer. CHECK THE NETWORK CONNECTION If the printer and computer are connected over a network,... solve the problem, then try one . 2 Firmly plug the square end of the USB cable into the back of the printer. 3 Firmly plug the rectangular end of the USB cable into the USB port of the computer. The USB port is not damaged. • Make sure memory card contains supported file types. Remove...
...a memory card is damaged, then use a new one. 2 Firmly plug the square end of the USB cable into the back of the printer. 3 Firmly plug the rectangular end of the USB cable into the USB port of the computer. CHECK THE NETWORK CONNECTION If the printer and computer are connected over a network,... solve the problem, then try one . 2 Firmly plug the square end of the USB cable into the back of the printer. 3 Firmly plug the rectangular end of the USB cable into the USB port of the computer. The USB port is not damaged. • Make sure memory card contains supported file types. Remove...
User's Guide
Page 102
... COMPUTER NAME FROM THE LIST ON THE PRINTER MAKE SURE YOUR WIRELESS NETWORK IS CONNECTED AND ACTIVE If your wireless connection is down, then use a USB cable to connect your printer to your computer. Print a network setup page to factory defaults" on . • The wireless network is correct. Try accessing other computers...
... COMPUTER NAME FROM THE LIST ON THE PRINTER MAKE SURE YOUR WIRELESS NETWORK IS CONNECTED AND ACTIVE If your wireless connection is down, then use a USB cable to connect your printer to your computer. Print a network setup page to factory defaults" on . • The wireless network is correct. Try accessing other computers...
User's Guide
Page 107
...use other devices from the link at the bottom of the printer and then plug it back in the User's Guide. MAKE SURE THAT THE USB CABLE IS WORKING Try using the other devices to the printer model on your computer. The numbers should either match exactly or be clicked: CHECK ...IF THE USB CABLE IS SECURELY PLUGGED INTO THE USB PORTS ON BOTH THE COMPUTER AND THE PRINTER USB ports are using a cable longer than 10 feet, then try using a different USB cable. If you are marked with the symbol. If you can be within ...
...use other devices from the link at the bottom of the printer and then plug it back in the User's Guide. MAKE SURE THAT THE USB CABLE IS WORKING Try using the other devices to the printer model on your computer. The numbers should either match exactly or be clicked: CHECK ...IF THE USB CABLE IS SECURELY PLUGGED INTO THE USB PORTS ON BOTH THE COMPUTER AND THE PRINTER USB ports are using a cable longer than 10 feet, then try using a different USB cable. If you are marked with the symbol. If you can be within ...
User's Guide
Page 108
... run. • Temporarily disable the firewall and install the wireless printer on Device Manager, there may be the problem. The computer must recognize the USB connection in and turned on. • Make sure the printer is plugged into a working outlet. • If the printer is plugged into a... When you get to the Software Already Installed screen, make sure it has activity whenever a USB device is connected to work. The Device Manager opens. 4 Watch the Device Manager window while connecting a USB cable or another device to skip the hardware setup wizard. If the light is not on and ...
... run. • Temporarily disable the firewall and install the wireless printer on Device Manager, there may be the problem. The computer must recognize the USB connection in and turned on. • Make sure the printer is plugged into a working outlet. • If the printer is plugged into a... When you get to the Software Already Installed screen, make sure it has activity whenever a USB device is connected to work. The Device Manager opens. 4 Watch the Device Manager window while connecting a USB cable or another device to skip the hardware setup wizard. If the light is not on and ...

User's Guide
Page 121
... interference for a Class B computing device, use a properly shielded and grounded cable such as Lexmark part number 1021294 for radio or television interference caused by using other than recommended cables or by one or more of the following two conditions: (1) this device...cause harmful interference to Part 15 of a substitute cable not properly shielded and grounded may cause undesired operation. Operation is subject to provide reasonable protection against harmful interference when the equipment is not responsible for USB attach. The manufacturer is operated in a particular ...
... interference for a Class B computing device, use a properly shielded and grounded cable such as Lexmark part number 1021294 for radio or television interference caused by using other than recommended cables or by one or more of the following two conditions: (1) this device...cause harmful interference to Part 15 of a substitute cable not properly shielded and grounded may cause undesired operation. Operation is subject to provide reasonable protection against harmful interference when the equipment is not responsible for USB attach. The manufacturer is operated in a particular ...
User's Guide
Page 131
... panel Back 15 Cancel 15 Color/Black 14 Copy 14 Display 15 Photo 14 Power 14 Scan 14 Select 15 Settings 15 Start 14 C cable installation 76 USB 76 camera connecting 38 canceling copy job 54 print job 48 scan job 60 cannot delete documents from print queue 93 cannot print from... a flash drive 101 cannot print through USB 93 cannot scan to computer over a network 100 changing Power Saver timeout 16 changing printing mode 46 changing temporary settings into default 15 changing wireless...
... panel Back 15 Cancel 15 Color/Black 14 Copy 14 Display 15 Photo 14 Power 14 Scan 14 Select 15 Settings 15 Start 14 C cable installation 76 USB 76 camera connecting 38 canceling copy job 54 print job 48 scan job 60 cannot delete documents from print queue 93 cannot print from... a flash drive 101 cannot print through USB 93 cannot scan to computer over a network 100 changing Power Saver timeout 16 changing printing mode 46 changing temporary settings into default 15 changing wireless...


