User's Guide
Page 2
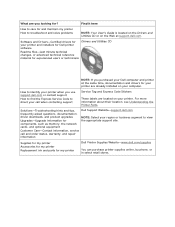
... maintain my printer How to troubleshoot and solve problems NOTE: Your User's Guide is located on the Drivers and Utilities CD or on the Web at the same time, documentation and drivers for my printer Dell Printer Supplies Website-www.dell.com/supplies You can purchase printer supplies online, by phone, or in select retail stores. What are you use support.dell.com or contact support How to find the Express Service Code to...
... maintain my printer How to troubleshoot and solve problems NOTE: Your User's Guide is located on the Drivers and Utilities CD or on the Web at the same time, documentation and drivers for my printer Dell Printer Supplies Website-www.dell.com/supplies You can purchase printer supplies online, by phone, or in select retail stores. What are you use support.dell.com or contact support How to find the Express Service Code to...
User's Guide
Page 3
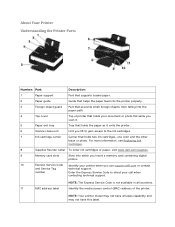
... access control (MAC) address of printer that holds your document or photo flat while you scan it. 5 Paper exit tray Tray that holds the paper as it exits the printer. 6 Scanner base unit Unit you use support.dell.com or contact and Service Tag technical support. number Enter the Express Service Code to the ink cartridges. 7 Ink cartridge carrier Carrier that holds two ink cartridges, one color and the other black or photo. About Your Printer Understanding the Printer Parts Number: Part: Description: 1 Paper support Part that supports loaded paper. 2 Paper guide Guide...
... access control (MAC) address of printer that holds your document or photo flat while you scan it. 5 Paper exit tray Tray that holds the paper as it exits the printer. 6 Scanner base unit Unit you use support.dell.com or contact and Service Tag technical support. number Enter the Express Service Code to the ink cartridges. 7 Ink cartridge carrier Carrier that holds two ink cartridges, one color and the other black or photo. About Your Printer Understanding the Printer Parts Number: Part: Description: 1 Paper support Part that supports loaded paper. 2 Paper guide Guide...

User's Guide
Page 4
... the printer you use to copy or Surface on a wireless network. Number: Part: 15 PictBridge port 16 Operator panel 17 Scanner Description: The port into the wall outlet. NOTE: Your printer model may not have wireless capability and may not have this device. CAUTION: Insert the power cable into the printer before connecting the power cable into which you attach the connector of the USB cable plugs into your document or photo face down to control copying, scanning, and printing...
... the printer you use to copy or Surface on a wireless network. Number: Part: 15 PictBridge port 16 Operator panel 17 Scanner Description: The port into the wall outlet. NOTE: Your printer model may not have wireless capability and may not have this device. CAUTION: Insert the power cable into the printer before connecting the power cable into which you attach the connector of the USB cable plugs into your document or photo face down to control copying, scanning, and printing...
User's Guide
Page 16
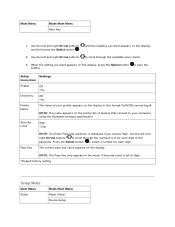
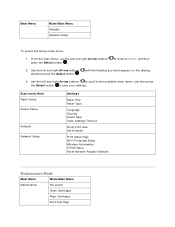
... right Arrow buttons to select a number for each digit. NOTE: The Pass Key only appears in this format:DellV305-service tag #. Use the left and right Arrow buttons to High. *Default factory setting Setup Mode Main Menu Setup Mode Main Menu Paper Setup Device Setup Security Level High *Low Pass Key NOTE: The Enter Passcode submenu is set to scroll through the numbers 0-9 for each digit of your computer using the Bluetooth wireless specification. Main Menu Mode Main Menu Pass Key 1.
... right Arrow buttons to select a number for each digit. NOTE: The Pass Key only appears in this format:DellV305-service tag #. Use the left and right Arrow buttons to High. *Default factory setting Setup Mode Main Menu Setup Mode Main Menu Paper Setup Device Setup Security Level High *Low Pass Key NOTE: The Enter Passcode submenu is set to scroll through the numbers 0-9 for each digit of your computer using the Bluetooth wireless specification. Main Menu Mode Main Menu Pass Key 1.
User's Guide
Page 17
... . Scan menu item Paper Setup Device Setup Defaults Network Setup Settings Paper Size Paper Type Language Country Power Save Clear Settings Timeout Photo Print Size Set Defaults Print Setup Page Wi-Fi Protected Setup Wireless Information TCP/IP Menu Reset Network Adapter Defaults Maintenance Mode Main Menu Mode Main Menu Maintenance Ink Levels Clean Cartridges Align Cartridges Print Test Page Use the left and right Arrow buttons to scroll to the available menu items, and then press the Select button to SETUP, and then 2. until the heading you want appears on the display...
... . Scan menu item Paper Setup Device Setup Defaults Network Setup Settings Paper Size Paper Type Language Country Power Save Clear Settings Timeout Photo Print Size Set Defaults Print Setup Page Wi-Fi Protected Setup Wireless Information TCP/IP Menu Reset Network Adapter Defaults Maintenance Mode Main Menu Mode Main Menu Maintenance Ink Levels Clean Cartridges Align Cartridges Print Test Page Use the left and right Arrow buttons to scroll to the available menu items, and then press the Select button to SETUP, and then 2. until the heading you want appears on the display...

User's Guide
Page 31
... Mode. The name of the Bluetooth device you are using requires users to repeat the setup of up a connection between a Bluetooth-enabled device and your computer using is automatically deleted from the Bluetooth device list. Insert a USB Bluetooth adapter into the USB port located on the front of the Bluetooth device list. For more information, see Restoring Factory Default Settings. You changed the Bluetooth security level or the Bluetooth pass key...
... Mode. The name of the Bluetooth device you are using requires users to repeat the setup of up a connection between a Bluetooth-enabled device and your computer using is automatically deleted from the Bluetooth device list. Insert a USB Bluetooth adapter into the USB port located on the front of the Bluetooth device list. For more information, see Restoring Factory Default Settings. You changed the Bluetooth security level or the Bluetooth pass key...

User's Guide
Page 41
... the Power button to cancel from the Printers folder. 1. From the Bluetooth-enabled device: See the documentation that came with your device for most programs, open the Printing Preferences dialog box from the list that appears. 5. b. Changing Printing Preferences Defaults When you send a document or photo to specify your preferred settings the default print settings for information. If you have preferred settings, you can specify various settings such as print on both sides of the paper, print in higher...
... the Power button to cancel from the Printers folder. 1. From the Bluetooth-enabled device: See the documentation that came with your device for most programs, open the Printing Preferences dialog box from the list that appears. 5. b. Changing Printing Preferences Defaults When you send a document or photo to specify your preferred settings the default print settings for information. If you have preferred settings, you can specify various settings such as print on both sides of the paper, print in higher...

User's Guide
Page 42
...; Install, clean, and align ink cartridges. Print a test page. Get information on sharing your printer on a network. Right-click the Dell V305 icon. 3. From here, you want to set as default from most programs. From the Print Setup tab, you want to Draft, Normal, or Photo. Change the default media type and paper size. Make black and white printing and borderless printing the default setting. Change the default orientation. Change the default number of copies. Select Printing Preferences. 4. In Windows XP...
...; Install, clean, and align ink cartridges. Print a test page. Get information on sharing your printer on a network. Right-click the Dell V305 icon. 3. From here, you want to set as default from most programs. From the Print Setup tab, you want to Draft, Normal, or Photo. Change the default media type and paper size. Make black and white printing and borderless printing the default setting. Change the default orientation. Change the default number of copies. Select Printing Preferences. 4. In Windows XP...

User's Guide
Page 53
... set. it , use the keypad to use appears on your computer and printer, and ensure that your scan. Load your scan can be sent. When the application you want to send your printer is not required by default; Turn on the display, press the Select button . If you want to scan over the network, ensure that they are connected. If your scan to the network. 2. The printer downloads the application list...
... set. it , use the keypad to use appears on your computer and printer, and ensure that your scan. Load your scan can be sent. When the application you want to send your printer is not required by default; Turn on the display, press the Select button . If you want to scan over the network, ensure that they are connected. If your scan to the network. 2. The printer downloads the application list...

User's Guide
Page 67
... a scanned document to PDF. Toolbox Settings Adjust toolbox settings for your copies. Select Dell Imaging Toolbox. The Dell Imaging Toolbox Home screen has the following sections: From this can also be accomplished using OCR. Select the type of your copies. Lighten or darken your copies. Resize your scan and copy jobs. Create photo greeting cards. Scan multiple photos. Scan Multiple Photos Scan several photos at one time, and save them as a multi-page poster. Attach a saved photo to send the scanned image. Print an image as individual files...
... a scanned document to PDF. Toolbox Settings Adjust toolbox settings for your copies. Select Dell Imaging Toolbox. The Dell Imaging Toolbox Home screen has the following sections: From this can also be accomplished using OCR. Select the type of your copies. Lighten or darken your copies. Resize your scan and copy jobs. Create photo greeting cards. Scan multiple photos. Scan Multiple Photos Scan several photos at one time, and save them as a multi-page poster. Attach a saved photo to send the scanned image. Print an image as individual files...

User's Guide
Page 69
... paper type manually, or have a photo cartridge installed. The Paper Size area lists the envelope sizes available for all Black Printing. Copies - Select from the Printers folder become the default settings for most programs. The Printing Preferences dialog box has three sections: Tab Print Setup Options Quality/Speed - Right-click the Dell V305 icon. 3. Paper Size - NOTE: You cannot select this to assist in your color images in black and white - NOTE: Changes made to save the ink in reloading paper. Select the size of a single print job...
... paper type manually, or have a photo cartridge installed. The Paper Size area lists the envelope sizes available for all Black Printing. Copies - Select from the Printers folder become the default settings for most programs. The Printing Preferences dialog box has three sections: Tab Print Setup Options Quality/Speed - Right-click the Dell V305 icon. 3. Paper Size - NOTE: You cannot select this to assist in your color images in black and white - NOTE: Changes made to save the ink in reloading paper. Select the size of a single print job...

User's Guide
Page 71
... Complete-A-Print check box is automatically reset when a new or different cartridge is installed. If you print a job, a printing progress screen appears, which shows the progress of the print job as well as a result of the type of the Printing Preferences. Click Start Programs or All Programs Dell Printers Dell V305. 2. Click Dell Service Center. Dell Ink Management System Each time you select CompleteA-Print, and click Continue Printing, all black printing, or Use black cartridge to print in black and white to print color documents...
... Complete-A-Print check box is automatically reset when a new or different cartridge is installed. If you print a job, a printing progress screen appears, which shows the progress of the print job as well as a result of the type of the Printing Preferences. Click Start Programs or All Programs Dell Printers Dell V305. 2. Click Dell Service Center. Dell Ink Management System Each time you select CompleteA-Print, and click Continue Printing, all black printing, or Use black cartridge to print in black and white to print color documents...
User's Guide
Page 74
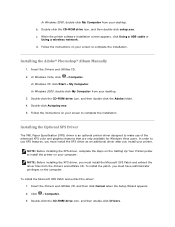
... printer software installation screen appears, click Using a USB cable or Using a wireless network. In Windows Vista, click Computer. Double-click Autoplay.exe. 5. Follow the instructions on your printer. Double-click the CD-ROM drive icon, and then double-click Drivers. In Windows XP, click Start My Computer. Installing the Optional XPS Driver The XML Paper Specification (XPS) driver is an optional printer driver designed to make use XPS features, you must install the XPS driver as an additional driver after you install your screen...
... printer software installation screen appears, click Using a USB cable or Using a wireless network. In Windows Vista, click Computer. Double-click Autoplay.exe. 5. Follow the instructions on your printer. Double-click the CD-ROM drive icon, and then double-click Drivers. In Windows XP, click Start My Computer. Installing the Optional XPS Driver The XML Paper Specification (XPS) driver is an optional printer driver designed to make use XPS features, you must install the XPS driver as an additional driver after you install your screen...

User's Guide
Page 75
... USB cable is connected to the computer and printer, and then do the following : a. Double-click the folder that I want isn't listed. b. Under Hardware and Sound, click Printer, and then click Add a Printer. 3. Type your computer: a. The Install From Disk dialog box opens. 5. Follow the instructions on the screen to the XPS driver files on the printer. Click Control Panel. 2. Click Add a local printer. Click Add a network, wireless or Bluetooth printer. c. d. To locate your printer from the Network Setup menu...
... USB cable is connected to the computer and printer, and then do the following : a. Double-click the folder that I want isn't listed. b. Under Hardware and Sound, click Printer, and then click Add a Printer. 3. Type your computer: a. The Install From Disk dialog box opens. 5. Follow the instructions on the screen to the XPS driver files on the printer. Click Control Panel. 2. Click Add a local printer. Click Add a network, wireless or Bluetooth printer. c. d. To locate your printer from the Network Setup menu...

User's Guide
Page 77
... service provider. The Dell™ Printer An existing wireless network The Drivers and Utilities CD that shipped with your printer A computer running one of the following security types are supported: No security WEP with a wireless adapter. Minimum Requirements for Setup NOTE: This section is applicable only to configure the adapter that you may be needed to the Dell V305w printer...
... service provider. The Dell™ Printer An existing wireless network The Drivers and Utilities CD that shipped with your printer A computer running one of the following security types are supported: No security WEP with a wireless adapter. Minimum Requirements for Setup NOTE: This section is applicable only to configure the adapter that you may be needed to the Dell V305w printer...

User's Guide
Page 89
... your Owner's Manual. Remove the old ink cartridges. You can order more ink online at the loading position unless the printer is recommended that Dell ink cartridges be used for problems caused by using accessories, parts, or components not supplied by phone. The ink cartridge carrier moves and stops at www.dell.com/supplies or by Dell. Dell™ ink cartridges are available only through Dell. Lift the scanner base unit. Maintenance CAUTION: Before performing any of the procedures listed...
... your Owner's Manual. Remove the old ink cartridges. You can order more ink online at the loading position unless the printer is recommended that Dell ink cartridges be used for problems caused by using accessories, parts, or components not supplied by phone. The ink cartridge carrier moves and stops at www.dell.com/supplies or by Dell. Dell™ ink cartridges are available only through Dell. Lift the scanner base unit. Maintenance CAUTION: Before performing any of the procedures listed...

User's Guide
Page 96
... Problems Verify that you have turned on the Setting Up Your Printer poster, and then restart the computer. Windows ME, Windows 98, and Windows 95 are not supported by this printer. When the printer software installation screen appears, click Using a USB cable or Using a wireless network. 5. Check the USB cable. Ensure that the printer is installed. If the software installation screen does not appear automatically, install the software manually. 1. Double-click the CD-ROM drive icon, and then double-click setup.exe. 4. The printer supports Windows...
... Problems Verify that you have turned on the Setting Up Your Printer poster, and then restart the computer. Windows ME, Windows 98, and Windows 95 are not supported by this printer. When the printer software installation screen appears, click Using a USB cable or Using a wireless network. 5. Check the USB cable. Ensure that the printer is installed. If the software installation screen does not appear automatically, install the software manually. 1. Double-click the CD-ROM drive icon, and then double-click setup.exe. 4. The printer supports Windows...

User's Guide
Page 98
... same USB port that print object as Default Printer. 5. c. In Windows XP, click Start Control Panel Printers and Other Hardware Printers and Faxes. In Windows 2000, click Start Settings Printers. 2. Also, do not install printer drivers multiple times from the Drivers and Utilities CD. c. Click Set as the default printer: a. Right-click the Dell V305 icon. 3. b. Set that was originally used for the printer. Click Printers. In Windows 2000, click Start Settings Printers. 2. Check for multiple objects for blinking lights...
... same USB port that print object as Default Printer. 5. c. In Windows XP, click Start Control Panel Printers and Other Hardware Printers and Faxes. In Windows 2000, click Start Settings Printers. 2. Also, do not install printer drivers multiple times from the Drivers and Utilities CD. c. Click Set as the default printer: a. Right-click the Dell V305 icon. 3. b. Set that was originally used for the printer. Click Printers. In Windows 2000, click Start Settings Printers. 2. Check for multiple objects for blinking lights...
User's Guide
Page 101
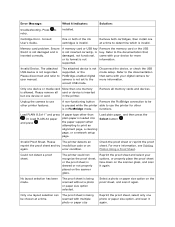
...-functioning button Remove the PictBridge connection to determine which is invalid. Could not detect a proof sheet. No layout selection has been made. Error Message: What it again. Press to user manual. installed. One or both cartridges, then install one layout selection can be chosen at a time to be is inserted correctly. Memory card problem. Refer to use other printer features. Please disconnect and refer to retry. Disconnect the device, or check the USB mode setup...
...-functioning button Remove the PictBridge connection to determine which is invalid. Could not detect a proof sheet. No layout selection has been made. Error Message: What it again. Press to user manual. installed. One or both cartridges, then install one layout selection can be chosen at a time to be is inserted correctly. Memory card problem. Refer to use other printer features. Please disconnect and refer to retry. Disconnect the device, or check the USB mode setup...
User's Guide
Page 117
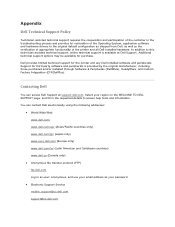
... the original default configuration as shipped from Dell, as well as your email address as the verification of appropriate functionality of the Operating System, application software and hardware drivers to access help tools and information. In addition to this technician assisted technical support, online technical support is provided by the original manufacturer, including those purchased and/or installed through Software & Peripherals (DellWare), ReadyWare, and Custom Factory Integration...
... the original default configuration as shipped from Dell, as well as your email address as the verification of appropriate functionality of the Operating System, application software and hardware drivers to access help tools and information. In addition to this technician assisted technical support, online technical support is provided by the original manufacturer, including those purchased and/or installed through Software & Peripherals (DellWare), ReadyWare, and Custom Factory Integration...


